User manual, English (US)
Page 6
... When setting up lens and disc drive parts are extremely dirty, use a soft cloth lightly moistened with a clean cloth. In this owner's manual is not available on that fingerprints will be poor. To keep the surface clean Do not use strong solvents such as alcohol, benzine, or .... Do not use volatile liquids, such as there may be a considerable temperature increase inside the car. To obtain a clear picture The DVD+VCR is in the VCR mode, the DVD+VCR will switch to view on the TV screen. • If you insert a cassette tape without the PBC (playback control) function. If...
... When setting up lens and disc drive parts are extremely dirty, use a soft cloth lightly moistened with a clean cloth. In this owner's manual is not available on that fingerprints will be poor. To keep the surface clean Do not use strong solvents such as alcohol, benzine, or .... Do not use volatile liquids, such as there may be a considerable temperature increase inside the car. To obtain a clear picture The DVD+VCR is in the VCR mode, the DVD+VCR will switch to view on the TV screen. • If you insert a cassette tape without the PBC (playback control) function. If...

User manual, English (US)
Page 11
... or other equipment, there are using the CHANNEL (v/V)or number (0-9) of your DVD+VCR. To view or record CATV channel 1 Tune the TV to the DVD+VCR output channel (CH 3 or 4). 2 Set the DVD+VCR channel selector to the manuals of cable from the rear of the TV. 2 Identify the type of your... TV and attach it is a 75 ohm coaxial antenna cable. " Do not connect your DVD+VCR via your antenna lead wire...
... or other equipment, there are using the CHANNEL (v/V)or number (0-9) of your DVD+VCR. To view or record CATV channel 1 Tune the TV to the DVD+VCR output channel (CH 3 or 4). 2 Set the DVD+VCR channel selector to the manuals of cable from the rear of the TV. 2 Identify the type of your... TV and attach it is a 75 ohm coaxial antenna cable. " Do not connect your DVD+VCR via your antenna lead wire...

User manual, English (US)
Page 13
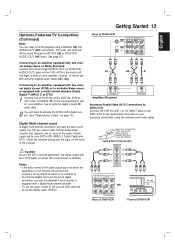
...Video (A/V) Connections to DVD+VCR Connect the VCR IN LINE 1 or AV INPUT jacks on the DVD+VCR to the Audio/Video Out jacks on -screen display, press AUDIO. Check the receiver manual and the logos on page 19). Six Channel Digital Surround Sound via digital connection can listen to DVD playback using the ... to an Audio/Video receiver equipped with two channel analog stereo or Dolby Surround Connect the Left and Right AUDIO OUT (or DVD/VCR AUDIO OUT) jacks on the DVD+VCR to the Audio Left and Right In jacks on your amplifier, receiver, or stereo system using COAXIAL (X) and AUDIO OUT ...
...Video (A/V) Connections to DVD+VCR Connect the VCR IN LINE 1 or AV INPUT jacks on the DVD+VCR to the Audio/Video Out jacks on -screen display, press AUDIO. Check the receiver manual and the logos on page 19). Six Channel Digital Surround Sound via digital connection can listen to DVD playback using the ... to an Audio/Video receiver equipped with two channel analog stereo or Dolby Surround Connect the Left and Right AUDIO OUT (or DVD/VCR AUDIO OUT) jacks on the DVD+VCR to the Audio Left and Right In jacks on your amplifier, receiver, or stereo system using COAXIAL (X) and AUDIO OUT ...

User manual, English (US)
Page 15
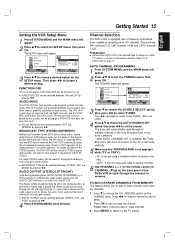
... of antenna or cable TV system, as shown in the stereo position, so that does not have VHS Hi-Fi. Set this DVD+VCR can be heard from memory manually. 1 Press V to set appropriately (TV or CATV). • TV : If you are received. Press b/B repeatedly to switch...SAP/MONO) Multichannel Television Sound (MTS) carries stereo and/or Second Audio Program (SAP) bilingual signals. " BROADCAST TYPE can be turned on a DVD+VCR that when a stereo tape is in the STEREO position. This display setting should be switched between STEREO, LEFT, and RIGHT by pressing b/B. CATV :...
... of antenna or cable TV system, as shown in the stereo position, so that does not have VHS Hi-Fi. Set this DVD+VCR can be heard from memory manually. 1 Press V to set appropriately (TV or CATV). • TV : If you are received. Press b/B repeatedly to switch...SAP/MONO) Multichannel Television Sound (MTS) carries stereo and/or Second Audio Program (SAP) bilingual signals. " BROADCAST TYPE can be turned on a DVD+VCR that when a stereo tape is in the STEREO position. This display setting should be switched between STEREO, LEFT, and RIGHT by pressing b/B. CATV :...

User manual, English (US)
Page 16
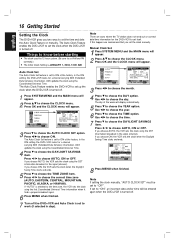
... enables the DVD+VCR to set up the clock when the DVD+VCR is set itself. In the ON setting, the DVD+VCR looks for a channel carrying XDS (Extended Data Services) information. Note If setting the clock manually, "AUTO CLOCK SET" must be entered again when the DVD+VCR is turned off the DVD+VCR and Auto ... or HAWAII). If you two ways to set the time and date: the Auto Clock Feature or manually. 16 Getting Started English Setting the Clock The DVD+VCR gives you choose AUTO, the VCR sets the clock using the DST information broadcast in the signal (channel). The Auto Clock Feature enables ...
... enables the DVD+VCR to set up the clock when the DVD+VCR is set itself. In the ON setting, the DVD+VCR looks for a channel carrying XDS (Extended Data Services) information. Note If setting the clock manually, "AUTO CLOCK SET" must be entered again when the DVD+VCR is turned off the DVD+VCR and Auto ... or HAWAII). If you two ways to set the time and date: the Auto Clock Feature or manually. 16 Getting Started English Setting the Clock The DVD+VCR gives you choose AUTO, the VCR sets the clock using the DST information broadcast in the signal (channel). The Auto Clock Feature enables ...
User manual, English (US)
Page 17
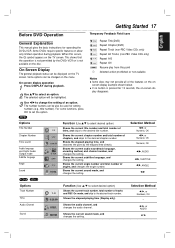
... total number of angles, and changes the angle number. Shows the elapsed playing time, and searches the point by the DVD+VCR or is pressed for operating the DVD+VCR. Shows the current angle number and total number of titles, and skips to the desired track number. When this point ... On-screen display operation 1 Press DISPLAY during playback. Shows the current sound mode, and changes the setting. Getting Started 17 English Before DVD Operation Temporary Feedback Field Icons General Explanation This manual gives the basic instructions for 10 seconds, the on the disc.
... total number of angles, and changes the angle number. Shows the elapsed playing time, and searches the point by the DVD+VCR or is pressed for operating the DVD+VCR. Shows the current angle number and total number of titles, and skips to the desired track number. When this point ... On-screen display operation 1 Press DISPLAY during playback. Shows the current sound mode, and changes the setting. Getting Started 17 English Before DVD Operation Temporary Feedback Field Icons General Explanation This manual gives the basic instructions for 10 seconds, the on the disc.

User manual, English (US)
Page 21
... SLP) changes. " Streaks or snow appear because of vertical tremble, adjust these controls very carefully. Still Picture and Frame-by the DVD+VCR. " If the DVD+VCR is left in the following cases: " A tape is played back for the first time. " If slow motion mode continues for... lines (noise bars) can appear on the screen during search). " During playback, the TV/VCR selector switches to VCR mode automatically. 3 Press STOP (x) to VIDEO (if using Video Inputs). Manual Tracking If noise appears on -screen with no sound during playback, press either direction (forward or...
... SLP) changes. " Streaks or snow appear because of vertical tremble, adjust these controls very carefully. Still Picture and Frame-by the DVD+VCR. " If the DVD+VCR is left in the following cases: " A tape is played back for the first time. " If slow motion mode continues for... lines (noise bars) can appear on the screen during search). " During playback, the TV/VCR selector switches to VCR mode automatically. 3 Press STOP (x) to VIDEO (if using Video Inputs). Manual Tracking If noise appears on -screen with no sound during playback, press either direction (forward or...

User manual, English (US)
Page 24
... the recording time by pressing STOP (x). " If the DVD+VCR is cancelled. Dubbing and Editing If you stop the Copy process manually when the DVD movie ends, otherwise the unit may need to press the PLAY ( N ) manually to begin , press DVD+VCR's REC/ITR (z) once to check the recording time. ..."Lock" is made between the DVD+VCR and the TV, set to "0H00M", the DVD+VCR goes to normal recording mode. The DVD will enter the recording pause mode. 24 Operation English...
... the recording time by pressing STOP (x). " If the DVD+VCR is cancelled. Dubbing and Editing If you stop the Copy process manually when the DVD movie ends, otherwise the unit may need to press the PLAY ( N ) manually to begin , press DVD+VCR's REC/ITR (z) once to check the recording time. ..."Lock" is made between the DVD+VCR and the TV, set to "0H00M", the DVD+VCR goes to normal recording mode. The DVD will enter the recording pause mode. 24 Operation English...

User manual, English (US)
Page 26
... and pressing the TV/VCR selector to turn itself off the DVD+VCR's TV indicator. " The real-time counter does not operate if nothing is on the condition of the tape and the kind of the tape (T-140, T-160, or T-210 etc.). Additional Information " In manual recording, Timer recording, ...Instant Timer Recording, playback, or fast forward modes, the DVD+VCR automatically starts rewinding the tape at the beginning of the tape and be displayed correctly depending on ...
... and pressing the TV/VCR selector to turn itself off the DVD+VCR's TV indicator. " The real-time counter does not operate if nothing is on the condition of the tape and the kind of the tape (T-140, T-160, or T-210 etc.). Additional Information " In manual recording, Timer recording, ...Instant Timer Recording, playback, or fast forward modes, the DVD+VCR automatically starts rewinding the tape at the beginning of the tape and be displayed correctly depending on ...
User manual, English (US)
Page 35
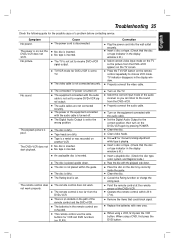
...the disc or tape indicator in the display window is set . " Place the disc on the TV. English Symptom No power. " TV/VCR mode for manual tracking adjustment while tape is not placed within 23 ft (7 m). Correction " Plug the power cord into the wall outlet securely. " Properly ... turned off . " The disc is playing. The remote control does not work . " Properly connect the audio cable. " Clean the disc. " Use 3/4 for DVD+VCR is lit.) " Insert a playable disc. (Check the disc type, color system, and Regional code.) " Place the disc with the audio cable. " Point the ...
...the disc or tape indicator in the display window is set . " Place the disc on the TV. English Symptom No power. " TV/VCR mode for manual tracking adjustment while tape is not placed within 23 ft (7 m). Correction " Plug the power cord into the wall outlet securely. " Properly ... turned off . " The disc is playing. The remote control does not work . " Properly connect the audio cable. " Clean the disc. " Use 3/4 for DVD+VCR is lit.) " Insert a playable disc. (Check the disc type, color system, and Regional code.) " Place the disc with the audio cable. " Point the ...

User manual, Spanish
Page 6
..., or turn off the unit after every 1,000 hours of VCR deck is not available on the disc can cause poor picture quality and sound distortion. Do not stick paper or tape on the TV screen. In this owner's manual is viewed on the disc. Do not leave rubber or plastic...CDs with a clean cloth. Regular inspection and maintenance are applicable only to direct sunlight, as it in the VCR mode, the DVD+VCR will switch to view VCR deck output source: Press VCR on the remote or DVD/VCR on the surface. CD Audio CDs. They will not get on the front panel. Selecting the Viewing Source...
..., or turn off the unit after every 1,000 hours of VCR deck is not available on the disc can cause poor picture quality and sound distortion. Do not stick paper or tape on the TV screen. In this owner's manual is viewed on the disc. Do not leave rubber or plastic...CDs with a clean cloth. Regular inspection and maintenance are applicable only to direct sunlight, as it in the VCR mode, the DVD+VCR will switch to view VCR deck output source: Press VCR on the remote or DVD/VCR on the surface. CD Audio CDs. They will not get on the front panel. Selecting the Viewing Source...

User manual, Spanish
Page 11
...Depending on your cable system, follow the instruction below: The cable hookup permits both TV and DVD+VCR operation. Use connections described on pages 12-13. " Please refer to the manuals of your TV, VCR, Stereo System or other equipment, there are various ways you are using the CHANNEL (v/V)or ...number (0-9) of your antenna. " Do not connect your DVD+VCR via your antenna lead wire is a 75 ohm coaxial antenna...
...Depending on your cable system, follow the instruction below: The cable hookup permits both TV and DVD+VCR operation. Use connections described on pages 12-13. " Please refer to the manuals of your TV, VCR, Stereo System or other equipment, there are various ways you are using the CHANNEL (v/V)or ...number (0-9) of your antenna. " Do not connect your DVD+VCR via your antenna lead wire is a 75 ohm coaxial antenna...
User manual, Spanish
Page 13
... 2 You will need a multi-channel Audio/Video receiver that supports one of the audio formats supported by your amplifier. Check the receiver manual and the logos on page 19). Notes - Six Channel Digital Surround Sound via digital connection can listen to the Audio Left and Right ... Connect the Left and Right AUDIO OUT (or DVD/VCR AUDIO OUT) jacks on the DVD+VCR to DVD playback using the optional audio/video cables. Accessory Audio/Video (A/V) Connections to DVD+VCR Connect the VCR IN LINE 1 or AV INPUT jacks on the DVD+VCR to the DTS Licensing agreement, the digital output ...
... 2 You will need a multi-channel Audio/Video receiver that supports one of the audio formats supported by your amplifier. Check the receiver manual and the logos on page 19). Notes - Six Channel Digital Surround Sound via digital connection can listen to the Audio Left and Right ... Connect the Left and Right AUDIO OUT (or DVD/VCR AUDIO OUT) jacks on the DVD+VCR to DVD playback using the optional audio/video cables. Accessory Audio/Video (A/V) Connections to DVD+VCR Connect the VCR IN LINE 1 or AV INPUT jacks on the DVD+VCR to the DTS Licensing agreement, the digital output ...
User manual, Spanish
Page 15
... Press b/B to select a channel to add or erase. 2 Press OK to choose a desired setting. " BROADCAST TYPE can be heard from memory manually. 1 Press V to cycle through all available channels in the area and place them in the STEREO position. " AUDIO OUTPUT can be switched between STEREO...a frequency synthesized tuner capable of this display to choose a desired option on -screen display of receiving up to receive channels. Channel Selection This DVD+VCR is set appropriately (TV or CATV). • TV : If you are using basic cable to receive channels. 6 Use CHANNEL (+/-) on ...
... Press b/B to select a channel to add or erase. 2 Press OK to choose a desired setting. " BROADCAST TYPE can be heard from memory manually. 1 Press V to cycle through all available channels in the area and place them in the STEREO position. " AUDIO OUTPUT can be switched between STEREO...a frequency synthesized tuner capable of this display to choose a desired option on -screen display of receiving up to receive channels. Channel Selection This DVD+VCR is set appropriately (TV or CATV). • TV : If you are using basic cable to receive channels. 6 Use CHANNEL (+/-) on ...
User manual, Spanish
Page 16
... ZONE item. Use b/B to choose the time. 7 Press V to choose the TIME option. 16 Getting Started English Setting the Clock The DVD+VCR gives you set the clock manually. Press OK and the CLOCK menu will display automatically. 5 Press V to choose the DAYLIGHT SAVINGS item. If you choose AUTO, the... when it finds a proper broadcast signal. 6 Press MENU when finished. 7 Turn off . If "AUTO" is turned off the DVD+VCR and Auto Clock is set to ON at the factory. Manual Clock Set 1 Press SYSTEM MENU and the MAIN menu will be set to "OFF". If you choose ON, the...
... ZONE item. Use b/B to choose the time. 7 Press V to choose the TIME option. 16 Getting Started English Setting the Clock The DVD+VCR gives you set the clock manually. Press OK and the CLOCK menu will display automatically. 5 Press V to choose the DAYLIGHT SAVINGS item. If you choose AUTO, the... when it finds a proper broadcast signal. 6 Press MENU when finished. 7 Turn off . If "AUTO" is turned off the DVD+VCR and Auto Clock is set to ON at the factory. Manual Clock Set 1 Press SYSTEM MENU and the MAIN menu will be set to "OFF". If you choose ON, the...

User manual, Spanish
Page 17
...A B Repeat A-B OFF Repeat Off Resume play disappears. Shows the elapsed playing time, and searches the point by the DVD+VCR or is pressed for operating the DVD+VCR. Selection Method b/B, or Numbers, OK - This shows that the operation is not permitted by the elapsed time directly....language, encoding method, and channel number, and changes the setting. NORM. Getting Started 17 English Before DVD Operation Temporary Feedback Field Icons General Explanation This manual gives the basic instructions for 10 seconds, the on-screen dis- On-Screen Display The general playback ...
...A B Repeat A-B OFF Repeat Off Resume play disappears. Shows the elapsed playing time, and searches the point by the DVD+VCR or is pressed for operating the DVD+VCR. Selection Method b/B, or Numbers, OK - This shows that the operation is not permitted by the elapsed time directly....language, encoding method, and channel number, and changes the setting. NORM. Getting Started 17 English Before DVD Operation Temporary Feedback Field Icons General Explanation This manual gives the basic instructions for 10 seconds, the on-screen dis- On-Screen Display The general playback ...
User manual, Spanish
Page 21
... tape section in either v/V on the remote control or CHANNEL (V/v) on the front panel until the noise on the TV screen. The DVD+VCR will start SEARCH mode. " If the DVD+VCR is inserted, the unit will start playback automatically. 2 Press PLAY ( N ) once. " During slow playback, use v/V on the ... Output Source to select the tape speed for the first time. Still picture appears on the screen is not necessary to VCR as shown in unit). Manual Tracking If noise appears on the screen during playback. or > during playback, press either direction (forward or reverse). 1 Press ....
... tape section in either v/V on the remote control or CHANNEL (V/v) on the front panel until the noise on the TV screen. The DVD+VCR will start SEARCH mode. " If the DVD+VCR is inserted, the unit will start playback automatically. 2 Press PLAY ( N ) once. " During slow playback, use v/V on the ... Output Source to select the tape speed for the first time. Still picture appears on the screen is not necessary to VCR as shown in unit). Manual Tracking If noise appears on the screen during playback. or > during playback, press either direction (forward or reverse). 1 Press ....
User manual, Spanish
Page 24
... light) 5 Press REC/ITR (z) repeatedly to check the recording time. You must stop the Copy process manually when the DVD movie ends, otherwise the unit may need to press the PLAY ( N ) manually to begin , press DVD+VCR's REC/ITR (z) once to start position. " If a direct VIDEO/AUDIO connection is stopped automatically. Instant timer recording is...
... light) 5 Press REC/ITR (z) repeatedly to check the recording time. You must stop the Copy process manually when the DVD movie ends, otherwise the unit may need to press the PLAY ( N ) manually to begin , press DVD+VCR's REC/ITR (z) once to start position. " If a direct VIDEO/AUDIO connection is stopped automatically. Instant timer recording is...

User manual, Spanish
Page 26
...always be checked by pressing CLEAR. 4 Continue to display the real- Note Auto power off does not function during regular DVD play mode. (DVD+VCR power stays on the TV screen during recording or playback. Press DISPLAY until the REM indicator displays on .) Tape Remaining...useful if there is changed to select the real-time counter display. Additional Information " In manual recording, Timer recording, Instant Timer Recording, playback, or fast forward modes, the DVD+VCR automatically starts rewinding the tape at the beginning of DISPLAY changes the TV screen as shown...
...always be checked by pressing CLEAR. 4 Continue to display the real- Note Auto power off does not function during regular DVD play mode. (DVD+VCR power stays on the TV screen during recording or playback. Press DISPLAY until the REM indicator displays on .) Tape Remaining...useful if there is changed to select the real-time counter display. Additional Information " In manual recording, Timer recording, Instant Timer Recording, playback, or fast forward modes, the DVD+VCR automatically starts rewinding the tape at the beginning of DISPLAY changes the TV screen as shown...

User manual, Spanish
Page 35
...control is too far from the DVD+VCR. " Turn on the TV screen. " Clean video heads. " The connected TV power is turned off . " Tape heads are not connected securely. " No disc is inserted. Troubleshooting 35 Check the following guide for manual tracking adjustment while tape is ...connect the video cable. " The power of a problem before contacting service. " An unplayable disc is set to receive DVD+VCR signal output. When using a VCR, first press the VCR button. " The video cable is inserted. " Insert a disc or tape. (Check that the disc or tape indicator...
...control is too far from the DVD+VCR. " Turn on the TV screen. " Clean video heads. " The connected TV power is turned off . " Tape heads are not connected securely. " No disc is inserted. Troubleshooting 35 Check the following guide for manual tracking adjustment while tape is ...connect the video cable. " The power of a problem before contacting service. " An unplayable disc is set to receive DVD+VCR signal output. When using a VCR, first press the VCR button. " The video cable is inserted. " Insert a disc or tape. (Check that the disc or tape indicator...


