
User manual, English (US)
Page 3
... the mark. Features • Automatic Channel Setup • Automatic Head Cleaner • Automatic Tracking Adjustment • Closed Caption • Daylight-Savings Time • English or Spanish displays • High Quality (HQ) System • One-Touch Recording • Real-Time Tape Counter • Remote Control or Front Panel menu access • Rental Playback • Repeat Play • ShowGuardTM - This equipment generates, uses, and can save energy. Magnavox recommends you use only video cassette tapes that interference...
... the mark. Features • Automatic Channel Setup • Automatic Head Cleaner • Automatic Tracking Adjustment • Closed Caption • Daylight-Savings Time • English or Spanish displays • High Quality (HQ) System • One-Touch Recording • Real-Time Tape Counter • Remote Control or Front Panel menu access • Rental Playback • Repeat Play • ShowGuardTM - This equipment generates, uses, and can save energy. Magnavox recommends you use only video cassette tapes that interference...
User manual, English (US)
Page 4
...Before Using the TV/VCR 5 Hooking Up the TV/VCR 6-7 Setting TV Channels for the First Time 8 Selecting a Menu Language 9 Resetting TV Channels 10 Adding/Deleting Channels 11 Setting the Clock 12-15 Daylight-Savings Time 16 Description of Controls Remote Control Buttons 17 Front Panel 18 Rear Panel 19 On-Screen Status Displays 20 Adjusting the Picture Controls 21 Basic Operations Playing 22 Playback Options 23 Recording 24 Recording Options One-Touch Recording 25 Timer Recording 26-28 Timer Recording Auto Return 29 Rerecording (Tape Duplication 30 Playing Options Repeat Play...
...Before Using the TV/VCR 5 Hooking Up the TV/VCR 6-7 Setting TV Channels for the First Time 8 Selecting a Menu Language 9 Resetting TV Channels 10 Adding/Deleting Channels 11 Setting the Clock 12-15 Daylight-Savings Time 16 Description of Controls Remote Control Buttons 17 Front Panel 18 Rear Panel 19 On-Screen Status Displays 20 Adjusting the Picture Controls 21 Basic Operations Playing 22 Playback Options 23 Recording 24 Recording Options One-Touch Recording 25 Timer Recording 26-28 Timer Recording Auto Return 29 Rerecording (Tape Duplication 30 Playing Options Repeat Play...
User manual, English (US)
Page 5
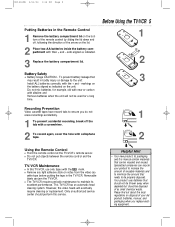
... time. Before Using the TV/VCR 5 1 2 3 Recording Prevention Video cassette tapes have record tabs to maintain its packaging, and this service. ends aligned as indicated on the unit; q Do not put objects between the remote control and the TV/VCR. Battery Safety q Battery Usage CAUTION - This TV/VCR has an automatic head cleaning system. Helpful Hint • Your new product, its excellent performance. MC13D1MG 3/22/02 1:26 PM Page 5 Putting Batteries in the Remote Control 1 Remove the battery...
... time. Before Using the TV/VCR 5 1 2 3 Recording Prevention Video cassette tapes have record tabs to maintain its packaging, and this service. ends aligned as indicated on the unit; q Do not put objects between the remote control and the TV/VCR. Battery Safety q Battery Usage CAUTION - This TV/VCR has an automatic head cleaning system. Helpful Hint • Your new product, its excellent performance. MC13D1MG 3/22/02 1:26 PM Page 5 Putting Batteries in the Remote Control 1 Remove the battery...

User manual, English (US)
Page 7
... TV/VCR. 3CH 4CH AUDIO VIDEO OUT IN IN ANT. Select channel 00 (AUX) at the TV/VCR when viewing tapes that you turn on page 30. Helpful Hints • Before connecting an antenna or cable signal to copy tapes or view tapes that are on the TV/VCR, go to page eight. If the pin is not bent. Details are playing on the front of the TV/VCR. 2 When all other connections...
... TV/VCR. 3CH 4CH AUDIO VIDEO OUT IN IN ANT. Select channel 00 (AUX) at the TV/VCR when viewing tapes that you turn on page 30. Helpful Hints • Before connecting an antenna or cable signal to copy tapes or view tapes that are on the TV/VCR, go to page eight. If the pin is not bent. Details are playing on the front of the TV/VCR. 2 When all other connections...
User manual, English (US)
Page 8
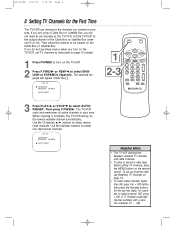
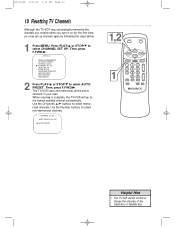
... TV/VCR scans and memorizes all active channels in your area. Then select the channel to set channels at the TV/VCR. Use the Number buttons to the output channel of the Cable Box or Satellite Box (channel 03 or 04). To set TV channels as instructed on page 10 instead. 1 Press POWER to select ENG- B LANGUAGE [ENGLISH] ESPAÑOL AUTO PRESET POWER SLEEP/WAKE UP 1 2-3 REW PLAY STOP F.FWD MENU DISPLAY ALT.CH 123 CH. 456 789 SPEED 0 RESET...
... TV/VCR scans and memorizes all active channels in your area. Then select the channel to set channels at the TV/VCR. Use the Number buttons to the output channel of the Cable Box or Satellite Box (channel 03 or 04). To set TV channels as instructed on page 10 instead. 1 Press POWER to select ENG- B LANGUAGE [ENGLISH] ESPAÑOL AUTO PRESET POWER SLEEP/WAKE UP 1 2-3 REW PLAY STOP F.FWD MENU DISPLAY ALT.CH 123 CH. 456 789 SPEED 0 RESET...
User manual, English (US)
Page 9
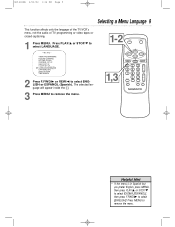
... IDIOMA [ESPAÑOL], then press F.FWD/B to remove the menu. 1-2 POWER SLEEP/WAKE UP 1,3 REW PLAY STOP F.FWD MENU DISPLAY ALT.CH 123 CH. 456 789 SPEED 0 RESET +100 PAUSE/STILL VOL. MC13D1MG 3/22/02 1:26 PM Page 9 Selecting a Menu Language 9 This function affects only the language of the TV/VCR's menu, not the audio of TV programming or video tapes or closed captioning. 1 Press MENU. Press MENU to remove the menu. M E N U -
... IDIOMA [ESPAÑOL], then press F.FWD/B to remove the menu. 1-2 POWER SLEEP/WAKE UP 1,3 REW PLAY STOP F.FWD MENU DISPLAY ALT.CH 123 CH. 456 789 SPEED 0 RESET +100 PAUSE/STILL VOL. MC13D1MG 3/22/02 1:26 PM Page 9 Selecting a Menu Language 9 This function affects only the language of the TV/VCR's menu, not the audio of TV programming or video tapes or closed captioning. 1 Press MENU. Press MENU to remove the menu. M E N U -
User manual, English (US)
Page 10
... Cable Box or Satellite Box. Then, press F.FWD/B. The TV/VCR scans and memorizes all the active channels in your area. Use the CH(annel) o/p buttons to select CHANNEL SET UP. When scanning is complete, the TV/VCR will go to select AUTO PRESET. ADD / DELETE CH (TV) B AUTO PRESET 1,2 POWER SLEEP/WAKE UP 1 REW PLAY STOP F.FWD MENU DISPLAY ALT.CH 123 CH. 456 789 SPEED 0 RESET +100 PAUSE/STILL VOL. TIMER PROGRAMMING PICTURE CONTROL SETTING CLOCK B CHANNEL SET...
... Cable Box or Satellite Box. Then, press F.FWD/B. The TV/VCR scans and memorizes all the active channels in your area. Use the CH(annel) o/p buttons to select CHANNEL SET UP. When scanning is complete, the TV/VCR will go to select AUTO PRESET. ADD / DELETE CH (TV) B AUTO PRESET 1,2 POWER SLEEP/WAKE UP 1 REW PLAY STOP F.FWD MENU DISPLAY ALT.CH 123 CH. 456 789 SPEED 0 RESET +100 PAUSE/STILL VOL. TIMER PROGRAMMING PICTURE CONTROL SETTING CLOCK B CHANNEL SET...
User manual, English (US)
Page 12
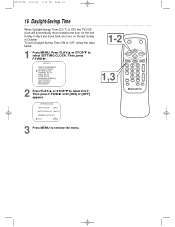
... . B AUTO CLOCK [ON] AUTO CLOCK CH [AUTO] MANUAL CLOCK SET D.S.T. [OFF] 1-2 POWER SLEEP/WAKE UP 1 REW PLAY STOP F.FWD MENU DISPLAY ALT.CH 123 4 5 6 CH. 789 SPEED 0 RESET +100 PAUSE/STILL VOL. Set the TV/VCR to the output channel of the Cable Box or Satellite Box. q The antenna/Cable TV connections are set the clock automatically by the PBS station. SETTING CLOCK - RECORD TIME SEARCH MUTE Helpful Hints • If the TV/VCR is on pages eight and 10. 1 Press MENU. TIMER PROGRAMMING PICTURE CONTROL B SETTING CLOCK CHANNEL SET UP USER'S SET UP...
... . B AUTO CLOCK [ON] AUTO CLOCK CH [AUTO] MANUAL CLOCK SET D.S.T. [OFF] 1-2 POWER SLEEP/WAKE UP 1 REW PLAY STOP F.FWD MENU DISPLAY ALT.CH 123 4 5 6 CH. 789 SPEED 0 RESET +100 PAUSE/STILL VOL. Set the TV/VCR to the output channel of the Cable Box or Satellite Box. q The antenna/Cable TV connections are set the clock automatically by the PBS station. SETTING CLOCK - RECORD TIME SEARCH MUTE Helpful Hints • If the TV/VCR is on pages eight and 10. 1 Press MENU. TIMER PROGRAMMING PICTURE CONTROL B SETTING CLOCK CHANNEL SET UP USER'S SET UP...

User manual, English (US)
Page 14
Then, press F.FWD/B. - TIMER PROGRAMMING PICTURE CONTROL B SETTING CLOCK CHANNEL SET UP USER'S SET UP V-CHIP SET UP LANGUAGE [ENGLISH] CAPTION [OFF] ZERO RETURN TIME SEARCH 2 Press PLAY/v or STOP/w to select SETTING CLOCK. AUTO CLOCK [ON] AUTO CLOCK CH [AUTO] B MANUAL CLOCK SET D.S.T. [OFF] 3 Press PLAY/v or STOP/w until your desired month appears. (Example: May →05) Then, press F.FWD/B. - RECORD TIME SEARCH MUTE Helpful Hint • If you unplug the AC power cord or if the power fails for more...
Then, press F.FWD/B. - TIMER PROGRAMMING PICTURE CONTROL B SETTING CLOCK CHANNEL SET UP USER'S SET UP V-CHIP SET UP LANGUAGE [ENGLISH] CAPTION [OFF] ZERO RETURN TIME SEARCH 2 Press PLAY/v or STOP/w to select SETTING CLOCK. AUTO CLOCK [ON] AUTO CLOCK CH [AUTO] B MANUAL CLOCK SET D.S.T. [OFF] 3 Press PLAY/v or STOP/w until your desired month appears. (Example: May →05) Then, press F.FWD/B. - RECORD TIME SEARCH MUTE Helpful Hint • If you unplug the AC power cord or if the power fails for more...
User manual, English (US)
Page 16
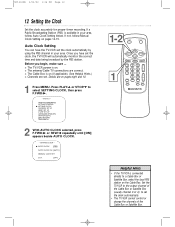
AUTO CLOCK [ON] AUTO CLOCK CH [AUTO] MANUAL CLOCK SET B D.S.T. [ON] 1-2 POWER SLEEP/WAKE UP 1,3 REW PLAY STOP F.FWD MENU DISPLAY ALT.CH 123 CH. 456 789 SPEED 0 RESET +100 PAUSE/STILL VOL. To turn Daylight-Savings Time ON or OFF, follow the steps below. 1 Press MENU. RECORD TIME SEARCH MUTE 3 Press MENU to select SETTING CLOCK. Press PLAY/v or STOP/w to remove the menu. Then, press F.FWD/B. - Then press F.FWD/B until [ON] or [OFF] appears. - SETTING CLOCK - TIMER PROGRAMMING PICTURE CONTROL B SETTING CLOCK CHANNEL SET UP...
AUTO CLOCK [ON] AUTO CLOCK CH [AUTO] MANUAL CLOCK SET B D.S.T. [ON] 1-2 POWER SLEEP/WAKE UP 1,3 REW PLAY STOP F.FWD MENU DISPLAY ALT.CH 123 CH. 456 789 SPEED 0 RESET +100 PAUSE/STILL VOL. To turn Daylight-Savings Time ON or OFF, follow the steps below. 1 Press MENU. RECORD TIME SEARCH MUTE 3 Press MENU to select SETTING CLOCK. Press PLAY/v or STOP/w to remove the menu. Then, press F.FWD/B. - Then press F.FWD/B until [ON] or [OFF] appears. - SETTING CLOCK - TIMER PROGRAMMING PICTURE CONTROL B SETTING CLOCK CHANNEL SET UP...
User manual, English (US)
Page 17
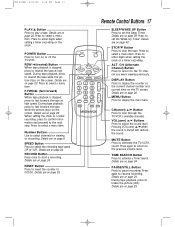
... the current channel number and current time on or off the TV/VCR. DISPLAY Button Press to enter digits when setting the clock or a timer recording. Details are on page 24. CH(annel) o/p Button Press to eliminate the TV/VCR's sound. MUTE Button Press to scan through the TV/VCR's available channels. Press to adjust the sound level. Remote Control Buttons 17 POWER SLEEP/WAKE UP REW PLAY STOP F.FWD MENU DISPLAY ALT.CH 123 CH. 456 789 SPEED 0 RESET +100 PAUSE...
... the current channel number and current time on or off the TV/VCR. DISPLAY Button Press to enter digits when setting the clock or a timer recording. Details are on page 24. CH(annel) o/p Button Press to eliminate the TV/VCR's sound. MUTE Button Press to scan through the TV/VCR's available channels. Press to adjust the sound level. Remote Control Buttons 17 POWER SLEEP/WAKE UP REW PLAY STOP F.FWD MENU DISPLAY ALT.CH 123 CH. 456 789 SPEED 0 RESET +100 PAUSE...
User manual, English (US)
Page 18
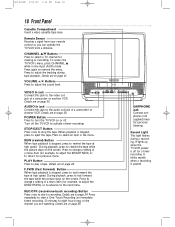
... next menu. To access the TV/VCR's menu, press CHANNEL v while in the menu. VIDEO In Jack VIDEO AUDIO Connect this jack to the audio out jack of a menu item (for example, to adjust the BRIGHTNESS) or to return to eight hours long) of a camcorder or another VCR. When playback is off for personal listening. CHANNEL v/w Buttons Press to play a tape. Press to adjust the sound level. VOLUME o/p Buttons Press to adjust the tracking during a recording. Turn off . During playback, press...
... next menu. To access the TV/VCR's menu, press CHANNEL v while in the menu. VIDEO In Jack VIDEO AUDIO Connect this jack to the audio out jack of a menu item (for example, to adjust the BRIGHTNESS) or to return to eight hours long) of a camcorder or another VCR. When playback is off for personal listening. CHANNEL v/w Buttons Press to play a tape. Press to adjust the sound level. VOLUME o/p Buttons Press to adjust the tracking during a recording. Turn off . During playback, press...
User manual, English (US)
Page 21
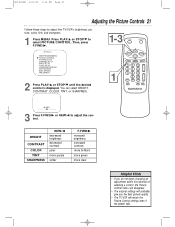
... SHARPNESS. 1-3 POWER SLEEP/WAKE UP 1 REW PLAY STOP F.FWD MENU DISPLAY ALT.CH 123 CH. 456 789 SPEED 0 RESET +100 PAUSE/STILL VOL. TIMER PROGRAMMING B PICTURE CONTROL SETTING CLOCK CHANNEL SET UP USER'S SET UP V-CHIP SET UP LANGUAGE [ENGLISH] CAPTION [OFF] ZERO RETURN TIME SEARCH 2 Press PLAY/v or STOP/w until the desired control is displayed. Press PLAY/v or STOP/w to adjust the control. PPPPPPPCPPPPPPP + 3 Press F.FWD/B or REW/s to select PICTURE CONTROL. Then, press F.FWD/B. - RECORD TIME SEARCH MUTE...
... SHARPNESS. 1-3 POWER SLEEP/WAKE UP 1 REW PLAY STOP F.FWD MENU DISPLAY ALT.CH 123 CH. 456 789 SPEED 0 RESET +100 PAUSE/STILL VOL. TIMER PROGRAMMING B PICTURE CONTROL SETTING CLOCK CHANNEL SET UP USER'S SET UP V-CHIP SET UP LANGUAGE [ENGLISH] CAPTION [OFF] ZERO RETURN TIME SEARCH 2 Press PLAY/v or STOP/w until the desired control is displayed. Press PLAY/v or STOP/w to adjust the control. PPPPPPPCPPPPPPP + 3 Press F.FWD/B or REW/s to select PICTURE CONTROL. Then, press F.FWD/B. - RECORD TIME SEARCH MUTE...

User manual, English (US)
Page 24
... . Cassette type / Playback Time Tape Speed T160 T120 T60 SP(Standard Play) 2 hrs. 40 mins. 2 hrs. 1 hr. MC13D1MG 3/22/02 1:26 PM Page 24 24 Recording Read and follow the steps below . 1 3 Use CH(annel) o/p or the Number buttons to select the channel you can change the tape speed with its record tab intact (see page five) in the TV/VCR. See tape speed details below to record. The Record light will eject the tape...
... . Cassette type / Playback Time Tape Speed T160 T120 T60 SP(Standard Play) 2 hrs. 40 mins. 2 hrs. 1 hr. MC13D1MG 3/22/02 1:26 PM Page 24 24 Recording Read and follow the steps below . 1 3 Use CH(annel) o/p or the Number buttons to select the channel you can change the tape speed with its record tab intact (see page five) in the TV/VCR. See tape speed details below to record. The Record light will eject the tape...
User manual, English (US)
Page 26
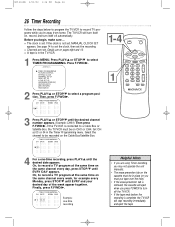
... SPEED 0 RESET +100 PAUSE/STILL VOL. q The clock is in the TV/VCR. 1 Press MENU. CH - - - RECORD TIME SEARCH MUTE Helpful Hints • If you press POWER to record a TV program at the same time on CH3 or CH4. The TV/VCR will stop recording immediately and eject the tape. q Channels are using Timer recording, you may not operate the unit manually. • The erase-prevention tab on the cassette must be recorded on , record, and turn itself off the TV/VCR...
... SPEED 0 RESET +100 PAUSE/STILL VOL. q The clock is in the TV/VCR. 1 Press MENU. CH - - - RECORD TIME SEARCH MUTE Helpful Hints • If you press POWER to record a TV program at the same time on CH3 or CH4. The TV/VCR will stop recording immediately and eject the tape. q Channels are using Timer recording, you may not operate the unit manually. • The erase-prevention tab on the cassette must be recorded on , record, and turn itself off the TV/VCR...

User manual, English (US)
Page 30
... VIDEO OUT to a power source after connections are made. 2 The VCR or camcorder will play your tape. Insert a blank tape in Line Input or Auxiliary mode. 5 Point the TV/VCR remote control at the same time. Otherwise, you may operate differently. • Make sure all connections are secure. Connect the source unit (VCR or camcorder) to VIDEO In 1 Make the connections shown above, using audio and video cables (not supplied). VIDEO AUDIO POWE AUDIO and VIDEO In Jacks on TV/VCR Helpful Hints • Unauthorized recording of copyrighted television programs, video tapes...
... VIDEO OUT to a power source after connections are made. 2 The VCR or camcorder will play your tape. Insert a blank tape in Line Input or Auxiliary mode. 5 Point the TV/VCR remote control at the same time. Otherwise, you may operate differently. • Make sure all connections are secure. Connect the source unit (VCR or camcorder) to VIDEO In 1 Make the connections shown above, using audio and video cables (not supplied). VIDEO AUDIO POWE AUDIO and VIDEO In Jacks on TV/VCR Helpful Hints • Unauthorized recording of copyrighted television programs, video tapes...

User manual, English (US)
Page 35
... a problem with the TV/VCR. • Changing channels may delay closed captions for a few seconds. Check your TV program listings for TV programming. CAPTION1 displays standard closed captions (foreign language words showing what a character is saying). Closed Caption 35 1-2 POWER SLEEP/WAKE UP 1,3 REW PLAY STOP F.FWD MENU DISPLAY ALT.CH 123 4 5 6 CH. 789 SPEED 0 RESET +100 PAUSE/STILL VOL. Press PLAY/v or STOP/w to remove the menu. TIMER PROGRAMMING PICTURE CONTROL SETTING CLOCK CHANNEL SET UP USER'S SET UP V-CHIP SET...
... a problem with the TV/VCR. • Changing channels may delay closed captions for a few seconds. Check your TV program listings for TV programming. CAPTION1 displays standard closed captions (foreign language words showing what a character is saying). Closed Caption 35 1-2 POWER SLEEP/WAKE UP 1,3 REW PLAY STOP F.FWD MENU DISPLAY ALT.CH 123 4 5 6 CH. 789 SPEED 0 RESET +100 PAUSE/STILL VOL. Press PLAY/v or STOP/w to remove the menu. TIMER PROGRAMMING PICTURE CONTROL SETTING CLOCK CHANNEL SET UP USER'S SET UP V-CHIP SET...
User manual, English (US)
Page 43
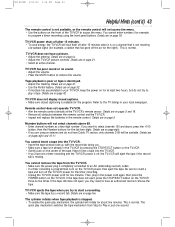
... remote control. Remote control does not operate TV/VCR. • Aim the remote control directly at least two hours, but do not have a picture. • Adjust the antenna. Number buttons will not access the menu. • Use the buttons on the front of the tape. Be sure to start a recording. • Make sure the tape has a record tab. You cannot enter numbers (for the program. Details are on the TV/VCR power, then eject the tape. TV/VCR does not display closed captions. • Make...
... remote control. Remote control does not operate TV/VCR. • Aim the remote control directly at least two hours, but do not have a picture. • Adjust the antenna. Number buttons will not access the menu. • Use the buttons on the front of the tape. Be sure to start a recording. • Make sure the tape has a record tab. You cannot enter numbers (for the program. Details are on the TV/VCR power, then eject the tape. TV/VCR does not display closed captions. • Make...
User manual, English (US)
Page 46
... save you buy your owner's manual before requesting service. It will be repaired or replaced, but is not limited to the duration of all labor charges. Magnavox, P.O. Warranty coverage begins the day you a service call. Warranty service is available in case you purchased the product is used for the original warranty period. Please keep the original box and packing material in all parts will...
... save you buy your owner's manual before requesting service. It will be repaired or replaced, but is not limited to the duration of all labor charges. Magnavox, P.O. Warranty coverage begins the day you a service call. Warranty service is available in case you purchased the product is used for the original warranty period. Please keep the original box and packing material in all parts will...
User manual, English (US)
Page 47
... setup 8, 10 clock 12-15 closed caption system . . . . . .35 color, adjusting 21 connections 6-7, 30 contents, table of 4 contrast, adjusting 21 controls remote 17 tv/vcr 18 daylight-savings time 16 display button 17, 20 duplication 30 earphone jack 18 ejecting a tape 43 menu button 17 front panel button access . .18 mute button 17 number buttons 17 one-touch recording 25 pause/still button 17, 23 picture, adjusting 21 play button 17, 18 playback options 23 playing 22 power button 17, 18 cord...
... setup 8, 10 clock 12-15 closed caption system . . . . . .35 color, adjusting 21 connections 6-7, 30 contents, table of 4 contrast, adjusting 21 controls remote 17 tv/vcr 18 daylight-savings time 16 display button 17, 20 duplication 30 earphone jack 18 ejecting a tape 43 menu button 17 front panel button access . .18 mute button 17 number buttons 17 one-touch recording 25 pause/still button 17, 23 picture, adjusting 21 play button 17, 18 playback options 23 playing 22 power button 17, 18 cord...


