User manual, English (US)
Page 3
... must be reused. IMPORTANT COPYRIGHT INFORMATION Unauthorized copying, broadcasting, public performance and lending of discs are questions regarding your TV set compatibility with this unit at least for Progressive Scan Output • Consumers should never be displayed in hazardous radiation exposure. ...wet hands. • Do not pull on your local recycling regulations. • Batteries should note that is a trademark of DVD Format/Logo Licensing Corporation. CAUTION: Visible and invisible laser radiation when open and interlocks defeated. Use of this apparatus, due to ...
... must be reused. IMPORTANT COPYRIGHT INFORMATION Unauthorized copying, broadcasting, public performance and lending of discs are questions regarding your TV set compatibility with this unit at least for Progressive Scan Output • Consumers should never be displayed in hazardous radiation exposure. ...wet hands. • Do not pull on your local recycling regulations. • Batteries should note that is a trademark of DVD Format/Logo Licensing Corporation. CAUTION: Visible and invisible laser radiation when open and interlocks defeated. Use of this apparatus, due to ...
User manual, English (US)
Page 4
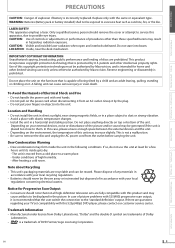
...touch Timer Recording 20 Timer Recording 21 Note for Timer Recording & OTR 21 Satellite Link 22 Dubbing a Cassette Tape 22 OPTIONAL SETTINGS Changing the DVD Settings (in any person or organization of their respective owners. Furthermore, any unauthorized commercial distribution of this document is strictly prohibited. EN... TV 10 Connection to an Audio System 12 Initial Setups 13 Turning on Unit for the First Time 13 Clock Setting 13 BASIC OPERATIONS For VCR Playback 14 For Disc Playback 14 Hint for Disc Playback 15 Fast Forward / Fast Reverse Playback 15 Still Mode ...
...touch Timer Recording 20 Timer Recording 21 Note for Timer Recording & OTR 21 Satellite Link 22 Dubbing a Cassette Tape 22 OPTIONAL SETTINGS Changing the DVD Settings (in any person or organization of their respective owners. Furthermore, any unauthorized commercial distribution of this document is strictly prohibited. EN... TV 10 Connection to an Audio System 12 Initial Setups 13 Turning on Unit for the First Time 13 Clock Setting 13 BASIC OPERATIONS For VCR Playback 14 For Disc Playback 14 Hint for Disc Playback 15 Fast Forward / Fast Reverse Playback 15 Still Mode ...
User manual, English (US)
Page 5
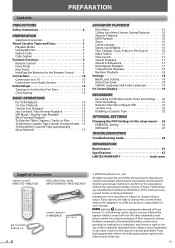
...them back. PRECAUTIONS PREPARATION BASIC OPERATIONS ADVANCED PLAYBACK PREPARATION About Cassette Tapes and Discs Playable Media Media Type DVDVIDEO DVD-RW DVD-R DVD+RW DVD+R CD-DA CD-RW CD-R Cassette Tape Logo Symbols used primarily in the United States and Canada). ... cannot play back DVD recorded in PAL color systems. RECORDING OPTIONAL SETTINGS TROUBLESHOOTING INFORMATION EN 5 A DVD labeled for region 1 in "Playable Media". Color System DVD is too small (less than 1 or ALL • DTS-CD • DVD-ROM for personal computers • HD DVD • Blu-...
...them back. PRECAUTIONS PREPARATION BASIC OPERATIONS ADVANCED PLAYBACK PREPARATION About Cassette Tapes and Discs Playable Media Media Type DVDVIDEO DVD-RW DVD-R DVD+RW DVD+R CD-DA CD-RW CD-R Cassette Tape Logo Symbols used primarily in the United States and Canada). ... cannot play back DVD recorded in PAL color systems. RECORDING OPTIONAL SETTINGS TROUBLESHOOTING INFORMATION EN 5 A DVD labeled for region 1 in "Playable Media". Color System DVD is too small (less than 1 or ALL • DTS-CD • DVD-ROM for personal computers • HD DVD • Blu-...
User manual, English (US)
Page 8
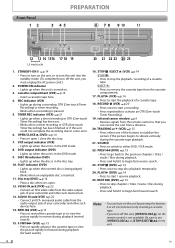
...during a recording, OTR (One-touch Timer Recording) or timer recording. • Blinks when a recording is not available. TRACKING o/ p (VCR) p.15 • Press either DVD / VCR mode. 22. Note: • You can control the unit from the video output jack of a cassette tape. PREPARATION Front Panel 12 ...open / close the disc tray. 7. F.FWD D (VCR) p.15 • Press to begin fast reverse search. 23. VCR output indicator (VCR) • Lights up when a timer recording or OTR (One-touch Timer Recording) has been set. • Blinks when a timer recording or OTR (...
...during a recording, OTR (One-touch Timer Recording) or timer recording. • Blinks when a recording is not available. TRACKING o/ p (VCR) p.15 • Press either DVD / VCR mode. 22. Note: • You can control the unit from the video output jack of a cassette tape. PREPARATION Front Panel 12 ...open / close the disc tray. 7. F.FWD D (VCR) p.15 • Press to begin fast reverse search. 23. VCR output indicator (VCR) • Lights up when a timer recording or OTR (One-touch Timer Recording) has been set. • Blinks when a timer recording or OTR (...
User manual, English (US)
Page 9
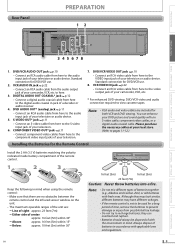
... should always be used for both VCR and DVD viewing. PRECAUTIONS Rear Panel PREPARATION 12 PREPARATION DIGITAL AUDIO OUT DVD AUDIO OUT S-VIDEO OUT COMPONENT VIDEO OUT Y DVD/VCR AUDIO OUT L VCR L COAXIAL R AUDIO IN CB R VIDEO OUT VIDEO IN CR L1 345678 BASIC OPERATIONS ADVANCED PLAYBACK RECORDING OPTIONAL SETTINGS TROUBLESHOOTING 1. VCR AUDIO IN jack p.22 •...
... should always be used for both VCR and DVD viewing. PRECAUTIONS Rear Panel PREPARATION 12 PREPARATION DIGITAL AUDIO OUT DVD AUDIO OUT S-VIDEO OUT COMPONENT VIDEO OUT Y DVD/VCR AUDIO OUT L VCR L COAXIAL R AUDIO IN CB R VIDEO OUT VIDEO IN CR L1 345678 BASIC OPERATIONS ADVANCED PLAYBACK RECORDING OPTIONAL SETTINGS TROUBLESHOOTING 1. VCR AUDIO IN jack p.22 •...
User manual, English (US)
Page 10
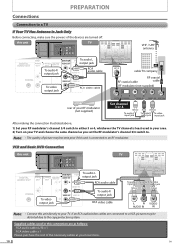
... Before connecting, make sure the powers of the devices are as you set the RF modulator's channel 3/4 switch to an RF modulator. VCR and Basic DVD Connection this unit DIGITAL AUDIO OUT DVD AUDIO OUT S-VIDEO OUT COMPONENT VIDEO OUT Y DVD/VCR AUDIO OUT L VCR L COAXIAL R AUDIO IN CB R VIDEO OUT VIDEO IN CR TV D DIGITAL A AUDIO...
... Before connecting, make sure the powers of the devices are as you set the RF modulator's channel 3/4 switch to an RF modulator. VCR and Basic DVD Connection this unit DIGITAL AUDIO OUT DVD AUDIO OUT S-VIDEO OUT COMPONENT VIDEO OUT Y DVD/VCR AUDIO OUT L VCR L COAXIAL R AUDIO IN CB R VIDEO OUT VIDEO IN CR TV D DIGITAL A AUDIO...
User manual, English (US)
Page 11
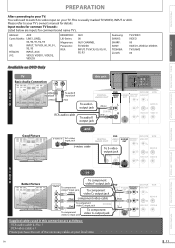
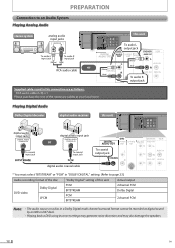
...SETTINGS TROUBLESHOOTING TV Basic Audio Connection L R AUDIO IN A U To audio L input jack To audio R input jack D I (White) (Red) O RCA audio cable this unit DIGITAL AUDIO OUT DVD AUDIO OUT To audio L L output jack (White) To audio R COAXIAL (Red) R output jack DIGITAL AUDIO OUT DVD AUDIO OUT S-VIDEO OUT COMPONENT VIDEO OUT Y DVD/VCR AUDIO OUT L VCR... HITACHI: INPUT, AUX JVC: VIDEO, VIDEO1, VIDEO2, VIDEO3 KENWOOD: LXI-Series: Magnavox: Panasonic: RCA: AUX 00 AUX CHANNEL TV/VIDEO INPUT, TV/VCR, 00, 90, 91, 92, 93 Samsung: SANYO: SHARP: SONY: TOSHIBA: Zenith...
...SETTINGS TROUBLESHOOTING TV Basic Audio Connection L R AUDIO IN A U To audio L input jack To audio R input jack D I (White) (Red) O RCA audio cable this unit DIGITAL AUDIO OUT DVD AUDIO OUT To audio L L output jack (White) To audio R COAXIAL (Red) R output jack DIGITAL AUDIO OUT DVD AUDIO OUT S-VIDEO OUT COMPONENT VIDEO OUT Y DVD/VCR AUDIO OUT L VCR... HITACHI: INPUT, AUX JVC: VIDEO, VIDEO1, VIDEO2, VIDEO3 KENWOOD: LXI-Series: Magnavox: Panasonic: RCA: AUX 00 AUX CHANNEL TV/VIDEO INPUT, TV/VCR, 00, 90, 91, 92, 93 Samsung: SANYO: SHARP: SONY: TOSHIBA: Zenith...
User manual, English (US)
Page 12
... 23.) Audio recording format of the disc DVD-video Dolby Digital LPCM "Dolby Digital" setting of the necessary cables at your local store. Playing Digital Audio Dolby Digital decoder digital audio receiver this unit DIGITAL AUDIO OUT DVD AUDIO OUT S-VIDEO OUT COMPONENT VIDEO OUT Y DVD/VCR AUDIO OUT L VCR L COAXIAL R AUDIO IN CB R VIDEO OUT...
... 23.) Audio recording format of the disc DVD-video Dolby Digital LPCM "Dolby Digital" setting of the necessary cables at your local store. Playing Digital Audio Dolby Digital decoder digital audio receiver this unit DIGITAL AUDIO OUT DVD AUDIO OUT S-VIDEO OUT COMPONENT VIDEO OUT Y DVD/VCR AUDIO OUT L VCR L COAXIAL R AUDIO IN CB R VIDEO OUT...

User manual, English (US)
Page 13
..."LANGUAGE SELECT". See your on-screen language. Then press to select your TV manual for the First Time VCR Press first. CLEAR Note: • If you press . Finally, press [CLEAR]. Clock Setting VCR Press first. 1 Press SETUP and use . 1 Be sure your to go to the next item. ...Then press to go to step 2. 2 Use / preference. In this manual refer to remote control use / to next step. - CLOCK SET MONTH DAY 10 / -- HOUR MINUTE -- : --...
..."LANGUAGE SELECT". See your on-screen language. Then press to select your TV manual for the First Time VCR Press first. CLEAR Note: • If you press . Finally, press [CLEAR]. Clock Setting VCR Press first. 1 Press SETUP and use . 1 Be sure your to go to the next item. ...Then press to go to step 2. 2 Use / preference. In this manual refer to remote control use / to next step. - CLOCK SET MONTH DAY 10 / -- HOUR MINUTE -- : --...
User manual, English (US)
Page 15
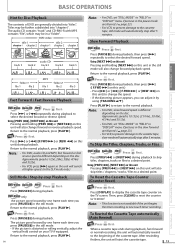
... unit will eject the cassette tape. 15 OPTIONAL SETTINGS TROUBLESHOOTING INFORMATION EN Note: • For DVD, set "STILL MODE" to "FIELD" in "DISPLAY" menu if pictures in the slow forward are blurred. ( page 23.) • For VCR, to prevent damage to the cassette tape, slow... subdivided into "titles". Press [g] or [h] repeatedly during playback. Note: • For DVD, audio CD and MP3, fast forward or fast reverse speed is 1(1/32x), 2(1/16x), 3(1/8x), 4(1/4x) and 5(1/2x). • For DVD, set "STILL MODE" to "FIELD" in "DISPLAY" menu if pictures in the still mode...
... unit will eject the cassette tape. 15 OPTIONAL SETTINGS TROUBLESHOOTING INFORMATION EN Note: • For DVD, set "STILL MODE" to "FIELD" in "DISPLAY" menu if pictures in the slow forward are blurred. ( page 23.) • For VCR, to prevent damage to the cassette tape, slow... subdivided into "titles". Press [g] or [h] repeatedly during playback. Note: • For DVD, audio CD and MP3, fast forward or fast reverse speed is 1(1/32x), 2(1/16x), 3(1/8x), 4(1/4x) and 5(1/2x). • For DVD, set "STILL MODE" to "FIELD" in "DISPLAY" menu if pictures in the still mode...
User manual, English (US)
Page 16
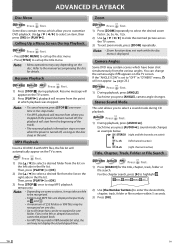
...sections, it may take a while to "OFF" in the file list. Note: • Zoom function does not work while the disc menu is set to be recognized on the right side in "OTHERS" menu, will resume from where you press [ANGLE], camera angle changes. You can be played back... may contain scenes which allow you to 8 hierarchies can change the camera angle if appears on the TV screen. AADDVVAANNCCED PPLLAAYYBBAACCKK Disc Menu DVD-Video Press DVD first. Some discs contain menus which have been shot simultaneously from the list on even when the power is active) Title, Chapter, Track...
...sections, it may take a while to "OFF" in the file list. Note: • Zoom function does not work while the disc menu is set to be recognized on the right side in "OTHERS" menu, will resume from where you press [ANGLE], camera angle changes. You can be played back... may contain scenes which allow you to 8 hierarchies can change the camera angle if appears on the TV screen. AADDVVAANNCCED PPLLAAYYBBAACCKK Disc Menu DVD-Video Press DVD first. Some discs contain menus which have been shot simultaneously from the list on even when the power is active) Title, Chapter, Track...
User manual, English (US)
Page 17
... function is not available for programmed and random playback of a DVD or an audio CD or during recording of the VCR. Repeat A-B Playback DVD-Video AudioCD MMPP33 DVD Press first. 1) During playback, press [A-B] at your desired starting... point as point A. 2) Press [A-B] at step 3. • For VCR, press [STOP C] to the beginning of the cassette tape. • The time search is available only during repeat A-B playback. Note: • The auto repeat can also be set...
... function is not available for programmed and random playback of a DVD or an audio CD or during recording of the VCR. Repeat A-B Playback DVD-Video AudioCD MMPP33 DVD Press first. 1) During playback, press [A-B] at your desired starting... point as point A. 2) Press [A-B] at step 3. • For VCR, press [STOP C] to the beginning of the cassette tape. • The time search is available only during repeat A-B playback. Note: • The auto repeat can also be set...
User manual, English (US)
Page 18
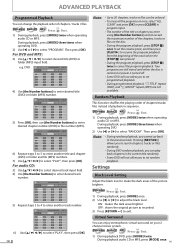
... C] twice to cancel the program playback. Virtual Surround You can play back chapters in the current title randomly. • Some DVD will not allow you to set random playback. Then press [OK]. DVD-PROGRAM MAX 4 Total 0 TITL E CHA P TE R P L AY A L L CL E A R 03 5) Press [OK], then use [... not allow you cannot go back to the previous track. During playback, press [MODE] three times when operating DVD. 2) Use [s] or [ B] to exit. Settings Black Level Setting Adjust the black level to make the dark areas of playback in sequence. ON: makes the dark areas brighter....
... C] twice to cancel the program playback. Virtual Surround You can play back chapters in the current title randomly. • Some DVD will not allow you to set random playback. Then press [OK]. DVD-PROGRAM MAX 4 Total 0 TITL E CHA P TE R P L AY A L L CL E A R 03 5) Press [OK], then use [... not allow you cannot go back to the previous track. During playback, press [MODE] three times when operating DVD. 2) Use [s] or [ B] to exit. Settings Black Level Setting Adjust the black level to make the dark areas of playback in sequence. ON: makes the dark areas brighter....
User manual, English (US)
Page 19
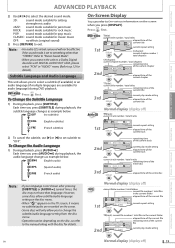
...surround will only allow you to change the subtitle/audio language setting from the disc menu. • Operation varies depending on the screen when you connect the unit to a Dolby Digital decoder with the disc for details. DVD-Video Press DVD first. OFF (no effects (original sound) 3) Press [...title Audio CD Normal display (display off ) 19 To Change the Audio Language 1) During playback, press [AUDIO ]. Press DVD first. However, some discs allow subtitle/audio language setting on the disc menu. • When " " appears on the TV screen, it means no subtitle/audio are available...
...surround will only allow you to change the subtitle/audio language setting from the disc menu. • Operation varies depending on the screen when you connect the unit to a Dolby Digital decoder with the disc for details. DVD-Video Press DVD first. OFF (no effects (original sound) 3) Press [...title Audio CD Normal display (display off ) 19 To Change the Audio Language 1) During playback, press [AUDIO ]. Press DVD first. However, some discs allow subtitle/audio language setting on the disc menu. • When " " appears on the TV screen, it means no subtitle/audio are available...
User manual, English (US)
Page 20
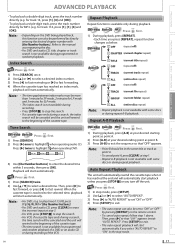
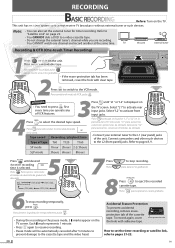
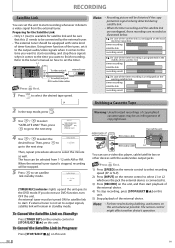
...CANNOT watch one channel and record another at the same time. REC TIMER REC IR STOP/EJECT PLAY RECORD OPEN/CLOSE TRACKING VCR SOU REMEMBER VCR • You need to set the external tuner for timer recording. Tape speed Recording / playback time Pulse INPUT hasta que se visualice "L1" o "L2...de entrada. • Connect your external tuner to the L1 (rear panel) jacks of VCR features. 3Press INPUT until desired duration recording REC time is displayed on page 22. • You CANNOT dub a DVD to the L2 (front panel) jacks. Then insert a recordable tape. This unit has no...
...CANNOT watch one channel and record another at the same time. REC TIMER REC IR STOP/EJECT PLAY RECORD OPEN/CLOSE TRACKING VCR SOU REMEMBER VCR • You need to set the external tuner for timer recording. Tape speed Recording / playback time Pulse INPUT hasta que se visualice "L1" o "L2...de entrada. • Connect your external tuner to the L1 (rear panel) jacks of VCR features. 3Press INPUT until desired duration recording REC time is displayed on page 22. • You CANNOT dub a DVD to the L2 (front panel) jacks. Then insert a recordable tape. This unit has no...
User manual, English (US)
Page 21
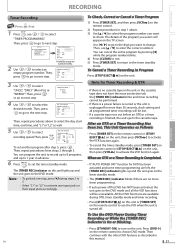
...While the [TIMER REC] Indicator is turned off for Timer Recording & OTR • If there is no more than 30 seconds, clock setting and all the VCR functions will be performed. • If there is a power failure occurred or the unit is finished, the unit ejects the cassette tape....L2 - - You can cancel the entire program by pressing [s] while the program number blinks. 4) Press [CLEAR] to exit. 5) Press [TIMER SET] to return to the DVD mode and all programmed timer recordings will be unavailable. REC SPEED - - Note: • To go to the digit you select will appear on...
...While the [TIMER REC] Indicator is turned off for Timer Recording & OTR • If there is no more than 30 seconds, clock setting and all the VCR functions will be performed. • If there is a power failure occurred or the unit is finished, the unit ejects the cassette tape....L2 - - You can cancel the entire program by pressing [s] while the program number blinks. 4) Press [CLEAR] to exit. 5) Press [TIMER SET] to return to the DVD mode and all programmed timer recordings will be unavailable. REC SPEED - - Note: • To go to the digit you select will appear on...
User manual, English (US)
Page 22
... Satellite Link: • Only L1 (rear) is overlapped on how to set the timer. TIMER PROGRAMMING B SATELLITE LINK AUTO REPEAT [OFF] CLOCK SET LANGUAGE SELECT 4 Use / to the DVD mode. L1 VCR DIGITAL AUDIO OUT DVD AUDIO OUT S-VIDEO OUT COMPONENT VIDEO OUT Y DVD/VCR AUDIO OUT L VCR L COAXIAL R AUDIO IN CB R VIDEO OUT VIDEO IN CR AUDIO...
... Satellite Link: • Only L1 (rear) is overlapped on how to set the timer. TIMER PROGRAMMING B SATELLITE LINK AUTO REPEAT [OFF] CLOCK SET LANGUAGE SELECT 4 Use / to the DVD mode. L1 VCR DIGITAL AUDIO OUT DVD AUDIO OUT S-VIDEO OUT COMPONENT VIDEO OUT Y DVD/VCR AUDIO OUT L VCR L COAXIAL R AUDIO IN CB R VIDEO OUT VIDEO IN CR AUDIO...
User manual, English (US)
Page 23
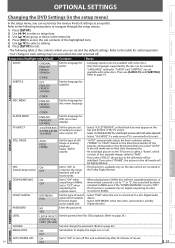
... "ON" to turn off . OOPPTTIIOONNAL SSEETTTTININGGSS PRECAUTIONS PREPARATION BASIC OPERATIONS ADVANCED PLAYBACK RECORDING Changing the DVD Settings (in the setup menu) In the setup menu, you can set to "OFF". • This function is available only on digital outputting of a disc recorded in 96kHz. LANGUAGE SUBTITLE ...be highly defined. Refer to display the angle icon or not. Refer to the table for DVD playback. (Refer to page 24.) LEVEL7 [NC-17] to LEVEL1 [KID SAFE] CHANGE Set and change to compress the range between soft and loud sounds. • This function is...
... "ON" to turn off . OOPPTTIIOONNAL SSEETTTTININGGSS PRECAUTIONS PREPARATION BASIC OPERATIONS ADVANCED PLAYBACK RECORDING Changing the DVD Settings (in the setup menu) In the setup menu, you can set to "OFF". • This function is available only on digital outputting of a disc recorded in 96kHz. LANGUAGE SUBTITLE ...be highly defined. Refer to display the angle icon or not. Refer to the table for DVD playback. (Refer to page 24.) LEVEL7 [NC-17] to LEVEL1 [KID SAFE] CHANGE Set and change to compress the range between soft and loud sounds. • This function is...

User manual, English (US)
Page 24
... LEVEL CHANGE Enter password ---- TIPS FOR LEVELS • 8 [ADULT]: DVD software of any grades (adult/ general/children) can be set to "PARENTAL" setting. PARENTAL Setting Parental setting will stop if the ratings exceed the levels you set password already, use [the Number buttons] to select "LEVEL", then press... on . Then, re-enter the new password. PASSWORD LEVEL CHANGE PARENTAL_CHANGE PASSWORD LEVEL CHANGE 5 / OK . OPTIONAL SETTINGS DVD Press first. Make sure this function works with those intended for the first time, use [the Number buttons] to select...
... LEVEL CHANGE Enter password ---- TIPS FOR LEVELS • 8 [ADULT]: DVD software of any grades (adult/ general/children) can be set to "PARENTAL" setting. PARENTAL Setting Parental setting will stop if the ratings exceed the levels you set password already, use [the Number buttons] to select "LEVEL", then press... on . Then, re-enter the new password. PASSWORD LEVEL CHANGE PARENTAL_CHANGE PASSWORD LEVEL CHANGE 5 / OK . OPTIONAL SETTINGS DVD Press first. Make sure this function works with those intended for the first time, use [the Number buttons] to select...

User manual, English (US)
Page 25
BASIC OPERATIONS ADVANCED PLAYBACK RECORDING OPTIONAL SETTINGS TROUBLESHOOTING INFORMATION EN 25 SELECT MENU LANGUAGE 1 ENGLISH 2 FRANÇAIS 3 ESPAÑOL The next time you operate, the player menu language will be the one you have selected. PRECAUTIONS PREPARATION OPTIONAL SETTINGS INITIALIZE Reset the settings to factory default. 1 SETUP Press to call up the setup menu. 2 Use 3 Press OK / to select "YES", then press . OK to select , then press . INITIALIZE_INITIALIZE INITIALIZE YES 4 Press 1 , 2 or 3 to select the desired language.
BASIC OPERATIONS ADVANCED PLAYBACK RECORDING OPTIONAL SETTINGS TROUBLESHOOTING INFORMATION EN 25 SELECT MENU LANGUAGE 1 ENGLISH 2 FRANÇAIS 3 ESPAÑOL The next time you operate, the player menu language will be the one you have selected. PRECAUTIONS PREPARATION OPTIONAL SETTINGS INITIALIZE Reset the settings to factory default. 1 SETUP Press to call up the setup menu. 2 Use 3 Press OK / to select "YES", then press . OK to select , then press . INITIALIZE_INITIALIZE INITIALIZE YES 4 Press 1 , 2 or 3 to select the desired language.


