User manual, English (US)
Page 3
... SETTINGS TROUBLESHOOTING INFORMATION EN 3 LASER SAFETY This apparatus employs a laser. CAUTION: Use of controls or adjustments or performance of explosion if battery is a trademark of picture problems with wet hands. • Do not pull on top or bottom of this unit at least for Progressive Scan Output • Consumers should note that the user switch the connection to remove the disc and unplug the AC power cord from Dolby...
... SETTINGS TROUBLESHOOTING INFORMATION EN 3 LASER SAFETY This apparatus employs a laser. CAUTION: Use of controls or adjustments or performance of explosion if battery is a trademark of picture problems with wet hands. • Do not pull on top or bottom of this unit at least for Progressive Scan Output • Consumers should note that the user switch the connection to remove the disc and unplug the AC power cord from Dolby...
User manual, English (US)
Page 4
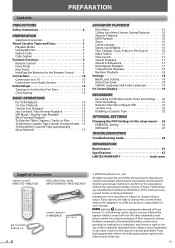
... Contents PRECAUTIONS Safety Instructions 2 PREPARATION Supplied Accessories 4 About Cassette Tapes and Discs 5 Playable Media 5 Unplayable Disc 5 Region Code 5 Color System 5 Function Overview 6 Remote Control 6 Front Panel 8 Rear Panel 9 Installing the Batteries for the Remote Control 9 Connections 10 Connection to a TV 10 Connection to an Audio System 12 Initial Setups 13 Turning on Unit for the First Time 13 Clock Setting 13 BASIC OPERATIONS For VCR Playback 14 For Disc Playback 14 Hint for Disc Playback 15 Fast Forward / Fast Reverse Playback 15 Still Mode / Step-by...
... Contents PRECAUTIONS Safety Instructions 2 PREPARATION Supplied Accessories 4 About Cassette Tapes and Discs 5 Playable Media 5 Unplayable Disc 5 Region Code 5 Color System 5 Function Overview 6 Remote Control 6 Front Panel 8 Rear Panel 9 Installing the Batteries for the Remote Control 9 Connections 10 Connection to a TV 10 Connection to an Audio System 12 Initial Setups 13 Turning on Unit for the First Time 13 Clock Setting 13 BASIC OPERATIONS For VCR Playback 14 For Disc Playback 14 Hint for Disc Playback 15 Fast Forward / Fast Reverse Playback 15 Still Mode / Step-by...
User manual, English (US)
Page 5
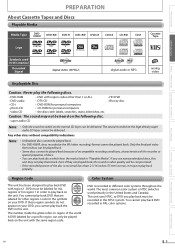
... been designed to play back DVD with region codes other regions. Caution: The sound may not play back discs which is recorded in PAL color systems. RECORDING OPTIONAL SETTINGS TROUBLESHOOTING INFORMATION EN 5 Color System DVD is used in this manual Recorded Signal DVD-Video AudioCD MMPP33 digital audio or MP3 VHS analog video Unplayable Disc Caution: Never play back on your DVD. PRECAUTIONS PREPARATION BASIC OPERATIONS ADVANCED PLAYBACK PREPARATION About Cassette Tapes and Discs Playable Media Media Type DVDVIDEO DVD-RW DVD-R DVD+RW DVD+R CD-DA...
... been designed to play back DVD with region codes other regions. Caution: The sound may not play back discs which is recorded in PAL color systems. RECORDING OPTIONAL SETTINGS TROUBLESHOOTING INFORMATION EN 5 Color System DVD is used in this manual Recorded Signal DVD-Video AudioCD MMPP33 digital audio or MP3 VHS analog video Unplayable Disc Caution: Never play back on your DVD. PRECAUTIONS PREPARATION BASIC OPERATIONS ADVANCED PLAYBACK PREPARATION About Cassette Tapes and Discs Playable Media Media Type DVDVIDEO DVD-RW DVD-R DVD+RW DVD+R CD-DA...
User manual, English (US)
Page 8
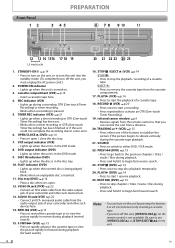
... AC power cord.) 2. Be sure to use [OPEN/CLOSE A] or [STOP/EJECT C A] on the unit, or to stop the playback / recording of your camcorder and other such devices here. 13. PLAY B (DVD) p.14 • Press to start a recording. • Press repeatedly to turn on the unit. 8 EN PREPARATION Front Panel 12 3 45 6 7 8 9 10 11 STANDBY-ON POWER ON VIDEO AUDIO REC TIMER REC IR REW F.FWD STOP/EJECT PLAY RECORD OPEN/CLOSE TRACKING VCR DVD DISC IN PLAY SOURCE PREV STOP PLAY NEXT...
... AC power cord.) 2. Be sure to use [OPEN/CLOSE A] or [STOP/EJECT C A] on the unit, or to stop the playback / recording of your camcorder and other such devices here. 13. PLAY B (DVD) p.14 • Press to start a recording. • Press repeatedly to turn on the unit. 8 EN PREPARATION Front Panel 12 3 45 6 7 8 9 10 11 STANDBY-ON POWER ON VIDEO AUDIO REC TIMER REC IR REW F.FWD STOP/EJECT PLAY RECORD OPEN/CLOSE TRACKING VCR DVD DISC IN PLAY SOURCE PREV STOP PLAY NEXT...
User manual, English (US)
Page 9
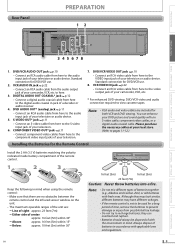
... Rear Panel PREPARATION 12 PREPARATION DIGITAL AUDIO OUT DVD AUDIO OUT S-VIDEO OUT COMPONENT VIDEO OUT Y DVD/VCR AUDIO OUT L VCR L COAXIAL R AUDIO IN CB R VIDEO OUT VIDEO IN CR L1 345678 BASIC OPERATIONS ADVANCED PLAYBACK RECORDING OPTIONAL SETTINGS TROUBLESHOOTING 1. Standard connection for both VCR and DVD viewing. DVD/VCR VIDEO OUT jack p.10 • Connect an RCA video cable from here to the VIDEO input jack of your television or audio device. DVD/VCR AUDIO OUT jack p.10 • Connect an RCA audio cable from here to the audio input...
... Rear Panel PREPARATION 12 PREPARATION DIGITAL AUDIO OUT DVD AUDIO OUT S-VIDEO OUT COMPONENT VIDEO OUT Y DVD/VCR AUDIO OUT L VCR L COAXIAL R AUDIO IN CB R VIDEO OUT VIDEO IN CR L1 345678 BASIC OPERATIONS ADVANCED PLAYBACK RECORDING OPTIONAL SETTINGS TROUBLESHOOTING 1. Standard connection for both VCR and DVD viewing. DVD/VCR VIDEO OUT jack p.10 • Connect an RCA video cable from here to the VIDEO input jack of your television or audio device. DVD/VCR AUDIO OUT jack p.10 • Connect an RCA audio cable from here to the audio input...
User manual, English (US)
Page 11
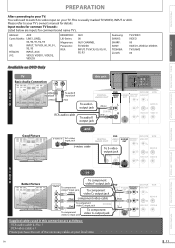
... BASIC OPERATIONS ADVANCED PLAYBACK RECORDING OPTIONAL SETTINGS TROUBLESHOOTING TV Basic Audio Connection L R AUDIO IN A U To audio L input jack To audio R input jack D I (White) (Red) O RCA audio cable this unit DIGITAL AUDIO OUT DVD AUDIO OUT To audio L L output jack (White) To audio R COAXIAL (Red) R output jack DIGITAL AUDIO OUT DVD AUDIO OUT S-VIDEO OUT COMPONENT VIDEO OUT Y DVD/VCR AUDIO OUT L VCR L COAXIAL R AUDIO IN CB R VIDEO OUT VIDEO IN CR DVD/VCR NT UT AUDIO OUT Y L VCR AUDIO IN CB R VIDEO OUT VIDEO IN CR Good Picture S-VIDEO IN...
... BASIC OPERATIONS ADVANCED PLAYBACK RECORDING OPTIONAL SETTINGS TROUBLESHOOTING TV Basic Audio Connection L R AUDIO IN A U To audio L input jack To audio R input jack D I (White) (Red) O RCA audio cable this unit DIGITAL AUDIO OUT DVD AUDIO OUT To audio L L output jack (White) To audio R COAXIAL (Red) R output jack DIGITAL AUDIO OUT DVD AUDIO OUT S-VIDEO OUT COMPONENT VIDEO OUT Y DVD/VCR AUDIO OUT L VCR L COAXIAL R AUDIO IN CB R VIDEO OUT VIDEO IN CR DVD/VCR NT UT AUDIO OUT Y L VCR AUDIO IN CB R VIDEO OUT VIDEO IN CR Good Picture S-VIDEO IN...
User manual, English (US)
Page 12
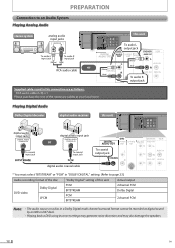
... AUDIO IN CB R VIDEO OUT VIDEO IN CR To audio L output jack TAL O OUT DVD AUDIO OUT S-VIDEO OUT COMPONENT VIDEO OUT Y (White) DVD/VCR AUDIO OUT L VCR L (WhiteC)OAXIAL R (Red) (Red) CB AUDIO IN R VIDEO OUT VIDEO IN To audioCRR output jack Supplied cables used in this unit PCM BITSTREAM PCM BITSTREAM Actual output 2channel PCM Dolby Digital 2channel PCM Note: • The audio source on a disc in "DOLBY DIGITAL" setting. (Refer to page 23.) Audio recording format of the disc DVD-video Dolby Digital LPCM "Dolby Digital" setting of this connection are as digital sound...
... AUDIO IN CB R VIDEO OUT VIDEO IN CR To audio L output jack TAL O OUT DVD AUDIO OUT S-VIDEO OUT COMPONENT VIDEO OUT Y (White) DVD/VCR AUDIO OUT L VCR L (WhiteC)OAXIAL R (Red) (Red) CB AUDIO IN R VIDEO OUT VIDEO IN To audioCRR output jack Supplied cables used in this unit PCM BITSTREAM PCM BITSTREAM Actual output 2channel PCM Dolby Digital 2channel PCM Note: • The audio source on a disc in "DOLBY DIGITAL" setting. (Refer to page 23.) Audio recording format of the disc DVD-video Dolby Digital LPCM "Dolby Digital" setting of this connection are as digital sound...

User manual, English (US)
Page 14
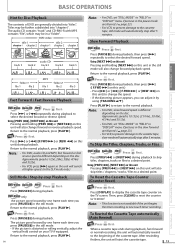
... detener la reproducción. For Disc Playback (page 16 for MP3 playback) 1 STANDBY-ON Press to turn on both sides, make sure the label of the side you operate any of DVD features. 4 Press PLAY to start playback. OPEN/CLOSE AUDIO REC TIMER REC IR STOP/EJECT PLAY RECORD TRACKING VCR DVD DISC IN PLAY SOURCE PREV STOP PLAY NEXT • If the protection tab has removed, playback will be turned on the TV. Inserte un...
... detener la reproducción. For Disc Playback (page 16 for MP3 playback) 1 STANDBY-ON Press to turn on both sides, make sure the label of the side you operate any of DVD features. 4 Press PLAY to start playback. OPEN/CLOSE AUDIO REC TIMER REC IR STOP/EJECT PLAY RECORD TRACKING VCR DVD DISC IN PLAY SOURCE PREV STOP PLAY NEXT • If the protection tab has removed, playback will be turned on the TV. Inserte un...
User manual, English (US)
Page 15
... the timer recording or one frame each time you press [PAUSE F] in the still mode will eject the cassette tape. 15 OPTIONAL SETTINGS TROUBLESHOOTING INFORMATION VCR VHS Press first. Press [g] or [h] repeatedly during playback. EN Note: • For DVD, set "STILL MODE" to "FIELD" in "DISPLAY" menu if pictures in the slow forward are generally divided into "chapters". After rewinding finishes, the unit will also change forward or reverse playback speed...
... the timer recording or one frame each time you press [PAUSE F] in the still mode will eject the cassette tape. 15 OPTIONAL SETTINGS TROUBLESHOOTING INFORMATION VCR VHS Press first. Press [g] or [h] repeatedly during playback. EN Note: • For DVD, set "STILL MODE" to "FIELD" in "DISPLAY" menu if pictures in the slow forward are generally divided into "chapters". After rewinding finishes, the unit will also change forward or reverse playback speed...
User manual, English (US)
Page 16
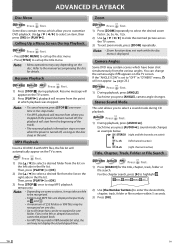
... a Menu Screen During Playback DVD-Video Press DVD first. • Press [DISC MENU] to call up the title menu. MMPP33 DVD Press first. 1) Use [K / L] to select a desired file from the list on the TV screen. Each time you press [AUDIO ], sound mode changes as the disc stays in the stop MP3 playback temporarily. For the chapter search, press [B] to highlight . 0 1 /01 002/021 00:03:53 OFF 2) Use [the Number buttons] to call up the disc menu. •...
... a Menu Screen During Playback DVD-Video Press DVD first. • Press [DISC MENU] to call up the title menu. MMPP33 DVD Press first. 1) Use [K / L] to select a desired file from the list on the TV screen. Each time you press [AUDIO ], sound mode changes as the disc stays in the stop MP3 playback temporarily. For the chapter search, press [B] to highlight . 0 1 /01 002/021 00:03:53 OFF 2) Use [the Number buttons] to call up the disc menu. •...
User manual, English (US)
Page 17
... play time 0:15:00) press [1],[5],[0],[0] of [the Number buttons]. • For DVD and audio CD, press [CLEAR] to erase the incorrect input at step 3. • For VCR, press [STOP C] to stop mode, press [SETUP]. 2) Use [K] or [L] to select "AUTO REPEAT". 3) Press [ B] to "AUTO REPEAT" to set to "ON" or "OFF" by directly entering the desired chapter number with some discs or during recording of the VCR. Note: • Depending on the remote control. • To cancel auto repeat...
... play time 0:15:00) press [1],[5],[0],[0] of [the Number buttons]. • For DVD and audio CD, press [CLEAR] to erase the incorrect input at step 3. • For VCR, press [STOP C] to stop mode, press [SETUP]. 2) Use [K] or [L] to select "AUTO REPEAT". 3) Press [ B] to "AUTO REPEAT" to set to "ON" or "OFF" by directly entering the desired chapter number with some discs or during recording of the VCR. Note: • Depending on the remote control. • To cancel auto repeat...
User manual, English (US)
Page 18
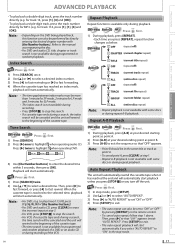
... E A R 4) Use [the Number buttons] to enter desired chapter number (DVD) or file number (MP3). Settings Black Level Setting Adjust the black level to make the dark areas of playback in sequence. CD-PROGRAM MAX 14 Total 0 No. During playback, press [MODE] three times when operating DVD. 2) Use [s] or [ B] to exit. OFF: shows the original picture as recorded. 3) Press [RETURN ] to select "RANDOM". During playback, press [MODE] three times when operating DVD. 2) Use [s] or [ B] to select desired title (DVD) or folder (MP3) input field...
... E A R 4) Use [the Number buttons] to enter desired chapter number (DVD) or file number (MP3). Settings Black Level Setting Adjust the black level to make the dark areas of playback in sequence. CD-PROGRAM MAX 14 Total 0 No. During playback, press [MODE] three times when operating DVD. 2) Use [s] or [ B] to exit. OFF: shows the original picture as recorded. 3) Press [RETURN ] to select "RANDOM". During playback, press [MODE] three times when operating DVD. 2) Use [s] or [ B] to select desired title (DVD) or folder (MP3) input field...
User manual, English (US)
Page 19
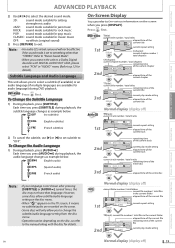
... Sound Mode". • When you connect the unit to a Dolby Digital decoder with the disc for details. To Change the Audio Language 1) During playback, press [AUDIO ]. folder1 2. file name1 3 2. Note: • For audio CD, virtual surround will only allow subtitle/audio language setting on the disc menu. • When " " appears on the TV screen, it means no subtitle/audio are available for audio language) during DVD playback. Each time you to select a subtitle (if available) or an audio language (if multiple languages are recorded...
... Sound Mode". • When you connect the unit to a Dolby Digital decoder with the disc for details. To Change the Audio Language 1) During playback, press [AUDIO ]. folder1 2. file name1 3 2. Note: • For audio CD, virtual surround will only allow subtitle/audio language setting on the disc menu. • When " " appears on the TV screen, it means no subtitle/audio are available for audio language) during DVD playback. Each time you to select a subtitle (if available) or an audio language (if multiple languages are recorded...
User manual, English (US)
Page 20
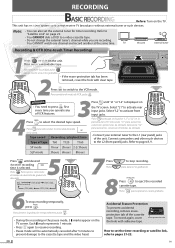
.... VCR Press to switch to eject the recorded cassette tape. REC TIMER REC IR STOP/EJECT PLAY RECORD OPEN/CLOSE TRACKING VCR SOU REMEMBER VCR • You need to turn on the TV. Select "L1" to pages 21-22. 20 EN Seleccione "L1" para activar los conectores posteriores de entrada. Connect camcorders and other such devices Type of VCR features. 3Press INPUT until desired duration recording REC time is displayed on the TV screen. SP mode...
.... VCR Press to switch to eject the recorded cassette tape. REC TIMER REC IR STOP/EJECT PLAY RECORD OPEN/CLOSE TRACKING VCR SOU REMEMBER VCR • You need to turn on the TV. Select "L1" to pages 21-22. 20 EN Seleccione "L1" para activar los conectores posteriores de entrada. Connect camcorders and other such devices Type of VCR features. 3Press INPUT until desired duration recording REC time is displayed on the TV screen. SP mode...
User manual, English (US)
Page 21
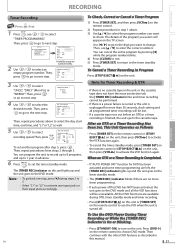
... . 3) Use [K / L] to select the program number you want to next step. - Then, repeat procedures from steps 2 through 5. To Cancel a Timer Recording in Progress Press [STOP/EJECT C A] on the unit, then press [VCR ] to activate the VCR function again. • To cancel the timer standby mode, press [TIMER SET] on the remote control or [STOP/EJECT C A] on the unit. After an OTR or a Timer Recording Has Been Set, This Unit Operates as Follows: • Press [TIMER SET] on the remote control...
... . 3) Use [K / L] to select the program number you want to next step. - Then, repeat procedures from steps 2 through 5. To Cancel a Timer Recording in Progress Press [STOP/EJECT C A] on the unit, then press [VCR ] to activate the VCR function again. • To cancel the timer standby mode, press [TIMER SET] on the remote control or [STOP/EJECT C A] on the unit. After an OTR or a Timer Recording Has Been Set, This Unit Operates as Follows: • Press [TIMER SET] on the remote control...
User manual, English (US)
Page 22
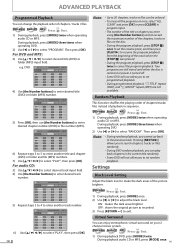
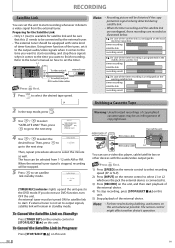
... stop mode, press . 3 Use / to the time you do not use a video disc player, cable/satellite box or other devices with some kind of the unit VIDEO AUDIO AUDIO OUT or L RCA audio cable L2 R You can use DVD function, turn OFF the unit. If external tuner is stopped, recording will remain in Progress: Press [STOP/EJECT C A] on the existing timer recording. To Cancel the Satellite Link in standby mode. Warning: Unauthorized recordings of the external device. output jacks of external device VIDEO OUT RCA video cable...
... stop mode, press . 3 Use / to the time you do not use a video disc player, cable/satellite box or other devices with some kind of the unit VIDEO AUDIO AUDIO OUT or L RCA audio cable L2 R You can use DVD function, turn OFF the unit. If external tuner is stopped, recording will remain in Progress: Press [STOP/EJECT C A] on the existing timer recording. To Cancel the Satellite Link in standby mode. Warning: Unauthorized recordings of the external device. output jacks of external device VIDEO OUT RCA video cable...
User manual, English (US)
Page 23
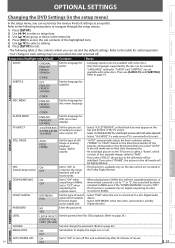
...; The following instructions to navigate through the setup menus. 1) Press [SETUP]. 2) Use [s / B] to select a setup item. 3) Use [K/ L] to go up or down sampled at 48kHz even if the "DOWN SAMPLING" is connected to a Dolby audio output jack. LANGUAGE SUBTITLE OFF ENGLISH FRENCH SPANISH ••• OTHER Set the language for disc menu language. DISC MENU ENGLISH FRENCH SPANISH ••• OTHER Set the language for subtitles. DISPLAY STILL MODE AUTO FIELD FRAME Set the type of sound • Select "PCM" when...
...; The following instructions to navigate through the setup menus. 1) Press [SETUP]. 2) Use [s / B] to select a setup item. 3) Use [K/ L] to go up or down sampled at 48kHz even if the "DOWN SAMPLING" is connected to a Dolby audio output jack. LANGUAGE SUBTITLE OFF ENGLISH FRENCH SPANISH ••• OTHER Set the language for disc menu language. DISC MENU ENGLISH FRENCH SPANISH ••• OTHER Set the language for subtitles. DISPLAY STILL MODE AUTO FIELD FRAME Set the type of sound • Select "PCM" when...

User manual, English (US)
Page 24
... if you are playing back a disc. Playback will be cleared and parental levels will prevent your password (except for 4737). PASSWORD Enter password NO YES ---- • If you set to enter the current 4-digit password. To Change the Password 1 Follow the step 1 to 3 in case you use the unit for the first time, use [the Number buttons] to enter the 4-digit number for adult and general use [the Number buttons] to "LEVEL...
... if you are playing back a disc. Playback will be cleared and parental levels will prevent your password (except for 4737). PASSWORD Enter password NO YES ---- • If you set to enter the current 4-digit password. To Change the Password 1 Follow the step 1 to 3 in case you use the unit for the first time, use [the Number buttons] to enter the 4-digit number for adult and general use [the Number buttons] to "LEVEL...
User manual, English (US)
Page 26
... signal may be received. Cannot remove the cassette tape. • Check if this manual. No picture and sound. • Please confirm to connect to the remote control. making a copy of the unit. If not, press [VCR ] on the DVD. • The DVD does not always contain sequences recorded from a desired track and random playback are not available during programmed playback. • Some functions are not available in specific modes, but the audio...
... signal may be received. Cannot remove the cassette tape. • Check if this manual. No picture and sound. • Please confirm to connect to the remote control. making a copy of the unit. If not, press [VCR ] on the DVD. • The DVD does not always contain sequences recorded from a desired track and random playback are not available during programmed playback. • Some functions are not available in specific modes, but the audio...

User manual, English (US)
Page 27
... call our toll free customer support line found on remote control. Note: • Remember to read it correctly. Wipe the disc from the center to clean the unit. There are subject to change without notice. • If there is showing clear, the dirt may need to be English. 27 OPTIONAL SETTINGS TROUBLESHOOTING INFORMATION ININFFOORMAATTIIOONN PRECAUTIONS PREPARATION BASIC OPERATIONS ADVANCED PLAYBACK RECORDING Maintenance Servicing • Please...
... call our toll free customer support line found on remote control. Note: • Remember to read it correctly. Wipe the disc from the center to clean the unit. There are subject to change without notice. • If there is showing clear, the dirt may need to be English. 27 OPTIONAL SETTINGS TROUBLESHOOTING INFORMATION ININFFOORMAATTIIOONN PRECAUTIONS PREPARATION BASIC OPERATIONS ADVANCED PLAYBACK RECORDING Maintenance Servicing • Please...


