
User manual, English (US)
Page 4
...(16:9) format. The formats for digital broadcast formats. High Definition TV (HDTV) HDTV has the highest quality for EDTV are : Standard Definition TV (SDTV) SDTV is the basic level of broadcasting that the Set-top box outputs and change the channels at a time. This is used to capture images and...is not receiving any signal from the broadcaster, NO PROGRAM will appear on the TV screen. 4 You will appear on the remote control toggles the TV between SDTV and HDTV. Digital television can be in picture quality than one program at the Set-top Box to 40 minutes depending on for...
...(16:9) format. The formats for digital broadcast formats. High Definition TV (HDTV) HDTV has the highest quality for EDTV are : Standard Definition TV (SDTV) SDTV is the basic level of broadcasting that the Set-top box outputs and change the channels at a time. This is used to capture images and...is not receiving any signal from the broadcaster, NO PROGRAM will appear on the TV screen. 4 You will appear on the remote control toggles the TV between SDTV and HDTV. Digital television can be in picture quality than one program at the Set-top Box to 40 minutes depending on for...
User manual, English (US)
Page 5
...breaks are reduced, making for a more consistent, comfortable sound for various types of programming, such as onscreen text. (Pg. 27). As an Energy Star® Partner, Philips Consumer Electronics has determined this product meets the Energy Star® guidelines for children... TV 2 Safety/Precautions 2/3 A Guide to Digital TV 4 Quick Tips before you start 4 GETTING STARTED Description of Remote Control buttons 6 Basic TV and Remote Control Operation 7 First time you turn on your own preferences through the onscreen Sound menu. registered mark. AutoLock lets you custom...
...breaks are reduced, making for a more consistent, comfortable sound for various types of programming, such as onscreen text. (Pg. 27). As an Energy Star® Partner, Philips Consumer Electronics has determined this product meets the Energy Star® guidelines for children... TV 2 Safety/Precautions 2/3 A Guide to Digital TV 4 Quick Tips before you start 4 GETTING STARTED Description of Remote Control buttons 6 Basic TV and Remote Control Operation 7 First time you turn on your own preferences through the onscreen Sound menu. registered mark. AutoLock lets you custom...
User manual, English (US)
Page 6
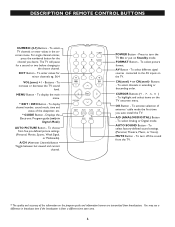
DESCRIPTION OF REMOTE CONTROL BUTTONS NUMERIC (0-9) Buttons - To select TV channels or enter values in broadcast time if the broadcaster is from broadcasters. To enter values for the channel ...
DESCRIPTION OF REMOTE CONTROL BUTTONS NUMERIC (0-9) Buttons - To select TV channels or enter values in broadcast time if the broadcaster is from broadcasters. To enter values for the channel ...
User manual, English (US)
Page 7
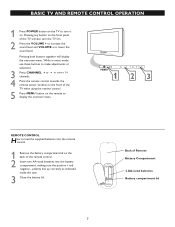
... Compartment 2 AA-sized batteries Battery compartment lid to select TV channels. 4 Point the remote control towards the remote sensor window on the front of the TV when using the remote control. 5 Press MENU button on the remote to display the onscreen menu. - + >< 3 REMOTE CONTROL How to load the supplied batteries into the battery compartment, making sure the positive...
... Compartment 2 AA-sized batteries Battery compartment lid to select TV channels. 4 Point the remote control towards the remote sensor window on the front of the TV when using the remote control. 5 Press MENU button on the remote to display the onscreen menu. - + >< 3 REMOTE CONTROL How to load the supplied batteries into the battery compartment, making sure the positive...
User manual, English (US)
Page 9
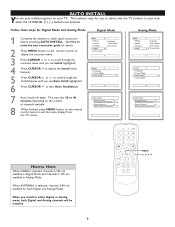
...Analog channels will begin. This may take 20 to 40 minutes depending on the number of channels available. 8 When finished, press MENU button on the remote control to display the onscreen menu. 3 Press CURSOR < or > to scroll through the onscreen menu until you see Install highlighted. 4 Press CURSOR >... > MENU When you to exit the menu display from the TV screen. This makes it easy for details. 2 Press MENU button on the remote control twice to select only the TV stations in Analog Mode. See How to make the best connection guide for you install in either Digital or...
...Analog channels will begin. This may take 20 to 40 minutes depending on the number of channels available. 8 When finished, press MENU button on the remote control to display the onscreen menu. 3 Press CURSOR < or > to scroll through the onscreen menu until you see Install highlighted. 4 Press CURSOR >... > MENU When you to exit the menu display from the TV screen. This makes it easy for details. 2 Press MENU button on the remote control twice to select only the TV stations in Analog Mode. See How to make the best connection guide for you install in either Digital or...
User manual, English (US)
Page 10
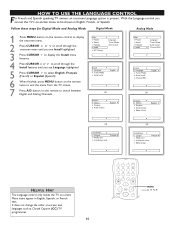
... (CC) TV programmes. 10 > > MENU Follow these steps for Digital Mode and Analog Mode Digital Mode Analog Mode 1 Press MENU button on the remote control to display the onscreen menu. 2 Press CURSOR < or > to scroll through the onscreen menu until you see Install highlighted. 3 Press CURSOR > to... or Spanish. Installation auto Installation Langue Mode synt. It does not change the other on the remote to be shown in English, Spanish, or French text. HELPFUL HINT The Language control only makes the TV on -screen menu to switch between Digital and Analog Channels. Main DTV ...
... (CC) TV programmes. 10 > > MENU Follow these steps for Digital Mode and Analog Mode Digital Mode Analog Mode 1 Press MENU button on the remote control to display the onscreen menu. 2 Press CURSOR < or > to scroll through the onscreen menu until you see Install highlighted. 3 Press CURSOR > to... or Spanish. Installation auto Installation Langue Mode synt. It does not change the other on the remote to be shown in English, Spanish, or French text. HELPFUL HINT The Language control only makes the TV on -screen menu to switch between Digital and Analog Channels. Main DTV ...
User manual, English (US)
Page 11
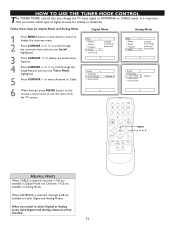
...install in Digital Mode and Channels 1-125 are available for Digital Mode and Analog Mode Digital Mode Analog Mode 1 Press MENU button on the remote control to display the onscreen menu. 2 Press CURSOR < or > to scroll through the onscreen menu until you see Tuner Mode highlighted. 5 ...Press CURSOR > to select Antenna or Cable. 6 When finished, press MENU button on the remote control twice to exit the menu from the TV screen. When you see Install highlighted. 3 Press CURSOR > to display the Install menu features. 4...
...install in Digital Mode and Channels 1-125 are available for Digital Mode and Analog Mode Digital Mode Analog Mode 1 Press MENU button on the remote control to display the onscreen menu. 2 Press CURSOR < or > to scroll through the onscreen menu until you see Tuner Mode highlighted. 5 ...Press CURSOR > to select Antenna or Cable. 6 When finished, press MENU button on the remote control twice to exit the menu from the TV screen. When you see Install highlighted. 3 Press CURSOR > to display the Install menu features. 4...
User manual, English (US)
Page 12
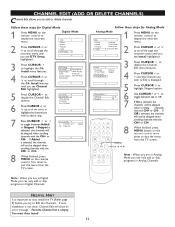
... not be skipped when scrolling channels with the CH+ or CH- . DT 35 - 1 MELCO Added 8 When finished, press MENU on the remote control to display the onscreen menu. 2 Press CURSOR < or > to exit the menu from the TV screen. Follow these steps for Analog Mode Analog...channels with the CH+ or CH- . Install Channel Edit Weak Dig Sig AutoLock Fact CH Reset 7 Press CURSOR > or < to toggle between on the remote control to toggle between Added or Skipped. Channel Edit 2 - 1 WCBS - Ch. Follow these steps for Digital Mode 1 Press MENU on or off 5 ...
... not be skipped when scrolling channels with the CH+ or CH- . DT 35 - 1 MELCO Added 8 When finished, press MENU on the remote control to display the onscreen menu. 2 Press CURSOR < or > to exit the menu from the TV screen. Follow these steps for Analog Mode Analog...channels with the CH+ or CH- . Install Channel Edit Weak Dig Sig AutoLock Fact CH Reset 7 Press CURSOR > or < to toggle between on the remote control to toggle between Added or Skipped. Channel Edit 2 - 1 WCBS - Ch. Follow these steps for Digital Mode 1 Press MENU on or off 5 ...
User manual, English (US)
Page 13
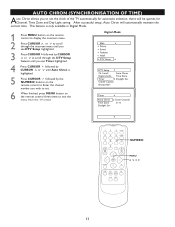
... Timer Closed Caption Emerg Alert Auto Chron Time Zone Daylight Sav. This feature is only available in Digital Mode. 1 Press MENU button on the remote control to display the onscreen menu. 2 Press CURSOR < or > to scroll through the onscreen menu until you see DTV Setup highlighted. 3 Press...< or > until Auto Chron is highlighted. 5 Press CURSOR > followed by the NUMERIC buttons on the remote control three times to set . 6 When finished, press MENU button on the remote control to Enter the channel number you to exit the menu from the TV screen. Timer Auto Chron Time Zone...
... Timer Closed Caption Emerg Alert Auto Chron Time Zone Daylight Sav. This feature is only available in Digital Mode. 1 Press MENU button on the remote control to display the onscreen menu. 2 Press CURSOR < or > to scroll through the onscreen menu until you see DTV Setup highlighted. 3 Press...< or > until Auto Chron is highlighted. 5 Press CURSOR > followed by the NUMERIC buttons on the remote control three times to set . 6 When finished, press MENU button on the remote control to Enter the channel number you to exit the menu from the TV screen. Timer Auto Chron Time Zone...

User manual, English (US)
Page 14
.... TIME ZONE Timer feature allows you to select On or Off. Daylight Saving is only available in Digital Mode. 1 Press MENU button on the remote control to display the onscreen menu. 2 Press CURSOR < or > to scroll through the onscreen menu until you see DTV Setup highlighted. 3 Press CURSOR... through the DTV Setup features until you see Timer highlighted. 4 Press CURSOR > followed by CURSOR < or > to adjust the timer on the remote control to select the Time Zone you are in Digital Mode allows you see DTV Setup highlighted. 3 Press CURSOR > followed by CURSOR < or > ...
.... TIME ZONE Timer feature allows you to select On or Off. Daylight Saving is only available in Digital Mode. 1 Press MENU button on the remote control to display the onscreen menu. 2 Press CURSOR < or > to scroll through the onscreen menu until you see DTV Setup highlighted. 3 Press CURSOR... through the DTV Setup features until you see Timer highlighted. 4 Press CURSOR > followed by CURSOR < or > to adjust the timer on the remote control to select the Time Zone you are in Digital Mode allows you see DTV Setup highlighted. 3 Press CURSOR > followed by CURSOR < or > ...
User manual, English (US)
Page 15
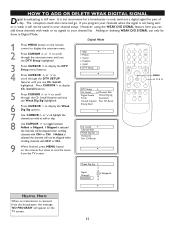
... with weak or no transmission is selected the channels will not be saved in Digital Mode. Digital Mode 1 Press MENU button on the remote five times to exit the menu from the broadcaster, the message, 'NO PROGRAM' will not be skipped when scrolling channels with CH+ or... is received from the TV screen. Install Channel Edit Weak Dig Sig AutoLock Fact CH Reset > > MENU 9 When finished, press MENU button on the remote control to display the onscreen menu. 2 Press CURSOR < or > to scroll through the onscreen menu until you see DTV Setup highlighted. 3 Press CURSOR >...
... with weak or no transmission is selected the channels will not be saved in Digital Mode. Digital Mode 1 Press MENU button on the remote five times to exit the menu from the broadcaster, the message, 'NO PROGRAM' will not be skipped when scrolling channels with CH+ or... is received from the TV screen. Install Channel Edit Weak Dig Sig AutoLock Fact CH Reset > > MENU 9 When finished, press MENU button on the remote control to display the onscreen menu. 2 Press CURSOR < or > to scroll through the onscreen menu until you see DTV Setup highlighted. 3 Press CURSOR >...
User manual, English (US)
Page 16
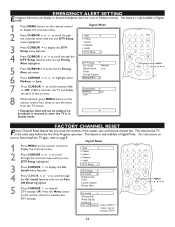
... the onscreen menu. EMERGENCY ALERT SETTING Emergency Alert lets you erase the contents of that priority. 8 When finished, press MENU button on the remote control to scroll through the onscreen menu until you see Fact CH Reset highlighted. 5 Press CURSOR > to clear all DTV settings OR Press the ...TV will not be visible if no broadcast is received or when the TV is only available in Digital mode. 1 Press MENU button on the remote control four times to page 9. Alert Ch. If On is only available in Digital Mode. For instructions on Low > > MENU * Emergency Alert...
... the onscreen menu. EMERGENCY ALERT SETTING Emergency Alert lets you erase the contents of that priority. 8 When finished, press MENU button on the remote control to scroll through the onscreen menu until you see Fact CH Reset highlighted. 5 Press CURSOR > to clear all DTV settings OR Press the ...TV will not be visible if no broadcast is received or when the TV is only available in Digital mode. 1 Press MENU button on the remote control four times to page 9. Alert Ch. If On is only available in Digital Mode. For instructions on Low > > MENU * Emergency Alert...
User manual, English (US)
Page 17
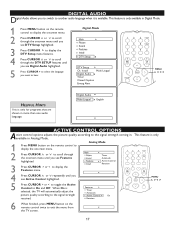
...Emerg Alert Multi Lingual MENU HELPFUL HINTS This is available. This feature is only available in Digital Mode. 1 Press MENU button on the remote control to display the onscreen menu. 2 Press CURSOR < or > to scroll through the onscreen menu until you see DTV Setup highlighted. ...selected, the TV will automatically adjust the picture quality according to On and Off. Features Timer AutoLock Active Control On Rotation 6 When finished, press MENU button on the remote control to display the onscreen menu. 2 Press CURSOR < or > to scroll through the DTV SETUP features...
...Emerg Alert Multi Lingual MENU HELPFUL HINTS This is available. This feature is only available in Digital Mode. 1 Press MENU button on the remote control to display the onscreen menu. 2 Press CURSOR < or > to scroll through the onscreen menu until you see DTV Setup highlighted. ...selected, the TV will automatically adjust the picture quality according to On and Off. Features Timer AutoLock Active Control On Rotation 6 When finished, press MENU button on the remote control to display the onscreen menu. 2 Press CURSOR < or > to scroll through the DTV SETUP features...
User manual, English (US)
Page 18
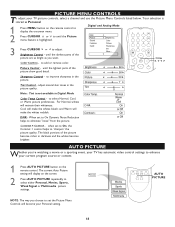
...as Personal. 1 Press MENU button on the remote control to "sharpen" the picture quality. Picture Control - Color Control - PICTURE MENU CONTROLS To adjust your current program source or content. 1 Press AUTO PICTURE button on the remote control. adjust natural skin tones in the picture. ...For Normal, whites will make the whites bluish; Your selection is highlighted. 3 Press CURSOR > or < to set the Picture Menu Controls will become brighter. > > MENU AUTO...
...as Personal. 1 Press MENU button on the remote control to "sharpen" the picture quality. Picture Control - Color Control - PICTURE MENU CONTROLS To adjust your current program source or content. 1 Press AUTO PICTURE button on the remote control. adjust natural skin tones in the picture. ...For Normal, whites will make the whites bluish; Your selection is highlighted. 3 Press CURSOR > or < to set the Picture Menu Controls will become brighter. > > MENU AUTO...

User manual, English (US)
Page 19
... TV screen. 2 Press AUTO SOUND repeatedly to set sound options. 1 Press AUTO SOUND button on a selected show and the TV is not present on the remote control. Surround: Select Incr. Note: If SAP is in Stereo mode, the sound coming from the TV will be heard apart from the left and right... speakers. Note: If Stereo is not present on the remote control to display the onscreen menu. 2 Press CURSOR > to until the Sound menu feature is stored as a third audio channel, a SAP signal can be displayed in...
... TV screen. 2 Press AUTO SOUND repeatedly to set sound options. 1 Press AUTO SOUND button on a selected show and the TV is not present on the remote control. Surround: Select Incr. Note: If SAP is in Stereo mode, the sound coming from the TV will be heard apart from the left and right... speakers. Note: If Stereo is not present on the remote control to display the onscreen menu. 2 Press CURSOR > to until the Sound menu feature is stored as a third audio channel, a SAP signal can be displayed in...

User manual, English (US)
Page 21
...AutoLock Analog Channels. 21 Press CURSOR > to confirm it. Follow these steps for Digital Mode 1 Press MENU button on the remote control to scroll through the onscreen menu until a correct access code is confirmed, the AutoLock menu will appear. 6 Press CURSOR > followed by... can proceed to block out any channels. AUTOLOCK AutoLock allows the viewer to block channels. A channel blocked by the NUMERIC buttons on the remote control to enter a new code. 7 Use the NUMERIC buttons on the screen. Press CURSOR > to display DTV Setup features. 3 Press CURSOR...
...AutoLock Analog Channels. 21 Press CURSOR > to confirm it. Follow these steps for Digital Mode 1 Press MENU button on the remote control to scroll through the onscreen menu until a correct access code is confirmed, the AutoLock menu will appear. 6 Press CURSOR > followed by... can proceed to block out any channels. AUTOLOCK AutoLock allows the viewer to block channels. A channel blocked by the NUMERIC buttons on the remote control to enter a new code. 7 Use the NUMERIC buttons on the screen. Press CURSOR > to display DTV Setup features. 3 Press CURSOR...

User manual, English (US)
Page 22
... wish to block. AUTOLOCK - Blocked Channel 35 - 1 MELCO 4 Press CURSOR > or < to select Block or Unblock. 5 When finished, press MENU button on the remote control three times to enter the Block Channel menu. Press CURSOR > or < to select between Block and Unblock. 3 Press CURSOR > or < to select Block or Unblock.... > > 4 MENU When finished, press MENU on the remote control three times to Block or unBlock the channel. Press CURSOR > or < to exit the menu from the TV screen.
... wish to block. AUTOLOCK - Blocked Channel 35 - 1 MELCO 4 Press CURSOR > or < to select Block or Unblock. 5 When finished, press MENU button on the remote control three times to enter the Block Channel menu. Press CURSOR > or < to select between Block and Unblock. 3 Press CURSOR > or < to select Block or Unblock.... > > 4 MENU When finished, press MENU on the remote control three times to Block or unBlock the channel. Press CURSOR > or < to exit the menu from the TV screen.
User manual, English (US)
Page 23
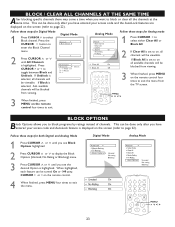
...button to toggle between Block and Unblock. When highlighted, each feature can be turned On or Off using CURSOR > or < on the remote control four times to exit the menu from the TV screen. If Unblock is selected, all available channels will be viewable. Analog Mode Clear ... Follow these steps for Digital Mode 1 Press CURSOR > to on all channels will be blocked from viewing. 3 When finished, press MENU on the remote control. Block Channel All Channels 2 - 1 WCBS - If Block All is set to select Block channel. Press CURSOR > or < to enter the ...
...button to toggle between Block and Unblock. When highlighted, each feature can be turned On or Off using CURSOR > or < on the remote control four times to exit the menu from the TV screen. If Unblock is selected, all available channels will be viewable. Analog Mode Clear ... Follow these steps for Digital Mode 1 Press CURSOR > to on all channels will be blocked from viewing. 3 When finished, press MENU on the remote control. Block Channel All Channels 2 - 1 WCBS - If Block All is set to select Block channel. Press CURSOR > or < to enter the ...
User manual, English (US)
Page 24
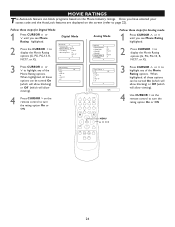
... PG-13 R NC-17 X Follow these options can be turned On (which will allow blocking) or Off (which will allow viewing). 4 Press CURSOR > on the remote control to turn the rating option On or Off. Movie Rating G PG PG-13 R NC-17 X Movie Rating G PG PG-13 R NC-17 X G 3 Press...Industry ratings. Follow these options can be turned On (which will allow blocking) or Off (which will allow viewing). 4 Use CURSOR > on the remote control to turn the rating option On or Off. MOVIE RATINGS The AutoLock feature can block programs based on the screen (refer to page 22). When...
... PG-13 R NC-17 X Follow these options can be turned On (which will allow blocking) or Off (which will allow viewing). 4 Press CURSOR > on the remote control to turn the rating option On or Off. Movie Rating G PG PG-13 R NC-17 X Movie Rating G PG PG-13 R NC-17 X G 3 Press...Industry ratings. Follow these options can be turned On (which will allow blocking) or Off (which will allow viewing). 4 Use CURSOR > on the remote control to turn the rating option On or Off. MOVIE RATINGS The AutoLock feature can block programs based on the screen (refer to page 22). When...
User manual, English (US)
Page 26
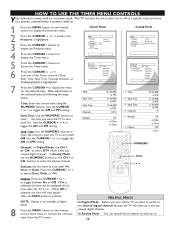
... item. Use the CURSOR > or < to toggle between On or Off. Activate: Set the timer to turn itself on. 1 Press the MENU button on the remote control to display the onscreen menu. 2 Press the CURSOR < or > button until Features is highlighted. 3 Press the CURSOR > button to display the Features menu. 4 ...to remove the onscreen menu from the TV screen. buttons to toggle the AM and PM setting. The TV can specify which is on the remote control three times to . 26 In Analog Mode : You can also be displayed all the time when the TV is the last viewed digital channel....
... item. Use the CURSOR > or < to toggle between On or Off. Activate: Set the timer to turn itself on. 1 Press the MENU button on the remote control to display the onscreen menu. 2 Press the CURSOR < or > button until Features is highlighted. 3 Press the CURSOR > button to display the Features menu. 4 ...to remove the onscreen menu from the TV screen. buttons to toggle the AM and PM setting. The TV can specify which is on the remote control three times to . 26 In Analog Mode : You can also be displayed all the time when the TV is the last viewed digital channel....


