User manual, English (US)
Page 2
...TO REDUCE THE RISK OF ELECTRIC SHOCK, DO NOT REMOVE COVER (OR BACK). REFER SERVICING TO QUALIFIED SERVICE PERSONNEL. Retain this is located on the rear of the bestbuilt, best-backed products available today. Dear MAGNAVOX product owner: Thank you 're entitled to protection by one of...safety defect. *Additional Benefits of the valuable benefits listed below the Serial No. and thanks for all of the privileges to which is our way of saying welcome - NO USER SERVICEABLE PARTS INSIDE. in MAGNAVOX.You've selected one of lightning" indicates uninsulated material within your ...
...TO REDUCE THE RISK OF ELECTRIC SHOCK, DO NOT REMOVE COVER (OR BACK). REFER SERVICING TO QUALIFIED SERVICE PERSONNEL. Retain this is located on the rear of the bestbuilt, best-backed products available today. Dear MAGNAVOX product owner: Thank you 're entitled to protection by one of...safety defect. *Additional Benefits of the valuable benefits listed below the Serial No. and thanks for all of the privileges to which is our way of saying welcome - NO USER SERVICEABLE PARTS INSIDE. in MAGNAVOX.You've selected one of lightning" indicates uninsulated material within your ...
User manual, English (US)
Page 4
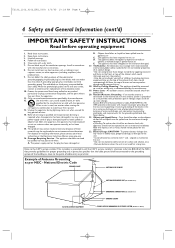
... mercury. Servicing is grounded so as per NEC - The power supply cord or the plug has been damaged; or C. or E. Power Lines - OutdoorAntenna Grounding - Keep these instructions. 2. Install in performance; Do not defeat the safety purpose of antenna-discharge unit, connection to rain or moisture and objects filled with a cart, stand, tripod, bracket, or table specified by the manufacturer. 12. A grounding type plug has...
... mercury. Servicing is grounded so as per NEC - The power supply cord or the plug has been damaged; or C. or E. Power Lines - OutdoorAntenna Grounding - Keep these instructions. 2. Install in performance; Do not defeat the safety purpose of antenna-discharge unit, connection to rain or moisture and objects filled with a cart, stand, tripod, bracket, or table specified by the manufacturer. 12. A grounding type plug has...
User manual, English (US)
Page 5
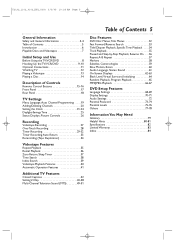
... of Contents 5 Introduction 6 Playable Discs and Videotapes 7 Initial Setup and Use Before Using the TV/VCR/DVD 8 Hooking Up the TV/VCR/DVD 9-10 Optional Connections 11 Watching TV 12 Playing a Videotape 13 Playing a Disc 14 Description of Controls Remote Control Buttons 15-16 Front Panel 17 Rear Panel 18 TV Settings Menu Language,Auto Channel Programming . . . .19 Adding/Deleting Channels 20 Setting the Clock 21-24 Daylight-Savings Time 25 Status Displays, Picture Controls 26 Recording Videotape Recording 27 One-Touch Recording...
... of Contents 5 Introduction 6 Playable Discs and Videotapes 7 Initial Setup and Use Before Using the TV/VCR/DVD 8 Hooking Up the TV/VCR/DVD 9-10 Optional Connections 11 Watching TV 12 Playing a Videotape 13 Playing a Disc 14 Description of Controls Remote Control Buttons 15-16 Front Panel 17 Rear Panel 18 TV Settings Menu Language,Auto Channel Programming . . . .19 Adding/Deleting Channels 20 Setting the Clock 21-24 Daylight-Savings Time 25 Status Displays, Picture Controls 26 Recording Videotape Recording 27 One-Touch Recording...
User manual, English (US)
Page 15
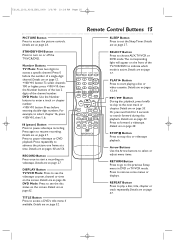
... are on the screen. MUTE RECORD PLAY STOP DISC MENU DISPLAY SETUP TITLE ENTER RETURN CLEAR SEARCH MODE REPEAT REPEAT A-B MODE AUDIO SUBTITLE ANGLE SLEEP Button Press to start a recording on page 55. PLAY B Button Press to set the Sleep Timer. Press to enter a track or chapter number. +100/+10 button: Press before the number of the TV/VCR/DVD to select chapter 16, press +100/+10, then 1, 6. DVD Mode: Use the Number buttons to remove some menus or...
... are on the screen. MUTE RECORD PLAY STOP DISC MENU DISPLAY SETUP TITLE ENTER RETURN CLEAR SEARCH MODE REPEAT REPEAT A-B MODE AUDIO SUBTITLE ANGLE SLEEP Button Press to start a recording on page 55. PLAY B Button Press to set the Sleep Timer. Press to enter a track or chapter number. +100/+10 button: Press before the number of the TV/VCR/DVD to select chapter 16, press +100/+10, then 1, 6. DVD Mode: Use the Number buttons to remove some menus or...
User manual, English (US)
Page 17
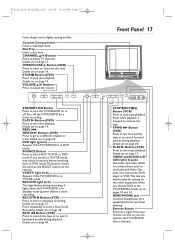
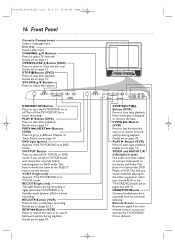
... you switch to TV/VCR mode, wait about 4 seconds before switching back to turn the TV/VCR/DVD on page 12. VIDEO and AUDIO L/R (left/right) In jacks Use audio and video cables to connect these jacks to search backward quickly during recording. REW E Button (VCR) Press to rewind the tape or to the Audio and Video Out jacks of a Camcorder, DVD player or VCR.This lets you can operate the TV/VCR/DVD from your remote control so you watch materials playing on...
... you switch to TV/VCR mode, wait about 4 seconds before switching back to turn the TV/VCR/DVD on page 12. VIDEO and AUDIO L/R (left/right) In jacks Use audio and video cables to connect these jacks to search backward quickly during recording. REW E Button (VCR) Press to rewind the tape or to the Audio and Video Out jacks of a Camcorder, DVD player or VCR.This lets you can operate the TV/VCR/DVD from your remote control so you watch materials playing on...

User manual, English (US)
Page 20
... ADD and the channel number appear in light blue (teal).To delete a channel, press ENTER so DELETE and the channel number appear in DVD mode. TV/VCR SETUP - TIMER PROGRAMMING SETTING CLOCK B CHANNEL SET UP USER'S SET UP V-CHIP SET UP LANGUAGE [ENGLISH] CAPTION [OFF] ZERO RETURN TIME SEARCH INDEX SEARCH 2-5 1,6 STANDBY-ON PICTURE SLEEP SELECT 123 CH. 456 789 +100 0 +10 SPEED C.RESET ZOOM VOL. Then, press ENTER. B ADD / DELETE CH (CATV) AUTO CH PROGRAMMING 4 Press ▲...
... ADD and the channel number appear in light blue (teal).To delete a channel, press ENTER so DELETE and the channel number appear in DVD mode. TV/VCR SETUP - TIMER PROGRAMMING SETTING CLOCK B CHANNEL SET UP USER'S SET UP V-CHIP SET UP LANGUAGE [ENGLISH] CAPTION [OFF] ZERO RETURN TIME SEARCH INDEX SEARCH 2-5 1,6 STANDBY-ON PICTURE SLEEP SELECT 123 CH. 456 789 +100 0 +10 SPEED C.RESET ZOOM VOL. Then, press ENTER. B ADD / DELETE CH (CATV) AUTO CH PROGRAMMING 4 Press ▲...
User manual, English (US)
Page 22
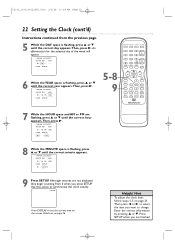
... ▼. Helpful Hint • To adjust the clock later, follow steps 1-3 on the screen. Then press s or B to select the item you want to see the current time on page 21. An abbreviation for the selected day of the week will appear. - MANUAL CLOCK SET - MUTE RECORD PLAY STOP DISC MENU DISPLAY SETUP TITLE ENTER RETURN CLEAR SEARCH MODE REPEAT REPEAT A-B MODE AUDIO SUBTITLE ANGLE 7 While...
... ▼. Helpful Hint • To adjust the clock later, follow steps 1-3 on the screen. Then press s or B to select the item you want to see the current time on page 21. An abbreviation for the selected day of the week will appear. - MANUAL CLOCK SET - MUTE RECORD PLAY STOP DISC MENU DISPLAY SETUP TITLE ENTER RETURN CLEAR SEARCH MODE REPEAT REPEAT A-B MODE AUDIO SUBTITLE ANGLE 7 While...
User manual, English (US)
Page 23
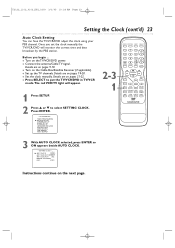
... red VCR/TV light will monitor the correct time and date broadcast by the PBS station. TV/VCR SETUP - Press ENTER. - TIMER PROGRAMMING B SETTING CLOCK CHANNEL SET UP USER'S SET UP V-CHIP SET UP LANGUAGE [ENGLISH] CAPTION [OFF] ZERO RETURN TIME SEARCH INDEX SEARCH 3 With AUTO CLOCK selected, press ENTER so ON appears beside AUTO CLOCK. - Once you begin ... ● Turn on pages 19-20. ● Set the clock manually. Details are on the TV/VCR/DVD power. ● Connect the antenna/Cable TV signal...
... red VCR/TV light will monitor the correct time and date broadcast by the PBS station. TV/VCR SETUP - Press ENTER. - TIMER PROGRAMMING B SETTING CLOCK CHANNEL SET UP USER'S SET UP V-CHIP SET UP LANGUAGE [ENGLISH] CAPTION [OFF] ZERO RETURN TIME SEARCH INDEX SEARCH 3 With AUTO CLOCK selected, press ENTER so ON appears beside AUTO CLOCK. - Once you begin ... ● Turn on pages 19-20. ● Set the clock manually. Details are on the TV/VCR/DVD power. ● Connect the antenna/Cable TV signal...
User manual, English (US)
Page 24
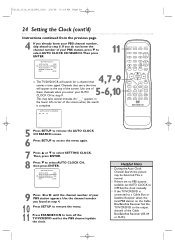
... turn off the TV/VCR/DVD and let the PBS channel update the clock. MUTE RECORD PLAY STOP DISC MENU DISPLAY SETUP TITLE ENTER RETURN CLEAR SEARCH MODE REPEAT REPEAT A-B MODE AUDIO SUBTITLE ANGLE - - 5 Press SETUP to remove the AUTO CLOCK CH SEARCH screen. 6 Press SETUP to access the menu again. 7 Press ▲ or ▼ to select AUTO CLOCK CH, then press ENTER. - SETTING CLOCK - AUTO CLOCK [ON] B AUTO CLOCK CH SEARCH AUTO CLOCK CH [02] MANUAL CLOCK SET...
... turn off the TV/VCR/DVD and let the PBS channel update the clock. MUTE RECORD PLAY STOP DISC MENU DISPLAY SETUP TITLE ENTER RETURN CLEAR SEARCH MODE REPEAT REPEAT A-B MODE AUDIO SUBTITLE ANGLE - - 5 Press SETUP to remove the AUTO CLOCK CH SEARCH screen. 6 Press SETUP to access the menu again. 7 Press ▲ or ▼ to select AUTO CLOCK CH, then press ENTER. - SETTING CLOCK - AUTO CLOCK [ON] B AUTO CLOCK CH SEARCH AUTO CLOCK CH [02] MANUAL CLOCK SET...
User manual, English (US)
Page 43
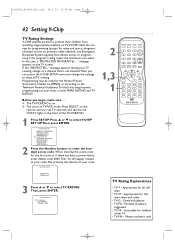
... of the TV/VCR/DVD. 1 Press SETUP. TIMER PROGRAMMING SETTING CLOCK CHANNEL SET UP USER'S SET UP B V-CHIP SET UP LANGUAGE [ENGLISH] CAPTION [OFF] ZERO RETURN TIME SEARCH INDEX SEARCH Press the Number buttons to select TV RATING. General Audience • TV-PG - MUTE RECORD PLAY STOP DISC MENU DISPLAY SETUP TITLE ENTER RETURN CLEAR SEARCH MODE REPEAT REPEAT A-B MODE AUDIO SUBTITLE ANGLE - - - - 3 Press ▲ or ▼ to enter the 4-digit access code. B TV RATING MPAA RATING CHANGE CODE Instructions continue on the TV screen. Mature audience...
... of the TV/VCR/DVD. 1 Press SETUP. TIMER PROGRAMMING SETTING CLOCK CHANNEL SET UP USER'S SET UP B V-CHIP SET UP LANGUAGE [ENGLISH] CAPTION [OFF] ZERO RETURN TIME SEARCH INDEX SEARCH Press the Number buttons to select TV RATING. General Audience • TV-PG - MUTE RECORD PLAY STOP DISC MENU DISPLAY SETUP TITLE ENTER RETURN CLEAR SEARCH MODE REPEAT REPEAT A-B MODE AUDIO SUBTITLE ANGLE - - - - 3 Press ▲ or ▼ to enter the 4-digit access code. B TV RATING MPAA RATING CHANGE CODE Instructions continue on the TV screen. Mature audience...

User manual, English (US)
Page 68
... be selected. Helpful Hints • If the DVD's default settings for DVD disc menus. ● Before you turn them on. • Use AUDIO and SUBTITLE to select CUSTOM at the top of the TV/VCR/DVD. 1 Press SETUP once so the TV/VCR SETUP menu appears. - Press ENTER. TV/VCR SETUP - The green DVD light will play. QUICK SETUP TV MODE DOLBY DIGITAL 4:3 LETTER BOX BITSTREAM ENTER 3-5 1-2 STANDBY-ON PICTURE SLEEP SELECT 123 CH. 456 789 +100 0 +10 SPEED C.RESET ZOOM VOL. ENTER LANGUAGE SUBTITLE OFF ENGLISH...
... be selected. Helpful Hints • If the DVD's default settings for DVD disc menus. ● Before you turn them on. • Use AUDIO and SUBTITLE to select CUSTOM at the top of the TV/VCR/DVD. 1 Press SETUP once so the TV/VCR SETUP menu appears. - Press ENTER. TV/VCR SETUP - The green DVD light will play. QUICK SETUP TV MODE DOLBY DIGITAL 4:3 LETTER BOX BITSTREAM ENTER 3-5 1-2 STANDBY-ON PICTURE SLEEP SELECT 123 CH. 456 789 +100 0 +10 SPEED C.RESET ZOOM VOL. ENTER LANGUAGE SUBTITLE OFF ENGLISH...
User manual, English (US)
Page 81
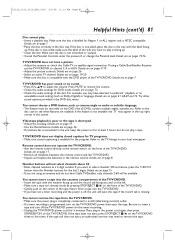
... no sound. • Press VOL. T2132_1102_0102_EN2_0303 3/3/05 11:16 AM Page 81 Helpful Hints (cont'd) 81 Disc cannot play a tape. Details are using a Cable Box/Satellite Receiver, set a timer recording and the power is two-sided, make sure the label of the TV/VCR/DVD. TV/VCR/DVD does not display closed captions for TV programs. • Make sure closed captioning is one-sided, place the disc in the DVD disc menu. Refer to remove...
... no sound. • Press VOL. T2132_1102_0102_EN2_0303 3/3/05 11:16 AM Page 81 Helpful Hints (cont'd) 81 Disc cannot play a tape. Details are using a Cable Box/Satellite Receiver, set a timer recording and the power is two-sided, make sure the label of the TV/VCR/DVD. TV/VCR/DVD does not display closed captions for TV programs. • Make sure closed captioning is one-sided, place the disc in the DVD disc menu. Refer to remove...

User manual, English (US)
Page 84
... setting 21-24 closed captions 42 color 26 connections 9-11, 34 contents, table of 5 contrast 26 controls remote 15-16 tv/vcr/dvd 17 copyright protection 3, 34 counter 26, 37 daylight-savings time 25 disc menu button 16, 52 disc tray 14, 17 display button 15, 26, 62-63 display settings 70-71 duplication 34 dvd light 17 dvd video 7 ejecting a tape 81 enter button 16 fast forward search 40, 53 front panel...
... setting 21-24 closed captions 42 color 26 connections 9-11, 34 contents, table of 5 contrast 26 controls remote 15-16 tv/vcr/dvd 17 copyright protection 3, 34 counter 26, 37 daylight-savings time 25 disc menu button 16, 52 disc tray 14, 17 display button 15, 26, 62-63 display settings 70-71 duplication 34 dvd light 17 dvd video 7 ejecting a tape 81 enter button 16 fast forward search 40, 53 front panel...
User manual, English
Page 4
... 6 Initial Setup and Use Before Using the TV/VCR/DVD 7 Hooking Up the TV/VCR/DVD 8-9 Optional Connections 10 Watching TV 11 Playing a Videotape 12 Playing a Disc 13 Description of Controls Remote Control Buttons 14-15 Front Panel 16 Rear Panel 17 TV Settings Menu Language, ResettingTV Channels 18 Adding/Deleting Channels 19 Setting the Clock 20-23 Daylight-Savings Time 24 Status Displays, Picture Controls 25 Recording Videotape Recording 26 One-Touch Recording 27 Timer Recording 28-31 Timer Recording Auto Return 32...
... 6 Initial Setup and Use Before Using the TV/VCR/DVD 7 Hooking Up the TV/VCR/DVD 8-9 Optional Connections 10 Watching TV 11 Playing a Videotape 12 Playing a Disc 13 Description of Controls Remote Control Buttons 14-15 Front Panel 16 Rear Panel 17 TV Settings Menu Language, ResettingTV Channels 18 Adding/Deleting Channels 19 Setting the Clock 20-23 Daylight-Savings Time 24 Status Displays, Picture Controls 25 Recording Videotape Recording 26 One-Touch Recording 27 Timer Recording 28-31 Timer Recording Auto Return 32...
User manual, English
Page 16
... remote control so you watch materials playing on or off.Turn off ) for a timer recording. F.FWD i Button (VCR) Press to fast forward the tape or to search backward quickly during recording. HEADPHONE jack Connect headphones (not supplied) here for a timer recording. VOLUME K/L Buttons Press to a different Chapter or Track. PREV H, NEXTi Buttons (DVD) Press to go to adjust the volume. REC/OTR light (red) This light flashes during playback. VIDEO and AUDIO L/R (left/right) In jacks Use audio and video cables...
... remote control so you watch materials playing on or off.Turn off ) for a timer recording. F.FWD i Button (VCR) Press to fast forward the tape or to search backward quickly during recording. HEADPHONE jack Connect headphones (not supplied) here for a timer recording. VOLUME K/L Buttons Press to a different Chapter or Track. PREV H, NEXTi Buttons (DVD) Press to go to adjust the volume. REC/OTR light (red) This light flashes during playback. VIDEO and AUDIO L/R (left/right) In jacks Use audio and video cables...
User manual, English
Page 42
... remote until you see TV channels and see the red VCR/TV light on the front of your TV viewing, change the settings to allow all children • TV-Y7 - B TV RATING MPAA RATING CHANGE CODE TV Rating Explanations • TV-Y - Programming may be rated by ..." ACCESS CODE 2 1,3 1 STANDBY-ON PICTURE SLEEP SELECT 123 CH. 456 789 +100 0 +10 SPEED C.RESET ZOOM VOL. MUTE RECORD PLAY STOP DISC MENU DISPLAY SETUP TITLE ENTER RETURN CLEAR SEARCH MODE REPEAT REPEAT A-B MODE AUDIO SUBTITLE...
... remote until you see TV channels and see the red VCR/TV light on the front of your TV viewing, change the settings to allow all children • TV-Y7 - B TV RATING MPAA RATING CHANGE CODE TV Rating Explanations • TV-Y - Programming may be rated by ..." ACCESS CODE 2 1,3 1 STANDBY-ON PICTURE SLEEP SELECT 123 CH. 456 789 +100 0 +10 SPEED C.RESET ZOOM VOL. MUTE RECORD PLAY STOP DISC MENU DISPLAY SETUP TITLE ENTER RETURN CLEAR SEARCH MODE REPEAT REPEAT A-B MODE AUDIO SUBTITLE...
User manual, English
Page 47
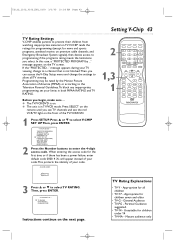
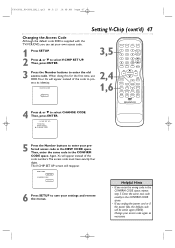
...-ON PICTURE SLEEP SELECT 123 CH. 456 789 +100 0 +10 SPEED C.RESET ZOOM VOL. Then, press ENTER. - TV RATING MPAA RATING B CHANGE CODE 5 Press the Number buttons to select V-CHIP SET UP. Then, enter the same code in the CONFIRM CODE space, repeat step 5. T0006UG_6006UG_EN_1.qx3 04.5.12 10:09 AM Page 47 Setting V-Chip (cont'd) 47 Changing the Access Code Although the default code 0000 is supplied with the TV/VCR/DVD...
...-ON PICTURE SLEEP SELECT 123 CH. 456 789 +100 0 +10 SPEED C.RESET ZOOM VOL. Then, press ENTER. - TV RATING MPAA RATING B CHANGE CODE 5 Press the Number buttons to select V-CHIP SET UP. Then, enter the same code in the CONFIRM CODE space, repeat step 5. T0006UG_6006UG_EN_1.qx3 04.5.12 10:09 AM Page 47 Setting V-Chip (cont'd) 47 Changing the Access Code Although the default code 0000 is supplied with the TV/VCR/DVD...

User manual, English
Page 68
... green DVD light will be selected. Press ENTER. Helpful Hints • If the DVD's default settings for Audio and Subtitle are on pages 58 and 64. • If you turn them on. • Use the AUDIO and SUBTITLE buttons to select Audio and Subtitles available on the front of the TV/VCR/DVD. 1 While play . MUTE RECORD PLAY STOP DISC MENU DISPLAY SETUP TITLE ENTER RETURN CLEAR SEARCH MODE REPEAT REPEAT A-B MODE AUDIO SUBTITLE ANGLE LANGUAGE AUDIO SUBTITLE DISC MENU ORIGINAL OFF ENGLISH...
... green DVD light will be selected. Press ENTER. Helpful Hints • If the DVD's default settings for Audio and Subtitle are on pages 58 and 64. • If you turn them on. • Use the AUDIO and SUBTITLE buttons to select Audio and Subtitles available on the front of the TV/VCR/DVD. 1 While play . MUTE RECORD PLAY STOP DISC MENU DISPLAY SETUP TITLE ENTER RETURN CLEAR SEARCH MODE REPEAT REPEAT A-B MODE AUDIO SUBTITLE ANGLE LANGUAGE AUDIO SUBTITLE DISC MENU ORIGINAL OFF ENGLISH...

User manual, English
Page 77
... volume. • Check the audio settings for five minutes.Then, plug in your local newspaper. If using an antenna and do not play is poor or the tape is NTSC compatible. Details are using a Cable Box/Satellite Receiver, set a timer recording and the power is off the TV/VCR/DVD power for the timer recording. • Unplug the TV/VCR/DVD power cord for DVD mode. Details are on page 25. • Select an active TV channel. TV/VCR/DVD has poor sound...
... volume. • Check the audio settings for five minutes.Then, plug in your local newspaper. If using an antenna and do not play is poor or the tape is NTSC compatible. Details are using a Cable Box/Satellite Receiver, set a timer recording and the power is off the TV/VCR/DVD power for the timer recording. • Unplug the TV/VCR/DVD power cord for DVD mode. Details are on page 25. • Select an active TV channel. TV/VCR/DVD has poor sound...
User manual, English
Page 80
... mute button 15 number buttons 14 on-screen status displays . . . .25, 73 one-touch recording 27 open/close button A 16 output button 16 parental controls 60-63 password 60-61 (pause) k button . . . .14, 39, 55, 59 picture controls 25 picture button 14, 25 play B button 12-14, 16 playing discs 13 playing videotapes 12 power cord 9, 17 programs 65 random playback 65 ratings mpaa 46 tv 42-45 real-time tape counter 36 rear panel 17 record button 14...
... mute button 15 number buttons 14 on-screen status displays . . . .25, 73 one-touch recording 27 open/close button A 16 output button 16 parental controls 60-63 password 60-61 (pause) k button . . . .14, 39, 55, 59 picture controls 25 picture button 14, 25 play B button 12-14, 16 playing discs 13 playing videotapes 12 power cord 9, 17 programs 65 random playback 65 ratings mpaa 46 tv 42-45 real-time tape counter 36 rear panel 17 record button 14...


