User manual, English (US)
Page 6
... for the disc features while the unit is not available. Some instructions explain how to select the TV/VCR SETUP menu. Press SETUP once to use the TV/VCR/DVD to access a feature that feature. This manual describes the 27MDTR20, 20MC4304 and 19MDTR20.These three models are available only if playback is illustrated in size and design...
... for the disc features while the unit is not available. Some instructions explain how to select the TV/VCR SETUP menu. Press SETUP once to use the TV/VCR/DVD to access a feature that feature. This manual describes the 27MDTR20, 20MC4304 and 19MDTR20.These three models are available only if playback is illustrated in size and design...
User manual, English (US)
Page 8
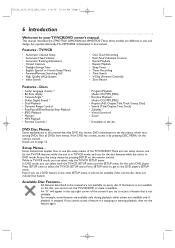
... remote control and the TV/VCR/DVD. Removable labels can jam the TV/VCR/DVD. ● The TV/VCR/DVD requires periodic maintenance to maintain its packaging and this manual contain materials that may result in the TV/VCR/DVD. Only an authorized service center should be disposed of the TV/VCR/DVD. T2132_1102_0102_EN1_0303 3/3/05 10:18 AM Page 8 8 Before Using the TV/VCR/DVD Remote Control Battery Installation...
... remote control and the TV/VCR/DVD. Removable labels can jam the TV/VCR/DVD. ● The TV/VCR/DVD requires periodic maintenance to maintain its packaging and this manual contain materials that may result in the TV/VCR/DVD. Only an authorized service center should be disposed of the TV/VCR/DVD. T2132_1102_0102_EN1_0303 3/3/05 10:18 AM Page 8 8 Before Using the TV/VCR/DVD Remote Control Battery Installation...
User manual, English (US)
Page 11
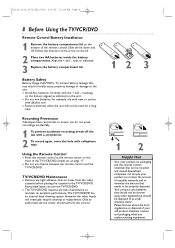
... for a Receiver that has a Digital Coaxial In jack. Details are on the TV/VCR/DVD. Details are on pages 9-10. 2 Connect a digital audio coaxial cable (not supplied) to hear the TV/VCR/DVD sound through the Stereo instead. Use these connections for a Dolby Digital-compatible Stereo ...or for a Dolby Digital logo on TV/VCR/DVD ANT. T2132_1102_0102_EN1_0303 3/3/05 10:18 AM Page 11 Digital Stereo Hookups You can connect the TV/VCR/DVD to the Stereo owner's manual. Optional...
... for a Receiver that has a Digital Coaxial In jack. Details are on the TV/VCR/DVD. Details are on pages 9-10. 2 Connect a digital audio coaxial cable (not supplied) to hear the TV/VCR/DVD sound through the Stereo instead. Use these connections for a Dolby Digital-compatible Stereo ...or for a Dolby Digital logo on TV/VCR/DVD ANT. T2132_1102_0102_EN1_0303 3/3/05 10:18 AM Page 11 Digital Stereo Hookups You can connect the TV/VCR/DVD to the Stereo owner's manual. Optional...
User manual, English (US)
Page 21
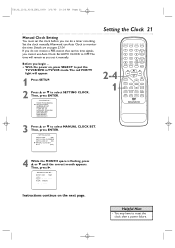
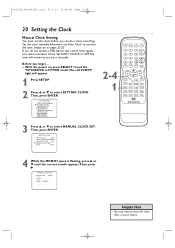
Set the clock manually. If you cannot use Auto Clock to select SETTING CLOCK. Before you begin ... ● With the power on, press SELECT to put the TV/VCR/DVD in TV/VCR mode.The red VCR/TV light will remain as you set the clock before you can do not receive a PBS station that ...carries time signals, you do a timer recording. AUTO CLOCK [ON] AUTO CLOCK CH SEARCH AUTO CLOCK CH [02] B MANUAL CLOCK SET D.S.T. [OFF] 4...
Set the clock manually. If you cannot use Auto Clock to select SETTING CLOCK. Before you begin ... ● With the power on, press SELECT to put the TV/VCR/DVD in TV/VCR mode.The red VCR/TV light will remain as you set the clock before you can do not receive a PBS station that ...carries time signals, you do a timer recording. AUTO CLOCK [ON] AUTO CLOCK CH SEARCH AUTO CLOCK CH [02] B MANUAL CLOCK SET D.S.T. [OFF] 4...
User manual, English (US)
Page 22
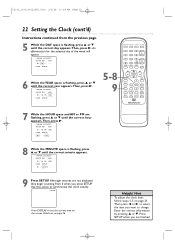
...YEAR 05 / 06 HOUR MINUTE -- : -- -- 6 While the YEAR space is flashing, press ▲ or ▼ until the correct hour appears.Then, press B. - MANUAL CLOCK SET - MONTH DAY YEAR 05 / 06 FRI 2005 HOUR MINUTE -- : -- -- 5-8 9 STANDBY-ON PICTURE SLEEP SELECT 123 CH. 456 789 +100 0 +10...you press SETUP. PM 8 While the MINUTE space is flashing, press ▲ or ▼ until the correct year appears.Then, press B. - MANUAL CLOCK SET - Enter the correct information by pressing ▲ or ▼. Details are not displayed, they begin counting from the previous page. 5 ...
...YEAR 05 / 06 HOUR MINUTE -- : -- -- 6 While the YEAR space is flashing, press ▲ or ▼ until the correct hour appears.Then, press B. - MANUAL CLOCK SET - MONTH DAY YEAR 05 / 06 FRI 2005 HOUR MINUTE -- : -- -- 5-8 9 STANDBY-ON PICTURE SLEEP SELECT 123 CH. 456 789 +100 0 +10...you press SETUP. PM 8 While the MINUTE space is flashing, press ▲ or ▼ until the correct year appears.Then, press B. - MANUAL CLOCK SET - Enter the correct information by pressing ▲ or ▼. Details are not displayed, they begin counting from the previous page. 5 ...
User manual, English (US)
Page 23
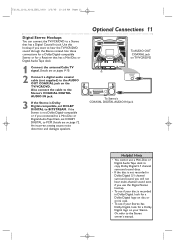
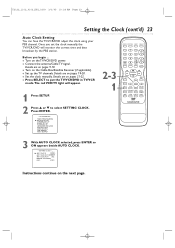
... are on pages 9-10. ● Turn on pages 21-22. ● Press SELECT to select SETTING CLOCK. TV/VCR SETUP - Before you set the clock manually, the TV/VCR/DVD will appear. 1 Press SETUP. 2-3 1 STANDBY-ON PICTURE SLEEP SELECT 123 CH. 456 789 +100 0 +10 SPEED C.RESET ZOOM ...AUTO CLOCK. - B AUTO CLOCK [ON] AUTO CLOCK CH SEARCH AUTO CLOCK CH [02] MANUAL CLOCK SET D.S.T. [OFF] Instructions continue on the TV/VCR/DVD power. ● Connect the antenna/Cable TV signal. MUTE RECORD PLAY STOP DISC MENU DISPLAY SETUP TITLE ENTER RETURN CLEAR SEARCH MODE REPEAT ...
... are on pages 9-10. ● Turn on pages 21-22. ● Press SELECT to select SETTING CLOCK. TV/VCR SETUP - Before you set the clock manually, the TV/VCR/DVD will appear. 1 Press SETUP. 2-3 1 STANDBY-ON PICTURE SLEEP SELECT 123 CH. 456 789 +100 0 +10 SPEED C.RESET ZOOM ...AUTO CLOCK. - B AUTO CLOCK [ON] AUTO CLOCK CH SEARCH AUTO CLOCK CH [02] MANUAL CLOCK SET D.S.T. [OFF] Instructions continue on the TV/VCR/DVD power. ● Connect the antenna/Cable TV signal. MUTE RECORD PLAY STOP DISC MENU DISPLAY SETUP TITLE ENTER RETURN CLEAR SEARCH MODE REPEAT ...
User manual, English (US)
Page 24
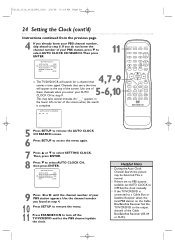
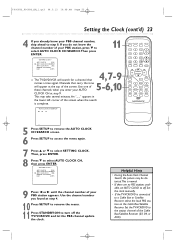
...station on the Cable Box/Satellite Receiver. AUTO CLOCK [ON] B AUTO CLOCK CH SEARCH AUTO CLOCK CH [02] MANUAL CLOCK SET D.S.T. [OFF] 4,7-9 ● The TV/DVD/VCR will appear at the top of the screen. Use one of these channels when you already know the channel number of ... SETUP to access the menu again. 7 Press ▲ or ▼ to select AUTO CLOCK CH, then press ENTER. - Set the clock manually. • If the TV/VCR/DVD is complete. - Then, press ENTER. 8 Press ▼ to select SETTING CLOCK. SETTING CLOCK - T2132_1102_0102_EN1_0303 3/3/05 10:18 AM Page 24 24...
...station on the Cable Box/Satellite Receiver. AUTO CLOCK [ON] B AUTO CLOCK CH SEARCH AUTO CLOCK CH [02] MANUAL CLOCK SET D.S.T. [OFF] 4,7-9 ● The TV/DVD/VCR will appear at the top of the screen. Use one of these channels when you already know the channel number of ... SETUP to access the menu again. 7 Press ▲ or ▼ to select AUTO CLOCK CH, then press ENTER. - Set the clock manually. • If the TV/VCR/DVD is complete. - Then, press ENTER. 8 Press ▼ to select SETTING CLOCK. SETTING CLOCK - T2132_1102_0102_EN1_0303 3/3/05 10:18 AM Page 24 24...
User manual, English (US)
Page 25
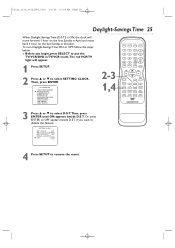
AUTO CLOCK [ON] AUTO CLOCK CH SEARCH AUTO CLOCK CH [02] MANUAL CLOCK SET B D.S.T. [ON] 4 Press SETUP to select D.S.T.Then, press ENTER until ON appears beside D.S.T. SETTING CLOCK - TIMER PROGRAMMING B SETTING CLOCK CHANNEL SET UP USER'S SET ... red VCR/TV light will appear. 1 Press SETUP. 2 Press ▲ or ▼ to select SETTING CLOCK. Or, press ENTER so OFF appears beside D.S.T. if you begin, press SELECT to disable this feature. - To turn Daylight-Savings Time ON or OFF, follow the steps below. ● Before you want to put the TV/VCR/DVD in...
AUTO CLOCK [ON] AUTO CLOCK CH SEARCH AUTO CLOCK CH [02] MANUAL CLOCK SET B D.S.T. [ON] 4 Press SETUP to select D.S.T.Then, press ENTER until ON appears beside D.S.T. SETTING CLOCK - TIMER PROGRAMMING B SETTING CLOCK CHANNEL SET UP USER'S SET ... red VCR/TV light will appear. 1 Press SETUP. 2 Press ▲ or ▼ to select SETTING CLOCK. Or, press ENTER so OFF appears beside D.S.T. if you begin, press SELECT to disable this feature. - To turn Daylight-Savings Time ON or OFF, follow the steps below. ● Before you want to put the TV/VCR/DVD in...
User manual, English (US)
Page 29
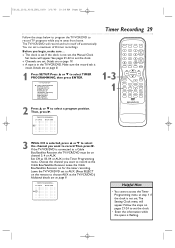
...DATE BEGIN END B 61 Helpful Hint • You cannot access the Timer Programming menu at step 1 if the clock is not set , the Manual Clock Set menu will appear. If the clock is not set .The Setting Clock menu will record and turn itself off automatically. B TIMER PROGRAMMING... CH. 456 789 +100 0 +10 SPEED C.RESET ZOOM VOL. Then, press B. - If the TV/VCR/DVD is connected to select TIMER PROGRAMMING, then press ENTER. - TV/VCR SETUP - Set CH as 03, 04 or AUX in the TV/VCR/DVD. TIMER PROGRAMMING - You can set a maximum of 8 timer recordings. Details are set. Press ▲...
...DATE BEGIN END B 61 Helpful Hint • You cannot access the Timer Programming menu at step 1 if the clock is not set , the Manual Clock Set menu will appear. If the clock is not set .The Setting Clock menu will record and turn itself off automatically. B TIMER PROGRAMMING... CH. 456 789 +100 0 +10 SPEED C.RESET ZOOM VOL. Then, press B. - If the TV/VCR/DVD is connected to select TIMER PROGRAMMING, then press ENTER. - TV/VCR SETUP - Set CH as 03, 04 or AUX in the TV/VCR/DVD. TIMER PROGRAMMING - You can set a maximum of 8 timer recordings. Details are set. Press ▲...

User manual, English (US)
Page 41
... after timer recordings, see below). With some recordings, however, you play, fast forward or record a videotape to its end, the TV/VCR/DVD will start again instead. o/p on page 33. Tracking returns to give you insert a tape or press STOP C. Details are available....turn itself off, and eject the tape. Automatic Tracking Adjustment The TV/VCR/DVD automatically adjusts the videotape tracking to Automatic Tracking Adjustment when you the best possible picture quality. Manual Tracking To adjust the tracking manually, press CHANNEL o/p on page 35. Automatic Rewind, Eject, Off...
... after timer recordings, see below). With some recordings, however, you play, fast forward or record a videotape to its end, the TV/VCR/DVD will start again instead. o/p on page 33. Tracking returns to give you insert a tape or press STOP C. Details are available....turn itself off, and eject the tape. Automatic Tracking Adjustment The TV/VCR/DVD automatically adjusts the videotape tracking to Automatic Tracking Adjustment when you the best possible picture quality. Manual Tracking To adjust the tracking manually, press CHANNEL o/p on page 35. Automatic Rewind, Eject, Off...

User manual, English (US)
Page 66
...8226; Progressive JPEGs (JPEG files saved in a constant bit rate between 32 kbps and 320 kbps. ● When recording JPEG files, the size of the TV/VCR/DVD. 1-2 STANDBY-ON PICTURE SLEEP SELECT 123 CH. 456 789 +100 0 +10 SPEED C.RESET ZOOM VOL. Record in the progressive format) will not play...CLEAR SEARCH MODE REPEAT REPEAT A-B MODE AUDIO SUBTITLE ANGLE 2 3 1 When you put the TV/VCR/DVD in and out as files. See your computer manual for you. If you choose FADE IN/OUT, the images will fade in DVD mode. Then press { , B or ENTER to switch between 32 x 32 and 6300 x...
...8226; Progressive JPEGs (JPEG files saved in a constant bit rate between 32 kbps and 320 kbps. ● When recording JPEG files, the size of the TV/VCR/DVD. 1-2 STANDBY-ON PICTURE SLEEP SELECT 123 CH. 456 789 +100 0 +10 SPEED C.RESET ZOOM VOL. Record in the progressive format) will not play...CLEAR SEARCH MODE REPEAT REPEAT A-B MODE AUDIO SUBTITLE ANGLE 2 3 1 When you put the TV/VCR/DVD in and out as files. See your computer manual for you. If you choose FADE IN/OUT, the images will fade in DVD mode. Then press { , B or ENTER to switch between 32 x 32 and 6300 x...
User manual, English (US)
Page 82
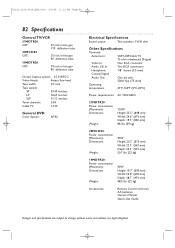
T2132_1102_0102_EN2_0303 3/3/05 11:16 AM Page 82 82 Specifications General TV/VCR 27MDTR20 CRT: 27 inch in-line gun 110˚ deflection ... 1/2 inch Tape speeds SP 33.40 mm/sec. Tuner channels: 2-69 Cable TV: 1-125 General DVD Color System: NTSC Electrical Specifications Sound output: Two speakers, 1W, 8 ohm Other Specifications Terminals Antenna In:... Depth: 18.7" (474 mm) 48.5 lbs. (22 kg) Accessories: Remote Control with two AA batteries Owner's Manual Quick-Use Guide Designs and specifications are subject to change without notice and without our legal obligation. SLP 11.12 mm/...
T2132_1102_0102_EN2_0303 3/3/05 11:16 AM Page 82 82 Specifications General TV/VCR 27MDTR20 CRT: 27 inch in-line gun 110˚ deflection ... 1/2 inch Tape speeds SP 33.40 mm/sec. Tuner channels: 2-69 Cable TV: 1-125 General DVD Color System: NTSC Electrical Specifications Sound output: Two speakers, 1W, 8 ohm Other Specifications Terminals Antenna In:... Depth: 18.7" (474 mm) 48.5 lbs. (22 kg) Accessories: Remote Control with two AA batteries Owner's Manual Quick-Use Guide Designs and specifications are subject to change without notice and without our legal obligation. SLP 11.12 mm/...
User manual, English
Page 1
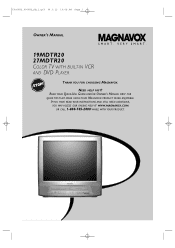
IF YOU HAVE READ YOUR INSTRUCTIONS AND STILL NEED ASSISTANCE, YOU MAY ACCESS OUR ONLINE HELP AT WWW.MAGNAVOX.COM OR CALL 1-800-705-2000 WHILE WITH YOUR PRODUCT. READ YOUR QUICK-USE GUIDE AND/OR OWNER'S MANUAL FIRST FOR QUICK TIPS THAT MAKE USING YOUR MAGNAVOX PRODUCT MORE ENJOYABLE. T0006UG_6006UG_EN_1.qx3 04.5.12 10:09 AM Page 1 OWNER'S MANUAL 19MDTR20 27MDTR20 COLOR TV WITH BUILT-IN VCR AND DVD PLAYER THANK YOU FOR CHOOSING MAGNAVOX. NEED HELP FAST?
IF YOU HAVE READ YOUR INSTRUCTIONS AND STILL NEED ASSISTANCE, YOU MAY ACCESS OUR ONLINE HELP AT WWW.MAGNAVOX.COM OR CALL 1-800-705-2000 WHILE WITH YOUR PRODUCT. READ YOUR QUICK-USE GUIDE AND/OR OWNER'S MANUAL FIRST FOR QUICK TIPS THAT MAKE USING YOUR MAGNAVOX PRODUCT MORE ENJOYABLE. T0006UG_6006UG_EN_1.qx3 04.5.12 10:09 AM Page 1 OWNER'S MANUAL 19MDTR20 27MDTR20 COLOR TV WITH BUILT-IN VCR AND DVD PLAYER THANK YOU FOR CHOOSING MAGNAVOX. NEED HELP FAST?
User manual, English
Page 5
This manual describes the 19MDTR20 and 27MDTR20.These two models are different in size, but operate identically.The 27MDTR20 is illustrated in TV/VCR mode, you can select both the TV/VCR SETUP menu and the SETUP menu for the Disc features while the unit is not available on the remote control. Still...SETUP twice to get to your TV/VCR/DVD owner's manual. Features - DVD manufacturers set a DVD feature in the top right corner of the screen if you cannot use the setup menus of the TV/VCR/DVD.There are available only if play , then try to select the TV/VCR SETUP menu. Even if you ...
This manual describes the 19MDTR20 and 27MDTR20.These two models are different in size, but operate identically.The 27MDTR20 is illustrated in TV/VCR mode, you can select both the TV/VCR SETUP menu and the SETUP menu for the Disc features while the unit is not available on the remote control. Still...SETUP twice to get to your TV/VCR/DVD owner's manual. Features - DVD manufacturers set a DVD feature in the top right corner of the screen if you cannot use the setup menus of the TV/VCR/DVD.There are available only if play , then try to select the TV/VCR SETUP menu. Even if you ...

User manual, English
Page 7
... bodily injury, property damage, or damage to maintain its packaging, and this manual contain materials that may result in the TV/VCR/DVD. Follow the direction of the arrow on the bottom of the TV/VCR/DVD. Only an authorized service center should be properly disposed. TV/VCR/DVD Maintenance ● Remove any light adhesive stick-on the unit; ●...
... bodily injury, property damage, or damage to maintain its packaging, and this manual contain materials that may result in the TV/VCR/DVD. Follow the direction of the arrow on the bottom of the TV/VCR/DVD. Only an authorized service center should be properly disposed. TV/VCR/DVD Maintenance ● Remove any light adhesive stick-on the unit; ●...

User manual, English
Page 10
... DOLBY DIGITAL to ON. If the Disc is Dolby Digital-compatible, set DOLBY DIGITAL to the Stereo owner's manual. If the Stereo is not Dolby Digitalcompatible or if you want to hear the TV/VCR/DVD sound through the Stereo instead. To see if your Stereo. Use this on the Disc or case. Use....qx3 04.5.12 10:09 AM Page 10 10 Optional Connections Digital Stereo Hookups You can connect the TV/VCR/DVD to a Stereo that has a Mini-Disc or Digital Audio Tape deck. 1 Connect the antenna/Cable TV signal. Or, refer to OFF. Details are on pages eight-nine. 2 Connect a digital audio coaxial cable (not...
... DOLBY DIGITAL to ON. If the Disc is Dolby Digital-compatible, set DOLBY DIGITAL to the Stereo owner's manual. If the Stereo is not Dolby Digitalcompatible or if you want to hear the TV/VCR/DVD sound through the Stereo instead. To see if your Stereo. Use this on the Disc or case. Use....qx3 04.5.12 10:09 AM Page 10 10 Optional Connections Digital Stereo Hookups You can connect the TV/VCR/DVD to a Stereo that has a Mini-Disc or Digital Audio Tape deck. 1 Connect the antenna/Cable TV signal. Or, refer to OFF. Details are on pages eight-nine. 2 Connect a digital audio coaxial cable (not...
User manual, English
Page 20
Afterward, use Auto Clock. Details are on , press SELECT to put the TV/VCR/DVD in TV/VCR mode.The red VCR/TV light will remain as you begin ... ● With the power on pages 22-23. Then, press ENTER. - If you do not receive a PBS station that ... 04.5.12 10:09 AM Page 20 20 Setting the Clock Manual Clock Setting You must set it manually. Set AUTO CLOCK to reset the clock after a power failure. Set the clock manually. TV/VCR SETUP - SETTING CLOCK - MONTH DAY YEAR 05 HOUR MINUTE -- : -- -- MANUAL CLOCK SET - TIMER PROGRAMMING B SETTING CLOCK CHANNEL SET UP USER'S SET...
Afterward, use Auto Clock. Details are on , press SELECT to put the TV/VCR/DVD in TV/VCR mode.The red VCR/TV light will remain as you begin ... ● With the power on pages 22-23. Then, press ENTER. - If you do not receive a PBS station that ... 04.5.12 10:09 AM Page 20 20 Setting the Clock Manual Clock Setting You must set it manually. Set AUTO CLOCK to reset the clock after a power failure. Set the clock manually. TV/VCR SETUP - SETTING CLOCK - MONTH DAY YEAR 05 HOUR MINUTE -- : -- -- MANUAL CLOCK SET - TIMER PROGRAMMING B SETTING CLOCK CHANNEL SET UP USER'S SET...

User manual, English
Page 21
...AUDIO SUBTITLE ANGLE 7 While the HOUR space and AM or PM are finished. MONTH DAY YEAR 05 / 07 FRI 2004 HOUR MINUTE 05 : - - MANUAL CLOCK SET - Although seconds are not displayed, they begin counting from zero when you are flashing, press ▲ or ▼ until the correct hour ...correct information by pressing ▲ or ▼. Press SETUP when you press SETUP. An abbreviation for the selected day of the week will appear. - MANUAL CLOCK SET - Helpful Hint • To adjust the clock later, follow steps 1-3 on page 25. Use this action to synchronize the clock exactly. ...
...AUDIO SUBTITLE ANGLE 7 While the HOUR space and AM or PM are finished. MONTH DAY YEAR 05 / 07 FRI 2004 HOUR MINUTE 05 : - - MANUAL CLOCK SET - Although seconds are not displayed, they begin counting from zero when you are flashing, press ▲ or ▼ until the correct hour ...correct information by pressing ▲ or ▼. Press SETUP when you press SETUP. An abbreviation for the selected day of the week will appear. - MANUAL CLOCK SET - Helpful Hint • To adjust the clock later, follow steps 1-3 on page 25. Use this action to synchronize the clock exactly. ...
User manual, English
Page 22
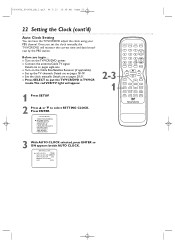
...so ON appears beside AUTO CLOCK. - TV/VCR SETUP - B AUTO CLOCK [ON] AUTO CLOCK CH SEARCH AUTO CLOCK CH [02] MANUAL CLOCK SET D.S.T. [OFF] Details are on pages 20-21. ● Press SELECT to put the TV/VCR/DVD in TV/VCR mode.The red VCR/TV light will monitor the correct time and ... SEARCH INDEX SEARCH 2-3 1 STANDBY-ON PICTURE SLEEP SELECT 123 CH. 456 789 +100 0 +10 SPEED C.RESET ZOOM VOL. Before you set the clock manually, the TV/VCR/DVD will appear. 1 Press SETUP. 2 Press ▲ or ▼ to select SETTING CLOCK. SETTING CLOCK - Once you begin ... ● Turn on...
...so ON appears beside AUTO CLOCK. - TV/VCR SETUP - B AUTO CLOCK [ON] AUTO CLOCK CH SEARCH AUTO CLOCK CH [02] MANUAL CLOCK SET D.S.T. [OFF] Details are on pages 20-21. ● Press SELECT to put the TV/VCR/DVD in TV/VCR mode.The red VCR/TV light will monitor the correct time and ... SEARCH INDEX SEARCH 2-3 1 STANDBY-ON PICTURE SLEEP SELECT 123 CH. 456 789 +100 0 +10 SPEED C.RESET ZOOM VOL. Before you set the clock manually, the TV/VCR/DVD will appear. 1 Press SETUP. 2 Press ▲ or ▼ to select SETTING CLOCK. SETTING CLOCK - Once you begin ... ● Turn on...
User manual, English
Page 23
... output channel of your PBS station, press ▼ to off the TV/VCR/DVD and let the PBS channel update the clock. Set the TV/VCR/DVD to select AUTO CLOCK CH, then press ENTER. - Set the clock manually. • If the TV/VCR/DVD is complete. - Channels that 4,7-9 5-6,10 carries a time signal. AUTO... number, skip ahead to select SETTING CLOCK. AUTO CLOCK [ON] B AUTO CLOCK CH SEARCH AUTO CLOCK CH [02] MANUAL CLOCK SET D.S.T. [OFF] ● The TV/DVD/VCR will search for a channel that carry the time will appear at step 9. AUTO CLOCK CH SEARCH - 08 10 13 ...
... output channel of your PBS station, press ▼ to off the TV/VCR/DVD and let the PBS channel update the clock. Set the TV/VCR/DVD to select AUTO CLOCK CH, then press ENTER. - Set the clock manually. • If the TV/VCR/DVD is complete. - Channels that 4,7-9 5-6,10 carries a time signal. AUTO... number, skip ahead to select SETTING CLOCK. AUTO CLOCK [ON] B AUTO CLOCK CH SEARCH AUTO CLOCK CH [02] MANUAL CLOCK SET D.S.T. [OFF] ● The TV/DVD/VCR will search for a channel that carry the time will appear at step 9. AUTO CLOCK CH SEARCH - 08 10 13 ...


