User manual, English (US)
Page 1
Table of Contents Important Information Important Safety Instructions Supplied Accessories Remote control Functional Overview Connections Basic Operations Watching TV Menu Adjustment Basic Operations DVD Play Discs In Various Ways Menu Setting DVD MP3 Operations Kodak Picture CD Playback Troubleshooting Technical Specifications Warranty Page 1 2-3 4 5-6 7 8 9 10-11 12-17 18-23 24-29 30-34 35 36 37-38 39 40
Table of Contents Important Information Important Safety Instructions Supplied Accessories Remote control Functional Overview Connections Basic Operations Watching TV Menu Adjustment Basic Operations DVD Play Discs In Various Ways Menu Setting DVD MP3 Operations Kodak Picture CD Playback Troubleshooting Technical Specifications Warranty Page 1 2-3 4 5-6 7 8 9 10-11 12-17 18-23 24-29 30-34 35 36 37-38 39 40
User manual, English (US)
Page 5
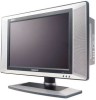
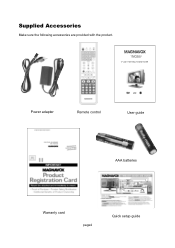
Supplied Accessories Make sure the following accessories are provided with the product. 17MD255V 17'' LCD TV WITH BUILT IN DVD PLAYER Power adapter Remote control User guide AAA batteries Warranty card page4 Quick setup guide
Supplied Accessories Make sure the following accessories are provided with the product. 17MD255V 17'' LCD TV WITH BUILT IN DVD PLAYER Power adapter Remote control User guide AAA batteries Warranty card page4 Quick setup guide
User manual, English (US)
Page 6
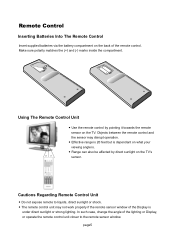
In such case, change the angle of the remote control. page5 Make sure polarity matches the (+) and (-) marks inside the compartment. + - + Using The Remote Control Unit ● Use the remote control by direct sunlight on what your viewing angle is under direct sunlight or strong lighting. Remote Control Inserting Batteries Into The Remote Control Insert supplied batteries via the battery compartment...
In such case, change the angle of the remote control. page5 Make sure polarity matches the (+) and (-) marks inside the compartment. + - + Using The Remote Control Unit ● Use the remote control by direct sunlight on what your viewing angle is under direct sunlight or strong lighting. Remote Control Inserting Batteries Into The Remote Control Insert supplied batteries via the battery compartment...
User manual, English (US)
Page 7
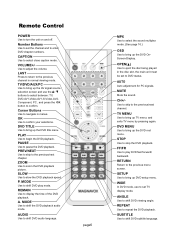
Remote Control POWER Use to the previous/next chapter. LAST Press to return to the previous channel in menus. TV/DVD/AUX/PC Use to bring up ...
Remote Control POWER Use to the previous/next chapter. LAST Press to return to the previous channel in menus. TV/DVD/AUX/PC Use to bring up ...
User manual, English (US)
Page 10
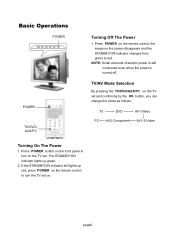
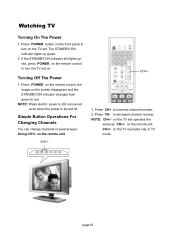
... amounts of electric power is still consumed even when the power is turned off. The STANDBY/ON indicator lights up red, press POWER on the remote control to turn on the screen disappears and the STANDBY/ON indicator changes from green to turn the TV set on the TV set . Press POWER.... Basic Operations POWER TV/DVD/AUX/PC CH CH VOL VOL POWER TV/DVD/ AUX/PC Turning Off The Power 1. page9 Press POWER on the remote control, the image on the TV set and confirming by the OK button, you can change the mode as follows: TV DVD AV1-Video PC AV2...
... amounts of electric power is still consumed even when the power is turned off. The STANDBY/ON indicator lights up red, press POWER on the remote control to turn on the screen disappears and the STANDBY/ON indicator changes from green to turn the TV set on the TV set . Press POWER.... Basic Operations POWER TV/DVD/AUX/PC CH CH VOL VOL POWER TV/DVD/ AUX/PC Turning Off The Power 1. page9 Press POWER on the remote control, the image on the TV set and confirming by the OK button, you can change the mode as follows: TV DVD AV1-Video PC AV2...
User manual, English (US)
Page 11
... TV mode. Using CH+/- NOTE: CH+/- Watching TV Turning On The Power 1. Press POWER on the remote control, the image on the front panel to turn the TV set operates the same as CH+/- on the remote unit. Press POWER button on the screen disappears and the STANDBY/ON indicator changes from green... POWER on the TV set. NOTE: Weak electric power is still consumed even when the power is turned off. Press CH+ to turn on the remote control to increase channel number. 2. TV/DVD/AUX/PC CH CH VOL VOL page10 on the...
... TV mode. Using CH+/- NOTE: CH+/- Watching TV Turning On The Power 1. Press POWER on the remote control, the image on the front panel to turn the TV set operates the same as CH+/- on the remote unit. Press POWER button on the screen disappears and the STANDBY/ON indicator changes from green... POWER on the TV set. NOTE: Weak electric power is still consumed even when the power is turned off. Press CH+ to turn on the remote control to increase channel number. 2. TV/DVD/AUX/PC CH CH VOL VOL page10 on the...
User manual, English (US)
Page 12
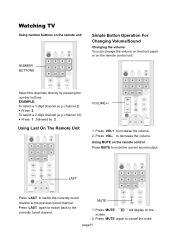
... again to switch back to mute the current sound output. Press MUTE . '' '' will display on the remote control unit. Watching TV Using number buttons on the remote unit NUMBER BUTTONS Simple Button Operation For Changing Volume/Sound Changing the volume You can change the volume on the... front panel or on the screen. 2. channel 2): ● Press 2 . Using MUTE on the remote control Press MUTE to the currently tuned channel. Select the channels directly by 2 . MUTE 1. page11 EXAMPLE: To select a 1-digit channel (e.g. To select a...
... again to switch back to mute the current sound output. Press MUTE . '' '' will display on the remote control unit. Watching TV Using number buttons on the remote unit NUMBER BUTTONS Simple Button Operation For Changing Volume/Sound Changing the volume You can change the volume on the... front panel or on the screen. 2. channel 2): ● Press 2 . Using MUTE on the remote control Press MUTE to the currently tuned channel. Select the channels directly by 2 . MUTE 1. page11 EXAMPLE: To select a 1-digit channel (e.g. To select a...
User manual, English (US)
Page 16
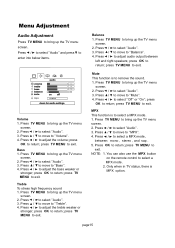
.... 1. MPX This function is to return; Press / to select a MPX mode, between left and right speakers; You can also use the MPX button on the remote control to bring up the TV menu screen. 2. Press TV MENU to select a MPX mode. 2. Press / to return; press OK to adjust the volume; Press / to...
.... 1. MPX This function is to return; Press / to select a MPX mode, between left and right speakers; You can also use the MPX button on the remote control to bring up the TV menu screen. 2. Press TV MENU to select a MPX mode. 2. Press / to return; press OK to adjust the volume; Press / to...
User manual, English (US)
Page 17
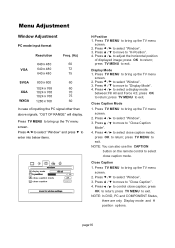
... press OK to return; Press / to return; press OK to select ''Window''. 3. press TV MENU to return; Press TV MENU to ''Close Caption''. 4. Press / to control close caption mode; press OK to exit. Press / to adjust the horizontal position of inputting the PC signal other than above signals, ''OUT OF RANGE... 3. NOTE: In DVD, PC and COMPONENT Status, there are only Display mode and H position options. NOTE: You can also use the CAPTION button on the remote control to bring up the TV menu screen. 2. Press TV MENU to select close caption mode. page16
... press OK to return; Press / to return; press OK to select ''Window''. 3. press TV MENU to return; Press TV MENU to ''Close Caption''. 4. Press / to control close caption mode; press OK to exit. Press / to adjust the horizontal position of inputting the PC signal other than above signals, ''OUT OF RANGE... 3. NOTE: In DVD, PC and COMPONENT Status, there are only Display mode and H position options. NOTE: You can also use the CAPTION button on the remote control to bring up the TV menu screen. 2. Press TV MENU to select close caption mode. page16
User manual, English (US)
Page 19
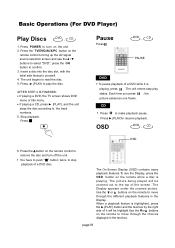
... text box. The On-Screen Display (OSD) contains many playback features.To see the Display, press the OSD button on the remote control to remove the disc and turn on the remote control to bring up the AV signal source selection screen and use the / buttons to select "DVD", press the OK button to... the top of it is playing, press .The unit enters step play the disc. Stop playback. Use the or buttons on the remote to resume playback...
... text box. The On-Screen Display (OSD) contains many playback features.To see the Display, press the OSD button on the remote control to remove the disc and turn on the remote control to bring up the AV signal source selection screen and use the / buttons to select "DVD", press the OK button to... the top of it is playing, press .The unit enters step play the disc. Stop playback. Use the or buttons on the remote to resume playback...
User manual, English (US)
Page 23
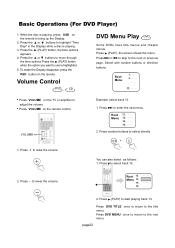
... Press (PLAY) to select directly. +10 + 3 You can also select as follows: 1. page22 To make the Display disappear, press the OSD button on the remote control. Press or to skip to the title menu. Menu 13. 14. 15. 2. Menu 13. 14. 15. 2. Press DVD TITLE once to return to the ... buttons or direction buttons. 1. Root 12. Press the or buttons to select track 13. 2. Press the (PLAY) button, the time options appears. 4. Volume Control DVD 、 CD DVD Menu Play DVD Some DVDs have title menus and chapter menus. Press to highlight "Time Disp" in the Display while a disc...
... Press (PLAY) to select directly. +10 + 3 You can also select as follows: 1. page22 To make the Display disappear, press the OSD button on the remote control. Press or to skip to the title menu. Menu 13. 14. 15. 2. Menu 13. 14. 15. 2. Press DVD TITLE once to return to the ... buttons or direction buttons. 1. Root 12. Press the or buttons to select track 13. 2. Press the (PLAY) button, the time options appears. 4. Volume Control DVD 、 CD DVD Menu Play DVD Some DVDs have title menus and chapter menus. Press to highlight "Time Disp" in the Display while a disc...
User manual, English (US)
Page 32
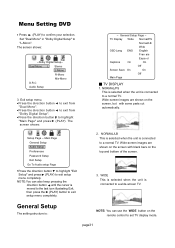
... to exit from "Dolby Digital Setup". ●Press the direction button to set TV display mode. NOTE:You can use the WIDE button on the remote control to highlight "Main Page" and press (PLAY).
... to exit from "Dolby Digital Setup". ●Press the direction button to set TV display mode. NOTE:You can use the WIDE button on the remote control to highlight "Main Page" and press (PLAY).
User manual, English (US)
Page 38
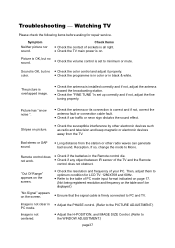
... the antenna or its connection is on the table won't be displayed.) ● Ensure that the signal cable is not clear in the Remote control die. Then, adjust them to optimum condition for repair service. Image is firmly connected to the WINDOW ADJUSTMENT.) page37 Troubleshooting __ Watching TV ... and if not, adjust the antenna toward the broadcasting station. ● Check the ''FINE TUNE ''is in color or in black & white. Remote control does ● Check if the batteries in PC mode. Bad stereo or SAP sound. ● Long distance from the TV. color. ●...
... the antenna or its connection is on the table won't be displayed.) ● Ensure that the signal cable is not clear in the Remote control die. Then, adjust them to optimum condition for repair service. Image is firmly connected to the WINDOW ADJUSTMENT.) page37 Troubleshooting __ Watching TV ... and if not, adjust the antenna toward the broadcasting station. ● Check the ''FINE TUNE ''is in color or in black & white. Remote control does ● Check if the batteries in PC mode. Bad stereo or SAP sound. ● Long distance from the TV. color. ●...
User manual, English (US)
Page 39
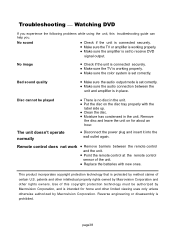
...sure the audio output mode is set correctly. ● Make sure the audio connection between the remote control and the unit. ● Point the remote control at the remote control sensor of this troubleshooting guide can help you. Reverse engineering or disassembly is protected by method claims ... Corporation and other limited viewing uses only unless otherwise authorized by Macrovision Corporation, and is in the unit. page38 Remote control does not work ● Remove barriers between the unit and amplifier is intended for about an hour. This product...
...sure the audio output mode is set correctly. ● Make sure the audio connection between the remote control and the unit. ● Point the remote control at the remote control sensor of this troubleshooting guide can help you. Reverse engineering or disassembly is protected by method claims ... Corporation and other limited viewing uses only unless otherwise authorized by Macrovision Corporation, and is in the unit. page38 Remote control does not work ● Remove barriers between the unit and amplifier is intended for about an hour. This product...


