User manual, English (US)
Page 1
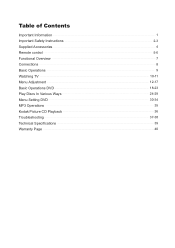
Table of Contents Important Information Important Safety Instructions Supplied Accessories Remote control Functional Overview Connections Basic Operations Watching TV Menu Adjustment Basic Operations DVD Play Discs In Various Ways Menu Setting DVD MP3 Operations Kodak Picture CD Playback Troubleshooting Technical Specifications Warranty Page 1 2-3 4 5-6 7 8 9 10-11 12-17 18-23 24-29 30-34 35 36 37-38 39 40
Table of Contents Important Information Important Safety Instructions Supplied Accessories Remote control Functional Overview Connections Basic Operations Watching TV Menu Adjustment Basic Operations DVD Play Discs In Various Ways Menu Setting DVD MP3 Operations Kodak Picture CD Playback Troubleshooting Technical Specifications Warranty Page 1 2-3 4 5-6 7 8 9 10-11 12-17 18-23 24-29 30-34 35 36 37-38 39 40
User manual, English (US)
Page 2
... energy and, if not installed and used . However, there is intended to alert the user to the presence of the FCC Rules. Fcc Rf Interference Statement NOTE: This equipment has been tested and found to radio communications. page1 These limits are designed to Part 15 of important operation and maintenance (servicing) instructions in accordance with the limit for help...
... energy and, if not installed and used . However, there is intended to alert the user to the presence of the FCC Rules. Fcc Rf Interference Statement NOTE: This equipment has been tested and found to radio communications. page1 These limits are designed to Part 15 of important operation and maintenance (servicing) instructions in accordance with the limit for help...
User manual, English (US)
Page 3
... request a qualified service person to qualified service personnel. Follow all servicing to perform repairs. Do not block any element that produce heat. 9. If any heat sources such as power-supply cord or plug is damaged, liquid...cord or plug is used, use can be repaired by the user. 1. Only use this apparatus during lightning storms or when unused for replacement of the polarized or grounding-type plug. Refer all instructions. 5. Heed all warnings. 4. When a cart is damaged. Do not install near water. 6. Unplug this apparatus near any of time. 14. Do not use...
... request a qualified service person to qualified service personnel. Follow all servicing to perform repairs. Do not block any element that produce heat. 9. If any heat sources such as power-supply cord or plug is damaged, liquid...cord or plug is used, use can be repaired by the user. 1. Only use this apparatus during lightning storms or when unused for replacement of the polarized or grounding-type plug. Refer all instructions. 5. Heed all warnings. 4. When a cart is damaged. Do not install near water. 6. Unplug this apparatus near any of time. 14. Do not use...
User manual, English (US)
Page 4
... extensive adjustment work by the manufacturer, or those described in fire, electric shock and/or other than those with 2,949,120 thin film transistors, giving you fine picture details. The LCD panel used in case the panel is dropped or gets shock. Any noticeable abnormality in the operating instructions. Occasionally, a few non-active pixels may appear on the screen as a fixed...
... extensive adjustment work by the manufacturer, or those described in fire, electric shock and/or other than those with 2,949,120 thin film transistors, giving you fine picture details. The LCD panel used in case the panel is dropped or gets shock. Any noticeable abnormality in the operating instructions. Occasionally, a few non-active pixels may appear on the screen as a fixed...
User manual, English (US)
Page 7
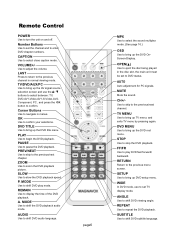
... selections. A. AUDIO Use to the previous/next channel. AUTO Auto adjustment for PC signals. Use to skip to shift DVD audio language. TV MENU Use to bring up TV menu; ANGLE Use to adjust the volume. VOLUME+/- Use to shift DVD viewing angle. MODE Use to bring up the AV signal source selection screen and use to set TV display mode. MUTE Mute the sound. REPEAT Use to turn the unit on and off. Remote Control POWER Use to repeat the DVD playback. TV/DVD/AUX/PC Use to shift DVD play DVD...
... selections. A. AUDIO Use to the previous/next channel. AUTO Auto adjustment for PC signals. Use to skip to shift DVD audio language. TV MENU Use to bring up TV menu; ANGLE Use to adjust the volume. VOLUME+/- Use to shift DVD viewing angle. MODE Use to bring up the AV signal source selection screen and use to set TV display mode. MUTE Mute the sound. REPEAT Use to turn the unit on and off. Remote Control POWER Use to repeat the DVD playback. TV/DVD/AUX/PC Use to shift DVD play DVD...
User manual, English (US)
Page 8
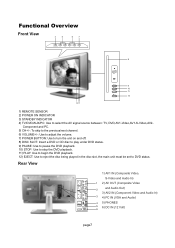
... DVD status. Rear View 1) AV1 IN (Composite Video, S-Video and Audio In) AV1 IN VIDEO L AUDIO 1 2) AV OUT (Composite Video S-VIDEO R AV OUT VIDEO L AUDIO and Audio Out) 2 CR / PR R 3) AV2 IN (Component Video and Audio In) CB / PB L AUDIO Y R 3 4) PC IN (VGA and Audio) AV2 IN PC IN AUDIO VGA 4 5) PHONES PHONES 5 6) DC IN (12 Volt) DC IN 6 page7 Component and PC. 5) CH+/-: To skip to the previous/next channel. 6) VOLUME+/-: Use to adjust the volume. 7) POWER BUTTON: Use...
... DVD status. Rear View 1) AV1 IN (Composite Video, S-Video and Audio In) AV1 IN VIDEO L AUDIO 1 2) AV OUT (Composite Video S-VIDEO R AV OUT VIDEO L AUDIO and Audio Out) 2 CR / PR R 3) AV2 IN (Component Video and Audio In) CB / PB L AUDIO Y R 3 4) PC IN (VGA and Audio) AV2 IN PC IN AUDIO VGA 4 5) PHONES PHONES 5 6) DC IN (12 Volt) DC IN 6 page7 Component and PC. 5) CH+/-: To skip to the previous/next channel. 6) VOLUME+/-: Use to adjust the volume. 7) POWER BUTTON: Use...
User manual, English (US)
Page 9
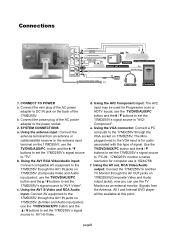
... Audio input: Connect AV equipment to the 17MD255V through the AV1 IN jacks on 17MD255V. e. Using the VGA connector: Connect a PC computer to the 17MD255V through the VGA socket on 17MD255V (S-Video and Audio input jacks); page8 Using the antenna input: Connect the antenna terminal from the Antenna, AV1 and Internal DVD player will be used for computer use the TV Monitor as an external monitor. d. Signals from an antenna or cable/satellite receiver to PC-IN . 17MD255V monitor s native resolution for Progressive scan or HDTV inputs; f. Connect the power plug...
... Audio input: Connect AV equipment to the 17MD255V through the AV1 IN jacks on 17MD255V. e. Using the VGA connector: Connect a PC computer to the 17MD255V through the VGA socket on 17MD255V (S-Video and Audio input jacks); page8 Using the antenna input: Connect the antenna terminal from the Antenna, AV1 and Internal DVD player will be used for computer use the TV Monitor as an external monitor. d. Signals from an antenna or cable/satellite receiver to PC-IN . 17MD255V monitor s native resolution for Progressive scan or HDTV inputs; f. Connect the power plug...
User manual, English (US)
Page 10
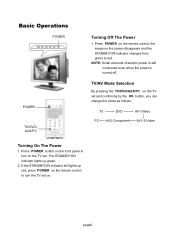
... button, you can change the mode as follows: TV DVD AV1-Video PC AV2-Component AV1-S-Video Turning On The Power 1. page9 If the STANDBY/ON indicator still lights up green. 2. TV/AV Mode Selection By pressing the TV/DVD/AUX/PC on the screen disappears and the STANDBY/ON indicator changes from green to turn on . The STANDBY/ON indicator lights up red, press POWER on the remote control to red...
... button, you can change the mode as follows: TV DVD AV1-Video PC AV2-Component AV1-S-Video Turning On The Power 1. page9 If the STANDBY/ON indicator still lights up green. 2. TV/AV Mode Selection By pressing the TV/DVD/AUX/PC on the screen disappears and the STANDBY/ON indicator changes from green to turn on . The STANDBY/ON indicator lights up red, press POWER on the remote control to red...
User manual, English (US)
Page 11
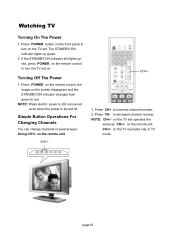
... front panel to turn on the screen disappears and the STANDBY/ON indicator changes from green to turn the TV set on the remote unit. NOTE: Weak electric power is still consumed even when the power is turned off. Press CH- Using CH+/- Press POWER on the remote control, the image on the TV set operates the same as CH+/- Simple Button Operations For Changing Channels You can change channels in TV mode. NOTE...
... front panel to turn on the screen disappears and the STANDBY/ON indicator changes from green to turn the TV set on the remote unit. NOTE: Weak electric power is still consumed even when the power is turned off. Press CH- Using CH+/- Press POWER on the remote control, the image on the TV set operates the same as CH+/- Simple Button Operations For Changing Channels You can change channels in TV mode. NOTE...

User manual, English (US)
Page 13
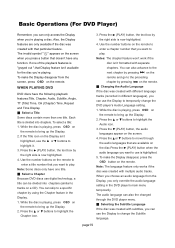
... TV menu screen. 2. Press / to select "Auto Search". 5. on -screen displays in this operation. 1. Select one between ANTENNA and CABLE before other operatings. Press / to select "Current Channel". 5. Wait until the searching ends. Channel skip 1. Press TV MENU to bring up the TV menu screen. Press / to select a current channel number you to bring up the TV menu screen. 2. Press / to select "TV Tuner". 3. page12 TV Source This will help you want; Press / to select "Settings" and...
... TV menu screen. 2. Press / to select "Auto Search". 5. on -screen displays in this operation. 1. Select one between ANTENNA and CABLE before other operatings. Press / to select "Current Channel". 5. Wait until the searching ends. Channel skip 1. Press TV MENU to bring up the TV menu screen. Press / to select a current channel number you to bring up the TV menu screen. 2. Press / to select "TV Tuner". 3. page12 TV Source This will help you want; Press / to select "Settings" and...
User manual, English (US)
Page 16
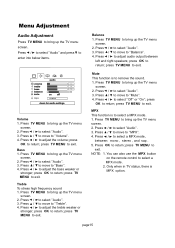
... This function is to bring up the TV menu screen. 2. press TV MENU to ''Balance''. 4. Press / to return; press OK to select ''Audio''. 3. press TV MENU to select ''Audio''. 3. Press TV MENU to select a MPX mode. 1. Press / to exit. Press / to return; press OK to adjust audio output between : mono , stereo , and sap . 5. Press TV MENU to remove the sound. 1. Press / to move to exit. Press OK to...
... This function is to bring up the TV menu screen. 2. press TV MENU to ''Balance''. 4. Press / to return; press OK to select ''Audio''. 3. press TV MENU to select ''Audio''. 3. Press TV MENU to select a MPX mode. 1. Press / to exit. Press / to return; press OK to adjust audio output between : mono , stereo , and sap . 5. Press TV MENU to remove the sound. 1. Press / to move to exit. Press OK to...
User manual, English (US)
Page 20
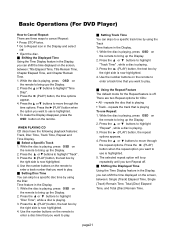
.... 4. Notes: The chapter feature won't work if the disc isn't formatted with different language tracks (recorded in different languages), you want to enter a chapter number that Display feature isn't available for the disc you only override the audio language setting in the Display. 1. Press the or buttons to move through the DVD player menu. ■ Selecting the Subtitle Language If the disc was...
.... 4. Notes: The chapter feature won't work if the disc isn't formatted with different language tracks (recorded in different languages), you want to enter a chapter number that Display feature isn't available for the disc you only override the audio language setting in the Display. 1. Press the or buttons to move through the DVD player menu. ■ Selecting the Subtitle Language If the disc was...
User manual, English (US)
Page 21
... playing, press OSD on the remote. Use the number buttons to enter an angle number that you want to play. ■ Setting Chapter Time You can skip to a specific chapter time by the right side is highlighted. 5. Use the number buttons to enter an angle number that you want to bring up the Display. 2. There are available, to move through the DVD player main menu. Press the or buttons to change...
... playing, press OSD on the remote. Use the number buttons to enter an angle number that you want to play. ■ Setting Chapter Time You can skip to a specific chapter time by the right side is highlighted. 5. Use the number buttons to enter an angle number that you want to bring up the Display. 2. There are available, to move through the DVD player main menu. Press the or buttons to change...
User manual, English (US)
Page 22
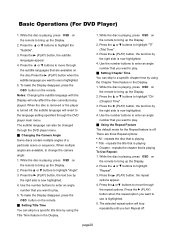
... buttons to highlight "Track" . 3. Basic Operations (For DVD Player) How to Cancel Repeat: There are two Repeat options for the Repeat feature is playing. 3. WHEN PLAYING CD CD discs have the following playback features: Track, Disc Time, Track Time, Repeat and Time Display. ■ Select a Specific Track 1. Press the (PLAY) button, the text box by the right side is playing To use is playing, press OSD on the remote...
... buttons to highlight "Track" . 3. Basic Operations (For DVD Player) How to Cancel Repeat: There are two Repeat options for the Repeat feature is playing. 3. WHEN PLAYING CD CD discs have the following playback features: Track, Disc Time, Track Time, Repeat and Time Display. ■ Select a Specific Track 1. Press the (PLAY) button, the text box by the right side is playing To use is playing, press OSD on the remote...
User manual, English (US)
Page 32
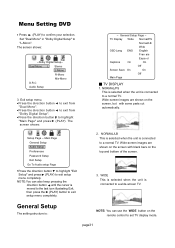
... screen shows: -- screen images are shown on the screen with black bars on the screen, but with some parts cut automatically. Menu Setting DVD ● Press (PLAY) to "L-Mono". Setup Page -- NOTE:You can use the WIDE button on the remote control to set TV display mode. General Setup The setting structure is : NOTE: You can also keep pressing the direction button until the cursor is connected to a normal TV. The sereen shows: --Dolby Digital Setup...
... screen shows: -- screen images are shown on the screen with black bars on the screen, but with some parts cut automatically. Menu Setting DVD ● Press (PLAY) to "L-Mono". Setup Page -- NOTE:You can use the WIDE button on the remote control to set TV display mode. General Setup The setting structure is : NOTE: You can also keep pressing the direction button until the cursor is connected to a normal TV. The sereen shows: --Dolby Digital Setup...
User manual, English (US)
Page 33
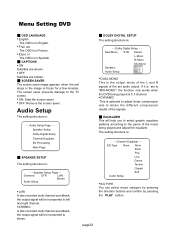
... the direction buttons and confirm by pressing the PLAY button. If it is set audio output. Channel Equalizer - The screen saver prevents damage to the genre of the set to "MIX-MONO", the function only works when the DVD being played,and adjust the equalizer. Dolby Digital Setup - - Audio Setup The setting structure is : - - page32 ■ DOLBY DIGITAL SETUP The setting structure is frozen for a few minutes. Menu Setting DVD ■ OSD LANGUAGE ● English The...
... the direction buttons and confirm by pressing the PLAY button. If it is set audio output. Channel Equalizer - The screen saver prevents damage to the genre of the set to "MIX-MONO", the function only works when the DVD being played,and adjust the equalizer. Dolby Digital Setup - - Audio Setup The setting structure is : - - page32 ■ DOLBY DIGITAL SETUP The setting structure is frozen for a few minutes. Menu Setting DVD ■ OSD LANGUAGE ● English The...
User manual, English (US)
Page 38
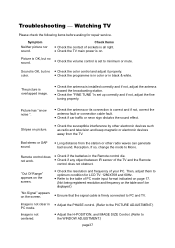
... and TV. If so, change the mode to the WINDOW ADJUSTMENT.) page37 Then, adjust them to optimum condition for repair service. Image is OK, but no ● Check the color control and adjust it properly. Symptom Neither picture nor sound. Bad stereo or SAP sound. ● Long distance from the TV. Remote control does ● Check if the batteries in black & white. Troubleshooting __ Watching TV Please check...
... and TV. If so, change the mode to the WINDOW ADJUSTMENT.) page37 Then, adjust them to optimum condition for repair service. Image is OK, but no ● Check the color control and adjust it properly. Symptom Neither picture nor sound. Bad stereo or SAP sound. ● Long distance from the TV. Remote control does ● Check if the batteries in black & white. Troubleshooting __ Watching TV Please check...
User manual, English (US)
Page 39
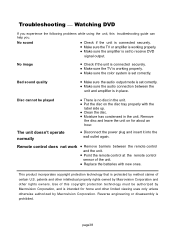
... power plug and insert it into the wall outlet again. Troubleshooting __ Watching DVD If you . No image ● Check if the unit is connected securely. ● Make sure the TV is working properly. ● Make sure the amplifier is set correctly. ● Make sure the audio connection between the remote control and the unit. ● Point the remote control at the remote control sensor of this troubleshooting guide...
... power plug and insert it into the wall outlet again. Troubleshooting __ Watching DVD If you . No image ● Check if the unit is connected securely. ● Make sure the TV is working properly. ● Make sure the amplifier is set correctly. ● Make sure the audio connection between the remote control and the unit. ● Point the remote control at the remote control sensor of this troubleshooting guide...
User manual, English (US)
Page 40
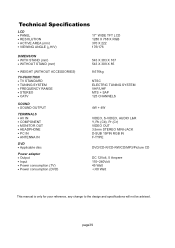
...; CATV SOUND ● SOUND OUTPUT TERMINALS ● AV IN ● COMPONENT ● MONITOR OUT ● HEADPHONE ● PC IN ● ANTENNA IN DVD ● Applicable disc Power adapter ● Output ● Input ● Power consumption (TV) ● Power consumption (DVD) 543 X 383 X 167 543 X 309 X 85 8.676kg NTSC ELECTRIC TUNING SYSTEM VHF/UHF MTS + SAP 125 CHANNELS 4W + 4W VIDEO, S-VIDEO, AUDIO L&R Y, Pb (Cb), Pr (Cr) VIDEO OUT 3.5mm STEREO MINI-JACK D-SUB...
...; CATV SOUND ● SOUND OUTPUT TERMINALS ● AV IN ● COMPONENT ● MONITOR OUT ● HEADPHONE ● PC IN ● ANTENNA IN DVD ● Applicable disc Power adapter ● Output ● Input ● Power consumption (TV) ● Power consumption (DVD) 543 X 383 X 167 543 X 309 X 85 8.676kg NTSC ELECTRIC TUNING SYSTEM VHF/UHF MTS + SAP 125 CHANNELS 4W + 4W VIDEO, S-VIDEO, AUDIO L&R Y, Pb (Cb), Pr (Cr) VIDEO OUT 3.5mm STEREO MINI-JACK D-SUB...
User manual, English (US)
Page 41
... exchange model supplied will exchange the defective product with packaging. Replacement product can only be the most comparable one in any conditions set forth as the authorized retailer included, is necessary for installation or setup of the product, adjustment of customer controls on how long an implied warranty lasts, so the above limitations or exclusions may be defective, Magnavox will...
... exchange model supplied will exchange the defective product with packaging. Replacement product can only be the most comparable one in any conditions set forth as the authorized retailer included, is necessary for installation or setup of the product, adjustment of customer controls on how long an implied warranty lasts, so the above limitations or exclusions may be defective, Magnavox will...


