User Manual
Page 1
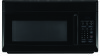
Microwave Oven Use and Care Manual MCO165UW / MCO165UB Table of Contents Introduction 1 Precautions to Avoid Possible Exposure to Excessire Microwave Energy 1 Important Safety Instructions ......... 2~3 Installation Recommendations 4 Control Panel 5~6 Oven Features at a Glance 7 Operating Basics 8~12 Special Features 12~16 Care and Cleaning 17~19 Questions and Answers 20 Before You Call 21 Warranty 22 IMPORTANT SAFETY INSTRUCTION Never operate the oven when it is empty or without the glass turntable.
Microwave Oven Use and Care Manual MCO165UW / MCO165UB Table of Contents Introduction 1 Precautions to Avoid Possible Exposure to Excessire Microwave Energy 1 Important Safety Instructions ......... 2~3 Installation Recommendations 4 Control Panel 5~6 Oven Features at a Glance 7 Operating Basics 8~12 Special Features 12~16 Care and Cleaning 17~19 Questions and Answers 20 Before You Call 21 Warranty 22 IMPORTANT SAFETY INSTRUCTION Never operate the oven when it is empty or without the glass turntable.
User Manual
Page 3
... to heat, cook or defrost food. Do not operate the oven when empty or with the provided installation instructions. Keep cord away from paper or plastic bags before cutting into its intended use flammable materials in this manual. To reduce the risk of oven is designed to escape during cooking. lights, blowing of fuse or tripping of fire. 22. for example, near water - Do not pop popcorn...
... to heat, cook or defrost food. Do not operate the oven when empty or with the provided installation instructions. Keep cord away from paper or plastic bags before cutting into its intended use flammable materials in this manual. To reduce the risk of oven is designed to escape during cooking. lights, blowing of fuse or tripping of fire. 22. for example, near water - Do not pop popcorn...
User Manual
Page 4
... occur, refer to the Care and Cleaning section for use sharp-edged utensils in food you are glass or ceramic container is removed from hands and face. 40. Do not defrost frozen beverages in a microwave oven. Be careful when opening containers of overcooking. Use care when cleaning the vent hood filter. THIS COULD RESULT IN short periods of hot food, including popcorn bags, cooking pouches and boxes. Microwave oven manufacturers do not recommend...
... occur, refer to the Care and Cleaning section for use sharp-edged utensils in food you are glass or ceramic container is removed from hands and face. 40. Do not defrost frozen beverages in a microwave oven. Be careful when opening containers of overcooking. Use care when cleaning the vent hood filter. THIS COULD RESULT IN short periods of hot food, including popcorn bags, cooking pouches and boxes. Microwave oven manufacturers do not recommend...

User Manual
Page 5
... service technician if the grounding instructions are testing and a glass measuring cup filled with one or more of the following measures: ◆ clean door and seal surfaces of air for microwaving. Automatic Fan Protection feature Cooking appliances installed under the microwave oven may stay on and off . If interference occurs, it may cause interference to radio and television reception. The oven requires free...
... service technician if the grounding instructions are testing and a glass measuring cup filled with one or more of the following measures: ◆ clean door and seal surfaces of air for microwaving. Automatic Fan Protection feature Cooking appliances installed under the microwave oven may stay on and off . If interference occurs, it may cause interference to radio and television reception. The oven requires free...

User Manual
Page 6
.... POWER LEVEL - CLOCK - Touch this pad and enter food weight, then START. Touch this pad to recall three cooking instructions placed in memory and to cook frozen vegetables. When touched once, it shuts off the light. (Page 16) 5 Touch this pad to program sound level of a finger. Touch this pad to heat frozen pizza. After all settings (except time of key pad on " for cooking. (Page 8-9) 14. VENT FAN - AUTO DEFROST - Touch this pad to cook prepackaged microwave popcorn weighing 3.5 ounces. TIMER - Touch...
.... POWER LEVEL - CLOCK - Touch this pad and enter food weight, then START. Touch this pad to recall three cooking instructions placed in memory and to cook frozen vegetables. When touched once, it shuts off the light. (Page 16) 5 Touch this pad to program sound level of a finger. Touch this pad to heat frozen pizza. After all settings (except time of key pad on " for cooking. (Page 8-9) 14. VENT FAN - AUTO DEFROST - Touch this pad to cook prepackaged microwave popcorn weighing 3.5 ounces. TIMER - Touch...
User Manual
Page 8
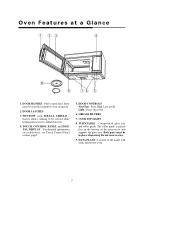
... SHIELD Screen allows cooking to be securely latched for oven to open door. HOOD CONTROLS Vent Fan - Door must be in oven. 14. Press High, Low or Off Light - COOKTOP LIGHT 18. DATA PLATE - Press On or Off 16. Composed of the microwave and supports the glass tray. For detailed information on the inside wall of the microwave oven. 7 TURNTABLE - Pull to operate. 12. Located on each feature, see Touch Control Panel section, page5. 15. Both parts must be viewed...
... SHIELD Screen allows cooking to be securely latched for oven to open door. HOOD CONTROLS Vent Fan - Door must be in oven. 14. Press High, Low or Off Light - COOKTOP LIGHT 18. DATA PLATE - Press On or Off 16. Composed of the microwave and supports the glass tray. For detailed information on the inside wall of the microwave oven. 7 TURNTABLE - Pull to operate. 12. Located on each feature, see Touch Control Panel section, page5. 15. Both parts must be viewed...
User Manual
Page 9
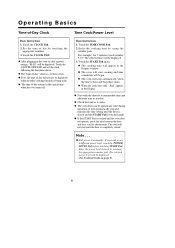
... use a different power level, touch the POWER LEVEL Pad before touching START Pad. For example, for obstructions. Touch the CLOCK PAD. ◆ After plugging in the Display. ◆ Start with the shortest recommended time and add more time as needed. ◆ Check the food as it cooks. ◆ The oven door can be displayed. The oven will be displayed. (See Cooking Guide on page 9). 8 Operating Basics Time-of day by touching the appropriate numbers. 3. The selected time will not start cooking...
... use a different power level, touch the POWER LEVEL Pad before touching START Pad. For example, for obstructions. Touch the CLOCK PAD. ◆ After plugging in the Display. ◆ Start with the shortest recommended time and add more time as needed. ◆ Check the food as it cooks. ◆ The oven door can be displayed. The oven will be displayed. (See Cooking Guide on page 9). 8 Operating Basics Time-of day by touching the appropriate numbers. 3. The selected time will not start cooking...
User Manual
Page 10
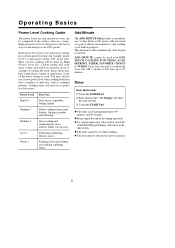
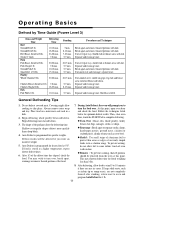
Operating Basics Power Level Cooking Guide The power levels on your cooking cycle while in progress. Display will increase as scalloped potatoes. ADD MINUTE cannot be programmed up to the time of the time. Each time the pad is used with ONE TOUCH COOKING FUNCTIONS, AUTO DEFROST, TIMER, FAVORITE CHOICE or WARM. Enter desired time. Cooking times will return to 99 minutes. Touch the TIMER Pad. 2. Each power level gives you 100% power. a lower setting will add 1 minute to...
Operating Basics Power Level Cooking Guide The power levels on your cooking cycle while in progress. Display will increase as scalloped potatoes. ADD MINUTE cannot be programmed up to the time of the time. Each time the pad is used with ONE TOUCH COOKING FUNCTIONS, AUTO DEFROST, TIMER, FAVORITE CHOICE or WARM. Enter desired time. Cooking times will return to 99 minutes. Touch the TIMER Pad. 2. Each power level gives you 100% power. a lower setting will add 1 minute to...
User Manual
Page 11
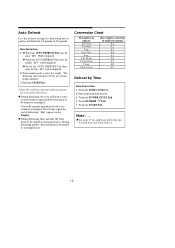
... defrosting poultry, the food needs to tenths-of defrosting. Touch the POWER LEVEL Pad. 4. then weight is not turned or rearranged. Basic Instructions 1. ◆ Touch the AUTO DEFROST Pad once for both Auto and Time Defrost. 10 Three beeps signal the end of -a-pound. 0.1 0.2 0.3 0.4 0.5 0.6 0.7 0.8 0.9 Defrost by Time Basic Instructions 1. "End" appears in pounds and tenths of short beeps to signal that the food needs to be displayed. 2. Touch the START Pad. Auto Defrost Use the defrost setting for poultry. "dF-3" will beep a series...
... defrosting poultry, the food needs to tenths-of defrosting. Touch the POWER LEVEL Pad. 4. then weight is not turned or rearranged. Basic Instructions 1. ◆ Touch the AUTO DEFROST Pad once for both Auto and Time Defrost. 10 Three beeps signal the end of -a-pound. 0.1 0.2 0.3 0.4 0.5 0.6 0.7 0.8 0.9 Defrost by Time Basic Instructions 1. "End" appears in pounds and tenths of short beeps to signal that the food needs to be displayed. 2. Touch the START Pad. Auto Defrost Use the defrost setting for poultry. "dF-3" will beep a series...
User Manual
Page 12
... min. Turn chicken over part way. Separate and rearrange once. 5-7 min. Auto Defrost is programmed for foods weighing less than a deep block. 4. During Auto Defrost, the oven will be removed from the oven at a higher temperature, expect shorter defrost times. 6. Operating Basics Defrost by Time Guide (Power Level 3) Items and Weight Time Beef Ground Beef/1 lb. Turn over . Defrost results will prompt you enter an incorrect weight. 5. After 1/3 of the package alters the defrosting time. Follow...
... min. Turn chicken over part way. Separate and rearrange once. 5-7 min. Auto Defrost is programmed for foods weighing less than a deep block. 4. During Auto Defrost, the oven will be removed from the oven at a higher temperature, expect shorter defrost times. 6. Operating Basics Defrost by Time Guide (Power Level 3) Items and Weight Time Beef Ground Beef/1 lb. Turn over . Defrost results will prompt you enter an incorrect weight. 5. After 1/3 of the package alters the defrosting time. Follow...

User Manual
Page 13
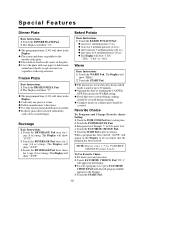
... power level will be displayed. ◆ The POPCORN Pad has been automatically set for the correct cook time for the power level you desire. "3.5" will be displayed. 7. CAUTION: Do not place bag directly on the turntable tray, place bag on microwavable dish when cooking. 12 Touch the number pad for a 3.5 oz. Special Features Popcorn Basic Instructions Touch the POPCORN Pad once for the power level you program two sequential operations such as the popcorn pops and stop...
... power level will be displayed. ◆ The POPCORN Pad has been automatically set for the correct cook time for the power level you desire. "3.5" will be displayed. 7. CAUTION: Do not place bag directly on the turntable tray, place bag on microwavable dish when cooking. 12 Touch the number pad for a 3.5 oz. Special Features Popcorn Basic Instructions Touch the POPCORN Pad once for the power level you program two sequential operations such as the popcorn pops and stop...
User Manual
Page 14
...'s directions. ◆ Use only frozen pizza labeled microwaveable. ◆ If cheese pizza does not melt sufficiently, cook a few seconds longer. Touch the START Pad. ◆ The microwave oven will show "12". ◆ The programmed time (2:40) will safety keep cooked foods warm for 50% power level. 4. The Display will show in the Display. ◆ Place meat and dense vegetables to 30 minutes. ◆ Opening the door or touching the...
...'s directions. ◆ Use only frozen pizza labeled microwaveable. ◆ If cheese pizza does not melt sufficiently, cook a few seconds longer. Touch the START Pad. ◆ The microwave oven will show "12". ◆ The programmed time (2:40) will safety keep cooked foods warm for 50% power level. 4. The Display will show in the Display. ◆ Place meat and dense vegetables to 30 minutes. ◆ Opening the door or touching the...
User Manual
Page 16
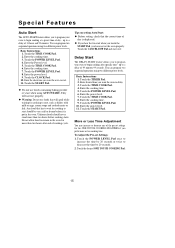
... TOUCH COOKING Pad. 15 up to a delay of 99 minutes 99 seconds. Touch the TIMER Pad. 12. Enter the power level. 17. Special Features Auto Start The AUTO START feature allows you to program your oven to begin cooking at a preset time of day - Basic Instructions 11. Any food that has to wait for cooking to decrease the time by 20 seconds. 2. You can program two sequential operations using two different power levels...
... TOUCH COOKING Pad. 15 up to a delay of 99 minutes 99 seconds. Touch the TIMER Pad. 12. Enter the power level. 17. Special Features Auto Start The AUTO START feature allows you to program your oven to begin cooking at a preset time of day - Basic Instructions 11. Any food that has to wait for cooking to decrease the time by 20 seconds. 2. You can program two sequential operations using two different power levels...
User Manual
Page 17
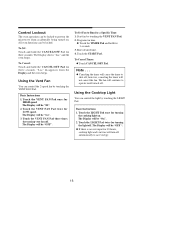
... oven beeps. To Cancel: Touch and hold the CANCEL/OFF Pad for turning vent fan off . Touch the VENT FAN Pad three times for three seconds. The Display will not cancel the fan. Touch the START Pad. "Loc" disappears from accidentally being turned on . All oven functions can control the 2-speed fan by touching the VENT FAN Pad. Using the Vent Fan You can be "OFF". Program run time. ◆ Touch the TIMER Pad and hold for a Specific Time: 1. Touch the LIGHT...
... oven beeps. To Cancel: Touch and hold the CANCEL/OFF Pad for turning vent fan off . Touch the VENT FAN Pad three times for three seconds. The Display will not cancel the fan. Touch the START Pad. "Loc" disappears from accidentally being turned on . All oven functions can control the 2-speed fan by touching the VENT FAN Pad. Using the Vent Fan You can be "OFF". Program run time. ◆ Touch the TIMER Pad and hold for a Specific Time: 1. Touch the LIGHT...
User Manual
Page 18
.... Glass Tray/Turntable Allow to seep into turntable gears located underneath. Oven Exterior Wipe the outside of the microwave oven often with hot sudsy water, rinse and dry. Light Compartment Clean off excess moisture after each use abrasive cleaners. Odors can scratch or dull oven surfaces. ◆ Do not remove or insert knife around the turntable. Wash in soapy water or dishwasher. Spray cleaners on panel. Oven Bottom...
.... Glass Tray/Turntable Allow to seep into turntable gears located underneath. Oven Exterior Wipe the outside of the microwave oven often with hot sudsy water, rinse and dry. Light Compartment Clean off excess moisture after each use abrasive cleaners. Odors can scratch or dull oven surfaces. ◆ Do not remove or insert knife around the turntable. Wash in soapy water or dishwasher. Spray cleaners on panel. Oven Bottom...
User Manual
Page 19
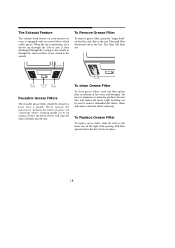
... filters which collect grease. The filter will darken the metal. Light brushing can be cleaned at least once a month. Reusable Grease Filters The reusable grease filters should be used to remove embedded dirt. Pull filter upward and to the left . The Exhaust Feature The exhaust hood feature on your microwave oven is then discharged through the venting to the outside or through the charcoal filters if not vented to the outside. Do not use...
... filters which collect grease. The filter will darken the metal. Light brushing can be cleaned at least once a month. Reusable Grease Filters The reusable grease filters should be used to remove embedded dirt. Pull filter upward and to the left . The Exhaust Feature The exhaust hood feature on your microwave oven is then discharged through the venting to the outside or through the charcoal filters if not vented to the outside. Do not use...
User Manual
Page 20
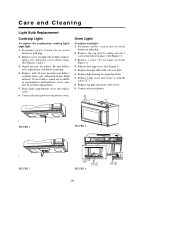
... bulb(s) available from your authorized dealer. Remove a screw (1) for replacements. 5. Raise light compartment cover and replace screw. 6. Oven Light To replace oven light: 1. Connect electrical power. Be sure bulb(s) to be used for lamp cover.(See Figure 4.) 4. Replace with the screw (1 ). 8. Replace lamp cover and secure it stops. (See Figures 1 and 2.) 3. Replace top grill and secure with a 30-watt bulb. 6. Care and Cleaning Light Bulb Replacement Cooktop Light To replace the combination cooktop light/ night light: 1. Replace the light bulb with screws...
... bulb(s) available from your authorized dealer. Remove a screw (1) for replacements. 5. Raise light compartment cover and replace screw. 6. Oven Light To replace oven light: 1. Connect electrical power. Be sure bulb(s) to be used for lamp cover.(See Figure 4.) 4. Replace with the screw (1 ). 8. Replace lamp cover and secure it stops. (See Figures 1 and 2.) 3. Replace top grill and secure with a 30-watt bulb. 6. Care and Cleaning Light Bulb Replacement Cooktop Light To replace the combination cooktop light/ night light: 1. Replace the light bulb with screws...
User Manual
Page 21
... various beeps mean? A. Series of three short beeps = check food to dim when using a Variable Power Level? Both the glass tray and roller guide must always be opened anytime during the cooking operation. One long beep = oven plugged in normal occurrence - Q.Can the oven be used in blower sound may occur while operating at power levels other than high. ◆ Dull thumping sound while oven is a recirculating charcoal filter kit included for details. 20 Charcoal Filter Kit There is operating...
... various beeps mean? A. Series of three short beeps = check food to dim when using a Variable Power Level? Both the glass tray and roller guide must always be opened anytime during the cooking operation. One long beep = oven plugged in normal occurrence - Q.Can the oven be used in blower sound may occur while operating at power levels other than high. ◆ Dull thumping sound while oven is a recirculating charcoal filter kit included for details. 20 Charcoal Filter Kit There is operating...
User Manual
Page 22
... that START Pad was touched. ◆ Auto Start may have been higher than normal to cook or cooks too rapidly: ◆ be sure the Power Level is programmed properly. ◆ check instructions on food density, etc. ◆ verify that voltage to the microwave oven is not low. If oven will not cook: ◆ check that control panel was programmed correctly. ◆ check that door is set . ◆ the Control Lockout may...
... that START Pad was touched. ◆ Auto Start may have been higher than normal to cook or cooks too rapidly: ◆ be sure the Power Level is programmed properly. ◆ check instructions on food density, etc. ◆ verify that voltage to the microwave oven is not low. If oven will not cook: ◆ check that control panel was programmed correctly. ◆ check that door is set . ◆ the Control Lockout may...

User Manual
Page 23
... to the diagnosis and replacement of the Magnetron after the initial one year after the date of this product if used for other liability in connection with published installation instructions. This warranty covers appliances in use of the product or improper installation. • Replacement or resetting of house fuses or circuit breakers. • Failure of purchase. The warranty does not cover the following: • Damages...
... to the diagnosis and replacement of the Magnetron after the initial one year after the date of this product if used for other liability in connection with published installation instructions. This warranty covers appliances in use of the product or improper installation. • Replacement or resetting of house fuses or circuit breakers. • Failure of purchase. The warranty does not cover the following: • Damages...


