User Manual
Page 1
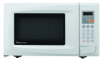
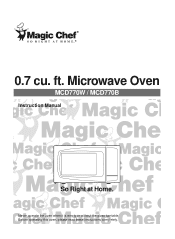
Never operate the oven when it is empty or without the glass turntable. Before operating this oven, please read these instructions completely. ft. Microwave Oven MCD770W / MCD770B Instruction Manual So Right at Home. 0.7 cu.
Never operate the oven when it is empty or without the glass turntable. Before operating this oven, please read these instructions completely. ft. Microwave Oven MCD770W / MCD770B Instruction Manual So Right at Home. 0.7 cu.
User Manual
Page 2
... 3 • GROUNDING INSTRUCTIONS ...3 • INSTALLATION ...4 • SPECIFICATIONS...5 • FEATURES DIAGRAM...6-7 • OPERATION PROCEDURE...8 • CONTROLS...9 SETTING THE CLOCK...9 WEIGHT DEFROSTING...10 TIME DEFROSTING...10 COOKING IN ONE STAGE ...11 COOKING IN TWO STAGES ...11 +30SEC ...12 AUTO COOK ...12 CHILD SAFETY LOCK ...14 TO SET POWER SAVE MODE...14 TO STOP THE OVEN WHILE THE OVEN IS OPERATING 14 • CARE OF YOUR MICROWAVE OVEN...15 • BEFORE YOU CALL FOR SERVICE...16 • CARE AND CLEANING...16 • MICROWAVE OVEN WARRANTY ...17 1 It...
... 3 • GROUNDING INSTRUCTIONS ...3 • INSTALLATION ...4 • SPECIFICATIONS...5 • FEATURES DIAGRAM...6-7 • OPERATION PROCEDURE...8 • CONTROLS...9 SETTING THE CLOCK...9 WEIGHT DEFROSTING...10 TIME DEFROSTING...10 COOKING IN ONE STAGE ...11 COOKING IN TWO STAGES ...11 +30SEC ...12 AUTO COOK ...12 CHILD SAFETY LOCK ...14 TO SET POWER SAVE MODE...14 TO STOP THE OVEN WHILE THE OVEN IS OPERATING 14 • CARE OF YOUR MICROWAVE OVEN...15 • BEFORE YOU CALL FOR SERVICE...16 • CARE AND CLEANING...16 • MICROWAVE OVEN WARRANTY ...17 1 It...
User Manual
Page 3
... locations. 12. c) Do not use . 17. Do not operate this appliance. To reduce the risk of table or counter. 15. Vapors from the microwave oven is specifically designed to surface tension of oven is not always present. Connect only to persons: a) Do not overheat the liquid. for example, closed , turn oven off, and disconnect the power cord, or shut off power at all instructions before removing...
... locations. 12. c) Do not use . 17. Do not operate this appliance. To reduce the risk of table or counter. 15. Vapors from the microwave oven is specifically designed to surface tension of oven is not always present. Connect only to persons: a) Do not overheat the liquid. for example, closed , turn oven off, and disconnect the power cord, or shut off power at all instructions before removing...
User Manual
Page 4
... short, have a qualified electrician or serviceman install an outlet near the appliance. WARNING: Improper use an extension cord, if the power supply cord is not responsible for any circumstances. 3 WARNING: Do not cut or remove the third (ground) prong from the receiver. • Plug the microwave oven into an outlet that is properly installed and grounded. It has been type...
... short, have a qualified electrician or serviceman install an outlet near the appliance. WARNING: Improper use an extension cord, if the power supply cord is not responsible for any circumstances. 3 WARNING: Do not cut or remove the third (ground) prong from the receiver. • Plug the microwave oven into an outlet that is properly installed and grounded. It has been type...
User Manual
Page 5
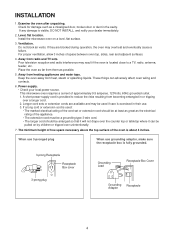
... possible. 5. Do not block air vents. Power supply. • Check your dealer immediately. 2. The minimum height of free space necessary above the top surface of the appliance. • The extension cord must be a grounding type 3-wire cord. • The longer cord should be pulled on a level, flat surface. 3. Examine the oven after unpacking. Install the microwave oven on by children or tripped...
... possible. 5. Do not block air vents. Power supply. • Check your dealer immediately. 2. The minimum height of free space necessary above the top surface of the appliance. • The extension cord must be a grounding type 3-wire cord. • The longer cord should be pulled on a level, flat surface. 3. Examine the oven after unpacking. Install the microwave oven on by children or tripped...

User Manual
Page 6
SPECIFICATIONS POWER SUPPLY INPUT POWER MICROWAVE ENERGY OUTPUT FREQUENCY OUTSIDE DIMENSIONS (W x H x D) CAVITY DIMENSIONS (W x H x D) CAVITY VOLUME NET WEIGHT TIMER POWER SELECTIONS 120V AC, 60Hz SINGLE PHASE WITH GROUNDING 1100 W 700 W 2,450 MHz 446 (17.5) x 270 (10.6) x 316 (12.4) mm (inch) 295 (11.6) x 219 (8.6) x 303 (11.9) mm (inch) 0.7 cu.ft APPROX. 9.5Kg (21.0lbs.) 59 min. 99 sec. 10 Levels * Specifications are subject to change without notice. 446mm (17.5inch) 316mm (12.4 inch) 270mm (10.6 inch) 5
SPECIFICATIONS POWER SUPPLY INPUT POWER MICROWAVE ENERGY OUTPUT FREQUENCY OUTSIDE DIMENSIONS (W x H x D) CAVITY DIMENSIONS (W x H x D) CAVITY VOLUME NET WEIGHT TIMER POWER SELECTIONS 120V AC, 60Hz SINGLE PHASE WITH GROUNDING 1100 W 700 W 2,450 MHz 446 (17.5) x 270 (10.6) x 316 (12.4) mm (inch) 295 (11.6) x 219 (8.6) x 303 (11.9) mm (inch) 0.7 cu.ft APPROX. 9.5Kg (21.0lbs.) 59 min. 99 sec. 10 Levels * Specifications are subject to change without notice. 446mm (17.5inch) 316mm (12.4 inch) 270mm (10.6 inch) 5
User Manual
Page 7
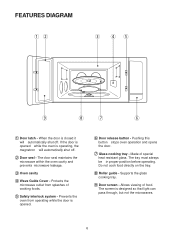
... . 2 Door seal - Protects the microwave outlet from operating while the door is opened while the oven is opened . 6 Door release button - The door seal maintains the microwave within the oven cavity and prevents microwave leakage. 3 Oven cavity 4 Wave Guide Cover - When the door is designed so that light can pass through, but not the microwaves. 6 Supports the glass cooking tray. 9 Door screen - Do not cook food directly on the tray. 8 Roller guide - Allows viewing of special heat resistant glass. FEATURES DIAGRAM 12 3 45 9 8 7 6 1 Door latch -
... . 2 Door seal - Protects the microwave outlet from operating while the door is opened while the oven is opened . 6 Door release button - The door seal maintains the microwave within the oven cavity and prevents microwave leakage. 3 Oven cavity 4 Wave Guide Cover - When the door is designed so that light can pass through, but not the microwaves. 6 Supports the glass cooking tray. 9 Door screen - Do not cook food directly on the tray. 8 Roller guide - Allows viewing of special heat resistant glass. FEATURES DIAGRAM 12 3 45 9 8 7 6 1 Door latch -
User Manual
Page 8
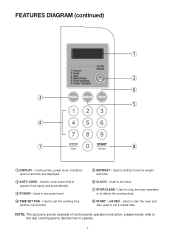
... DIAGRAM (continued) 1 2 6 3 5 4 7 8 1 DISPLAY - Used to stop the oven operation or to set clock. 7 STOP/CLEAR - Cooking time, power level, indicators and current time are displayed. 2 AUTO COOK - Used to delete the cooking data. 8 START / +30 SEC - Used to set power level. 4 TIME SET PAD - Used to defrost foods for weight and time. 6 CLOCK - NOTE: The picture is just an example of popular food easily and automatically. 3 POWER - Used to set the cooking time and the current time. 5 DEFROST - Used to cook some kind of control panel operation instruction...
... DIAGRAM (continued) 1 2 6 3 5 4 7 8 1 DISPLAY - Used to stop the oven operation or to set clock. 7 STOP/CLEAR - Cooking time, power level, indicators and current time are displayed. 2 AUTO COOK - Used to delete the cooking data. 8 START / +30 SEC - Used to set power level. 4 TIME SET PAD - Used to defrost foods for weight and time. 6 CLOCK - NOTE: The picture is just an example of popular food easily and automatically. 3 POWER - Used to set the cooking time and the current time. 5 DEFROST - Used to cook some kind of control panel operation instruction...
User Manual
Page 9
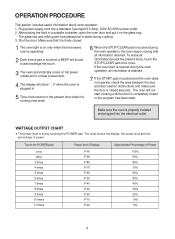
... 3 times 4 times 5 times 6 times 7 times 8 times 9 times 10 times 11 times Power level (Display) P-HI P-90 P-80 P-70 P-60 P-50 P-40 P-30 P-20 P-10 P-00 Approximate Percentage of power. Make sure that it on only when the microwave oven is operating. 2 Each time a pad is touched, a BEEP will sound to the present time when the cooking time ends. 6 When the STOP/CLEAR pad is completely closed or the program has been reset. If the oven door is opened during cooking...
... 3 times 4 times 5 times 6 times 7 times 8 times 9 times 10 times 11 times Power level (Display) P-HI P-90 P-80 P-70 P-60 P-50 P-40 P-30 P-20 P-10 P-00 Approximate Percentage of power. Make sure that it on only when the microwave oven is operating. 2 Each time a pad is touched, a BEEP will sound to the present time when the cooking time ends. 6 When the STOP/CLEAR pad is completely closed or the program has been reset. If the oven door is opened during cooking...
User Manual
Page 10
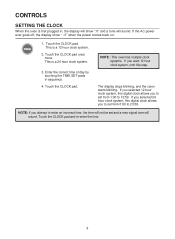
... an incorrect time, the time will not be set from 0:00 to set and a error signal tone will sound. If the AC power ever goes off, the display show ":0" and a tone will sound. The display stops blinking, and the colon starts blinking. Enter the correct time of day by touching the TIME SET pads in , the display will show " : 0" when the power comes back on. 1. Touch the CLOCK pad and...
... an incorrect time, the time will not be set from 0:00 to set and a error signal tone will sound. If the AC power ever goes off, the display show ":0" and a tone will sound. The display stops blinking, and the colon starts blinking. Enter the correct time of day by touching the TIME SET pads in , the display will show " : 0" when the power comes back on. 1. Touch the CLOCK pad and...
User Manual
Page 11
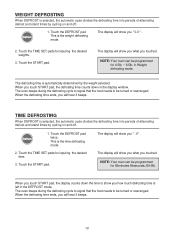
... weight selected. WEIGHT DEFROSTING When DEFROST is the weight defrosting mode. Touch the TIME SET pads for 59minutes 99seconds.(59:99). in the DEFROST mode. This is left in Weight defrosting mode. The display will show you what you touched. Touch the START pad. The oven beeps during the defrosting cycle to signal that the food needs to show you how much defrosting time is the time defrosting mode. 2. The oven beeps during the defrosting cycle to signal that the food needs to be programmed...
... weight selected. WEIGHT DEFROSTING When DEFROST is the weight defrosting mode. Touch the TIME SET pads for 59minutes 99seconds.(59:99). in the DEFROST mode. This is left in Weight defrosting mode. The display will show you what you touched. Touch the START pad. The oven beeps during the defrosting cycle to signal that the food needs to show you how much defrosting time is the time defrosting mode. 2. The oven beeps during the defrosting cycle to signal that the food needs to be programmed...
User Manual
Page 12
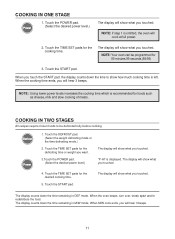
... desired power level.) The display will show what you touched. 4. The display will show what you touched. The display counts down the time remaining in M/W mode. COOKING IN ONE STAGE 1. Touch the TIME SET pads for the defrosting time or weight you touched. The display will hear 3 beeps. Touch the TIME SET pads for the cooking time. NOTE: Your oven can be defrosted fully before cooking. 1. Touch the START pad. the display counts down the time to be programmed for the desired cooking time...
... desired power level.) The display will show what you touched. 4. The display will show what you touched. The display counts down the time remaining in M/W mode. COOKING IN ONE STAGE 1. Touch the TIME SET pads for the defrosting time or weight you touched. The display will hear 3 beeps. Touch the TIME SET pads for the cooking time. NOTE: Your oven can be defrosted fully before cooking. 1. Touch the START pad. the display counts down the time to be programmed for the desired cooking time...
User Manual
Page 13
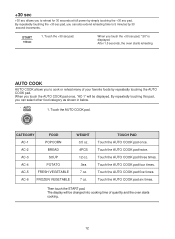
... FOOD AC-1 POPCORN AC-2 BREAD AC-3 SOUP AC-4 POTATO AC-5 FRESH VEGETABLE AC-6 FROZEN VEGETABLE WEIGHT 3.5 oz. 4PCS 12 oz. 3ea 7 oz. 7 oz. By repeatedly touching the +30 sec pad, you touch the AUTO COOK pad once, "AC-1" will be displayed. AUTO COOK AUTO COOK allows you can also extend reheating time to cook or reheat many of quantity and the oven starts cooking. 12 Touch the AUTO COOK pad. Touch...
... FOOD AC-1 POPCORN AC-2 BREAD AC-3 SOUP AC-4 POTATO AC-5 FRESH VEGETABLE AC-6 FROZEN VEGETABLE WEIGHT 3.5 oz. 4PCS 12 oz. 3ea 7 oz. 7 oz. By repeatedly touching the +30 sec pad, you touch the AUTO COOK pad once, "AC-1" will be displayed. AUTO COOK AUTO COOK allows you can also extend reheating time to cook or reheat many of quantity and the oven starts cooking. 12 Touch the AUTO COOK pad. Touch...
User Manual
Page 14
... extremely hot. 5. When you use the AUTO COOK pad. Place bag in oven according to manufacturer's directions. 3. The bag may be folded down as follows. Pop only one bag at a time. 4. Do not leave oven unattended while popping popcorn. CAUTION : If prepackaged popcorn is of a different weight than the recommended weight, do not use the AC-1, place the popcorn bag carefully so bag does not touch oven walls...
... extremely hot. 5. When you use the AUTO COOK pad. Place bag in oven according to manufacturer's directions. 3. The bag may be folded down as follows. Pop only one bag at a time. 4. Do not leave oven unattended while popping popcorn. CAUTION : If prepackaged popcorn is of a different weight than the recommended weight, do not use the AC-1, place the popcorn bag carefully so bag does not touch oven walls...
User Manual
Page 15
... SET POWER SAVE MODE 1. The display will disappear. 3. To cancel power save mode, touch any key. TO STOP THE OVEN WHILE THE OVEN IS OPERATING 1. NOTE: Oven stops operating when door is again available for 3 seconds, a beep sounds. Touch the STOP/CLEAR pad. Touch and then hold the STOP/CLEAR pad for normal use. But if there is on. The oven is opened. 14 Touch the STOP/CLEAR pad. • You can restart the oven by touching the START...
... SET POWER SAVE MODE 1. The display will disappear. 3. To cancel power save mode, touch any key. TO STOP THE OVEN WHILE THE OVEN IS OPERATING 1. NOTE: Oven stops operating when door is again available for 3 seconds, a beep sounds. Touch the STOP/CLEAR pad. Touch and then hold the STOP/CLEAR pad for normal use. But if there is on. The oven is opened. 14 Touch the STOP/CLEAR pad. • You can restart the oven by touching the START...
User Manual
Page 16
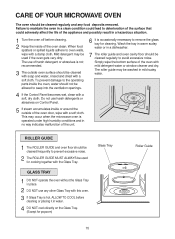
... for popcorn) Glass Tray Roller Guide 15 Mild detergent may be cleaned with soap and water, rinsed and dried with a soft cloth. This may be washed in no way indicates malfunction of the oven clean. When food spatters or spilled liquids adhere to the operating parts inside or around the outside oven surface should be used for cooking together with the Glass Tray. To prevent damage to oven walls...
... for popcorn) Glass Tray Roller Guide 15 Mild detergent may be cleaned with soap and water, rinsed and dried with a soft cloth. This may be washed in no way indicates malfunction of the oven clean. When food spatters or spilled liquids adhere to the operating parts inside or around the outside oven surface should be used for cooking together with the Glass Tray. To prevent damage to oven walls...
User Manual
Page 17
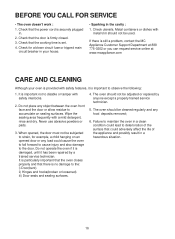
... disable or tamper with metal trim should not be used. Check that the power cord is securely plugged in your oven is provided with a mild detergent, rinse and dry. It is still a problem, contact the MC Appliance Customer Support Department at 888 775-0202 or you can request service online at www.mcappliance.com CARE AND CLEANING Although your house. •...
... disable or tamper with metal trim should not be used. Check that the power cord is securely plugged in your oven is provided with a mild detergent, rinse and dry. It is still a problem, contact the MC Appliance Customer Support Department at 888 775-0202 or you can request service online at www.mcappliance.com CARE AND CLEANING Although your house. •...
User Manual
Page 18
... prior to receiving a replacement unit or refund. year warranty expires. In addition MC Appliance Corporation warrants the Magnetron (parts only) to be free from defects in use of the product or improper installation. • Replacement or resetting of house fuses or circuit breakers. • Failure of your appliance is required to furnish a new part(s) (at www.mcappliance.com This warranty covers appliances in material...
... prior to receiving a replacement unit or refund. year warranty expires. In addition MC Appliance Corporation warrants the Magnetron (parts only) to be free from defects in use of the product or improper installation. • Replacement or resetting of house fuses or circuit breakers. • Failure of your appliance is required to furnish a new part(s) (at www.mcappliance.com This warranty covers appliances in material...


