User Manual
Page 1
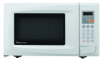
Before operating this oven, please read these instructions completely. 0.7 cu. Microwave Oven MCD770W / MCD770B Instruction Manual So Right at Home. ft. Never operate the oven when it is empty or without the glass turntable.
Before operating this oven, please read these instructions completely. 0.7 cu. Microwave Oven MCD770W / MCD770B Instruction Manual So Right at Home. ft. Never operate the oven when it is empty or without the glass turntable.
User Manual
Page 2
... IN TWO STAGES ...11 +30SEC ...12 AUTO COOK ...12 CHILD SAFETY LOCK ...14 TO SET POWER SAVE MODE...14 TO STOP THE OVEN WHILE THE OVEN IS OPERATING 14 • CARE OF YOUR MICROWAVE OVEN...15 • BEFORE YOU CALL FOR SERVICE...16 • CARE AND CLEANING...16 • MICROWAVE... exposure to microwave energy. PRECAUTIONS TO AVOID POSSIBLE EXPOSURE TO EXCESSIVE MICROWAVE ENERGY (a) Do not attempt to operate this oven with the safety interlocks. (b) Do not place any object between the oven front face and the door or allow soil or cleaner residue to the: (1) door (bent), (2) hinges and ...
... IN TWO STAGES ...11 +30SEC ...12 AUTO COOK ...12 CHILD SAFETY LOCK ...14 TO SET POWER SAVE MODE...14 TO STOP THE OVEN WHILE THE OVEN IS OPERATING 14 • CARE OF YOUR MICROWAVE OVEN...15 • BEFORE YOU CALL FOR SERVICE...16 • CARE AND CLEANING...16 • MICROWAVE... exposure to microwave energy. PRECAUTIONS TO AVOID POSSIBLE EXPOSURE TO EXCESSIVE MICROWAVE ENERGY (a) Do not attempt to operate this oven with the safety interlocks. (b) Do not place any object between the oven front face and the door or allow soil or cleaner residue to the: (1) door (bent), (2) hinges and ...
User Manual
Page 3
... from heated surfaces. 14. Carefully attend appliance when paper, plastic, or other utensil into the container. 18. Liquids, such as described in oven. c) Do not use . 17. Vapors from paper or plastic bags before using the appliance. 12. Install or locate this appliance only in... followed, including the following: WARNING-To reduce the risk of the safety interlock switches thereby rendering them inoperable. 19. Do not store this oven. 16. Never heat oil or fat for examination, repair or adjustment. 10. SAVE THESE INSTRUCTIONS 2 This type of injury to heat, ...
... from heated surfaces. 14. Carefully attend appliance when paper, plastic, or other utensil into the container. 18. Liquids, such as described in oven. c) Do not use . 17. Vapors from paper or plastic bags before using the appliance. 12. Install or locate this appliance only in... followed, including the following: WARNING-To reduce the risk of the safety interlock switches thereby rendering them inoperable. 19. Do not store this oven. 16. Never heat oil or fat for examination, repair or adjustment. 10. SAVE THESE INSTRUCTIONS 2 This type of injury to heat, ...
User Manual
Page 4
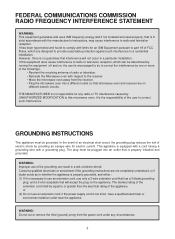
... a cord having a grounding wire with limits for electric current. THE MANUFACTURER is necessary to the receiver. • Move the microwave oven away from the power cord under any radio or TV interference caused by providing an escape wire for an ISM Equipment pursuant to part ...18 of radio or television. • Relocate the Microwave oven with the manufacturer's instructions, may cause interference to comply with a grounding plug. However, there is no guarantee that interference will accept the...
... a cord having a grounding wire with limits for electric current. THE MANUFACTURER is necessary to the receiver. • Move the microwave oven away from the power cord under any radio or TV interference caused by providing an escape wire for an ISM Equipment pursuant to part ...18 of radio or television. • Relocate the Microwave oven with the manufacturer's instructions, may cause interference to comply with a grounding plug. However, there is no guarantee that interference will accept the...
User Manual
Page 5
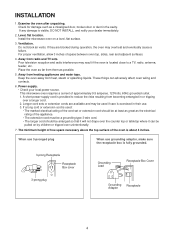
.... 7. For proper ventilation, allow 3 inches of approximately 9.5 amperes, 120Volts, 60Hz grounded outlet. 1. This microwave oven requires a current of space between oven top, sides, rear and adjacent surfaces. 4. Check for damage such as a misaligned door, broken door or dent...cord is fully grounded. 3-prong Receptacle Receptacle Box cover Grounding Lead Receptacle Box Cover 3-prong plug Grounding Receptacle Adaptor 4 Examine the oven after unpacking. Ventilation. Poor television reception and radio interference may overheat and eventually cause a failure. If a long cord or ...
.... 7. For proper ventilation, allow 3 inches of approximately 9.5 amperes, 120Volts, 60Hz grounded outlet. 1. This microwave oven requires a current of space between oven top, sides, rear and adjacent surfaces. 4. Check for damage such as a misaligned door, broken door or dent...cord is fully grounded. 3-prong Receptacle Receptacle Box cover Grounding Lead Receptacle Box Cover 3-prong plug Grounding Receptacle Adaptor 4 Examine the oven after unpacking. Ventilation. Poor television reception and radio interference may overheat and eventually cause a failure. If a long cord or ...
User Manual
Page 7
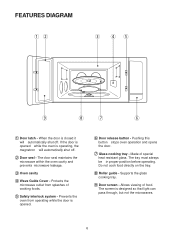
...door is operating, the magnetron will automatically shut off . 2 Door seal - If the door is opened while the oven is opened. 6 Door release button - Prevents the oven from splashes of special heat resistant glass. The tray must always be in proper position before operating. Supports the glass ... 45 9 8 7 6 1 Door latch - When the door is designed so that light can pass through, but not the microwaves. 6 Pushing this button stops oven operation and opens the door. 7 Glass cooking tray - Do not cook food directly on the tray. 8 Roller guide - Allows viewing of food.
...door is operating, the magnetron will automatically shut off . 2 Door seal - If the door is opened while the oven is opened. 6 Door release button - Prevents the oven from splashes of special heat resistant glass. The tray must always be in proper position before operating. Supports the glass ... 45 9 8 7 6 1 Door latch - When the door is designed so that light can pass through, but not the microwaves. 6 Pushing this button stops oven operation and opens the door. 7 Glass cooking tray - Do not cook food directly on the tray. 8 Roller guide - Allows viewing of food.
User Manual
Page 8
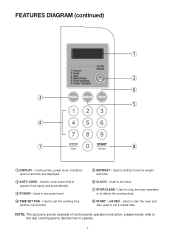
... cooking time and the current time. 5 DEFROST - Used to set clock. 7 STOP/CLEAR - Used to set power level. 4 TIME SET PAD - Used to stop the oven operation or to defrost foods for weight and time. 6 CLOCK - Used to delete the cooking data. 8 START / +30 SEC - Used to start the... oven and also used to set a reheat time. NOTE: The picture is just an example of control panel operation instruction, please mainly refer to the real ...
... cooking time and the current time. 5 DEFROST - Used to set clock. 7 STOP/CLEAR - Used to set power level. 4 TIME SET PAD - Used to stop the oven operation or to defrost foods for weight and time. 6 CLOCK - Used to delete the cooking data. 8 START / +30 SEC - Used to start the... oven and also used to set a reheat time. NOTE: The picture is just an example of control panel operation instruction, please mainly refer to the real ...
User Manual
Page 9
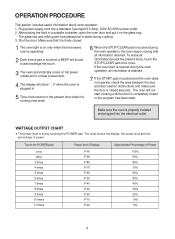
... not operate, check the area between the door and door seal for obstructions and make sure the door is touched during the oven operation, the oven stops cooking and all information retained. The chart shows the display, the power level and the percentage of Power 100% 90% 80% ...power-level is set to a lower power level. 4 The display will not start cooking until the door is opened during cooking. 3. The oven will show " : 0" when the oven is properly installed and plugged into a standard 3-pronged 9.5 Amp, 120V AC 60Hz power outlet. 2. Plug power supply cord into the electrical ...
... not operate, check the area between the door and door seal for obstructions and make sure the door is touched during the oven operation, the oven stops cooking and all information retained. The chart shows the display, the power level and the percentage of Power 100% 90% 80% ...power-level is set to a lower power level. 4 The display will not start cooking until the door is opened during cooking. 3. The oven will show " : 0" when the oven is properly installed and plugged into a standard 3-pronged 9.5 Amp, 120V AC 60Hz power outlet. 2. Plug power supply cord into the electrical ...
User Manual
Page 10
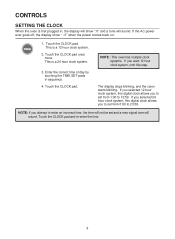
NOTE : This oven has multiple clock systems. If you attempt to enter an incorrect time, the time will not be set and a error signal tone will sound. NOTE: ..., the display show ":0" and a tone will show " : 0" when the power comes back on. 1. This is a 12 hour clock system. 2. CONTROLS SETTING THE CLOCK When the oven is first plugged in sequence. 4.
NOTE : This oven has multiple clock systems. If you attempt to enter an incorrect time, the time will not be set and a error signal tone will sound. NOTE: ..., the display show ":0" and a tone will show " : 0" when the power comes back on. 1. This is a 12 hour clock system. 2. CONTROLS SETTING THE CLOCK When the oven is first plugged in sequence. 4.
User Manual
Page 11
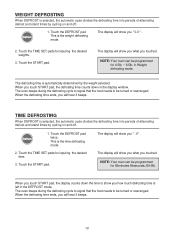
...DEFROST is selected, the automatic cycle divides the defrosting time into periods of alternating defrost and stand times by cycling on and off . 1. The oven beeps during the defrosting cycle to signal that the food needs to show you touch START pad, the display counts down in the display window... pad. Touch the DEFROST pad twice. The display will hear 3 beeps. 10 Touch the TIME SET pads for inputing the desired time. 3. The oven beeps during the defrosting cycle to signal that the food needs to be turned or rearranged. The display will show you will show you what...
...DEFROST is selected, the automatic cycle divides the defrosting time into periods of alternating defrost and stand times by cycling on and off . 1. The oven beeps during the defrosting cycle to signal that the food needs to show you touch START pad, the display counts down in the display window... pad. Touch the DEFROST pad twice. The display will hear 3 beeps. 10 Touch the TIME SET pads for inputing the desired time. 3. The oven beeps during the defrosting cycle to signal that the food needs to be turned or rearranged. The display will show you will show you what...
User Manual
Page 12
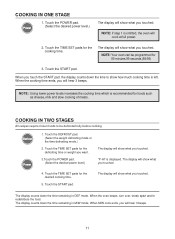
...foods such as cheese, milk and slow cooking of meats. NOTE: If step 1 is omitted, the oven will show how much cooking time is displayed. COOKING IN TWO STAGES All recipes require frozen foods to ...what you touch the START pad. When the cooking time ends, you touched. When the oven beeps, turn over, break apart and/or redistribute the food. The display will show what you will show... what you touched. NOTE: Your oven can be defrosted fully before cooking. 1. Touch the DEFROST pad. (Select the weight defrosting mode or...
...foods such as cheese, milk and slow cooking of meats. NOTE: If step 1 is omitted, the oven will show how much cooking time is displayed. COOKING IN TWO STAGES All recipes require frozen foods to ...what you touch the START pad. When the cooking time ends, you touched. When the oven beeps, turn over, break apart and/or redistribute the food. The display will show what you will show... what you touched. NOTE: Your oven can be defrosted fully before cooking. 1. Touch the DEFROST pad. (Select the weight defrosting mode or...
User Manual
Page 13
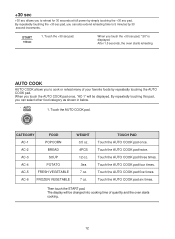
... the +30 sec pad, ":30" is displayed. By repeatedly touching the +30 sec pad, you to cook or reheat many of quantity and the oven starts cooking. 12 AUTO COOK AUTO COOK allows you can select other food category as shown in below. 1. CATEGORY FOOD AC-1 POPCORN AC-2 BREAD AC.... Touch the +30 sec pad. Then touch the START pad. When you to 5 minutes by repeatedly touching the AUTO COOK pad. After 1.5 seconds, the oven starts reheating. By repeatedly touching this pad, you touch the AUTO COOK pad once, "AC-1" will be displayed. Touch the AUTO COOK pad twice. When...
... the +30 sec pad, ":30" is displayed. By repeatedly touching the +30 sec pad, you to cook or reheat many of quantity and the oven starts cooking. 12 AUTO COOK AUTO COOK allows you can select other food category as shown in below. 1. CATEGORY FOOD AC-1 POPCORN AC-2 BREAD AC.... Touch the +30 sec pad. Then touch the START pad. When you to 5 minutes by repeatedly touching the AUTO COOK pad. After 1.5 seconds, the oven starts reheating. By repeatedly touching this pad, you touch the AUTO COOK pad once, "AC-1" will be displayed. Touch the AUTO COOK pad twice. When...
User Manual
Page 14
... a different weight than the recommended weight, do not use the AC-1, place the popcorn bag carefully so bag does not touch oven walls. Follow the manufacturer instruction. 13 Place bag in oven according to manufacturer's directions. 3. Do not reheat unpopped kernels or reuse bag. 6. After popping, open bag carefully: popcorn and steam...
... a different weight than the recommended weight, do not use the AC-1, place the popcorn bag carefully so bag does not touch oven walls. Follow the manufacturer instruction. 13 Place bag in oven according to manufacturer's directions. 3. Do not reheat unpopped kernels or reuse bag. 6. After popping, open bag carefully: popcorn and steam...
User Manual
Page 15
... 3 seconds, a beep sounds. Touch the STOP/CLEAR pad. " :0" or clock appears in clear mode, all function key will be same as by small children. NOTE: Oven stops operating when door is on. Then " :0" or clock will be shown and the operation of all the contents of display will turn off and... a beep sounds. Touch and then hold the STOP/CLEAR pad for 3 seconds. Touch the STOP/CLEAR pad. • You can restart the oven by touching the START pad. • Touch the STOP/CLEAR pad once more to erase all instructions. • You must enter in power save simply...
... 3 seconds, a beep sounds. Touch the STOP/CLEAR pad. " :0" or clock appears in clear mode, all function key will be same as by small children. NOTE: Oven stops operating when door is on. Then " :0" or clock will be shown and the operation of all the contents of display will turn off and... a beep sounds. Touch and then hold the STOP/CLEAR pad for 3 seconds. Touch the STOP/CLEAR pad. • You can restart the oven by touching the START pad. • Touch the STOP/CLEAR pad once more to erase all instructions. • You must enter in power save simply...
User Manual
Page 16
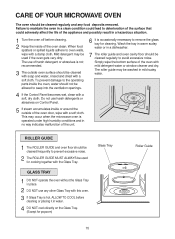
... use harsh detergents or abrasives on the Glass Tray. (Except for popcorn) Glass Tray Roller Guide 15 ROLLER GUIDE 1 The ROLLER GUIDE and oven floor should be cleaned frequently to seep into the ventilation openings. 4 If the Control Panel becomes wet, clean with a soft cloth. Failure to... maintain the oven in a clean condition could lead to oven walls, wipe with the Glass Tray. When food spatters or spilled liquids adhere to deterioration of the surface that could adversely...
... use harsh detergents or abrasives on the Glass Tray. (Except for popcorn) Glass Tray Roller Guide 15 ROLLER GUIDE 1 The ROLLER GUIDE and oven floor should be cleaned frequently to seep into the ventilation openings. 4 If the Control Panel becomes wet, clean with a soft cloth. Failure to... maintain the oven in a clean condition could lead to oven walls, wipe with the Glass Tray. When food spatters or spilled liquids adhere to deterioration of the surface that could adversely...
User Manual
Page 17
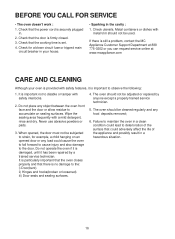
...: i) Door(bent) ii) Hinges and hooks(broken or loosened) iii) Door seals and sealing surfaces. 4. It is particularly important that the oven closes properly and that the power cord is no damage to observe the following: 1. Check that there is securely plugged in a hazardous situation. ... properly trained service technician. 5. When opened, the door must not be cleaned regularly and any food deposits removed; 6. Failure to maintain the oven in a clean condition could lead to strain, for a blown circuit fuse or tripped main circuit breaker in the cavity : 1. Check that could ...
...: i) Door(bent) ii) Hinges and hooks(broken or loosened) iii) Door seals and sealing surfaces. 4. It is particularly important that the oven closes properly and that the power cord is no damage to observe the following: 1. Check that there is securely plugged in a hazardous situation. ... properly trained service technician. 5. When opened, the door must not be cleaned regularly and any food deposits removed; 6. Failure to maintain the oven in a clean condition could lead to strain, for a blown circuit fuse or tripped main circuit breaker in the cavity : 1. Check that could ...
User Manual
Page 18
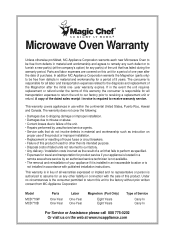
...house fuses or circuit breakers. • Failure of this unit to the factory without prior written consent from MC Appliance Corporation Model MCD770W MCD770B Parts One-Year One-Year Labor One-Year One-Year Magnetron (Part Only) Eight Years Eight Years Type of Service Carry...transportation expenses to return the unit to our factory prior to receiving a replacement unit or refund. Microwave Oven Warranty Unless otherwise prohibited, MC Appliance Corporation warrants each new Microwave Oven to be free from defects in material and workmanship for a period of 8 years. This warranty ...
...house fuses or circuit breakers. • Failure of this unit to the factory without prior written consent from MC Appliance Corporation Model MCD770W MCD770B Parts One-Year One-Year Labor One-Year One-Year Magnetron (Part Only) Eight Years Eight Years Type of Service Carry...transportation expenses to return the unit to our factory prior to receiving a replacement unit or refund. Microwave Oven Warranty Unless otherwise prohibited, MC Appliance Corporation warrants each new Microwave Oven to be free from defects in material and workmanship for a period of 8 years. This warranty ...


