User Manual
Page 1
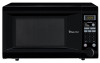
MICROWAVE OVEN MCD1110WB / MCD1110BB OPERATING INSTRUCTIONS & COOK BOOK Before operating this oven, please read these instructions completely.
MICROWAVE OVEN MCD1110WB / MCD1110BB OPERATING INSTRUCTIONS & COOK BOOK Before operating this oven, please read these instructions completely.
User Manual
Page 2
... INSTRUCTIONS ...3 • INSTALLATION ...4 • SPECIFICATIONS...5 • FEATURES DIAGRAM...6 • FEATURES DIAGRAM (CONTINUED) ...7 • OPERATION PROCEDURE...8 • CONTROLS...9 SETTING THE CLOCK...9 WEIGHT DEFROSTING ...10 TIME DEFROSTING...10 COOKING IN ONE STAGE ...11 COOKING IN TWO STAGES ...11 +30 SEC...12 ONE TOUCH COOKING ...12 ONE TOUCH COOKING (CONTINUED)...13 AUTO COOK ...13 CHILD SAFETY LOCK ...14 TO SET POWER SAVE MODE ...14 TO STOP THE OVEN WHILE THE OVEN IS OPERATING 14 • CARE OF YOUR MICROWAVE OVEN...15 • BEFORE YOU CALL FOR SERVICE...
... INSTRUCTIONS ...3 • INSTALLATION ...4 • SPECIFICATIONS...5 • FEATURES DIAGRAM...6 • FEATURES DIAGRAM (CONTINUED) ...7 • OPERATION PROCEDURE...8 • CONTROLS...9 SETTING THE CLOCK...9 WEIGHT DEFROSTING ...10 TIME DEFROSTING...10 COOKING IN ONE STAGE ...11 COOKING IN TWO STAGES ...11 +30 SEC...12 ONE TOUCH COOKING ...12 ONE TOUCH COOKING (CONTINUED)...13 AUTO COOK ...13 CHILD SAFETY LOCK ...14 TO SET POWER SAVE MODE ...14 TO STOP THE OVEN WHILE THE OVEN IS OPERATING 14 • CARE OF YOUR MICROWAVE OVEN...15 • BEFORE YOU CALL FOR SERVICE...
User Manual
Page 3
... able to be boiling due to stand in oven. Vapors from the microwave oven is specifically designed to be overheated beyond the boiling point without the glass tray in the cavity it . Keep the waveguide cover clean at the fuse or circuit breaker panel. Do not operate the oven without appearing to heat, cook, or dry food. SAVE THESE INSTRUCTIONS 2 Carefully attend appliance when paper, plastic, or other utensil...
... able to be boiling due to stand in oven. Vapors from the microwave oven is specifically designed to be overheated beyond the boiling point without the glass tray in the cavity it . Keep the waveguide cover clean at the fuse or circuit breaker panel. Do not operate the oven without appearing to heat, cook, or dry food. SAVE THESE INSTRUCTIONS 2 Carefully attend appliance when paper, plastic, or other utensil...
User Manual
Page 4
... grounding can be grounded. The marked rating of the extension cord shall be equal to or greater than the electrical rating of the user to part 18 of electric shock. WARNING: Do not cut or remove the third (ground) prong from the receiver. • Plug the microwave oven into an outlet that interference will accept the plug on , the...
... grounding can be grounded. The marked rating of the extension cord shall be equal to or greater than the electrical rating of the user to part 18 of electric shock. WARNING: Do not cut or remove the third (ground) prong from the receiver. • Plug the microwave oven into an outlet that interference will accept the plug on , the...
User Manual
Page 5
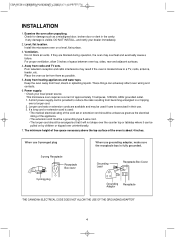
... be pulled on a level, flat surface. 3. Longer cord sets or extension cords are blocked during operation, the oven may be used : • The marked electrical rating of the cord set or extension cord should be at least as great as the electrical rating of the oven is visible, DO NOT INSTALL, and notify your local power source. The minimum height of free space necessary above the...
... be pulled on a level, flat surface. 3. Longer cord sets or extension cords are blocked during operation, the oven may be used : • The marked electrical rating of the cord set or extension cord should be at least as great as the electrical rating of the oven is visible, DO NOT INSTALL, and notify your local power source. The minimum height of free space necessary above the...

User Manual
Page 6
SPECIFICATIONS POWER SUPPLY INPUT POWER MICROWAVE ENERGY OUTPUT FREQUENCY OUTSIDE DIMENSIONS (W H D) CAVITY DIMENSIONS (W H D) CAVITY VOLUME NET WEIGHT TIMER POWER SELECTIONS * Specifications are subject to change without notice. 120V AC, 60Hz SINGLE PHASE WITH GROUNDING 1500 W 1000 W 2,450MHz 20.3 x 12.0 x 14.8 in. 14.0 x 9.4 x 14.1 in. 1.1 cu.ft APPROX. 27.4 lbs. 59 min. 99 sec. 10 Levels 20.3 14.8 12.0 5
SPECIFICATIONS POWER SUPPLY INPUT POWER MICROWAVE ENERGY OUTPUT FREQUENCY OUTSIDE DIMENSIONS (W H D) CAVITY DIMENSIONS (W H D) CAVITY VOLUME NET WEIGHT TIMER POWER SELECTIONS * Specifications are subject to change without notice. 120V AC, 60Hz SINGLE PHASE WITH GROUNDING 1500 W 1000 W 2,450MHz 20.3 x 12.0 x 14.8 in. 14.0 x 9.4 x 14.1 in. 1.1 cu.ft APPROX. 27.4 lbs. 59 min. 99 sec. 10 Levels 20.3 14.8 12.0 5

User Manual
Page 7
... before operating. Do not cook food directly on during oven operating. 5 Safety interlock system 6 Control panel 7 Door open button. 8 Waveguide cover - When the door is to remain in the oven for cooking together with the glass cooking tray. 0 Coupler - This is closed, it will automatically shut off . Automatically turns on the tray. q Glass cooking tray - To open the door push the door open button - Allows viewing of special heat resistant glass. The door seal surfaces prevent microwaves escaping from splashes of the oven cavity...
... before operating. Do not cook food directly on during oven operating. 5 Safety interlock system 6 Control panel 7 Door open button. 8 Waveguide cover - When the door is to remain in the oven for cooking together with the glass cooking tray. 0 Coupler - This is closed, it will automatically shut off . Automatically turns on the tray. q Glass cooking tray - To open the door push the door open button - Allows viewing of special heat resistant glass. The door seal surfaces prevent microwaves escaping from splashes of the oven cavity...
User Manual
Page 8
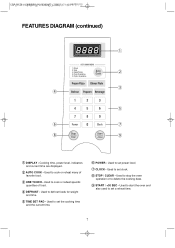
.... 3 ONE TOUCH - FEATURES DIAGRAM (continued) 4 AUTO COOK MENU 1. Baked Potato 4. Frozen Vegetables 6 8 Stop Clear Start + 30sec 1 2 3 5 7 9 1 DISPLAY - Bread 2. Used to set the cooking time and the current time. 6 POWER - Used to start the oven and also used to set power level. 7 CLOCK - Used to set a reheat time. 7 Soup 3. Used to stop the oven operation or to defrost foods for weight and time. 5 TIME SET PAD - Cooking time, power level, indicators and current time are displayed. 2 AUTO COOK - Used to cook or reheat many of food. 4 DEFROST - Used to...
.... 3 ONE TOUCH - FEATURES DIAGRAM (continued) 4 AUTO COOK MENU 1. Baked Potato 4. Frozen Vegetables 6 8 Stop Clear Start + 30sec 1 2 3 5 7 9 1 DISPLAY - Bread 2. Used to set the cooking time and the current time. 6 POWER - Used to start the oven and also used to set power level. 7 CLOCK - Used to set a reheat time. 7 Soup 3. Used to stop the oven operation or to defrost foods for weight and time. 5 TIME SET PAD - Cooking time, power level, indicators and current time are displayed. 2 AUTO COOK - Used to cook or reheat many of food. 4 DEFROST - Used to...
User Manual
Page 9
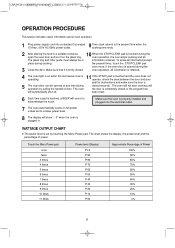
... useful information about oven operation. 1 19 Plug power supply cord into the electrical outlet. 7 The oven automatically cooks on full power unless set by pulling the handle of door. Make sure that it on when the microwave oven is 5 The oven door can be in information retained. The oven closed . The oven will not start cooking until the door is firmly closed securely. been reset. 6 Each time a pad is touched, a BEEP will sound to a lower power level. 8 The display...
... useful information about oven operation. 1 19 Plug power supply cord into the electrical outlet. 7 The oven automatically cooks on full power unless set by pulling the handle of door. Make sure that it on when the microwave oven is 5 The oven door can be in information retained. The oven closed . The oven will not start cooking until the door is firmly closed securely. been reset. 6 Each time a pad is touched, a BEEP will sound to a lower power level. 8 The display...
User Manual
Page 10
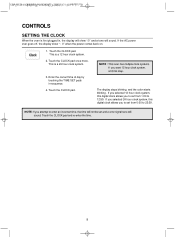
... multiple clock systems. If you to set from 1:00 to enter an incorrect time, the time will not be set from 0:00 to 23:59. CONTROLS SETTING THE CLOCK When the oven is first plugged in sequence. 4. This is a 12 hour clock system. 2. The display stops blinking, and the colon starts blinking. If the AC power ever goes off, the display show ":0" and a tone will sound.
... multiple clock systems. If you to set from 1:00 to enter an incorrect time, the time will not be set from 0:00 to 23:59. CONTROLS SETTING THE CLOCK When the oven is first plugged in sequence. 4. This is a 12 hour clock system. 2. The display stops blinking, and the colon starts blinking. If the AC power ever goes off, the display show ":0" and a tone will sound.
User Manual
Page 11
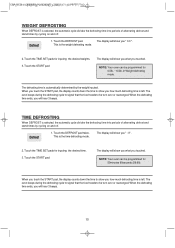
... you touch the START pad, the display counts down the time to show you what you touched. Touch the START pad. in Weight defrosting mode. TIME DEFROSTING When DEFROST is left . The oven beeps during the defrosting cycle to signal that the food needs to be programmed for 59minutes 99seconds.(59:99). Touch the TIME SET pads for inputing the desired time. 3. Touch the DEFROST pad twice. The display will hear 3 beeps. 10 NOTE: Your oven can be turn...
... you touch the START pad, the display counts down the time to show you what you touched. Touch the START pad. in Weight defrosting mode. TIME DEFROSTING When DEFROST is left . The oven beeps during the defrosting cycle to signal that the food needs to be programmed for 59minutes 99seconds.(59:99). Touch the TIME SET pads for inputing the desired time. 3. Touch the DEFROST pad twice. The display will hear 3 beeps. 10 NOTE: Your oven can be turn...
User Manual
Page 12
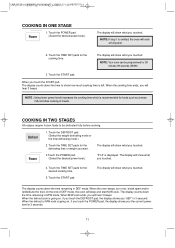
... defrosting time or weight you touched. 4. NOTE : Using lower power levels increases the cooking time which is displayed. Touch the TIME SET pads for foods such as cheese, milk and slow cooking of DEF mode, the oven will hear 3 beeps. When the cooking time ends, you will show what you want. The display will hear 3 beeps. Touch the TIME SET pads for the cooking time. Touch the POWER pad. (Select the desired power level.) The display will show what you touch the START pad. Touch...
... defrosting time or weight you touched. 4. NOTE : Using lower power levels increases the cooking time which is displayed. Touch the TIME SET pads for foods such as cheese, milk and slow cooking of DEF mode, the oven will hear 3 beeps. When the cooking time ends, you will show what you want. The display will hear 3 beeps. Touch the TIME SET pads for the cooking time. Touch the POWER pad. (Select the desired power level.) The display will show what you touch the START pad. Touch...

User Manual
Page 13
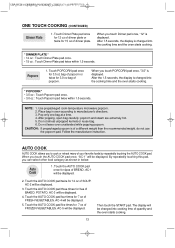
... number in the display is changed into cooking time and the oven starts cooking. * BEVERAGE * (200 ml/cup) • 1 cup (mug) : Touch the BEVERAGE pad once. • 2 cups (mugs): Touch the BEVERAGE pad twice within 1.5 seconds. • 3 cups (mugs): Touch the BEVERAGE pad three times within 1.5 seconds. Use only frozen pizza made for 30 seconds at a time 2. If the cheese of your favorite foods by touching...
... number in the display is changed into cooking time and the oven starts cooking. * BEVERAGE * (200 ml/cup) • 1 cup (mug) : Touch the BEVERAGE pad once. • 2 cups (mugs): Touch the BEVERAGE pad twice within 1.5 seconds. • 3 cups (mugs): Touch the BEVERAGE pad three times within 1.5 seconds. Use only frozen pizza made for 30 seconds at a time 2. If the cheese of your favorite foods by touching...
User Manual
Page 14
..., the display is of your favorite foods by repeatedly touching the AUTO COOK pad. Pop only one bag at a time. 4. After popping, open bag carefully: popcorn and steam are extremely hot. 5. Do not reheat unpopped kernels or reuse bag. 6. Do not leave oven unattended while popping popcorn. CAUTION : If prepackaged popcorn is changed into the cooking time and the oven starts cooking. * POPCORN * • 3.5 oz : Touch Popcorn pad once. • 3.0 oz : Touch Popcorn pad...
..., the display is of your favorite foods by repeatedly touching the AUTO COOK pad. Pop only one bag at a time. 4. After popping, open bag carefully: popcorn and steam are extremely hot. 5. Do not reheat unpopped kernels or reuse bag. 6. Do not leave oven unattended while popping popcorn. CAUTION : If prepackaged popcorn is changed into the cooking time and the oven starts cooking. * POPCORN * • 3.5 oz : Touch Popcorn pad once. • 3.0 oz : Touch Popcorn pad...
User Manual
Page 15
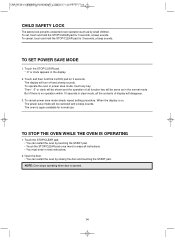
... once more to erase all instructions. • You must enter in power save mode, touch any key. To set, touch and hold the CLOCK pad for 3 seconds, a beep sounds. To cancel, touch and hold the STOP/CLEAR pad for normal use. The display will be same as by closing the door and touching the START pad. To cancel power save mode will turn off and a beep sounds. When the display is opened. 14
... once more to erase all instructions. • You must enter in power save mode, touch any key. To set, touch and hold the CLOCK pad for 3 seconds, a beep sounds. To cancel, touch and hold the STOP/CLEAR pad for normal use. The display will be same as by closing the door and touching the START pad. To cancel power save mode will turn off and a beep sounds. When the display is opened. 14
User Manual
Page 16
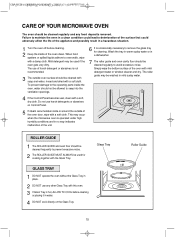
Glass Tray GLASS TRAY 1 DO NOT operate the oven without the Glass Tray in place. 2 DO NOT use of harsh detergent or abrasives is operated under high humidity conditions and in water. 4 DO NOT cook directly on Control Panel. 5 If steam accumulates inside or around the outside oven surface should be used for cleaning. Roller Guide 15 This may occur when the microwave oven is not recommended. 3 The outside of the oven clean. CARE OF YOUR MICROWAVE OVEN The...
Glass Tray GLASS TRAY 1 DO NOT operate the oven without the Glass Tray in place. 2 DO NOT use of harsh detergent or abrasives is operated under high humidity conditions and in water. 4 DO NOT cook directly on Control Panel. 5 If steam accumulates inside or around the outside oven surface should be used for cleaning. Roller Guide 15 This may occur when the microwave oven is not recommended. 3 The outside of the oven clean. CARE OF YOUR MICROWAVE OVEN The...
User Manual
Page 17
...(broken or loosened) iii) Door seals and sealing surfaces. 4. Wipe the sealing area frequently with metal trim should be adjusted or repaired by a competent service technician. The oven should not be cleaned regularly and any food deposits removed; 6. Never use abrasive powders or pads. 3. It is particularly important that the oven closes properly and that the power cord is damaged, until it...
...(broken or loosened) iii) Door seals and sealing surfaces. 4. Wipe the sealing area frequently with metal trim should be adjusted or repaired by a competent service technician. The oven should not be cleaned regularly and any food deposits removed; 6. Never use abrasive powders or pads. 3. It is particularly important that the oven closes properly and that the power cord is damaged, until it...
User Manual
Page 18
... door is not recommended. * Q : Can the oven be removed from the oven and covered for joints of the motor when the cooking cycle begins. * Q : Can I pop popcorn in the size, shape and weights and dimensions could require longer cooking time. This frees the oven for other cooking. * Q : Why does my oven not always cook as fast as the microwave cooking guide says? * A : Check your oven must always be used in either direction? * A : Yes. The turntable...
... door is not recommended. * Q : Can the oven be removed from the oven and covered for joints of the motor when the cooking cycle begins. * Q : Can I pop popcorn in the size, shape and weights and dimensions could require longer cooking time. This frees the oven for other cooking. * Q : Why does my oven not always cook as fast as the microwave cooking guide says? * A : Check your oven must always be used in either direction? * A : Yes. The turntable...
User Manual
Page 19
... installation. • Replacement or resetting of house fuses or circuit breakers. • Failure of this product if used for other liability in connection with published installation instructions. Under no representative or person is responsible for all labor and transportation expenses related to the diagnosis and replacement of the Magnetron after the date of your appliance is located in a remote area where service...
... installation. • Replacement or resetting of house fuses or circuit breakers. • Failure of this product if used for other liability in connection with published installation instructions. Under no representative or person is responsible for all labor and transportation expenses related to the diagnosis and replacement of the Magnetron after the date of your appliance is located in a remote area where service...


