
User Guide
Page 2
...no guarantee is given as to make changes without notice. Trademarks All trademarks are registered trademarks of Novell, Inc. Visit the MSI website for further guidance. We take every care in the preparation of this document is the intellectual property of M ICRO-STAR ...from the user's manual, please contact your place of their respective owners. Alternatively, please try the following help resources for FAQ, technical guide, BIOS updates, driver updates, and other countries. Netware® is a registered trademark of American Megatrends Inc. AMD, Athlon™, Athlon™ ...
...no guarantee is given as to make changes without notice. Trademarks All trademarks are registered trademarks of Novell, Inc. Visit the MSI website for further guidance. We take every care in the preparation of this document is the intellectual property of M ICRO-STAR ...from the user's manual, please contact your place of their respective owners. Alternatively, please try the following help resources for FAQ, technical guide, BIOS updates, driver updates, and other countries. Netware® is a registered trademark of American Megatrends Inc. AMD, Athlon™, Athlon™ ...
User Guide
Page 9
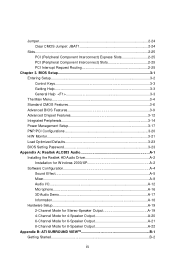
Jumper...2-24 Clear CMOS Jumper: JBAT1 2-24 Slots...2-25 PCI (Peripheral Component Interconnect) Express Slots 2-25 PCI (Peripheral Component Interconnect) Slots 2-25 PCI Interrupt Request Routing 2-25 Chapter 3. BIOS Setup 3-1 Entering Setup...3-2 Control Keys 3-3 Getting Help 3-3 General Help
Jumper...2-24 Clear CMOS Jumper: JBAT1 2-24 Slots...2-25 PCI (Peripheral Component Interconnect) Express Slots 2-25 PCI (Peripheral Component Interconnect) Slots 2-25 PCI Interrupt Request Routing 2-25 Chapter 3. BIOS Setup 3-1 Entering Setup...3-2 Control Keys 3-3 Getting Help 3-3 General Help
User Guide
Page 14
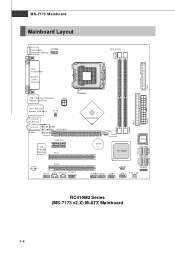
... T: Lin e-In RTL8110SB M: Lin e-Out /RTL8100C B: Mic (Optional) PCIE16X1 VIA VT6308P (Optional) PCIE 1X1 PCI1 ATI RC410S BATT + ATI SB600 BIOS ALC883 PCI 2 JAUD1 JCD1 SPDOUT J1394_1 (Optional) JBAT1 JLPC1 JUSB3 JUS B1 JUS B2 JFP1 SYS_FAN RC410M2 Series (MS-7173 v2.X) M-ATX Mainboard DIMM1 DIMM2 IDE1 ATX1 SATA4 SATA2 SATA3 SATA1 1-4
... T: Lin e-In RTL8110SB M: Lin e-Out /RTL8100C B: Mic (Optional) PCIE16X1 VIA VT6308P (Optional) PCIE 1X1 PCI1 ATI RC410S BATT + ATI SB600 BIOS ALC883 PCI 2 JAUD1 JCD1 SPDOUT J1394_1 (Optional) JBAT1 JLPC1 JUSB3 JUS B1 JUS B2 JFP1 SYS_FAN RC410M2 Series (MS-7173 v2.X) M-ATX Mainboard DIMM1 DIMM2 IDE1 ATX1 SATA4 SATA2 SATA3 SATA1 1-4

User Guide
Page 22
... of the mainboard. 14. Then rotate the locking switch (refer to the correct direction marked on the mainboard with the plastic cap covered (shown in BIOS (Chapter 3) for details) again and push the clip to avoid damaging. 3. Check the information in PC Health Status of the CPU is not installed, always...
... of the mainboard. 14. Then rotate the locking switch (refer to the correct direction marked on the mainboard with the plastic cap covered (shown in BIOS (Chapter 3) for details) again and push the clip to avoid damaging. 3. Check the information in PC Health Status of the CPU is not installed, always...
User Guide
Page 40
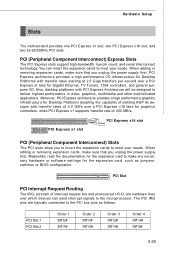
... PCI Express x1 supports transfer rate of 4.0 GB/s over which devices can insert the expansion cards to the PCI bus pins as jumpers, switches or BIOS configuration. PCI Express x16 slot PCI Express x1 slot PCI (Peripheral Component Interconnect) Slots The PCI slots allow you unplug the power supply first. The...
... PCI Express x1 supports transfer rate of 4.0 GB/s over which devices can insert the expansion cards to the PCI bus pins as jumpers, switches or BIOS configuration. PCI Express x16 slot PCI Express x1 slot PCI (Peripheral Component Interconnect) Slots The PCI slots allow you unplug the power supply first. The...

User Guide
Page 41
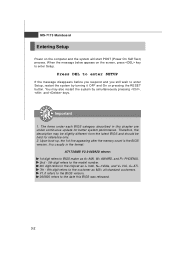
You may need to run SETUP. ized features. 3-1 You want to run the Setup program when: An error message appears on the BIOS Setup program and allows you to change the default settings for optimum use. Chapter 3 BIOS Setup BIOS Setup This chapter provides the information on the screen during the system booting up, and requests you to configure the system for custom-
You may need to run SETUP. ized features. 3-1 You want to run the Setup program when: An error message appears on the BIOS Setup program and allows you to change the default settings for optimum use. Chapter 3 BIOS Setup BIOS Setup This chapter provides the information on the screen during the system booting up, and requests you to configure the system for custom-
User Guide
Page 42
... update for reference only. 2. Upon boot-up, the 1st line appearing after the memory count is usuIamllypionrtthaenftormat: A7173AMS V2.0 060920 where: 1st digit refers to BIOS maker as A= AMI, W= AWARD, and P= PHOENIX. 2nd - 5th digit refers to the model number. 6th digit refers to the chipset as MS=... all standard customers. It is the BIOS version. V1.0 refers to the BIOS version. 060920 refers to the customer as I= Intel, N= nVidia, and V= VIA, A= ATi. 7th - 8th digit refers to the date ...
... update for reference only. 2. Upon boot-up, the 1st line appearing after the memory count is usuIamllypionrtthaenftormat: A7173AMS V2.0 060920 where: 1st digit refers to BIOS maker as A= AMI, W= AWARD, and P= PHOENIX. 2nd - 5th digit refers to the model number. 6th digit refers to the chipset as MS=... all standard customers. It is the BIOS version. V1.0 refers to the BIOS version. 060920 refers to the customer as I= Intel, N= nVidia, and V= VIA, A= ATi. 7th - 8th digit refers to the date ...

User Guide
Page 43
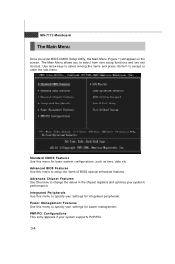
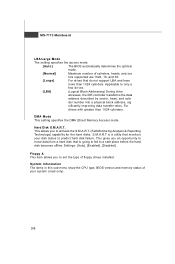
...menu. The Help screen lists the appropriate keys to select the item. A sub-menu contains additional options for the highlighted item. General Help The BIOS setup program provides a General Help screen. The on-line description of the highlighted setup function is the Main Menu. You can use and the ...possible selections for a field parameter. Press to exit the Help screen. 3-3 BIOS Setup Control Keys Move to the previous item Move to the next item Move to the item in the left of the screen. Main Menu...
...menu. The Help screen lists the appropriate keys to select the item. A sub-menu contains additional options for the highlighted item. General Help The BIOS setup program provides a General Help screen. The on-line description of the highlighted setup function is the Main Menu. You can use and the ...possible selections for a field parameter. Press to exit the Help screen. 3-3 BIOS Setup Control Keys Move to the previous item Move to the next item Move to the item in the left of the screen. Main Menu...
User Guide
Page 44
... your settings for integrated peripherals. Integrated Peripherals Use this menu to specify your system's performance. Advanced BIOS Features Use this menu to accept or enter the sub-menu. The Main Menu allows you enter BIOS CMOS Setup Utility, the Main Menu (Figure 1) will appear on the screen. Use arrow keys ... the items and press to specify your system supports PnP/PCI. 3-4 MS-7173 M ainboard The Main Menu Once you to setup the items of BIOS special enhanced features. Power Management Features Use this menu to select from nine setup functions and two exit choices.
... your settings for integrated peripherals. Integrated Peripherals Use this menu to specify your system's performance. Advanced BIOS Features Use this menu to accept or enter the sub-menu. The Main Menu allows you enter BIOS CMOS Setup Utility, the Main Menu (Figure 1) will appear on the screen. Use arrow keys ... the items and press to specify your system supports PnP/PCI. 3-4 MS-7173 M ainboard The Main Menu Once you to setup the items of BIOS special enhanced features. Power Management Features Use this menu to select from nine setup functions and two exit choices.

User Guide
Page 45
BIOS Setup H/W Monitor This entry shows your PC health status. Save & Exit Setup Save changes to load the default values set the password for optimal performance of the mainboard. BIOS Setting Password Use this menu to CMOS and exit setup. Exit Without Saving Abandon all changes and exit setup. 3-5 Load Optimized Defaults Use this menu to set by the mainboard manufacturer specifically for BIOS.
BIOS Setup H/W Monitor This entry shows your PC health status. Save & Exit Setup Save changes to load the default values set the password for optimal performance of the mainboard. BIOS Setting Password Use this menu to CMOS and exit setup. Exit Without Saving Abandon all changes and exit setup. 3-5 Load Optimized Defaults Use this menu to set by the mainboard manufacturer specifically for BIOS.
User Guide
Page 46
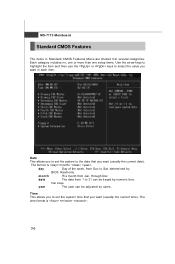
... current time). through Dec. day Day of the week, from Jan. Time This allows you to set the system to 31 can be keyed by BIOS. Date This allows you to Sat, determined by numeric func tion keys. Read-only. month The month from Sun to set the system time that...
... current time). through Dec. day Day of the week, from Jan. Time This allows you to set the system to 31 can be keyed by BIOS. Date This allows you to Sat, determined by numeric func tion keys. Read-only. month The month from Sun to set the system time that...
User Guide
Page 47
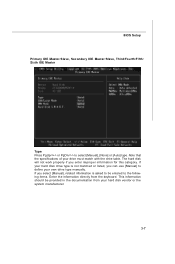
... select [Manual], related information is not matched or listed, you enter improper information for this category. If your drive must match with the drive table. BIOS Setup Primary IDE Master/Slave, Secondary IDE Master/Slave, Third/Fourth/Fifth/ Sixth IDE Master Ty pe Press PgUp/ or PgDn/ to be provided in...
... select [Manual], related information is not matched or listed, you enter improper information for this category. If your drive must match with the drive table. BIOS Setup Primary IDE Master/Slave, Secondary IDE Master/Slave, Third/Fourth/Fifth/ Sixth IDE Master Ty pe Press PgUp/ or PgDn/ to be provided in...
User Guide
Page 48
...Floppy A This item allows you to predict hard disk failure. System Information The items in this sub-menu show the CPU type, BIOS version and memory status of cylinders, heads, and sec tors supported are 1024, 16, and 63. [Large] For drives that ...and cylin der number into a physical block address, sig nificantly improving data transfer rates. Settings: [Auto], [Enabled], [Disabled]. Applicable to ] The BIOS automatically determines the optimal mode. [Nor m al ] Maximum number of your disk status to activate the S.M.A.R.T. (Self-Monitoring Analysis & Reporting Technology) ...
...Floppy A This item allows you to predict hard disk failure. System Information The items in this sub-menu show the CPU type, BIOS version and memory status of cylinders, heads, and sec tors supported are 1024, 16, and 63. [Large] For drives that ...and cylin der number into a physical block address, sig nificantly improving data transfer rates. Settings: [Auto], [Enabled], [Disabled]. Applicable to ] The BIOS automatically determines the optimal mode. [Nor m al ] Maximum number of your disk status to activate the S.M.A.R.T. (Self-Monitoring Analysis & Reporting Technology) ...

User Guide
Page 49
...when combined with a Flash utility. When a malicious worm attempts to insert code in memory by unauthorized users or computer viruses. Advanced BIOS Features BIOS Setup Quick Boot Setting the item to [Enabled] allows the system to boot within 5 seconds since it cannot. This functionality allows ...can execute and where it will skip some check items. Available options: [Enabled], [Disabled]. To successfully update the BIOS, you'll need to update the BIOS with a supporting operating system. When enabled, the BIOS' data cannot be changed when attempting to disable this Flash...
...when combined with a Flash utility. When a malicious worm attempts to insert code in memory by unauthorized users or computer viruses. Advanced BIOS Features BIOS Setup Quick Boot Setting the item to [Enabled] allows the system to boot within 5 seconds since it cannot. This functionality allows ...can execute and where it will skip some check items. Available options: [Enabled], [Disabled]. To successfully update the BIOS, you'll need to update the BIOS with a supporting operating system. When enabled, the BIOS' data cannot be changed when attempting to disable this Flash...
User Guide
Page 50
... processor will expand available IRQ resources for your operating system. Due to compliance with HT Technology; * Chipset: An Intel® Chipset that supports HT Technology; * BIOS: A BIOS that supports HT Technology and has it enabled; * OS: An operating system that can execute instructions simultaneously.
... processor will expand available IRQ resources for your operating system. Due to compliance with HT Technology; * Chipset: An Intel® Chipset that supports HT Technology; * BIOS: A BIOS that supports HT Technology and has it enabled; * OS: An operating system that can execute instructions simultaneously.

User Guide
Page 51
... try to boot from the 1st/2nd/3rd boot device. Then you to set the sequence of boot devices where BIOS attempts to move it up/down in this priority list. 3-11 BIOS Setup Boot Sequence Press to enter the sub-menu and the following screen appears: 1st/2nd/3rd Boot Device...
... try to boot from the 1st/2nd/3rd boot device. Then you to set the sequence of boot devices where BIOS attempts to move it up/down in this priority list. 3-11 BIOS Setup Boot Sequence Press to enter the sub-menu and the following screen appears: 1st/2nd/3rd Boot Device...
User Guide
Page 53
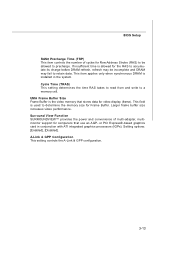
BIOS Setup RAS# Precharge Time (TRP) This item controls the number of multi-adapter, multimonitor support for computers that stores data for video display (frame). This ...
BIOS Setup RAS# Precharge Time (TRP) This item controls the number of multi-adapter, multimonitor support for computers that stores data for video display (frame). This ...
User Guide
Page 55
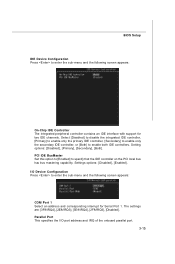
... screen appears: On-Chip IDE Controller The integrated peripheral controller contains an IDE interface with support for Serial Port 1. Setting options: [Disabled], [Primary], [Secondary], [Both]. BIOS Setup IDE Device Configuration Press to enter the sub-menu and the following screen appears: COM Port 1 Select an address and corresponding interrupt for two...
... screen appears: On-Chip IDE Controller The integrated peripheral controller contains an IDE interface with support for Serial Port 1. Setting options: [Disabled], [Primary], [Secondary], [Both]. BIOS Setup IDE Device Configuration Press to enter the sub-menu and the following screen appears: COM Port 1 Select an address and corresponding interrupt for two...
User Guide
Page 57
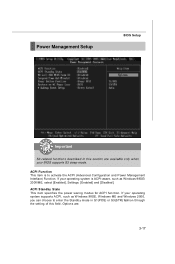
ACPI Standby State This item specifies the power saving modes for ACPI function. Options are available only when your BIOS supports S3 sleep mode. Power Management Setup BIOS Setup Important S3-related functions described in S1(POS) or S3(STR) fashion through the setting of this section are : 3-17 If your operating system...
ACPI Standby State This item specifies the power saving modes for ACPI function. Options are available only when your BIOS supports S3 sleep mode. Power Management Setup BIOS Setup Important S3-related functions described in S1(POS) or S3(STR) fashion through the setting of this section are : 3-17 If your operating system...
User Guide
Page 58
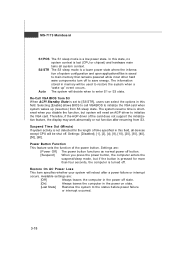
... feature, the display may work abnormally or not function after a power failure or interrupt occurs. Au to initialize the VGA card. Selecting [Enable] allows BIOS to call VGABIOS to the status before power failure or interrupt occurred. 3-18 The information stored in the power on state. [Last State] Restores the... system will reboot after resuming from S3 sleep state. MS-7173 M ainboard S1/POS The S1 sleep mode is turned off. Re-Call VGA BIOS from S3 When ACPI Standby State is set to enter S1 or S3 state. Restore On AC Power Loss This item specifies whether your system...
... feature, the display may work abnormally or not function after a power failure or interrupt occurs. Au to initialize the VGA card. Selecting [Enable] allows BIOS to call VGABIOS to the status before power failure or interrupt occurred. 3-18 The information stored in the power on state. [Last State] Restores the... system will reboot after resuming from S3 sleep state. MS-7173 M ainboard S1/POS The S1 sleep mode is turned off. Re-Call VGA BIOS from S3 When ACPI Standby State is set to enter S1 or S3 state. Restore On AC Power Loss This item specifies whether your system...


