
User Guide
Page 3
Visit the MSI website for further guidance. Preface Technical Support If a problem arises with your system and no solution can be obtained from the user's manual, please contact ... user manuals within minutes. Alternatively, please try the following help resources for technical guide, BIOS updates, driver updates, and other information: http://www.msi.com/service/download/ Contact our technical staff at: http://support.msi.com iii Preface Smartphone Application MSI+ is a smart web gadget that works as a shopping navigator and provides specs comparison...
Visit the MSI website for further guidance. Preface Technical Support If a problem arises with your system and no solution can be obtained from the user's manual, please contact ... user manuals within minutes. Alternatively, please try the following help resources for technical guide, BIOS updates, driver updates, and other information: http://www.msi.com/service/download/ Contact our technical staff at: http://support.msi.com iii Preface Smartphone Application MSI+ is a smart web gadget that works as a shopping navigator and provides specs comparison...
User Guide
Page 12
... Front Panel Audio Connector Installation 2-11 Peripheral Connector Installation 2-12 USB2.0 Connector Installation 2-12 USB3.0 Connector Installation 2-12 Graphics Card Installation 2-13 Chapter 3 BIOS Setup 3-1 Entering Setup 3-2 Entering BIOS Setup 3-2 Overview 3-3 Operation 3-5 SETTINGS 3-6 System Status 3-6 Advanced 3-7 Boot 3-15 Security 3-15 Save & Exit 3-16 OC 3-17 M-FLASH 3-25 OC PROFILE 3-26 HARDWARE MONITOR...
... Front Panel Audio Connector Installation 2-11 Peripheral Connector Installation 2-12 USB2.0 Connector Installation 2-12 USB3.0 Connector Installation 2-12 Graphics Card Installation 2-13 Chapter 3 BIOS Setup 3-1 Entering Setup 3-2 Entering BIOS Setup 3-2 Overview 3-3 Operation 3-5 SETTINGS 3-6 System Status 3-6 Advanced 3-7 Boot 3-15 Security 3-15 Save & Exit 3-16 OC 3-17 M-FLASH 3-25 OC PROFILE 3-26 HARDWARE MONITOR...

User Guide
Page 19
...System fan speed detection ■ CPU/System fan speed control ■ 64 Mb flash (for Z87M-G43) ■ 128 Mb flash (for H87M-G43/ B85M-G43) ■ UEFI AMI BIOS ■ ACPI 5.0, PnP 1.0a, SM BIOS 2.7, DMI 2.0 ■ Multi-language ■ Military Class 4 ■ OC Genie 4 &#...9632; Click BIOS 4 ■ AMD CrossFire ■ Sound Blaster Cinema (for Z87M-G43) ■ Clear CMOS Button ■ Total Fan Control &#...
...System fan speed detection ■ CPU/System fan speed control ■ 64 Mb flash (for Z87M-G43) ■ 128 Mb flash (for H87M-G43/ B85M-G43) ■ UEFI AMI BIOS ■ ACPI 5.0, PnP 1.0a, SM BIOS 2.7, DMI 2.0 ■ Multi-language ■ Military Class 4 ■ OC Genie 4 &#...9632; Click BIOS 4 ■ AMD CrossFire ■ Sound Blaster Cinema (for Z87M-G43) ■ Clear CMOS Button ■ Total Fan Control &#...

User Guide
Page 34
.... Install two AMD Radeon™ HD graphics cards into the PCI_E1 & PCI_E4 expansion slots. 2. For best compatibility with the motherboard, MSI graphics cards are of the metal contacts (please refer to ensure a successful two-way CrossFire™ installation. 1. Please note that all... graphics cards used in the BIOS as needed . It allows the ability to scale a system's graphics power as needed , making it the most scalable gaming platform. AMD...
.... Install two AMD Radeon™ HD graphics cards into the PCI_E1 & PCI_E4 expansion slots. 2. For best compatibility with the motherboard, MSI graphics cards are of the metal contacts (please refer to ensure a successful two-way CrossFire™ installation. 1. Please note that all... graphics cards used in the BIOS as needed . It allows the ability to scale a system's graphics power as needed , making it the most scalable gaming platform. AMD...

User Guide
Page 42
... intrusion switch cable. If the computer case is opened, the chassis intrusion mechanism will flash on screen. To clear the warning, you must enter the BIOS utility and clear the record. 2.C1.IGNTroRuUnd Getting Started 1-28 Chapter 1 JLPT1: Parallel Port Connector This connector is a standard printer port that supports Enhanced Parallel...
... intrusion switch cable. If the computer case is opened, the chassis intrusion mechanism will flash on screen. To clear the warning, you must enter the BIOS utility and clear the record. 2.C1.IGNTroRuUnd Getting Started 1-28 Chapter 1 JLPT1: Parallel Port Connector This connector is a standard printer port that supports Enhanced Parallel...

User Guide
Page 59
...under continuous update for detailed information. • Please clear the CMOS data and restore the default settings if the system becomes unbootable after changing BIOS settings. (Refer to the Clear CMOS jumper/ button section to clear the CMOS data, select the "Restore Defaults" and press in this chapter... are for reference only and may vary from the latest BIOS and should be held for reference only. • The pictures in BIOS to the actual screens of your mouse and keyboard, users can import and export parameter data for backup ...
...under continuous update for detailed information. • Please clear the CMOS data and restore the default settings if the system becomes unbootable after changing BIOS settings. (Refer to the Clear CMOS jumper/ button section to clear the CMOS data, select the "Restore Defaults" and press in this chapter... are for reference only and may vary from the latest BIOS and should be held for reference only. • The pictures in BIOS to the actual screens of your mouse and keyboard, users can import and export parameter data for backup ...

User Guide
Page 60
... DEL key to enter Setup Menu, F11 to enter Boot Menu If the message disappears before using it to enter the BIOS setup. You can click the "GO2BIOS" tab on "MSI Fast Boot" utility screen or press the physical "GO2BIOS" button (optional) on the screen during the system booting up,... and requests you keep the default settings to avoid possible system damage or failure booting due to inappropriate BIOS configuration. Important Please be sure to install the "MSI Fast Boot" utility before you respond and you still need to run SETUP. ■ You want to restore the optimal...
... DEL key to enter Setup Menu, F11 to enter Boot Menu If the message disappears before using it to enter the BIOS setup. You can click the "GO2BIOS" tab on "MSI Fast Boot" utility screen or press the physical "GO2BIOS" button (optional) on the screen during the system booting up,... and requests you keep the default settings to avoid possible system damage or failure booting due to inappropriate BIOS configuration. Important Please be sure to install the "MSI Fast Boot" utility before you respond and you still need to run SETUP. ■ You want to restore the optimal...

User Guide
Page 61
...the motherboard. ▶ Language Allows you to select the language of the BIOS setup. ▶ System information Shows the time, date, CPU name, CPU frequency, DRAM frequency, DRAM capacity and the BIOS version. ▶ BIOS menu selection The following screen is used to set various overclocking profiles. &#...users to specify the parameters for chipset and boot devices. ■ OC - Chapter 3 3-3 BIOS Setup This menu contains the frequency and voltage adjustments. This menu provides the way to update BIOS with a USB flash disk. ■ OC PROFILE -This menu is used to set the ...
...the motherboard. ▶ Language Allows you to select the language of the BIOS setup. ▶ System information Shows the time, date, CPU name, CPU frequency, DRAM frequency, DRAM capacity and the BIOS version. ▶ BIOS menu selection The following screen is used to set various overclocking profiles. &#...users to specify the parameters for chipset and boot devices. ■ OC - Chapter 3 3-3 BIOS Setup This menu contains the frequency and voltage adjustments. This menu provides the way to update BIOS with a USB flash disk. ■ OC PROFILE -This menu is used to set the ...
User Guide
Page 62
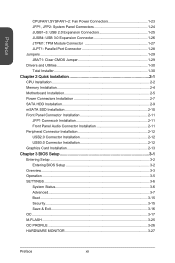
...motherboard. When enabled, this button. General Help Sub-Menu Scroll bar ▶ Sub-menu If you in grasping the selected item. Chapter 3 BIOS Setup 3-4 You can use the arrow keys or mouse to highlight the item and press or double-click the left mouse button to enter ... the other items that means a sub-menu can be launched for additional options. ▶ Boot device priority bar You can automatically overclock with MSI optimized overclocking profile. ▶ Model Name Shows the model name of certain items, that are available on this button will be configured. ▶...
...motherboard. When enabled, this button. General Help Sub-Menu Scroll bar ▶ Sub-menu If you in grasping the selected item. Chapter 3 BIOS Setup 3-4 You can use the arrow keys or mouse to highlight the item and press or double-click the left mouse button to enter ... the other items that means a sub-menu can be launched for additional options. ▶ Boot device priority bar You can automatically overclock with MSI optimized overclocking profile. ▶ Model Name Shows the model name of certain items, that are available on this button will be configured. ▶...

User Guide
Page 63
...-Z Load optimized defaults OC Profile Load From USB OC Profile Save to USB Save Change and Reset Save a screenshot to a FAT/FAT32 USB drive Chapter 3 3-5 BIOS Setup Hot key Mouse Description Select Item . Operation You can control...
...-Z Load optimized defaults OC Profile Load From USB OC Profile Save to USB Save Change and Reset Save a screenshot to a FAT/FAT32 USB drive Chapter 3 3-5 BIOS Setup Hot key Mouse Description Select Item . Operation You can control...

User Guide
Page 64
... connections of the device and motherboard. ▶ System Information Shows detailed system information, including CPU type, BIOS version, and Memory (read only). Read-only. The year can be adjusted by BIOS. The date from Jan. Use tab key to 31 can be keyed by numeric function keys. The ...month from 1 to switch between time elements. BIOS Setup 3-6 Day of connected SATA device. Use tab key to Sat, determined by users. ▶ System Time Sets the system time. Important ...
... connections of the device and motherboard. ▶ System Information Shows detailed system information, including CPU type, BIOS version, and Memory (read only). Read-only. The year can be adjusted by BIOS. The date from Jan. Use tab key to 31 can be keyed by numeric function keys. The ...month from 1 to switch between time elements. BIOS Setup 3-6 Day of connected SATA device. Use tab key to Sat, determined by users. ▶ System Time Sets the system time. Important ...

User Guide
Page 65
... state. ▶ Integrated Peripherals Sets integrated peripherals' parameters, such as first and second PCIe x16 slots. [Auto] Enables all PCIe Gen1, Gen2 and Gen3. Chapter 3 3-7 BIOS Setup Press to enter the sub-menu. ▶ Onboard LAN Controller [Enabled] Enables or disables the onboard LAN controller. ▶ LAN Option ROM [Disabled] Enables...
... state. ▶ Integrated Peripherals Sets integrated peripherals' parameters, such as first and second PCIe x16 slots. [Auto] Enables all PCIe Gen1, Gen2 and Gen3. Chapter 3 3-7 BIOS Setup Press to enter the sub-menu. ▶ Onboard LAN Controller [Enabled] Enables or disables the onboard LAN controller. ▶ LAN Option ROM [Disabled] Enables...

User Guide
Page 66
... Graphics Device. ▶ Integrated Graphics Share Memory [64M] Selects a fixed amount of SATA storage device, such as 2D/3D games. [Options: 128MB, 256MB, Maximum] Chapter 3 BIOS Setup 3-8 Press to the onboard graphics. [Options: 32M, 64M, 128M, 256M] ▶ DVMT Memory [256MB] DVMT memory can dynamically allocate system memory for running graphicsintensive...
... Graphics Device. ▶ Integrated Graphics Share Memory [64M] Selects a fixed amount of SATA storage device, such as 2D/3D games. [Options: 128MB, 256MB, Maximum] Chapter 3 BIOS Setup 3-8 Press to the onboard graphics. [Options: 32M, 64M, 128M, 256M] ▶ DVMT Memory [256MB] DVMT memory can dynamically allocate system memory for running graphicsintensive...

User Guide
Page 67
.... ▶ Hybrid Hard Disk Support [Disabled] Enables or disables the Intel Rapid Start Technology to enter the sleep mode with Intel Rapid Start Technology. Chapter 3 3-9 BIOS Setup To support the Lucid Virtu MVP Technology, please enable this item. [Enabled] Enables IGD multi-screen function. [Disabled] Disables IGD multi-screen function. ▶...
.... ▶ Hybrid Hard Disk Support [Disabled] Enables or disables the Intel Rapid Start Technology to enter the sleep mode with Intel Rapid Start Technology. Chapter 3 3-9 BIOS Setup To support the Lucid Virtu MVP Technology, please enable this item. [Enabled] Enables IGD multi-screen function. [Disabled] Disables IGD multi-screen function. ▶...

User Guide
Page 68
... system Super I/O chip parameters including LPT and COM ports. This item appears when a installed CPU supports this function. ▶ RapidStart Display Type [BIOS Save/Restore] Selects the screen type of serial(COM) port 0. Press to enter the submenu. ▶ Serial (COM) Port 0 [Enabled] ...(COM) Port 0 Settings [Auto] Sets serial port 0 (COM). The screen will optimize the IRQ automatically or you can set to "Auto", BIOS will be saved or restored. ▶ RapidStart Display Save/Restore [Enabled] Enables or disables the Intel Rapid Start Display screen to be saved before ...
... system Super I/O chip parameters including LPT and COM ports. This item appears when a installed CPU supports this function. ▶ RapidStart Display Type [BIOS Save/Restore] Selects the screen type of serial(COM) port 0. Press to enter the submenu. ▶ Serial (COM) Port 0 [Enabled] ...(COM) Port 0 Settings [Auto] Sets serial port 0 (COM). The screen will optimize the IRQ automatically or you can set to "Auto", BIOS will be saved or restored. ▶ RapidStart Display Save/Restore [Enabled] Enables or disables the Intel Rapid Start Display screen to be saved before ...

User Guide
Page 69
... power. [Last State] Restores the system to wait for optimizing system network performance in power off ) before AC power loss. Chapter 3 3-11 BIOS Setup If set to "Auto", BIOS will not support RTC wake up event functions. ▶ Restore after AC Power Loss [Power Off] Sets the system behaviors while encountering the...
... power. [Last State] Restores the system to wait for optimizing system network performance in power off ) before AC power loss. Chapter 3 3-11 BIOS Setup If set to "Auto", BIOS will not support RTC wake up event functions. ▶ Restore after AC Power Loss [Power Off] Sets the system behaviors while encountering the...

User Guide
Page 70
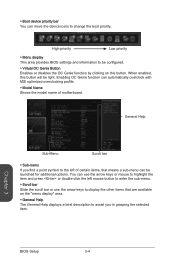
... you want to enter BIOS with enabled "MSI Fast Boot" mode, you have to minimize booting time. When enabled, the USB, PS2 and SATA devices will be detected while booting. [Enabled] Enables the MSI Fast Boot function to click the "GO2BIOS" tab on MSI Fast Boot utility screen or...Boot utility screen or press the "GO2BIOS" button (optional) on the motherboard. This item will be disabled and fixed. [Disabled] Disables MSI Fast Boot. Chapter 3 BIOS Setup 3-12 The PS2 devices will appear when "Fast Boot" is the fastest way to meet the Windows 8 requirements. [Enabled] The...
... you want to enter BIOS with enabled "MSI Fast Boot" mode, you have to minimize booting time. When enabled, the USB, PS2 and SATA devices will be detected while booting. [Enabled] Enables the MSI Fast Boot function to click the "GO2BIOS" tab on MSI Fast Boot utility screen or...Boot utility screen or press the "GO2BIOS" button (optional) on the motherboard. This item will be disabled and fixed. [Disabled] Disables MSI Fast Boot. Chapter 3 BIOS Setup 3-12 The PS2 devices will appear when "Fast Boot" is the fastest way to meet the Windows 8 requirements. [Enabled] The...
User Guide
Page 71
... sub-menu. Press to enter the sub-menu. This item is enabled. [Standard] The system will automatically load the secure keys from BIOS. [Custom] Allows user to prevent the unauthorized accessing. This sub-menu will appear when "Secure Boot Mode" sets to select how the... set the secure boot settings. [Disabled] Disables this function. ▶ Secure Boot Mode [Standard] Selects the secure boot mode. Chapter 3 3-13 BIOS Setup Press to enter the sub-menu. This sub-menu will appear when "Windows 8 Feature" is enabled. [Disabled] DisableS the SATA devices during POST...
... sub-menu. Press to enter the sub-menu. This item is enabled. [Standard] The system will automatically load the secure keys from BIOS. [Custom] Allows user to prevent the unauthorized accessing. This sub-menu will appear when "Secure Boot Mode" sets to select how the... set the secure boot settings. [Disabled] Disables this function. ▶ Secure Boot Mode [Standard] Selects the secure boot mode. Chapter 3 3-13 BIOS Setup Press to enter the sub-menu. This sub-menu will appear when "Windows 8 Feature" is enabled. [Disabled] DisableS the SATA devices during POST...

User Guide
Page 72
.../ S5 state when activity of PS/2 mouse is detected. [Disabled] Disables this function. Chapter 3 BIOS Setup 3-14 Press to enter the sub-menu. ▶ Wake Up Event By [BIOS] Selects the wake up event by BIOS or operating system. [BIOS] Activates the following items, and use these fields (using the and to select the...
.../ S5 state when activity of PS/2 mouse is detected. [Disabled] Disables this function. Chapter 3 BIOS Setup 3-14 Press to enter the sub-menu. ▶ Wake Up Event By [BIOS] Selects the wake up event by BIOS or operating system. [BIOS] Activates the following items, and use these fields (using the and to select the...

User Guide
Page 73
... password from CMOS memory. You will be prompted to abort the selection. You may also press to confirm the password. Chapter 3 3-15 BIOS Setup The password typed now will replace any previous set ; A message will confirm the password is disabled, you are used to prioritize the...you can access the system. ▶ Chassis Intrusion Configuration Press to enter the sub-menu. but user might have limited rights to change the BIOS items. ▶ User Password Sets User Password for system security. user has full rights to enter a new password. Type the password then ...
... password from CMOS memory. You will be prompted to abort the selection. You may also press to confirm the password. Chapter 3 3-15 BIOS Setup The password typed now will replace any previous set ; A message will confirm the password is disabled, you are used to prioritize the...you can access the system. ▶ Chassis Intrusion Configuration Press to enter the sub-menu. but user might have limited rights to change the BIOS items. ▶ User Password Sets User Password for system security. user has full rights to enter a new password. Type the password then ...


