
User Manual
Page 5
... using the telephone function (other than a cordless type) during a lightning storm. 2. Never touch uninsulated telephone wires or terminals unless the telephone line has been disconnected at the network interface. 4. Do not use this model properly, read the instruction manual carefully and keep this model, please contact your future reference. CD-ROM Drive Notice CAUTION: This appliance contains a laser system and is specifically designed...
... using the telephone function (other than a cordless type) during a lightning storm. 2. Never touch uninsulated telephone wires or terminals unless the telephone line has been disconnected at the network interface. 4. Do not use this model properly, read the instruction manual carefully and keep this model, please contact your future reference. CD-ROM Drive Notice CAUTION: This appliance contains a laser system and is specifically designed...
User Manual
Page 6
...-on it up. 5. Safety Instructions 1. Always unplug the power cord before setting it . Do not cover the openings. 6. Preface Macrovision Notice This product incorporates copyright protection technology that the power voltage is within its safety range and has been adjusted properly to the value of 100~240V before connecting the equipment to the power inlet. 7. Use of the following situations...
...-on it up. 5. Safety Instructions 1. Always unplug the power cord before setting it . Do not cover the openings. 6. Preface Macrovision Notice This product incorporates copyright protection technology that the power voltage is within its safety range and has been adjusted properly to the value of 100~240V before connecting the equipment to the power inlet. 7. Use of the following situations...
User Manual
Page 13
...-side View 2-11 Rear View 2-13 Bottom View 2-14 Power Management 2-16 AC Adapter 2-16 Battery Pack 2-17 Using the Battery Pack 2-20 Basic Operations 2-22 Safety and Comfort Tips 2-22 Have a Good Work Habit 2-23 Knowing the Keyboard 2-24 Knowing the Touchpad 2-29 About Hard Disk Drive 2-33 Using the Optical Device Drive 2-34 Customizing this Notebook Connecting the External Devices 3-2 Connecting the Peripheral Devices 3-3 Connecting the Communication Devices 3-6 Express Card Installation 3-7 Installing the Express card 3-7 XIII
...-side View 2-11 Rear View 2-13 Bottom View 2-14 Power Management 2-16 AC Adapter 2-16 Battery Pack 2-17 Using the Battery Pack 2-20 Basic Operations 2-22 Safety and Comfort Tips 2-22 Have a Good Work Habit 2-23 Knowing the Keyboard 2-24 Knowing the Touchpad 2-29 About Hard Disk Drive 2-33 Using the Optical Device Drive 2-34 Customizing this Notebook Connecting the External Devices 3-2 Connecting the Peripheral Devices 3-3 Connecting the Communication Devices 3-6 Express Card Installation 3-7 Installing the Express card 3-7 XIII
User Manual
Page 16
... where you purchased this notebook. How to Use This Manual This User's Manual provides instructions and illustrations on how to check out that if you have all the accessories of this notebook. Also, this chapter instructs the correct procedure of this notebook. 1-2 Chapter 2, Getting Started, provides the specification of this notebook, and introduces the function buttons, quick launch buttons, connectors, LEDs and externals of this notebook. Chapter 1, General Introductions...
... where you purchased this notebook. How to Use This Manual This User's Manual provides instructions and illustrations on how to check out that if you have all the accessories of this notebook. Also, this chapter instructs the correct procedure of this notebook. 1-2 Chapter 2, Getting Started, provides the specification of this notebook, and introduces the function buttons, quick launch buttons, connectors, LEDs and externals of this notebook. Chapter 1, General Introductions...
User Manual
Page 17
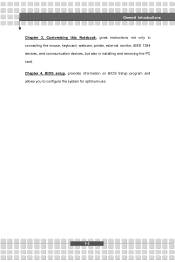
General Introductions Chapter 3, Customizing this Notebook, gives instructions not only in connecting the mouse, keyboard, webcam, printer, external monitor, IEEE 1394 devices, and communication devices, but also in installing and removing the PC card. Chapter 4, BIOS setup, provides information on BIOS Setup program and allows you to configure the system for optimum use. 1-3
General Introductions Chapter 3, Customizing this Notebook, gives instructions not only in connecting the mouse, keyboard, webcam, printer, external monitor, IEEE 1394 devices, and communication devices, but also in installing and removing the PC card. Chapter 4, BIOS setup, provides information on BIOS Setup program and allows you to configure the system for optimum use. 1-3

User Manual
Page 18
.... w High-capacity Li-ion battery pack w AC adapter and power cord w Phone cable/Phone jack (optional) w Notebook carry bag (optional) These accessories listed above may change without notice. 1-4 Also, keep the box and packing materials in case you need to ship the unit in -one application disk, containing the drivers, utilities, and optional recovery function. The package should contain the following items: w Notebook PC w User's Manual or Quick Start Guide w All-in the...
.... w High-capacity Li-ion battery pack w AC adapter and power cord w Phone cable/Phone jack (optional) w Notebook carry bag (optional) These accessories listed above may change without notice. 1-4 Also, keep the box and packing materials in case you need to ship the unit in -one application disk, containing the drivers, utilities, and optional recovery function. The package should contain the following items: w Notebook PC w User's Manual or Quick Start Guide w All-in the...

User Manual
Page 21
Getting Started Optical Device I/O Port Monitor(VGA) USB Headphone Out (SPDIF Out supported) Mic-in Line-in TV-Out RJ11 RJ45 Communication Port 56K Fax/MODEM MDC (Azaliza) LAN Wireless LAN Express Card Slot Display LCD Type w DVD Combo w DVD dual w Super Multi w Lightscribe (Devices listed here may vary without notice) 15 pin D-Sub x 1 x 4 (USB version 2.0) x 1 x 1 x 1 optional x 1 x 1 Support Analog 5.1 function See Product Overview for more information. 56k SW/Modem, V90/92 supported 10/100Mbps MS-6877 Express Card Slot x 1 13.3" non-glare (optional) 2-3
Getting Started Optical Device I/O Port Monitor(VGA) USB Headphone Out (SPDIF Out supported) Mic-in Line-in TV-Out RJ11 RJ45 Communication Port 56K Fax/MODEM MDC (Azaliza) LAN Wireless LAN Express Card Slot Display LCD Type w DVD Combo w DVD dual w Super Multi w Lightscribe (Devices listed here may vary without notice) 15 pin D-Sub x 1 x 4 (USB version 2.0) x 1 x 1 x 1 optional x 1 x 1 Support Analog 5.1 function See Product Overview for more information. 56k SW/Modem, V90/92 supported 10/100Mbps MS-6877 Express Card Slot x 1 13.3" non-glare (optional) 2-3
User Manual
Page 24
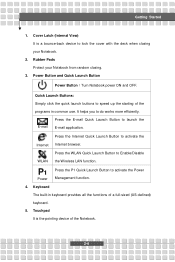
... E-mail Quick Launch Button to activate the Internet browser. Quick Launch Buttons: Simply click the quick launch buttons to Enable/Disable WLAN the Wireless LAN function. P1 Power Press the P1 Quick Launch Button to do works more efficiently. Power Button and Quick Launch Button Power Button:Turn Notebook power ON and OFF. Getting Started 1. It helps you to activate the Power Management function. 4. Cover Latch (Internal View) It is the pointing device of a full-sized (US-defined) keyboard. 5. Press the WLAN Quick Launch Button to...
... E-mail Quick Launch Button to activate the Internet browser. Quick Launch Buttons: Simply click the quick launch buttons to Enable/Disable WLAN the Wireless LAN function. P1 Power Press the P1 Quick Launch Button to do works more efficiently. Power Button and Quick Launch Button Power Button:Turn Notebook power ON and OFF. Getting Started 1. It helps you to activate the Power Management function. 4. Cover Latch (Internal View) It is the pointing device of a full-sized (US-defined) keyboard. 5. Press the WLAN Quick Launch Button to...

User Manual
Page 26
... or when the AC adapter is being charged. Power On / OFF / Standby w Blinking green when the system is in low battery status. w Blinking orange if the battery fails and it is activated. w Glowing green when the system is recommended to replace a new battery. Getting Started Line In: Used for an external microphone. w Glowing orange when the battery is enabled. Microphone: Used for an external audio device. Wireless LAN w Glowing green when wireless LAN function is in suspend...
... or when the AC adapter is being charged. Power On / OFF / Standby w Blinking green when the system is in low battery status. w Blinking orange if the battery fails and it is activated. w Glowing green when the system is recommended to replace a new battery. Getting Started Line In: Used for an external microphone. w Glowing orange when the battery is enabled. Microphone: Used for an external audio device. Wireless LAN w Glowing green when wireless LAN function is in suspend...
User Manual
Page 28
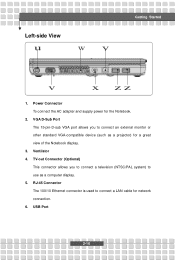
... connect a television (NTSC/PAL system) to connect an external monitor or other standard VGA-compatible device (such as a computer display. 5. Ventilator 4. TV-out Connector (Optional) This connector allows you to use as a projector) for a great view of the Notebook display. 3. RJ-45 Connector The 100/10 Ethernet connector is used to connect a LAN cable for the Notebook. 2. USB Port 2-10 Power Connector To connect the AC adapter and supply power for network connection...
... connect a television (NTSC/PAL system) to connect an external monitor or other standard VGA-compatible device (such as a computer display. 5. Ventilator 4. TV-out Connector (Optional) This connector allows you to use as a projector) for a great view of the Notebook display. 3. RJ-45 Connector The 100/10 Ethernet connector is used to connect a LAN cable for the Notebook. 2. USB Port 2-10 Power Connector To connect the AC adapter and supply power for network connection...

User Manual
Page 29
... card slot. The USB-standard interface supports "plug-and-play" technology, so that you to use the CD/DVD disc for installing software, accessing data and playing music/movie on the model you purchased. Optical Storage Device A slim DVD Combo or DVD Dual or Super Multi (DVD Dual and DVD RAM) or Lightscribe drive is smaller and faster than PC Card interface. USB Ports The USB 2.0 port allows you can connect and remove the USB devices without turning...
... card slot. The USB-standard interface supports "plug-and-play" technology, so that you to use the CD/DVD disc for installing software, accessing data and playing music/movie on the model you purchased. Optical Storage Device A slim DVD Combo or DVD Dual or Super Multi (DVD Dual and DVD RAM) or Lightscribe drive is smaller and faster than PC Card interface. USB Ports The USB 2.0 port allows you can connect and remove the USB devices without turning...

User Manual
Page 38
... be lost. If the battery power is critical to conserve power. w Only replace the main battery pack with the same or equivalent type of batteries according to temperatures above +60° C (+140° F). w Connect an AC adapter to help optimizing battery life and avoid a sudden power loss. w Disable unneeded settings or remove idle peripherals to maintain a normal operation. Conserving Battery Power Efficient battery power is not managed well, the saved...
... be lost. If the battery power is critical to conserve power. w Only replace the main battery pack with the same or equivalent type of batteries according to temperatures above +60° C (+140° F). w Connect an AC adapter to help optimizing battery life and avoid a sudden power loss. w Disable unneeded settings or remove idle peripherals to maintain a normal operation. Conserving Battery Power Efficient battery power is not managed well, the saved...
User Manual
Page 46
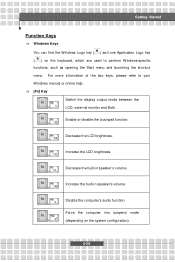
...to perform Windows-specific functions, such as opening the Start menu and launching the shortcut menu. n [Fn] Key Switch the display output mode between the + LCD, external monitor and Both. Getting Started Function Keys n Windows Keys You can find the Windows Logo key ( ) and one Application Logo key ( ) on the system configuration). 2-28 Enable or disable the touchpad function. + Decrease the LCD brightness. + Increase the LCD brightness. + Decrease the built-in speaker's volume. + Increase the built-in speaker's volume. + Disable the computer's audio function. + Force the...
...to perform Windows-specific functions, such as opening the Start menu and launching the shortcut menu. n [Fn] Key Switch the display output mode between the + LCD, external monitor and Both. Getting Started Function Keys n Windows Keys You can find the Windows Logo key ( ) and one Application Logo key ( ) on the system configuration). 2-28 Enable or disable the touchpad function. + Decrease the LCD brightness. + Increase the LCD brightness. + Decrease the built-in speaker's volume. + Increase the built-in speaker's volume. + Disable the computer's audio function. + Force the...
User Manual
Page 49
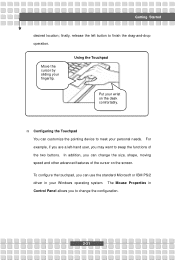
... personal needs. Getting Started desired location; Move the cursor by sliding your wrist on the screen. For example, if you may want to finish the drag-and-drop operation. To configure the touchpad, you can use the standard Microsoft or IBM PS/2 driver in Control Panel allows you to meet your Windows operating system. Using the Touchpad Put your fingertip. In addition, you can change the configuration...
... personal needs. Getting Started desired location; Move the cursor by sliding your wrist on the screen. For example, if you may want to finish the drag-and-drop operation. To configure the touchpad, you can use the standard Microsoft or IBM PS/2 driver in Control Panel allows you to meet your Windows operating system. Using the Touchpad Put your fingertip. In addition, you can change the configuration...
User Manual
Page 57
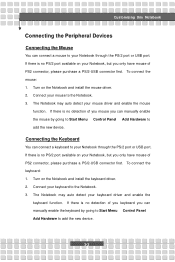
.../2-USB connector first. To connect the mouse: 1. Connect your keyboard to add the new device. The Notebook may auto detect your Notebook, but you can manually enable the keyboard by going to Start Menu à Control Panel à Add Hardware to add the new device. 3-3 If there is no PS/2 port available on your Notebook, but you can manually enable the mouse by going to Start Menu à Control Panel à Add Hardware to the Notebook. 3. Turn on the Notebook and install the keyboard driver...
.../2-USB connector first. To connect the mouse: 1. Connect your keyboard to add the new device. The Notebook may auto detect your Notebook, but you can manually enable the keyboard by going to Start Menu à Control Panel à Add Hardware to add the new device. 3-3 If there is no PS/2 port available on your Notebook, but you can manually enable the mouse by going to Start Menu à Control Panel à Add Hardware to the Notebook. 3. Turn on the Notebook and install the keyboard driver...
User Manual
Page 58
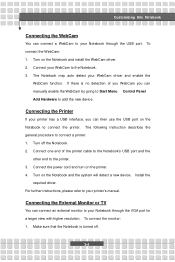
... has a USB interface, you can manually enable the WebCam by going to Start Menu à Control Panel à Add Hardware to the printer. 3. Turn on the printer. 4. Connecting the External Monitor or TV You can connect an external monitor to your Notebook through the USB port. Connect the power cord and turn on the Notebook and install the WebCam driver. 2. For further instructions, please refer to your WebCam driver and enable the WebCam function. Customizing this Notebook Connecting the WebCam You can connect a WebCam to your Notebook through...
... has a USB interface, you can manually enable the WebCam by going to Start Menu à Control Panel à Add Hardware to the printer. 3. Turn on the printer. 4. Connecting the External Monitor or TV You can connect an external monitor to your Notebook through the USB port. Connect the power cord and turn on the Notebook and install the WebCam driver. 2. For further instructions, please refer to your WebCam driver and enable the WebCam function. Customizing this Notebook Connecting the WebCam You can connect a WebCam to your Notebook through...

User Manual
Page 60
... a network connection. For more instructions or detailed steps on dialing-up through the modem, please consult your Notebook to take full advantage of the modem feature. 3-6 You are strongly recommended to install the modem driver included in 10/100 Base-T LAN module supports data transfer rate up to connect the Internet. This built-in the software CD of your MIS staff or Internet service...
... a network connection. For more instructions or detailed steps on dialing-up through the modem, please consult your Notebook to take full advantage of the modem feature. 3-6 You are strongly recommended to install the modem driver included in 10/100 Base-T LAN module supports data transfer rate up to connect the Internet. This built-in the software CD of your MIS staff or Internet service...
User Manual
Page 69
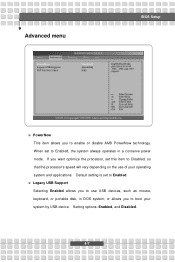
... processor's speed will vary depending on the use USB devices, such as mouse, keyboard, or portable disk, in a conserve power mode. If you to use of your system by USB device. or allows you to enable or disable AMD PowerNow technology. Default setting is set to Enabled. Advanced menu BIOS Setup w PowerNow This item allows you to boot your operating system and applications. When set to Enabled, the system always operates in DOS system; Setting options: Enabled, and Disabled. 4-7
... processor's speed will vary depending on the use USB devices, such as mouse, keyboard, or portable disk, in a conserve power mode. If you to use of your system by USB device. or allows you to enable or disable AMD PowerNow technology. Default setting is set to Enabled. Advanced menu BIOS Setup w PowerNow This item allows you to boot your operating system and applications. When set to Enabled, the system always operates in DOS system; Setting options: Enabled, and Disabled. 4-7

User Manual
Page 72
... Setup. About Supervisor Password and User Password Supervisor Password allows the user to specify the type of the setup menu; BIOS Setup When the Supervisor Password is set password, just press [Enter] when you can make changes. 4-10 The Password Check item is used to enter and change the settings of BIOS password protection that is implemented. You can enter Setup without entering any password. To clear a set , the new item User Access Level and Password Check will boot and you are described below: Setup The password...
... Setup. About Supervisor Password and User Password Supervisor Password allows the user to specify the type of the setup menu; BIOS Setup When the Supervisor Password is set password, just press [Enter] when you can make changes. 4-10 The Password Check item is used to enter and change the settings of BIOS password protection that is implemented. You can enter Setup without entering any password. To clear a set , the new item User Access Level and Password Check will boot and you are described below: Setup The password...
User Manual
Page 73
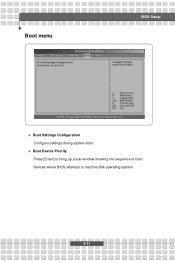
w Boot Device Priority Press [Enter] to bring up a sub-window showing the sequence of boot devices where BIOS attempts to load the disk operating system. 4-11 Boot menu BIOS Setup w Boot Settings Configuration Configure settings during system boot.
w Boot Device Priority Press [Enter] to bring up a sub-window showing the sequence of boot devices where BIOS attempts to load the disk operating system. 4-11 Boot menu BIOS Setup w Boot Settings Configuration Configure settings during system boot.

