

User Manual
Page 2
... from that interference will not occur in a particular installation. However, there is connected. This equipment generates uses and can be used in accordance with the instructions, may cause harmful interference to radio communications. If this equipment does cause harmful interference to part 15 of the following measures: w Reorient or relocate the...
... from that interference will not occur in a particular installation. However, there is connected. This equipment generates uses and can be used in accordance with the instructions, may cause harmful interference to radio communications. If this equipment does cause harmful interference to part 15 of the following measures: w Reorient or relocate the...
User Manual
Page 5
... touch uninsulated telephone wires or terminals unless the telephone line has been disconnected at the network interface. 4. Do not use this model properly, read the instruction manual carefully and keep this model, please contact your future reference. Never install telephone wiring during an electrical storm. CD-ROM Drive Notice CAUTION: This...
... touch uninsulated telephone wires or terminals unless the telephone line has been disconnected at the network interface. 4. Do not use this model properly, read the instruction manual carefully and keep this model, please contact your future reference. Never install telephone wiring during an electrical storm. CD-ROM Drive Notice CAUTION: This...
User Manual
Page 6
Read the safety instructions carefully and thoroughly. 2. Do not place anything on it up. 5. Always unplug the power cord before inserting any of the following situations arises, get the ... by a service personnel: VI Lay this equipment away from overheating. If any add-on a stable surface before connecting the equipment to the power inlet. 7. Safety Instructions 1. Keep this equipment on card or module. 9. Make sure that the power voltage is within its safety range and has been adjusted properly to the...
Read the safety instructions carefully and thoroughly. 2. Do not place anything on it up. 5. Always unplug the power cord before inserting any of the following situations arises, get the ... by a service personnel: VI Lay this equipment away from overheating. If any add-on a stable surface before connecting the equipment to the power inlet. 7. Safety Instructions 1. Keep this equipment on card or module. 9. Make sure that the power voltage is within its safety range and has been adjusted properly to the...
User Manual
Page 12
Preface Table of Content Preface Regulations Information II FCC-B Radio Frequency Interference Statement II FCC Conditions III Safety Guideline for Using Lithium Battery IV Caution on Using Modem V CD-ROM Drive Notice V Macrovision Notice VI Safety Instructions VI WEEE Statement VIII Trademarks ...XI Release History XI Introductions How to Use This Manual 1-2 Unpacking ...1-4 Getting Started Specification ...2-2 Product Overview 2-6 XII
Preface Table of Content Preface Regulations Information II FCC-B Radio Frequency Interference Statement II FCC Conditions III Safety Guideline for Using Lithium Battery IV Caution on Using Modem V CD-ROM Drive Notice V Macrovision Notice VI Safety Instructions VI WEEE Statement VIII Trademarks ...XI Release History XI Introductions How to Use This Manual 1-2 Unpacking ...1-4 Getting Started Specification ...2-2 Product Overview 2-6 XII
User Manual
Page 16
How to Use This Manual This User's Manual provides instructions and illustrations on how to operate this notebook. It is damaged or missing, please contact the vendor where you have all the accessories of this ... satisfaction. Chapter 1, General Introductions, includes the descriptions of all the accessories included when you a delightful and professional experience in using this notebook. Also, this chapter instructs the correct procedure of installing or uninstalling the battery pack, and the brief ideas on how to read this manual carefully before using notebook. General...
How to Use This Manual This User's Manual provides instructions and illustrations on how to operate this notebook. It is damaged or missing, please contact the vendor where you have all the accessories of this ... satisfaction. Chapter 1, General Introductions, includes the descriptions of all the accessories included when you a delightful and professional experience in using this notebook. Also, this chapter instructs the correct procedure of installing or uninstalling the battery pack, and the brief ideas on how to read this manual carefully before using notebook. General...
User Manual
Page 17
General Introductions Chapter 3, Customizing this Notebook, gives instructions not only in connecting the mouse, keyboard, webcam, printer, external monitor, IEEE 1394 devices, and communication devices, but also in installing and removing the PC card. Chapter 4, BIOS setup, provides information on BIOS Setup program and allows you to configure the system for optimum use. 1-3
General Introductions Chapter 3, Customizing this Notebook, gives instructions not only in connecting the mouse, keyboard, webcam, printer, external monitor, IEEE 1394 devices, and communication devices, but also in installing and removing the PC card. Chapter 4, BIOS setup, provides information on BIOS Setup program and allows you to configure the system for optimum use. 1-3
User Manual
Page 53
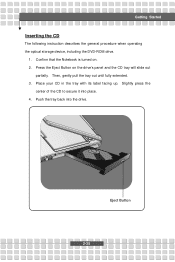
Place your CD in the tray with its label facing up. Then, gently pull the tray out until fully extended. 3. Getting Started Inserting the CD The following instruction describes the general procedure when operating the optical storage device, including the DVD-ROM drive. 1. Confirm that the Notebook is turned on the drive's panel and the CD tray will slide out partially. Press the Eject Button on . 2. Push the tray back into place. 4. Eject Button 2-35 Slightly press the center of the CD to secure it into the drive.
Place your CD in the tray with its label facing up. Then, gently pull the tray out until fully extended. 3. Getting Started Inserting the CD The following instruction describes the general procedure when operating the optical storage device, including the DVD-ROM drive. 1. Confirm that the Notebook is turned on the drive's panel and the CD tray will slide out partially. Press the Eject Button on . 2. Push the tray back into place. 4. Eject Button 2-35 Slightly press the center of the CD to secure it into the drive.
User Manual
Page 58
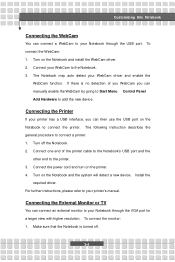
... the general procedure to the printer. 3. Turn off . 3-4 Connect your printer's manual. Turn on the Notebook and install the WebCam driver. 2. For further instructions, please refer to your WebCam to the Notebook. 3. Connecting the External Monitor or TV You can connect a WebCam to your Notebook through the VGA port ...
... the general procedure to the printer. 3. Turn off . 3-4 Connect your printer's manual. Turn on the Notebook and install the WebCam driver. 2. For further instructions, please refer to your WebCam to the Notebook. 3. Connecting the External Monitor or TV You can connect a WebCam to your Notebook through the VGA port ...

User Manual
Page 60
... 56Kbps fax/data modem allows you to connect the LAN (local area network) devices, such as a hub, switch and gateway, to 100Mbps. For more instructions or detailed steps on dialing-up through the modem, please consult your MIS staff or Internet service provider (ISP) for help . 1. For more... instructions or detailed steps on connecting to the LAN, please ask your Notebook to connect the Internet. You are strongly recommended to install the modem ...
... 56Kbps fax/data modem allows you to connect the LAN (local area network) devices, such as a hub, switch and gateway, to 100Mbps. For more instructions or detailed steps on dialing-up through the modem, please consult your MIS staff or Internet service provider (ISP) for help . 1. For more... instructions or detailed steps on connecting to the LAN, please ask your Notebook to connect the Internet. You are strongly recommended to install the modem ...
User Manual
Page 61
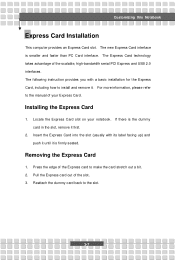
... Express Card. The new Express Card interface is firmly seated. Customizing this Notebook Express Card Installation This computer provides an Express Card slot. The following instruction provides you with its label facing up) and push it until it first. 2. Pull the Express card out of the scalable, high-bandwidth serial PCI...
... Express Card. The new Express Card interface is firmly seated. Customizing this Notebook Express Card Installation This computer provides an Express Card slot. The following instruction provides you with its label facing up) and push it until it first. 2. Pull the Express card out of the scalable, high-bandwidth serial PCI...