
User Manual
Page 3
... Acquisition of Replaceable Parts 1-10 Safety Instructions...1-11 MSI Highlights ...1-14 Introductions 2-1 Unpacking...2-2 Product Overview...2-3 Top-open View...2-3 Front Side View...2-6 Right Side View...2-7 Left Side View...2-8 Rear Side View...2-9 Bottom Side View 2-10 How to Use the Keyboard 2-11 Power Key/ Enter Sleep Mode 2-11 Windows Key...2-11 Enable Quick Fn Launch Keys 2-12 Use Quick Fn Launch Keys 2-12 Screen Capture...2-14 Use Multiple Monitors 2-14 Application: True Color (optional 2-14 Specifications...2-15 1-3
... Acquisition of Replaceable Parts 1-10 Safety Instructions...1-11 MSI Highlights ...1-14 Introductions 2-1 Unpacking...2-2 Product Overview...2-3 Top-open View...2-3 Front Side View...2-6 Right Side View...2-7 Left Side View...2-8 Rear Side View...2-9 Bottom Side View 2-10 How to Use the Keyboard 2-11 Power Key/ Enter Sleep Mode 2-11 Windows Key...2-11 Enable Quick Fn Launch Keys 2-12 Use Quick Fn Launch Keys 2-12 Screen Capture...2-14 Use Multiple Monitors 2-14 Application: True Color (optional 2-14 Specifications...2-15 1-3

User Manual
Page 4
... Set up a Facial Login with IR Camera 3-18 How to Use the Touchpad 3-20 About HDD and SSD 3-21 About M.2 SSD Slot...3-21 How to Connect the Internet 3-22 Wireless LAN...3-22 Wired LAN...3-24 How to Set Up Bluetooth Connection 3-29 Activating Bluetooth Connection 3-29 How to Connect External Devices 3-32 Video: How to Use RAID Function (optional 3-33 How to Select Boot Mode in BIOS 3-34 Video: How to Restore Windows 10 Operating System on MSI Notebooks 3-35 Video: How to Use MSI One Touch Install...
... Set up a Facial Login with IR Camera 3-18 How to Use the Touchpad 3-20 About HDD and SSD 3-21 About M.2 SSD Slot...3-21 How to Connect the Internet 3-22 Wireless LAN...3-22 Wired LAN...3-24 How to Set Up Bluetooth Connection 3-29 Activating Bluetooth Connection 3-29 How to Connect External Devices 3-32 Video: How to Use RAID Function (optional 3-33 How to Select Boot Mode in BIOS 3-34 Video: How to Restore Windows 10 Operating System on MSI Notebooks 3-35 Video: How to Use MSI One Touch Install...

User Manual
Page 10
... recommended that certain components, such as memory modules, HDD, SSD, ODD, and Bluetooth/WiFi combo card, etc., preinstalled in certain countries or territories may cause the product to upgrade or replace any further information on the models users purchased. Do not attempt to be damaged. Acquisition of Replaceable Parts Please be noticed that the acquisition of replaceable parts (or compatible ones) of the product...
... recommended that certain components, such as memory modules, HDD, SSD, ODD, and Bluetooth/WiFi combo card, etc., preinstalled in certain countries or territories may cause the product to upgrade or replace any further information on the models users purchased. Do not attempt to be damaged. Acquisition of Replaceable Parts Please be noticed that the acquisition of replaceable parts (or compatible ones) of the product...
User Manual
Page 11
... not cover the ventilators of the power cord, since it . Leaving a battery in an explosion. Do not place anything on top of the power cord. • Always place the notebook on a stable, flat, hard surface before setting it up. • Do not lay the notebook on it is an important safety feature. • Always use the AC/DC adapter and power...
... not cover the ventilators of the power cord, since it . Leaving a battery in an explosion. Do not place anything on top of the power cord. • Always place the notebook on a stable, flat, hard surface before setting it up. • Do not lay the notebook on it is an important safety feature. • Always use the AC/DC adapter and power...
User Manual
Page 18
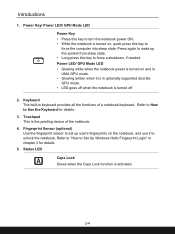
... needed. Status LED Caps Lock Glows when the Caps Lock function is the pointing device of a notebook keyboard. Press again to wake up user's fingerprints on , quick press this key to Use the Keyboard for details. 5. Keyboard The built-in chapter 3 for details. 3. Fingerprint Sensor (optional) Use the fingerprint sensor to unlock the notebook. Refer to "How to force the computer into sleep state. Power Key/ Power LED/ GPU Mode LED Power Key • Press this key to turn...
... needed. Status LED Caps Lock Glows when the Caps Lock function is the pointing device of a notebook keyboard. Press again to wake up user's fingerprints on , quick press this key to Use the Keyboard for details. 5. Keyboard The built-in chapter 3 for details. 3. Fingerprint Sensor (optional) Use the fingerprint sensor to unlock the notebook. Refer to "How to force the computer into sleep state. Power Key/ Power LED/ GPU Mode LED Power Key • Press this key to turn...
User Manual
Page 19
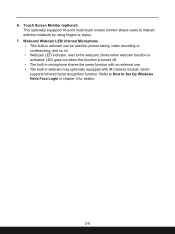
... interact with IR Camera module, which supports infrared facial recognition function. LED goes out when this function is activated; Touch Screen Monitor (optional) This optionally equipped 10-point multi-touch screen monitor allows users to Set Up Windows Hello Face Login in webcam can be used for details. 2-5 Webcam/ Webcam LED/ Internal Microphone • This built-in chapter 3 for picture taking, video recording or conferencing, and so on. • Webcam LED indicator, next to the webcam, blinks when webcam function is turned off. •...
... interact with IR Camera module, which supports infrared facial recognition function. LED goes out when this function is activated; Touch Screen Monitor (optional) This optionally equipped 10-point multi-touch screen monitor allows users to Set Up Windows Hello Face Login in webcam can be used for details. 2-5 Webcam/ Webcam LED/ Internal Microphone • This built-in chapter 3 for picture taking, video recording or conferencing, and so on. • Webcam LED indicator, next to the webcam, blinks when webcam function is turned off. •...

User Manual
Page 22
...; Supports using a power bank to supply power to the notebook and charge the battery pack. However, the maximum portable charging power limitation may up to 40Gbps data rate. • Supports Power Delivery function. Thunderbolt (Type-C) (optional) • Optionally supports USB 4.0, PCIe, HDMI, DisplayPort connection; 8K display monitor output; Introductions Left Side View 1. If the problem persists, please contact your local authorized retailer or service center. • Battery LED goes out when the battery is fully charged or...
...; Supports using a power bank to supply power to the notebook and charge the battery pack. However, the maximum portable charging power limitation may up to 40Gbps data rate. • Supports Power Delivery function. Thunderbolt (Type-C) (optional) • Optionally supports USB 4.0, PCIe, HDMI, DisplayPort connection; 8K display monitor output; Introductions Left Side View 1. If the problem persists, please contact your local authorized retailer or service center. • Battery LED goes out when the battery is fully charged or...

User Manual
Page 24
... supports the SSD device with built-in stereo speakers which deliver the high quality sound, and supports the HD audio technology. 4. Contact the authorized dealer or service center for air circulation. 2. DO NOT block the ventilator for product service. 2-10 Introductions Bottom Side View 1. Ventilator The ventilator is upgraded or the system hangs, please 1) power off the notebook; 2) remove the AC power; 3) use...
... supports the SSD device with built-in stereo speakers which deliver the high quality sound, and supports the HD audio technology. 4. Contact the authorized dealer or service center for air circulation. 2. DO NOT block the ventilator for product service. 2-10 Introductions Bottom Side View 1. Ventilator The ventilator is upgraded or the system hangs, please 1) power off the notebook; 2) remove the AC power; 3) use...
User Manual
Page 25
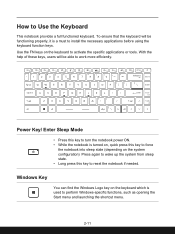
... key to force the notebook into sleep state (depending on the keyboard to reset the notebook if needed. With the help of these keys, users will be able to install the necessary applications before using the keyboard function keys. To ensure that the keyboard will be functioning properly, it is used to Use the Keyboard This notebook provides a full functioned keyboard. How to perform Windows-specific functions, such as opening the Start menu and launching the shortcut menu. 2-11 Windows Key...
... key to force the notebook into sleep state (depending on the keyboard to reset the notebook if needed. With the help of these keys, users will be able to install the necessary applications before using the keyboard function keys. To ensure that the keyboard will be functioning properly, it is used to Use the Keyboard This notebook provides a full functioned keyboard. How to perform Windows-specific functions, such as opening the Start menu and launching the shortcut menu. 2-11 Windows Key...
User Manual
Page 26
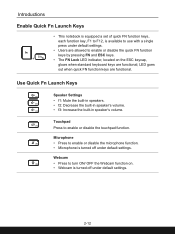
...: Increase the built-in speaker's volume. Introductions Enable Quick Fn Launch Keys • This notebook is equipped a set of quick FN function keys, each function key, F1 to F12, is available to use with a single press under default settings. • Users are allowed to enable or disable the quick FN function keys by pressing FN and ESC keys. + • The FN Lock LED indicator, located on . • Webcam is turned off under default settings. LED goes out when quick FN function keys are functional;
...: Increase the built-in speaker's volume. Introductions Enable Quick Fn Launch Keys • This notebook is equipped a set of quick FN function keys, each function key, F1 to F12, is available to use with a single press under default settings. • Users are allowed to enable or disable the quick FN function keys by pressing FN and ESC keys. + • The FN Lock LED indicator, located on . • Webcam is turned off under default settings. LED goes out when quick FN function keys are functional;
User Manual
Page 28
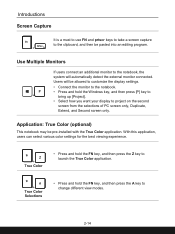
... hold the Windows key, and then press [P] key to + bring up [Project]. • Select how you want your display to change different view modes. 2-14 Application: True Color (optional) This notebook may be allowed to customize the display settings. • Connect the monitor to the notebook. • Press and hold the FN key, and then press the A key to project on the second screen from the...
... hold the Windows key, and then press [P] key to + bring up [Project]. • Select how you want your display to change different view modes. 2-14 Application: True Color (optional) This notebook may be allowed to customize the display settings. • Connect the monitor to the notebook. • Press and hold the FN key, and then press the A key to project on the second screen from the...
User Manual
Page 30
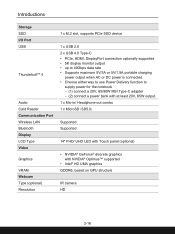
... Port USB ThunderboltTM 4 Audio Card Reader Communication Port Wireless LAN Bluetooth Display LCD Type Video Graphics VRAM Webcam Type (optional) Resolution 1 x M.2 slot, supports PCIe SSD device 1 x USB 2.0 2 x USB 4.0 Type-C • PCIe, HDMI, DisplayPort connection optionally supported • 5K display monitor output • up to 40Gbps data rate • Supports maximum 5V/3A or 5V/1.5A portable charging power output when AC or DC power is connected • Choose either way to use Power Delivery function to supply power for the notebook - (1) connect a 20V, 65/90W MSI Type-C adapter...
... Port USB ThunderboltTM 4 Audio Card Reader Communication Port Wireless LAN Bluetooth Display LCD Type Video Graphics VRAM Webcam Type (optional) Resolution 1 x M.2 slot, supports PCIe SSD device 1 x USB 2.0 2 x USB 4.0 Type-C • PCIe, HDMI, DisplayPort connection optionally supported • 5K display monitor output • up to 40Gbps data rate • Supports maximum 5V/3A or 5V/1.5A portable charging power output when AC or DC power is connected • Choose either way to use Power Delivery function to supply power for the notebook - (1) connect a 20V, 65/90W MSI Type-C adapter...
User Manual
Page 37
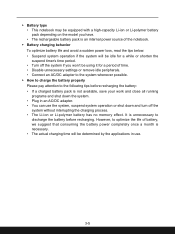
... adapter. • You can use . 3-5 ▶▶ Battery type • This notebook may be equipped with a high-capacity Li-ion or Li-polymer battery pack depending on the model you have. • The rechargeable battery pack is an internal power source of the notebook. ▶▶ Battery charging behavior To optimize battery life and avoid a sudden power loss, read the tips below: • Suspend system operation...
... adapter. • You can use . 3-5 ▶▶ Battery type • This notebook may be equipped with a high-capacity Li-ion or Li-polymer battery pack depending on the model you have. • The rechargeable battery pack is an internal power source of the notebook. ▶▶ Battery charging behavior To optimize battery life and avoid a sudden power loss, read the tips below: • Suspend system operation...
User Manual
Page 40
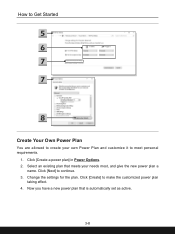
Change the settings for the plan. Click [Create] to continue. 3. Click [Create a power plan] in Power Options. 2. Click [Next] to make the customized power plan taking effect. 4. Now you have a new power plan that meets your own Power Plan and customize it to meet personal requirements. 1. Select an existing plan that is automatically set as active. 3-8 How to Get Started Create Your Own Power Plan You are allowed to create your needs most, and give the new power plan a name.
Change the settings for the plan. Click [Create] to continue. 3. Click [Create a power plan] in Power Options. 2. Click [Next] to make the customized power plan taking effect. 4. Now you have a new power plan that meets your own Power Plan and customize it to meet personal requirements. 1. Select an existing plan that is automatically set as active. 3-8 How to Get Started Create Your Own Power Plan You are allowed to create your needs most, and give the new power plan a name.
User Manual
Page 42
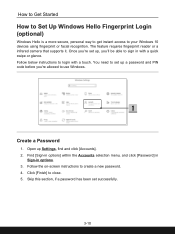
.... Create a Password 1. Find [Sign-in options] within the Accounts selection menu, and click [Password] in Sign-in with a touch. Skip this section, if a password has been set up Settings, find and click [Accounts]. 2. Once you're set successfully. 3-10 Click [Finish] to your Windows 10 devices using fingerprint or facial recognition. Follow the on-screen instructions to use Windows. The feature requires fingerprint reader or a infrared camera that supports it. Open...
.... Create a Password 1. Find [Sign-in options] within the Accounts selection menu, and click [Password] in Sign-in with a touch. Skip this section, if a password has been set up Settings, find and click [Accounts]. 2. Once you're set successfully. 3-10 Click [Finish] to your Windows 10 devices using fingerprint or facial recognition. Follow the on-screen instructions to use Windows. The feature requires fingerprint reader or a infrared camera that supports it. Open...

User Manual
Page 47
... feature requires fingerprint reader or a infrared camera that supports it. Skip this section, if a password has been set up a password and PIN code before you 're set up Settings, find and click [Accounts]. 2. You need to set successfully. 3-15 Follow the instructions as below to create a new password. 4. Create a Password 1. Follow the on-screen instructions to login with a quick swipe or glance. How to Set Up Windows Hello Face Login (optional) Windows Hello is...
... feature requires fingerprint reader or a infrared camera that supports it. Skip this section, if a password has been set up a password and PIN code before you 're set up Settings, find and click [Accounts]. 2. You need to set successfully. 3-15 Follow the instructions as below to create a new password. 4. Create a Password 1. Follow the on-screen instructions to login with a quick swipe or glance. How to Set Up Windows Hello Face Login (optional) Windows Hello is...

User Manual
Page 50
Follow the Windows Hello setup wizards; Position your face. 4. If you either way. Click [Remove] to cancel the facial login setup. 3-18 In Sign-in the center of the frame that appears on screen. Click [Get started] button. 3. This will register your face in options, click the [Set up a Facial Login with IR Camera 1. The camera will help the system recognize you wore glasses while setting up face recognition, click [Improve recognition] to go through the setup again without them. Complete the setup. How to Get Started Set up ] button under [Windows Hello Face]. 2.
Follow the Windows Hello setup wizards; Position your face. 4. If you either way. Click [Remove] to cancel the facial login setup. 3-18 In Sign-in the center of the frame that appears on screen. Click [Get started] button. 3. This will register your face in options, click the [Set up a Facial Login with IR Camera 1. The camera will help the system recognize you wore glasses while setting up face recognition, click [Improve recognition] to go through the setup again without them. Complete the setup. How to Get Started Set up ] button under [Windows Hello Face]. 2.
User Manual
Page 52
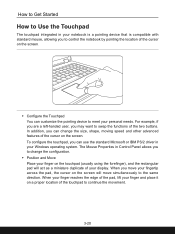
... to Get Started How to Use the Touchpad The touchpad integrated in your notebook is a pointing device that is compatible with standard mouse, allowing you to control the notebook by pointing the location of the two buttons. For example, if you are a left-handed user, you may want to swap the functions of the cursor on the screen. The Mouse Properties in your personal needs. When...
... to Get Started How to Use the Touchpad The touchpad integrated in your notebook is a pointing device that is compatible with standard mouse, allowing you to control the notebook by pointing the location of the two buttons. For example, if you are a left-handed user, you may want to swap the functions of the cursor on the screen. The Mouse Properties in your personal needs. When...

User Manual
Page 53
... and hold the left button to users. Do not attempt to remove or install the HDD and SSD when the notebook is to the desired location; Please consult an authorized retailer or service center for M.2 SSD cards, which are the data storage devices used for correct specifications and installations. 3-21 Tapping twice more rapidly on the touchpad is powered on the touchpad, and then lift your...
... and hold the left button to users. Do not attempt to remove or install the HDD and SSD when the notebook is to the desired location; Please consult an authorized retailer or service center for M.2 SSD cards, which are the data storage devices used for correct specifications and installations. 3-21 Tapping twice more rapidly on the touchpad is powered on the touchpad, and then lift your...
User Manual
Page 56
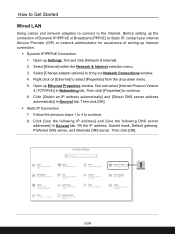
How to Get Started Wired LAN Using cables and network adapters to connect to bring out Network Connections window. 4. Select [Change adapter options] to the Internet. Then click [OK]. ▶▶ Static IP Connection 7. Right click on [Ethernet] to continue. 6. Click [Use the following IP address] and [Use the following DNS server addresses] in General tab. Then click [Properties] to select [Properties] from the drop-down menu. 5. Follow the...
How to Get Started Wired LAN Using cables and network adapters to connect to bring out Network Connections window. 4. Select [Change adapter options] to the Internet. Then click [OK]. ▶▶ Static IP Connection 7. Right click on [Ethernet] to continue. 6. Click [Use the following IP address] and [Use the following DNS server addresses] in General tab. Then click [Properties] to select [Properties] from the drop-down menu. 5. Follow the...

