User Guide
Page 5
... telephone lines. 5. Do not use this model properly, read the instruction manual carefully and keep this model, please contact your future reference. In case of any trouble with this manual for wet locations. 3. Never install telephone jacks in the vicinity of electric shock from lightning. 6. Avoid using the telephone function (other than a cordless type) during a lightning storm. 2. Never install telephone wiring during an electrical...
... telephone lines. 5. Do not use this model properly, read the instruction manual carefully and keep this model, please contact your future reference. In case of any trouble with this manual for wet locations. 3. Never install telephone jacks in the vicinity of electric shock from lightning. 6. Avoid using the telephone function (other than a cordless type) during a lightning storm. 2. Never install telephone wiring during an electrical...
User Guide
Page 6
.... 5. Safety Instructions 1. patents and other limited viewing uses only unless otherwise authorized by Macrovision, and is within its safety range and has been adjusted properly to the value of this User Guide for air convection and to step on card or module. 9. Read the safety instructions carefully and thoroughly. 2. Lay this equipment away from overheating. Do not cover the openings. 6.
.... 5. Safety Instructions 1. patents and other limited viewing uses only unless otherwise authorized by Macrovision, and is within its safety range and has been adjusted properly to the value of this User Guide for air convection and to step on card or module. 9. Read the safety instructions carefully and thoroughly. 2. Lay this equipment away from overheating. Do not cover the openings. 6.
User Guide
Page 14
Preface Customizing this Notebook Connecting the External Devices 3-2 Connecting the Peripheral Devices 3-3 Connecting the Communication Devices 3-6 Express PC Card Installation 3-7 Installing the Express card 3-7 Removing the Express card 3-7 Safely Remove Hardware 3-8 BIOS Setup About BIOS Setup 4-2 When to Use BIOS Setup 4-2 How to Run BIOS Setup 4-2 Control Keys 4-3 BIOS Setup Menu 4-4 Main menu 4-5 Advanced menu 4-7 Security menu 4-9 Boot menu 4-11 Exit menu 4-12 XIV
Preface Customizing this Notebook Connecting the External Devices 3-2 Connecting the Peripheral Devices 3-3 Connecting the Communication Devices 3-6 Express PC Card Installation 3-7 Installing the Express card 3-7 Removing the Express card 3-7 Safely Remove Hardware 3-8 BIOS Setup About BIOS Setup 4-2 When to Use BIOS Setup 4-2 How to Run BIOS Setup 4-2 Control Keys 4-3 BIOS Setup Menu 4-4 Main menu 4-5 Advanced menu 4-7 Security menu 4-9 Boot menu 4-11 Exit menu 4-12 XIV
User Guide
Page 16
If any item is recommended to use this manual carefully before using notebook. Chapter 2, Getting Started, provides the specification of this notebook, and introduces the function buttons, quick launch buttons, connectors, LEDs and externals of this notebook. Also, this chapter instructs the correct procedure of installing or uninstalling the battery pack, and the brief ideas on how to operate this notebook. It is damaged or missing, please contact the vendor...
If any item is recommended to use this manual carefully before using notebook. Chapter 2, Getting Started, provides the specification of this notebook, and introduces the function buttons, quick launch buttons, connectors, LEDs and externals of this notebook. Also, this chapter instructs the correct procedure of installing or uninstalling the battery pack, and the brief ideas on how to operate this notebook. It is damaged or missing, please contact the vendor...
User Guide
Page 17
Chapter 4, BIOS setup, provides information on BIOS Setup program and allows you to configure the system for optimum use. 1-3 General Introductions connecting the mouse, keyboard, webcam, printer, external monitor, IEEE 1394 devices, and communication devices, but also in installing and removing the PC card.
Chapter 4, BIOS setup, provides information on BIOS Setup program and allows you to configure the system for optimum use. 1-3 General Introductions connecting the mouse, keyboard, webcam, printer, external monitor, IEEE 1394 devices, and communication devices, but also in installing and removing the PC card.
User Guide
Page 18
... check all items carefully. If any item contained is damaged or missing, please contact your local dealer immediately. The package should contain the following items: w Notebook w User's Manual or Quick Start Guide w All-in the future. Also, keep the box and packing materials in case you need to ship the unit in -one software DVD containing the drivers and utilities and optional recovery function.
... check all items carefully. If any item contained is damaged or missing, please contact your local dealer immediately. The package should contain the following items: w Notebook w User's Manual or Quick Start Guide w All-in the future. Also, keep the box and packing materials in case you need to ship the unit in -one software DVD containing the drivers and utilities and optional recovery function.
User Guide
Page 23
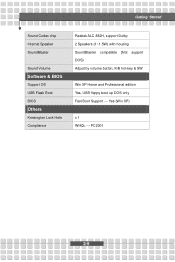
Yes (Win XP) x 1 WHQL --- PC2001 2-5 Getting Started Sound Codec chip Internal Speaker SoundBlaster Sound Volume Software & BIOS Support OS USB Flash Boot BIOS Others Kensington Lock Hole Compliance Realtek ALC 882H, support Dolby 2 Speakers (1~1.5W) with housing SoundBlaster compatible (Not support DOS) Adjust by volume button, K/B hot-key & SW Win XP Home and Professional edition Yes, USB floppy boot up DOS only Fast Boot Support ---
Yes (Win XP) x 1 WHQL --- PC2001 2-5 Getting Started Sound Codec chip Internal Speaker SoundBlaster Sound Volume Software & BIOS Support OS USB Flash Boot BIOS Others Kensington Lock Hole Compliance Realtek ALC 882H, support Dolby 2 Speakers (1~1.5W) with housing SoundBlaster compatible (Not support DOS) Adjust by volume button, K/B hot-key & SW Win XP Home and Professional edition Yes, USB floppy boot up DOS only Fast Boot Support ---
User Guide
Page 25
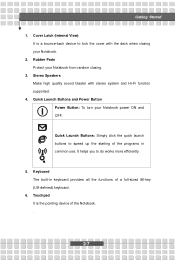
... works more efficiently. 5. Stereo Speakers Make high quality sound blaster with the deck when closing . 3. It helps you to lock the cover with stereo system and Hi-Fi function supported. 4. Keyboard The built-in common use. Cover Latch (Internal View) It is the pointing device of the programs in keyboard provides all the functions of a full-sized 86-key (US-defined) keyboard. 6. Quick Launch Buttons and Power Button Power Button: To turn your Notebook...
... works more efficiently. 5. Stereo Speakers Make high quality sound blaster with the deck when closing . 3. It helps you to lock the cover with stereo system and Hi-Fi function supported. 4. Keyboard The built-in common use. Cover Latch (Internal View) It is the pointing device of the programs in keyboard provides all the functions of a full-sized 86-key (US-defined) keyboard. 6. Quick Launch Buttons and Power Button Power Button: To turn your Notebook...
User Guide
Page 27
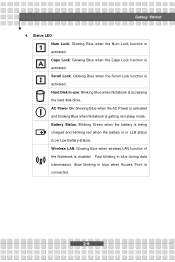
... activated and blinking Blue when Notebook is activated. Scroll Lock: Glowing Blue when the Scroll Lock function is in LLB status (Low Low Battery status). Battery Status: Blinking Green when the battery is being charged and blinking red when the battery is activated. Slow blinking in blue during data transmission. Getting Started 4. Hard Disk In-use: Blinking Blue when Notebook is connected. 2-9 Wireless LAN: Glowing Blue when wireless LAN function of the Notebook is activated. Caps Lock: Glowing Blue when the Caps Lock function is enabled...
... activated and blinking Blue when Notebook is activated. Scroll Lock: Glowing Blue when the Scroll Lock function is in LLB status (Low Low Battery status). Battery Status: Blinking Green when the battery is being charged and blinking red when the battery is activated. Slow blinking in blue during data transmission. Getting Started 4. Hard Disk In-use: Blinking Blue when Notebook is connected. 2-9 Wireless LAN: Glowing Blue when wireless LAN function of the Notebook is activated. Caps Lock: Glowing Blue when the Caps Lock function is enabled...
User Guide
Page 29
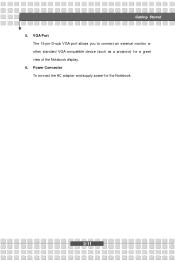
Getting Started 5. Power Connector To connect the AC adapter and supply power for a great view of the Notebook display. 6. VGA Port The 15-pin-D-sub VGA port allows you to connect an external monitor or other standard VGA-compatible device (such as a projector) for the Notebook. 2-11
Getting Started 5. Power Connector To connect the AC adapter and supply power for a great view of the Notebook display. 6. VGA Port The 15-pin-D-sub VGA port allows you to connect an external monitor or other standard VGA-compatible device (such as a projector) for the Notebook. 2-11
User Guide
Page 30
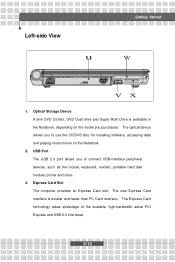
... Card interface. The new Express Card interface is available in the Notebook, depending on the Notebook. 2. Express Card Slot The computer provides an Express Card slot. Left-side View u Getting Started w vx 1. The optical device allows you to use the CD/DVD disc for installing software, accessing data and playing music/movie on the model you purchased. USB Port The USB 2.0 port allows you to connect USB-interface peripheral devices, such as the mouse, keyboard, modem, portable hard disk module...
... Card interface. The new Express Card interface is available in the Notebook, depending on the Notebook. 2. Express Card Slot The computer provides an Express Card slot. Left-side View u Getting Started w vx 1. The optical device allows you to use the CD/DVD disc for installing software, accessing data and playing music/movie on the model you purchased. USB Port The USB 2.0 port allows you to connect USB-interface peripheral devices, such as the mouse, keyboard, modem, portable hard disk module...
User Guide
Page 40
... recycling options or for a while or shorten the Suspend Timer's time period. w Do not temper with your area. w Do not disassemble, short-circuit or incinerate batteries or expose them away from children. If the battery power is critical to conserve power. Getting Started Using the Battery Pack Battery Safety Tips Replacing or handling the battery incorrectly may be lost. w Disable unneeded settings or remove idle...
... recycling options or for a while or shorten the Suspend Timer's time period. w Do not temper with your area. w Do not disassemble, short-circuit or incinerate batteries or expose them away from children. If the battery power is critical to conserve power. Getting Started Using the Battery Pack Battery Safety Tips Replacing or handling the battery incorrectly may be lost. w Disable unneeded settings or remove idle...
User Guide
Page 52
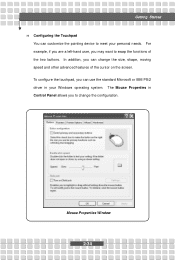
To configure the touchpad, you to change the size, shape, moving speed and other advanced features of the two buttons. Mouse Properties Window 2-34 The Mouse Properties in Control Panel allows you can use the standard Microsoft or IBM PS/2 driver in your personal needs. Getting Started n Configuring the Touchpad You can customize the pointing device to meet your Windows operating system. For example, if you are a left-hand user, you can change the configuration. In addition, you may want to swap the functions of the cursor on the screen.
To configure the touchpad, you to change the size, shape, moving speed and other advanced features of the two buttons. Mouse Properties Window 2-34 The Mouse Properties in Control Panel allows you can use the standard Microsoft or IBM PS/2 driver in your personal needs. Getting Started n Configuring the Touchpad You can customize the pointing device to meet your Windows operating system. For example, if you are a left-hand user, you can change the configuration. In addition, you may want to swap the functions of the cursor on the screen.
User Guide
Page 58
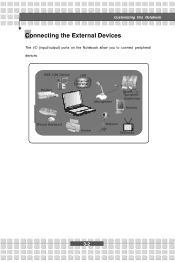
Customizing this Notebook Connecting the External Devices The I/O (input/output) ports on the Notebook allow you to connect peripheral devices. IEEE 1394 Device LAN Modem Microphone Speakers/ Earphones Monitor Mouse/ Keyboard Printer Webcam Television 3-2
Customizing this Notebook Connecting the External Devices The I/O (input/output) ports on the Notebook allow you to connect peripheral devices. IEEE 1394 Device LAN Modem Microphone Speakers/ Earphones Monitor Mouse/ Keyboard Printer Webcam Television 3-2
User Guide
Page 59
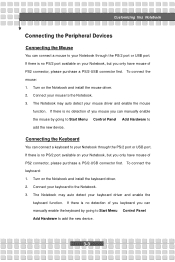
... can connect a mouse to your Notebook through the PS/2 port or USB port. Connect your mouse driver and enable the mouse function. Connecting the Keyboard You can manually enable the keyboard by going to Start Menu à Control Panel à Add Hardware to add the new device. The Notebook may auto detect your keyboard to the Notebook. 3. To connect the mouse: 1. To connect the keyboard: 1. If there is no PS/2 port available on your Notebook, but you can connect a keyboard to your keyboard driver and enable the keyboard function. The Notebook...
... can connect a mouse to your Notebook through the PS/2 port or USB port. Connect your mouse driver and enable the mouse function. Connecting the Keyboard You can manually enable the keyboard by going to Start Menu à Control Panel à Add Hardware to add the new device. The Notebook may auto detect your keyboard to the Notebook. 3. To connect the mouse: 1. To connect the keyboard: 1. If there is no PS/2 port available on your Notebook, but you can connect a keyboard to your keyboard driver and enable the keyboard function. The Notebook...
User Guide
Page 60
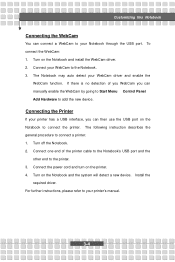
... detection of the printer cable to the Notebook's USB port and the other end to your printer has a USB interface, you can manually enable the WebCam by going to Start Menu à Control Panel à Add Hardware to the Notebook. 3. Connect one end of you WebCam you can connect a WebCam to the printer. 3. For further instructions, please refer to connect a printer: 1. To connect the WebCam: 1. Turn on the Notebook and install the WebCam driver. 2. Connect your WebCam driver and enable the WebCam function.
... detection of the printer cable to the Notebook's USB port and the other end to your printer has a USB interface, you can manually enable the WebCam by going to Start Menu à Control Panel à Add Hardware to the Notebook. 3. Connect one end of you WebCam you can connect a WebCam to the printer. 3. For further instructions, please refer to connect a printer: 1. To connect the WebCam: 1. Turn on the Notebook and install the WebCam driver. 2. Connect your WebCam driver and enable the WebCam function.
User Guide
Page 61
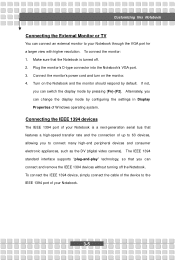
... (digital video camera). Plug the monitor's D-type connector into the Notebook's VGA port. 3. Alternately, you can change the display mode by configuring the settings in Display Properties of your Notebook is turned off the Notebook. Connect the monitor's power cord and turn on the Notebook and the monitor should respond by default. To connect the IEEE 1394 device, simply connect the cable of your Notebook. 3-5 Turn on the monitor. 4. Customizing this Notebook Connecting the External Monitor or TV You can switch the display mode by pressing...
... (digital video camera). Plug the monitor's D-type connector into the Notebook's VGA port. 3. Alternately, you can change the display mode by configuring the settings in Display Properties of your Notebook is turned off the Notebook. Connect the monitor's power cord and turn on the Notebook and the monitor should respond by default. To connect the IEEE 1394 device, simply connect the cable of your Notebook. 3-5 Turn on the monitor. 4. Customizing this Notebook Connecting the External Monitor or TV You can switch the display mode by pressing...
User Guide
Page 62
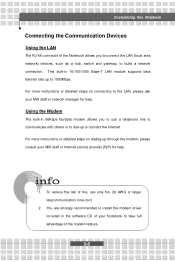
... strongly recommended to install the modem driver included in the software CD of your MIS staff or network manager for help . This built-in 56Kbps fax/data modem allows you to connect the LAN (local area network) devices, such as a hub, switch and gateway, to build a network connection. For more instructions or detailed steps on connecting to the LAN, please ask your Notebook to take full...
... strongly recommended to install the modem driver included in the software CD of your MIS staff or network manager for help . This built-in 56Kbps fax/data modem allows you to connect the LAN (local area network) devices, such as a hub, switch and gateway, to build a network connection. For more instructions or detailed steps on connecting to the LAN, please ask your Notebook to take full...
User Guide
Page 71
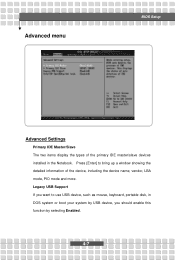
Press [Enter] to use USB device, such as mouse, keyboard, portable disk, in the Notebook. Legacy USB Support If you want to bring up a window showing the detailed information of the primary IDE master/slave devices installed in DOS system or boot your system by USB device, you should enable this function by selecting Enabled. 4-7 Advanced menu BIOS Setup Advanced Settings Primary IDE Master/Slave The two items display the types of the device, including the device name, vendor, LBA mode, PIO mode and more.
Press [Enter] to use USB device, such as mouse, keyboard, portable disk, in the Notebook. Legacy USB Support If you want to bring up a window showing the detailed information of the primary IDE master/slave devices installed in DOS system or boot your system by USB device, you should enable this function by selecting Enabled. 4-7 Advanced menu BIOS Setup Advanced Settings Primary IDE Master/Slave The two items display the types of the device, including the device name, vendor, LBA mode, PIO mode and more.
User Guide
Page 74
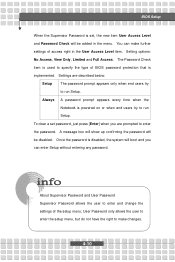
... menu. Always A password prompt appears every time when the Notebook is powered on or when end users try to specify the type of BIOS password protection that is implemented. To clear a set , the new item User Access Level and Password Check will be disabled. You can enter Setup without entering any password. About Supervisor Password and User Password Supervisor Password allows the user to enter the password. BIOS Setup When the Supervisor Password is set password, just press [Enter] when you can make changes...
... menu. Always A password prompt appears every time when the Notebook is powered on or when end users try to specify the type of BIOS password protection that is implemented. To clear a set , the new item User Access Level and Password Check will be disabled. You can enter Setup without entering any password. About Supervisor Password and User Password Supervisor Password allows the user to enter the password. BIOS Setup When the Supervisor Password is set password, just press [Enter] when you can make changes...


