
Quick Start Guide
Page 3
... Gaming Mode 13 How to Enable Gaming Mode 14 Smart Priority...15 Interface Overview...15 Add and Edit the SW List 16 How to Use Smart Priority 18 User Scenario...20 How to Use User Scenario 20 How to Use User Scenario with Keyboard FN keys 22 General Settings...23 Game Highlights...24 Interface Overview...25 MSI Companion...26 Control tab...26 Display tab...27 Mystic Light ...28 Function...
... Gaming Mode 13 How to Enable Gaming Mode 14 Smart Priority...15 Interface Overview...15 Add and Edit the SW List 16 How to Use Smart Priority 18 User Scenario...20 How to Use User Scenario 20 How to Use User Scenario with Keyboard FN keys 22 General Settings...23 Game Highlights...24 Interface Overview...25 MSI Companion...26 Control tab...26 Display tab...27 Mystic Light ...28 Function...

Quick Start Guide
Page 4
... use iOS Screen Mirroring 47 System Diagnosis...48 Battery Master...48 Battery Calibration...49 System Diagnosis...52 Performance Analysis...54 Hardware Diagnosis...56 Gaming Gear...59 Hardware Monitoring 60 Support...61 Live Update...61 Live Update...61 Microsoft APP...62 System Info...63 Service...65 Trouble Shooting and Knowledge Base 65 MSI Recovery...66 Go to WinPE to Use MSI Recovery 66 Create a MSI Rescue USB disk 67 Create a Customize Image Backup 70 Recovering...
... use iOS Screen Mirroring 47 System Diagnosis...48 Battery Master...48 Battery Calibration...49 System Diagnosis...52 Performance Analysis...54 Hardware Diagnosis...56 Gaming Gear...59 Hardware Monitoring 60 Support...61 Live Update...61 Live Update...61 Microsoft APP...62 System Info...63 Service...65 Trouble Shooting and Knowledge Base 65 MSI Recovery...66 Go to WinPE to Use MSI Recovery 66 Create a MSI Rescue USB disk 67 Create a Customize Image Backup 70 Recovering...

Quick Start Guide
Page 10
Experience the convenience that MSI Center brings to you are able to choose your own style and features. Move the mouse cursor to meet your favorite features in Feature Sets page. Simply install or update your personal needs. 10 In Feature Sets page, feel free to select, install or uninstall any MSI features listed to the [Feature Sets] icon at the upper right corner and click on it. 2. Feature Sets -- Choose Your Features Within the latest MSI Center, you ! 1.
Experience the convenience that MSI Center brings to you are able to choose your own style and features. Move the mouse cursor to meet your favorite features in Feature Sets page. Simply install or update your personal needs. 10 In Feature Sets page, feel free to select, install or uninstall any MSI features listed to the [Feature Sets] icon at the upper right corner and click on it. 2. Feature Sets -- Choose Your Features Within the latest MSI Center, you ! 1.

Quick Start Guide
Page 12
... Gaming Mode options dialog box. 12 Mystic Light: Show Hotkey Lighting or Game Sense on Per Key RGB Keyboard for palm resistance. 4. System Performance: Switch to Extreme Performance mode, free up memory and prioritize your game to ON or OFF in Gaming Mode page. The games which are playing with the best possible visual and audio lighting setting and brings you a superior gaming experience. Touchpad disabled: Disable the touchpad...
... Gaming Mode options dialog box. 12 Mystic Light: Show Hotkey Lighting or Game Sense on Per Key RGB Keyboard for palm resistance. 4. System Performance: Switch to Extreme Performance mode, free up memory and prioritize your game to ON or OFF in Gaming Mode page. The games which are playing with the best possible visual and audio lighting setting and brings you a superior gaming experience. Touchpad disabled: Disable the touchpad...

Quick Start Guide
Page 18
How to the SW List. 8. Before using Smart Priority, make sure that the function SWITCH is selected, the system resources will be allocated automatically. Left click on the icon and hold the mouse button. Right click on the icon and hold the mouse button. Follow the on AI calculation. 4. If [Smart Priority] mode is set to [ON], and all the Apps...
How to the SW List. 8. Before using Smart Priority, make sure that the function SWITCH is selected, the system resources will be allocated automatically. Left click on the icon and hold the mouse button. Right click on the icon and hold the mouse button. Follow the on AI calculation. 4. If [Smart Priority] mode is set to [ON], and all the Apps...

Quick Start Guide
Page 20
... needs. • Smart Auto: Switch to increase the work efficiency. Follow the on-screen instructions to setup the Fan Speed by selecting [Advanced], and adjust the Fan Speed. 4. If Extreme Performance is selected, users are available for users to choose in advanced settings. • Balanced: A Balanced mode that brings a balance between performance and battery. • Silent: A Silent mode that lowers the fan noise. • Super Battery: A Super Battery mode...
... needs. • Smart Auto: Switch to increase the work efficiency. Follow the on-screen instructions to setup the Fan Speed by selecting [Advanced], and adjust the Fan Speed. 4. If Extreme Performance is selected, users are available for users to choose in advanced settings. • Balanced: A Balanced mode that brings a balance between performance and battery. • Silent: A Silent mode that lowers the fan noise. • Super Battery: A Super Battery mode...

Quick Start Guide
Page 23
.... 7. Functions listed here may differ from model to switch the Windows key and the Fn key on the keyboard. 2. Switch Key: Click to model. 1. Display Switch: Select a proper display mode as needed. 9. GPU Switch: Select MSHybrid Graphics Mode or Discrete Graphics Mode or Intergrated Graphics Mode. 5. General Settings Go to MSI Center [Features > General Settings] and you can enable/disable some general settings in unplugged to hibernate or sleep when close lid or press Power button. 23 WebCam: Enable or disable WebCam function 4. USB Power Share: Enable...
.... 7. Functions listed here may differ from model to switch the Windows key and the Fn key on the keyboard. 2. Switch Key: Click to model. 1. Display Switch: Select a proper display mode as needed. 9. GPU Switch: Select MSHybrid Graphics Mode or Discrete Graphics Mode or Intergrated Graphics Mode. 5. General Settings Go to MSI Center [Features > General Settings] and you can enable/disable some general settings in unplugged to hibernate or sleep when close lid or press Power button. 23 WebCam: Enable or disable WebCam function 4. USB Power Share: Enable...
Quick Start Guide
Page 28
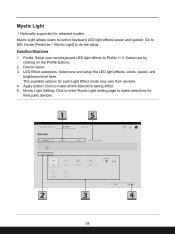
...: Select one by clicking on the Profile buttons. 2. Mystic Light Setting: Click to enter Mystic Light setting page to do the setup. The available options for selected models. Device name. 3. Apply button: Click to Profile 1~3. Profile: Setup your own keyboard LED light effects to make selections for third party devices. 28 Mystic Light allows users to control keyboard LED light effects easier and quicker. Mystic Light *Optionally supported for each Light Effect mode may vary from...
...: Select one by clicking on the Profile buttons. 2. Mystic Light Setting: Click to enter Mystic Light setting page to do the setup. The available options for selected models. Device name. 3. Apply button: Click to Profile 1~3. Profile: Setup your own keyboard LED light effects to make selections for third party devices. 28 Mystic Light allows users to control keyboard LED light effects easier and quicker. Mystic Light *Optionally supported for each Light Effect mode may vary from...

Quick Start Guide
Page 30
... to continue. (Left is power light and center is happening in setting up . 2. To use Ambient Link, click on what is local network light.) 4. Nanoleaf Setup (optional) 1. You can be disabled once the Light Panels are connected in the app) • For best results in games. Ambient Link *Optionally supported for Wifi scanning and discovering the Light Panels. Network Requirements 1. Philips Hue Setup (optional) 1. The router is complete...
... to continue. (Left is power light and center is happening in setting up . 2. To use Ambient Link, click on what is local network light.) 4. Nanoleaf Setup (optional) 1. You can be disabled once the Light Panels are connected in the app) • For best results in games. Ambient Link *Optionally supported for Wifi scanning and discovering the Light Panels. Network Requirements 1. Philips Hue Setup (optional) 1. The router is complete...

Quick Start Guide
Page 31
... the controller starts flashing. 3. Release the two buttons, the LED stays on, and the controller remains on the controller for your Light Panels into power. Plug in your Light Panels will be reset, but all the scenes will show the last Scene that the Light Panels can only be connected to one Wifi network at a time. After a 1 minute boot up sequence, the Panels will be connected to a new network or reset back to the factory settings. Enter...
... the controller starts flashing. 3. Release the two buttons, the LED stays on, and the controller remains on the controller for your Light Panels into power. Plug in your Light Panels will be reset, but all the scenes will show the last Scene that the Light Panels can only be connected to one Wifi network at a time. After a 1 minute boot up sequence, the Panels will be connected to a new network or reset back to the factory settings. Enter...

Quick Start Guide
Page 59
Connect MSI gaming gear to MSI Center [Features > Gaming Gear] 3. Follow the on the device button to enter its setting page. 59 Gaming Gear This page will only be available when MSI gaming gear or supported third-party devices are allowed to setup specific options to the devices connected. 1. Go to your notebook. Move the mouse cursor to the detected devices shown on this page, and click on -screen instructions to your notebook. 2. You are connected to install necessary drivers, if needed. 4.
Connect MSI gaming gear to MSI Center [Features > Gaming Gear] 3. Follow the on the device button to enter its setting page. 59 Gaming Gear This page will only be available when MSI gaming gear or supported third-party devices are allowed to setup specific options to the devices connected. 1. Go to your notebook. Move the mouse cursor to the detected devices shown on this page, and click on -screen instructions to your notebook. 2. You are connected to install necessary drivers, if needed. 4.

Quick Start Guide
Page 65
Service Trouble Shooting and Knowledge Base In Trouble Shooting and Knowledge Base page, user can search for related information by searching for the keywords in the search toolbar. Users can find a list of frequently asked questions and answers, giving them possible instructions to solve basic situations. Move the mose cursor to click on [More] to MSI Center [Support > Service]. Go to get more information at MSI official website. 65
Service Trouble Shooting and Knowledge Base In Trouble Shooting and Knowledge Base page, user can search for related information by searching for the keywords in the search toolbar. Users can find a list of frequently asked questions and answers, giving them possible instructions to solve basic situations. Move the mose cursor to click on [More] to MSI Center [Support > Service]. Go to get more information at MSI official website. 65

User Manual
Page 9
... assembly/disassembly, since the product has been discontinued, depending on the official regulations declared at most since it may be damaged. For any component of spare parts. 1-9 Upgrade and Warranty Please note that certain components, such as memory modules, HDD, SSD, ODD, and Bluetooth/WiFi combo card, etc., preinstalled in certain countries or territories may be fulfilled by user's request...
... assembly/disassembly, since the product has been discontinued, depending on the official regulations declared at most since it may be damaged. For any component of spare parts. 1-9 Upgrade and Warranty Please note that certain components, such as memory modules, HDD, SSD, ODD, and Bluetooth/WiFi combo card, etc., preinstalled in certain countries or territories may be fulfilled by user's request...

User Manual
Page 18
Power Key/ Battery Reset/ Fingerprint Sensor Power Key • Press this key to set up the system from view, if necessay. • The built-in microphone shares the same function with IR Camera module, which supports infrared facial recognition function. • Webcam LED indicator, next to the webcam, blinks when webcam function is turned off. • Slide the camera shutter to hide the camera from sleep state. • Long press this function is activated; Fingerprint Sensor Use the fingerprint...
Power Key/ Battery Reset/ Fingerprint Sensor Power Key • Press this key to set up the system from view, if necessay. • The built-in microphone shares the same function with IR Camera module, which supports infrared facial recognition function. • Webcam LED indicator, next to the webcam, blinks when webcam function is turned off. • Slide the camera shutter to hide the camera from sleep state. • Long press this function is activated; Fingerprint Sensor Use the fingerprint...

User Manual
Page 26
To ensure that the keyboard will be functioning properly, it is used to perform Windows-specific functions, such as opening the Start menu and launching the shortcut menu. 2-12 Windows Key You can find the Windows Logo key on the keyboard to work more efficiently. Use the FN keys on the keyboard which is a must to Use the Keyboard This notebook provides a full functioned keyboard. With the help of these keys, users will be able to activate the specific applications or tools. Introductions How to install the necessary applications before using the keyboard function keys.
To ensure that the keyboard will be functioning properly, it is used to perform Windows-specific functions, such as opening the Start menu and launching the shortcut menu. 2-12 Windows Key You can find the Windows Logo key on the keyboard to work more efficiently. Use the FN keys on the keyboard which is a must to Use the Keyboard This notebook provides a full functioned keyboard. With the help of these keys, users will be able to activate the specific applications or tools. Introductions How to install the necessary applications before using the keyboard function keys.

User Manual
Page 27
... pressing FN and ESC keys. + • Read the FN Lock LED indicator, located on the ESC keycap, to enable or disable the microphone function. • The Microphone LED indicator, located on F1 to F12, has a built-in speaker's volume. Microphone Off • Press to learn the function status. Touchpad Press to enable or disable the touchpad function. Enable Quick FN Launch Keys • This notebook is turned off under default settings. 2-13 LED on the F6 keycap, glows when webcam function is disabled.
... pressing FN and ESC keys. + • Read the FN Lock LED indicator, located on the ESC keycap, to enable or disable the microphone function. • The Microphone LED indicator, located on F1 to F12, has a built-in speaker's volume. Microphone Off • Press to learn the function status. Touchpad Press to enable or disable the touchpad function. Enable Quick FN Launch Keys • This notebook is turned off under default settings. 2-13 LED on the F6 keycap, glows when webcam function is disabled.

User Manual
Page 29
... the display settings. • Connect the monitor to the notebook. • Press and hold the Windows key, and then press [P] key to + bring up [Project]. • Select how you want your display to project on the second screen from the selections of FN Combination keys Break key + Works as Break key by using both keys. Scroll Lock key + Works as Pause key by using both keys. Users will automatically detect the external monitor connected. Functions of PC screen only...
... the display settings. • Connect the monitor to the notebook. • Press and hold the Windows key, and then press [P] key to + bring up [Project]. • Select how you want your display to project on the second screen from the selections of FN Combination keys Break key + Works as Break key by using both keys. Scroll Lock key + Works as Pause key by using both keys. Users will automatically detect the external monitor connected. Functions of PC screen only...

User Manual
Page 41
... [Start] and then move the mouse cursor to [Type here to continue. 5. Open up [All Control Panel Items] window. Make advanced changes here to the selected power plan to meet most people's needs. meet your needs. 8. Select [Power Options] to search] field. 2. Within [Power Options] window, the Power Plan of Windows operating system installed. Click on the [Change plan settings] to bring out [Power Options]. Power plans can modify settings for existing plans or create your computer uses and...
... [Start] and then move the mouse cursor to [Type here to continue. 5. Open up [All Control Panel Items] window. Make advanced changes here to the selected power plan to meet most people's needs. meet your needs. 8. Select [Power Options] to search] field. 2. Within [Power Options] window, the Power Plan of Windows operating system installed. Click on the [Change plan settings] to bring out [Power Options]. Power plans can modify settings for existing plans or create your computer uses and...

User Manual
Page 45
... different version of Windows operating system installed. Under [Password], click [Add] to [Start > Settings] and locate [Accounts]. 2. Once you 'll be vary depending on -screen instructions to create a new password for your account, and then click [Finish] to setup your Windows operating system using fingerprint or facial recognition. Create an Account's Password Before setting up , you 're set up Windows Hello, it . The feature requires fingerprint reader or a infrared camera that supports it is...
... different version of Windows operating system installed. Under [Password], click [Add] to [Start > Settings] and locate [Accounts]. 2. Once you 'll be vary depending on -screen instructions to create a new password for your account, and then click [Finish] to setup your Windows operating system using fingerprint or facial recognition. Create an Account's Password Before setting up , you 're set up Windows Hello, it . The feature requires fingerprint reader or a infrared camera that supports it is...

User Manual
Page 66
... various USB devices, such as AC/ DC mode is enabled, it is always suggested to use the official authorized cable to perform this function. 2. It is a must to connect AC power to the notebook before using this function under default settings; USB Power Share function will only be optionally supported USB Power Share function via Type-A USB ports, providing portable charging power output for reference only. 3-32 How to Get Started How to Use USB Power Share Function (optional) This notebook may affect the battery...
... various USB devices, such as AC/ DC mode is enabled, it is always suggested to use the official authorized cable to perform this function. 2. It is a must to connect AC power to the notebook before using this function under default settings; USB Power Share function will only be optionally supported USB Power Share function via Type-A USB ports, providing portable charging power output for reference only. 3-32 How to Get Started How to Use USB Power Share Function (optional) This notebook may affect the battery...


