User Guide
Page 2
...Business Machines Corporation. Intel® and Pentium® are registered trademarks of their respective owners. Visit the MSI website for FAQ, technical guide, BIOS updates, driver updates, and other countries. We take every care in the United States and/or other information: http... staff at: http://ocss.msi.com.tw ii Netware® is a registered trademark of NVIDIA Corporation in the preparation of this document is a registered trademark of American Megatrends Inc. Alternatively, please try the following help resources for P45 Diamond Date March 2008 Technical Support...
...Business Machines Corporation. Intel® and Pentium® are registered trademarks of their respective owners. Visit the MSI website for FAQ, technical guide, BIOS updates, driver updates, and other countries. We take every care in the United States and/or other information: http... staff at: http://ocss.msi.com.tw ii Netware® is a registered trademark of NVIDIA Corporation in the preparation of this document is a registered trademark of American Megatrends Inc. Alternatively, please try the following help resources for P45 Diamond Date March 2008 Technical Support...

User Guide
Page 8
... BIOS Setting Password 3-19 Cell Menu ...3-20 Load Fail-Safe/ Optimized Defaults 3-25 Appendix A X-Fi Xtreme Audio (optional A-1 Introduction ...A-2 Hardware Installation A-4 Installing the Creative Audio Driver A-7 viii CONTENTS Copyright Notice ...ii Trademarks ...ii Revision History ...ii Technical Support ...ii Safety Instructions ...iii FCC-B Radio Frequency Interference Statement iv W EEE (Waste Electrical...
... BIOS Setting Password 3-19 Cell Menu ...3-20 Load Fail-Safe/ Optimized Defaults 3-25 Appendix A X-Fi Xtreme Audio (optional A-1 Introduction ...A-2 Hardware Installation A-4 Installing the Creative Audio Driver A-7 viii CONTENTS Copyright Notice ...ii Trademarks ...ii Revision History ...ii Technical Support ...ii Safety Instructions ...iii FCC-B Radio Frequency Interference Statement iv W EEE (Waste Electrical...
User Guide
Page 9
... Dual Core Center B-2 Main ...B-3 DOT (Dynamic OverClocking B-5 Clock ...B-6 Voltage ...B-7 FAN Speed ...B-8 Temperature ...B-9 User Profile ...B-10 Appendix C Intel ICH10R SATA RAID C-1 ICH10R Introduction C-2 BIOS Configuration C-3 Installing Driver ...C-9 Installing Software C-11 RAID Migration Instructions C-16 Recovery Volume Creation C-23 Degraded RAID Array C-27 Appendix D JM icron RAID Introduction D-1 Introduction ...D-2 JMicron RAID BIOS Utility...
... Dual Core Center B-2 Main ...B-3 DOT (Dynamic OverClocking B-5 Clock ...B-6 Voltage ...B-7 FAN Speed ...B-8 Temperature ...B-9 User Profile ...B-10 Appendix C Intel ICH10R SATA RAID C-1 ICH10R Introduction C-2 BIOS Configuration C-3 Installing Driver ...C-9 Installing Software C-11 RAID Migration Instructions C-16 Recovery Volume Creation C-23 Degraded RAID Array C-27 Appendix D JM icron RAID Introduction D-1 Introduction ...D-2 JMicron RAID BIOS Utility...
User Guide
Page 14
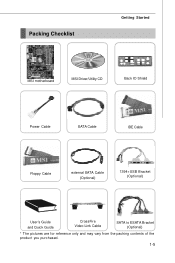
Packing Checklist Getting Started MSI motherboard MSI Driver/Utility CD Back IO Shield Power Cable SATA Cable IDE Cable Floppy Cable external SATA Cable (Optional) 1394+USB Bracket (Optional) User's Guide and Quick Guide CrossFire Video Link Cable SATA to ESATA Bracket (Optional) * The pictures are for reference only and may vary from the packing contents of the product you purchased. 1-5
Packing Checklist Getting Started MSI motherboard MSI Driver/Utility CD Back IO Shield Power Cable SATA Cable IDE Cable Floppy Cable external SATA Cable (Optional) 1394+USB Bracket (Optional) User's Guide and Quick Guide CrossFire Video Link Cable SATA to ESATA Bracket (Optional) * The pictures are for reference only and may vary from the packing contents of the product you purchased. 1-5

User Guide
Page 15
MS-7516 Mainboard SATA HDD Power Cable (For SATA to ESATA Bracket) (Optional) 6/8mm Adapter x 2 6/10mm Adapter x 2 6mm Clamp x 4 8mm Clamp x 2 10mm Clamp x 2 C Type Tubing Clip x 2 Tube x 2 (5mm internal diameter, 8mm outter diameter) GreenPower Genie Set (1 GreenPower genie & 1 power cable & 1 (2x2 pin) cable) X-Fi Xtreme Audio Card Set (Card and Driver CD) * The pictures are for reference only and may vary from the packing contents of the product you purchased. 1-6
MS-7516 Mainboard SATA HDD Power Cable (For SATA to ESATA Bracket) (Optional) 6/8mm Adapter x 2 6/10mm Adapter x 2 6mm Clamp x 4 8mm Clamp x 2 10mm Clamp x 2 C Type Tubing Clip x 2 Tube x 2 (5mm internal diameter, 8mm outter diameter) GreenPower Genie Set (1 GreenPower genie & 1 power cable & 1 (2x2 pin) cable) X-Fi Xtreme Audio Card Set (Card and Driver CD) * The pictures are for reference only and may vary from the packing contents of the product you purchased. 1-6

User Guide
Page 77
... card bracket with a screw. 6. A-4 Turn off your mainboard integrates audio function or an audio card installed, after installing the X-Fi Xtreme Audio Card and its driver, there will be selected and used at a time. Remove the bracket which may obstruct the PCI-E x1 slot. 5. Select Audio Controller If your computer and...
... card bracket with a screw. 6. A-4 Turn off your mainboard integrates audio function or an audio card installed, after installing the X-Fi Xtreme Audio Card and its driver, there will be selected and used at a time. Remove the bracket which may obstruct the PCI-E x1 slot. 5. Select Audio Controller If your computer and...

User Guide
Page 80
... 1 for Creative CA0110 to function properly before installing the driver. Insert the Creative audio driver CD into the CD-ROM drive. X-Fi Xtreme Audio Card Installing the Creative Audio Driver You need to install the driver for W indows® XP before you install the drivers in this chapter may be slightly different from the latest...
... 1 for Creative CA0110 to function properly before installing the driver. Insert the Creative audio driver CD into the CD-ROM drive. X-Fi Xtreme Audio Card Installing the Creative Audio Driver You need to install the driver for W indows® XP before you install the drivers in this chapter may be slightly different from the latest...

User Guide
Page 82
... float on the desktop, simply click on each icon to enter the configuration screen. X-Fi Xtreme Audio Card Software Configuration After installing the creative audio driver, you can move the mouse cursor to the top of the screen to activate the Sound Blaster X-Fi Xtreme Audio Applications, simply click on each...
... float on the desktop, simply click on each icon to enter the configuration screen. X-Fi Xtreme Audio Card Software Configuration After installing the creative audio driver, you can move the mouse cursor to the top of the screen to activate the Sound Blaster X-Fi Xtreme Audio Applications, simply click on each...
User Guide
Page 92
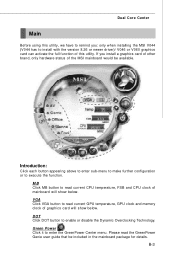
... make further configuration or to enter the GreenPower Center menu. Green Power Click it to execute the function. If you : only when installing the MSI V044 (V044 has to read current GPU temperature, GPU clock and memory clock of mainboard will show below . VGA Click VGA button to install... with the version 8.26 or newer driver)/ V046 or V060 graphics card can activate the full function of the MSI mainboard would be included in the mainboard package for details. Please read current CPU temperature, FSB and CPU ...
... make further configuration or to enter the GreenPower Center menu. Green Power Click it to execute the function. If you : only when installing the MSI V044 (V044 has to read current GPU temperature, GPU clock and memory clock of mainboard will show below . VGA Click VGA button to install... with the version 8.26 or newer driver)/ V046 or V060 graphics card can activate the full function of the MSI mainboard would be included in the mainboard package for details. Please read current CPU temperature, FSB and CPU ...

User Guide
Page 103
...and keys simultaneously to enter the RAID Configuration Utility. C-3 Please use + keys to enter the "Intel(R) RAID for a few seconds: Important The "Driver Model", "Serial #" and "Size" in the following procedure is the Intel RAID implementation and provides BIOS and DOS disk services. Intel ICH10R SATA RAID... BIOS Configuration The Intel Matrix Storage Manager Option ROM should be integrated with the system BIOS on all motherboards with a newly-built system or if you need to enable the RAID function in BIOS to create, delete and reset RAID volumes....
...and keys simultaneously to enter the RAID Configuration Utility. C-3 Please use + keys to enter the "Intel(R) RAID for a few seconds: Important The "Driver Model", "Serial #" and "Size" in the following procedure is the Intel RAID implementation and provides BIOS and DOS disk services. Intel ICH10R SATA RAID... BIOS Configuration The Intel Matrix Storage Manager Option ROM should be integrated with the system BIOS on all motherboards with a newly-built system or if you need to enable the RAID function in BIOS to create, delete and reset RAID volumes....

User Guide
Page 110
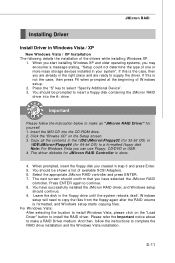
...type of available SCSI Adapters. W indows setup will need to install Vista click on the Setup screen. 3. C-10 MS-7516 Mainboard Installing Driver Install Driver in Windows Vista / XP / 2000 † New Windows Vista / XP / 2000 Installation The following details the installation of W indows ...W hen you start installing Windows XP and older operating systems, you created in step 3 and press Enter. 6. Insert the MSI CD into the A: drive. The driver diskette for yourself. 1. For W indows Vista: During the Operating system installation, after selecting the location to copy the files...
...type of available SCSI Adapters. W indows setup will need to install Vista click on the Setup screen. 3. C-10 MS-7516 Mainboard Installing Driver Install Driver in Windows Vista / XP / 2000 † New Windows Vista / XP / 2000 Installation The following details the installation of W indows ...W hen you start installing Windows XP and older operating systems, you created in step 3 and press Enter. 6. Insert the MSI CD into the A: drive. The driver diskette for yourself. 1. For W indows Vista: During the Operating system installation, after selecting the location to copy the files...

User Guide
Page 111
Intel ICH10R SATA RAID † Existing Windows Vista/XP/2000 Driver Installation 1. Under the Driver tab, click on Intel IAA RAID Edition. 4. Click the "+" in front of the SCSI and RAID Controllers hardware type. C-11 The CD will auto-run ...and the setup screen will be automatically installed. † Confirming Windows Vista/XP/2000 Driver Installation 1. Insert the MSI CD into the CD-ROM drive. 2. Choose the Hardware tab, then click the Device M anager tab. 3. The drivers will appear. 3. From W indows Vista/XP/2000, open the Control Panel from My Computer followed...
Intel ICH10R SATA RAID † Existing Windows Vista/XP/2000 Driver Installation 1. Under the Driver tab, click on Intel IAA RAID Edition. 4. Click the "+" in front of the SCSI and RAID Controllers hardware type. C-11 The CD will auto-run ...and the setup screen will be automatically installed. † Confirming Windows Vista/XP/2000 Driver Installation 1. Insert the MSI CD into the CD-ROM drive. 2. Choose the Hardware tab, then click the Device M anager tab. 3. The drivers will appear. 3. From W indows Vista/XP/2000, open the Control Panel from My Computer followed...

User Guide
Page 112
MS-7516 Mainboard Installing Software Install Intel Matrix Storage Console The Intel Application Accelerator RAID Edition driver may be used to install the software. Insert the MSI CD and click on this reason, you will have the ability to un-install all other non-driver components. Click on the Intel IAA RAID Editor to operate the hard drive from the system after installation; however, you cannot remove or un-install this driver from which the system is booting or a hard drive that contains important data. For this item C-12
MS-7516 Mainboard Installing Software Install Intel Matrix Storage Console The Intel Application Accelerator RAID Edition driver may be used to install the software. Insert the MSI CD and click on this reason, you will have the ability to un-install all other non-driver components. Click on the Intel IAA RAID Editor to operate the hard drive from the system after installation; however, you cannot remove or un-install this driver from which the system is booting or a hard drive that contains important data. For this item C-12

User Guide
Page 116
... W indows on the source disk is preserved. However, several important steps must be recovered. Install the Intel Application Accelerator RAID Driver during W indows Setup. 3. After the Intel Matrix Storage Console has been successfully installed and the system has rebooted, click on installing the... driver during W indows Setup. It is first configured in order to take advantage of the BIOS. 2. MS-7516 Mainboard RAID Migration Instructions...
... W indows on the source disk is preserved. However, several important steps must be recovered. Install the Intel Application Accelerator RAID Driver during W indows Setup. 3. After the Intel Matrix Storage Console has been successfully installed and the system has rebooted, click on installing the... driver during W indows Setup. It is first configured in order to take advantage of the BIOS. 2. MS-7516 Mainboard RAID Migration Instructions...

User Guide
Page 131
... After that, save the configuration and exit. Revert HDD to non-RAID. Sovle a mirror conflict. Delete a legacy RAID set . RAID Disk Driver List The menu shows the current configuration of RAID set . Delete RAID Disk Drive - A brief description of the drives physically attached to enter the... JMicron BIOS RAID utility. Hard Disk Driver List The menu shows the model number and capacities of each section is lost. Exit W ithout Saving - During boot up (POST), press ...
... After that, save the configuration and exit. Revert HDD to non-RAID. Sovle a mirror conflict. Delete a legacy RAID set . RAID Disk Driver List The menu shows the current configuration of RAID set . Delete RAID Disk Drive - A brief description of the drives physically attached to enter the... JMicron BIOS RAID utility. Hard Disk Driver List The menu shows the model number and capacities of each section is lost. Exit W ithout Saving - During boot up (POST), press ...

User Guide
Page 135
In the RAID Disk Driver List menu, use key to select the RAID set 1. JMicron RAID 2. Then press key. 3. D-7 Then press . Select "Delete RAID Disk Drive". Deleting RAID set you want to delete. Press "Y" to accept the deletion when a deletion message is appeared.
In the RAID Disk Driver List menu, use key to select the RAID set 1. JMicron RAID 2. Then press key. 3. D-7 Then press . Select "Delete RAID Disk Drive". Deleting RAID set you want to delete. Press "Y" to accept the deletion when a deletion message is appeared.

User Guide
Page 136
MS-7516 Mainboard Revert HDD to non-RAID Select Revert HDD to non-RAID' could include issues such as incompatible RAID configurations or a failed volume or failed disk. Important 1. D-8 You will lose all data on the RAID drives and any RAID structures from the drives. Possible reasons to 'Revert HDD to non-RAID and press . The following screen appears, press key to select the disks you perform this operation. 2. In the Hard Disk Driver List menu use key to remove any internal RAID structures when you want to revert then click key.
MS-7516 Mainboard Revert HDD to non-RAID Select Revert HDD to non-RAID' could include issues such as incompatible RAID configurations or a failed volume or failed disk. Important 1. D-8 You will lose all data on the RAID drives and any RAID structures from the drives. Possible reasons to 'Revert HDD to non-RAID and press . The following screen appears, press key to select the disks you perform this operation. 2. In the Hard Disk Driver List menu use key to remove any internal RAID structures when you want to revert then click key.

User Guide
Page 137
... source drive and rebuild the Mirror drive according to the contents of the source drive. Press to set as source drive. In the Hard Disk Driver List menu use key to select the disks you to begin rebuilding the Mirror configuration.
... source drive and rebuild the Mirror drive according to the contents of the source drive. Press to set as source drive. In the Hard Disk Driver List menu use key to select the disks you to begin rebuilding the Mirror configuration.
User Guide
Page 139
...should be shown a list of one or more mass storage devices installed in your system". Insert the MSI CD into the A: drive. Press the "S" key to continue. 8. The driver diskette for JM icron RAID Controller is not the case, then press F6 when prompted at the ..., please click on the Setup screen. 3. You should continue. 9. If this is formatted, and W indows setup starts copying files. JMicron RAID Installing Driver Install Driver in Windows Vista / XP † New Windows Vista / XP Installation The following details the installation of W indows setup. 2. W hen you start ...
...should be shown a list of one or more mass storage devices installed in your system". Insert the MSI CD into the A: drive. Press the "S" key to continue. 8. The driver diskette for JM icron RAID Controller is not the case, then press F6 when prompted at the ..., please click on the Setup screen. 3. You should continue. 9. If this is formatted, and W indows setup starts copying files. JMicron RAID Installing Driver Install Driver in Windows Vista / XP † New Windows Vista / XP Installation The following details the installation of W indows setup. 2. W hen you start ...

User Guide
Page 140
... the Hardware tab, then click the Device M anager tab. 3. Insert the MSI CD into the CD-ROM drive. 2. MS-7516 Mainboard † Existing Windows Vista/XP Driver Installation 1. The drivers will appear. 3. Click the "+" in front of the SCSI and RAID Controllers hardware type. From W indows Vista/XP, open the Control Panel from... Computer followed by the System icon. 2. D-12 The CD will auto-run and the setup screen will be automatically installed. † Confirming Windows Vista/XP Driver Installation 1. The driver JMicron JM B36X Controller should appear.
... the Hardware tab, then click the Device M anager tab. 3. Insert the MSI CD into the CD-ROM drive. 2. MS-7516 Mainboard † Existing Windows Vista/XP Driver Installation 1. The drivers will appear. 3. Click the "+" in front of the SCSI and RAID Controllers hardware type. From W indows Vista/XP, open the Control Panel from... Computer followed by the System icon. 2. D-12 The CD will auto-run and the setup screen will be automatically installed. † Confirming Windows Vista/XP Driver Installation 1. The driver JMicron JM B36X Controller should appear.


