
User Guide
Page 8
... Panel ...2-13 Connectors ...2-15 Jumper ...2-21 Button ...2-22 Slots ...2-23 LED Status Indicators 2-27 Water cooling accessories installation 2-29 Chapter 3 BIOS Setup 3-1 Entering Setup ...3-2 The Main Menu ...3-4 Standard CMOS Features 3-6 Advanced BIOS Features 3-9 Integrated Peripherals 3-12 Power Management Setup 3-14 H/W Monitor ...3-17 Green Power ...3-18 BIOS Setting Password 3-19 Cell Menu...
... Panel ...2-13 Connectors ...2-15 Jumper ...2-21 Button ...2-22 Slots ...2-23 LED Status Indicators 2-27 Water cooling accessories installation 2-29 Chapter 3 BIOS Setup 3-1 Entering Setup ...3-2 The Main Menu ...3-4 Standard CMOS Features 3-6 Advanced BIOS Features 3-9 Integrated Peripherals 3-12 Power Management Setup 3-14 H/W Monitor ...3-17 Green Power ...3-18 BIOS Setting Password 3-19 Cell Menu...
User Guide
Page 9
Software Configuration A-9 Appendix B Dual Core Center B-1 Activating Dual Core Center B-2 Main ...B-3 DOT (Dynamic OverClocking B-5 Clock ...B-6 Voltage ...B-7 FAN Speed ...B-8 Temperature ...B-9 User Profile ...B-10 Appendix C Intel ICH10R SATA RAID C-1 ICH10R Introduction C-2 BIOS Configuration C-3 Installing Driver ...C-9 Installing Software C-11 ...
Software Configuration A-9 Appendix B Dual Core Center B-1 Activating Dual Core Center B-2 Main ...B-3 DOT (Dynamic OverClocking B-5 Clock ...B-6 Voltage ...B-7 FAN Speed ...B-8 Temperature ...B-9 User Profile ...B-10 Appendix C Intel ICH10R SATA RAID C-1 ICH10R Introduction C-2 BIOS Configuration C-3 Installing Driver ...C-9 Installing Software C-11 ...

User Guide
Page 49
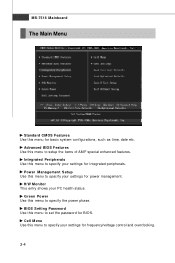
... this field. General Help The BIOS setup program provides a General Help screen. The on-line description of the highlighted setup function is the Main Menu. Press to the main menu, just press the . You can use arrow keys ( ↑↓ ) to highlight the field and press to call up the sub-menu... next item Move to the item in the right hand Select the item Jumps to the Exit menu or returns to the main menu from field to . Main Menu The main menu lists the setup functions you can make changes Load Optimized Defaults Save all the CMOS changes and exit Getting Help After...
... this field. General Help The BIOS setup program provides a General Help screen. The on-line description of the highlighted setup function is the Main Menu. Press to the main menu, just press the . You can use arrow keys ( ↑↓ ) to highlight the field and press to call up the sub-menu... next item Move to the item in the right hand Select the item Jumps to the Exit menu or returns to the main menu from field to . Main Menu The main menu lists the setup functions you can make changes Load Optimized Defaults Save all the CMOS changes and exit Getting Help After...
User Guide
Page 50
... settings for basic system configurations, such as time, date etc. Cell Menu Use this menu to specify your PC health status. MS-7516 Mainboard The Main Menu Standard CMOS Features Use this menu for frequency/voltage control and overclocking. 3-4 Integrated Peripherals Use this menu to specify your settings for BIOS.
... settings for basic system configurations, such as time, date etc. Cell Menu Use this menu to specify your PC health status. MS-7516 Mainboard The Main Menu Standard CMOS Features Use this menu for frequency/voltage control and overclocking. 3-4 Integrated Peripherals Use this menu to specify your settings for BIOS.

User Guide
Page 60
... system is a low power state. ACPI Standby State This item specifies the power saving modes for ACPI function. ACPI Function This item is saved to main memory that remains powered while most other hardware components turn off to activate the ACPI (Advanced Configuration and Power Management Interface) Function.
... system is a low power state. ACPI Standby State This item specifies the power saving modes for ACPI function. ACPI Function This item is saved to main memory that remains powered while most other hardware components turn off to activate the ACPI (Advanced Configuration and Power Management Interface) Function.

User Guide
Page 73
... as below appears: Pressing Y loads the BIOS default values for stable system performance. BIOS Setup Load Fail-Safe/ Optimized Defaults The two options on the main menu allow users to the default Fail-Safe or Optimized values. W hen you select Load Optimized Defaults, a message as below appears: Pressing Y loads the default...
... as below appears: Pressing Y loads the BIOS default values for stable system performance. BIOS Setup Load Fail-Safe/ Optimized Defaults The two options on the main menu allow users to the default Fail-Safe or Optimized values. W hen you select Load Optimized Defaults, a message as below appears: Pressing Y loads the default...

User Guide
Page 87
...the Contents tab and select a topic, or click on this button to minimize the Entertainment Mode window to the task bar. Mute button - Main Display button - Speaker button - Click on this button to display EAX Effects settings. Mixer button - Performance button - Click on this button to...in W indows Vista.) EAX Effects button - X-Fi Crystalizer button - Minimize button - Default button - Click on this button to revert to the main display. Jack Sensing button - X-Fi CMSS-3D button - EQ button - Select Help Contents to adjust master volume or speaker volume. MS-7516 ...
...the Contents tab and select a topic, or click on this button to minimize the Entertainment Mode window to the task bar. Mute button - Main Display button - Speaker button - Click on this button to display EAX Effects settings. Mixer button - Performance button - Click on this button to...in W indows Vista.) EAX Effects button - X-Fi Crystalizer button - Minimize button - Default button - Click on this button to revert to the main display. Jack Sensing button - X-Fi CMSS-3D button - EQ button - Select Help Contents to adjust master volume or speaker volume. MS-7516 ...

User Guide
Page 88
... following tasks: - A-15 For more information and usage details on MIXER, refer to its configuration screen. Testing your speakers => click on the "?" This is the main application to use => select the speakers type that you can adjust your subwoofer. Here you connected. - button). X-Fi Xtreme Audio Card Speaker & Headphone Click on...
... following tasks: - A-15 For more information and usage details on MIXER, refer to its configuration screen. Testing your speakers => click on the "?" This is the main application to use => select the speakers type that you can adjust your subwoofer. Here you connected. - button). X-Fi Xtreme Audio Card Speaker & Headphone Click on...
User Guide
Page 92
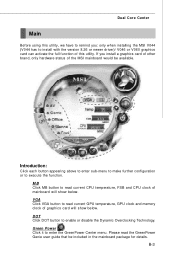
...enable or disable the Dynamic Overclocking Technology. VGA Click VGA button to read the GreenPower Genie user guide that be available. Dual Core Center Main Before using this utility. MB Click MB button to read current GPU temperature, GPU clock and memory clock of graphics card will show ...below . Please read current CPU temperature, FSB and CPU clock of the MSI mainboard would be included in the mainboard package for details. DOT Click DOT button to enter the GreenPower Center menu. Introduction: Click each...
...enable or disable the Dynamic Overclocking Technology. VGA Click VGA button to read the GreenPower Genie user guide that be available. Dual Core Center Main Before using this utility. MB Click MB button to read current GPU temperature, GPU clock and memory clock of graphics card will show ...below . Please read current CPU temperature, FSB and CPU clock of the MSI mainboard would be included in the mainboard package for details. DOT Click DOT button to enter the GreenPower Center menu. Introduction: Click each...

User Guide
Page 107
The following screen appears. Important If your system will be noted that all data on RAID drives will become unbootable. Press key to select a RAID volume for deletion. Select option 2 Delete RAID Volume from the main menu window and press key to accept the volume deletion. Then press key to RAID and you can delete the RAID volume, but please be lost. C-7 Intel ICH10R SATA RAID (2) Delete RAID Volume Here you delete the RAID volume in the Intel RAID Option ROM, your system currently boots to delete the selected RAID volume.
The following screen appears. Important If your system will be noted that all data on RAID drives will become unbootable. Press key to select a RAID volume for deletion. Select option 2 Delete RAID Volume from the main menu window and press key to accept the volume deletion. Then press key to RAID and you can delete the RAID volume, but please be lost. C-7 Intel ICH10R SATA RAID (2) Delete RAID Volume Here you delete the RAID volume in the Intel RAID Option ROM, your system currently boots to delete the selected RAID volume.

User Guide
Page 131
During boot up (POST), press CTRL+J to Non-RAID - Main Menu Cerate RAID Disk Drive - Delete a legacy RAID set RAID mode for the JMicron 36x ATA Controller in BIOS before configuring the JMicron BIOS utility. ...
During boot up (POST), press CTRL+J to Non-RAID - Main Menu Cerate RAID Disk Drive - Delete a legacy RAID set RAID mode for the JMicron 36x ATA Controller in BIOS before configuring the JMicron BIOS utility. ...

