User Guide
Page 67
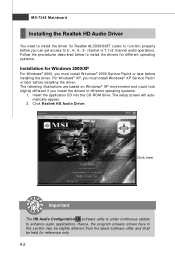
... to function properly before you install the drivers in this section may be slightly different from the latest software utility and shall be held for Windows 2000/XP For W indows® 2000, you must install W indows® 2000 Service Pack4 or later before installing the driver. For... Windows® XP, you must install W indows® XP Service Pack1 or later before installing the driver. The following illustrations are based on W indows® XP ...
... to function properly before you install the drivers in this section may be slightly different from the latest software utility and shall be held for Windows 2000/XP For W indows® 2000, you must install W indows® 2000 Service Pack4 or later before installing the driver. For... Windows® XP, you must install W indows® XP Service Pack1 or later before installing the driver. The following illustrations are based on W indows® XP ...
User Guide
Page 88
... Center Appendix B Dual Core Center Dual CoreCenter, the most useful and powerful utility that MSI has spent much research and efforts to develop, helps users to monitor or configure the hardware status of MSI Mainboard & MSI Graphics card in windows, such as CPU/GPU clock, voltage, fan speed and temperature. Operation system: W indows XP...
... Center Appendix B Dual Core Center Dual CoreCenter, the most useful and powerful utility that MSI has spent much research and efforts to develop, helps users to monitor or configure the hardware status of MSI Mainboard & MSI Graphics card in windows, such as CPU/GPU clock, voltage, fan speed and temperature. Operation system: W indows XP...

User Guide
Page 102
MS-7345 Mainboard After pressing the and keys simultaneously, the following screen appears. Use the arrow keys to select the RAID level best suited to your usage model in the Name field, specify a RAID Volume name and then press the or key to go to the next field. 2. The following window will appear: (1) Create RAID Volume 1. C-4 Then in RAID Level. Select option 1 "Create RAID Volume" and press key.
MS-7345 Mainboard After pressing the and keys simultaneously, the following screen appears. Use the arrow keys to select the RAID level best suited to your usage model in the Name field, specify a RAID Volume name and then press the or key to go to the next field. 2. The following window will appear: (1) Create RAID Volume 1. C-4 Then in RAID Level. Select option 1 "Create RAID Volume" and press key.

User Guide
Page 105
Intel ICH9R SATA RAID (2) Delete RAID Volume Here you delete the RAID volume in the Intel RAID Option ROM, your system currently boots to select a RAID volume for deletion. Press key to delete the selected RAID volume. C-7 The following screen appears. Then press key to accept the volume deletion. Select option 2 Delete RAID Volume from the main menu window and press key to RAID and you can delete the RAID volume, but please be noted that all data on RAID drives will become unbootable. Important If your system will be lost.
Intel ICH9R SATA RAID (2) Delete RAID Volume Here you delete the RAID volume in the Intel RAID Option ROM, your system currently boots to select a RAID volume for deletion. Press key to delete the selected RAID volume. C-7 The following screen appears. Then press key to accept the volume deletion. Select option 2 Delete RAID Volume from the main menu window and press key to RAID and you can delete the RAID volume, but please be noted that all data on RAID drives will become unbootable. Important If your system will be lost.
User Guide
Page 107
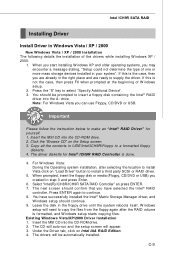
...the Driver tab, click on the Setup screen. 3. W hen you start installing Windows XP and older operating systems, you created in your system". You have selected the Intel® RAID controller. Insert the MSI CD into the CD-ROM drive. 2. The drivers will be prompted to a ...formatted floppy d is done. 4. Insert the MSI CD into the CD-ROM drive. 2. Leave the disk in Windows Vista / XP / 2000 † New Windows Vista / XP / 2000 Installation The following details the installation of the drivers while installing W indows XP...
...the Driver tab, click on the Setup screen. 3. W hen you start installing Windows XP and older operating systems, you created in your system". You have selected the Intel® RAID controller. Insert the MSI CD into the CD-ROM drive. 2. The drivers will be prompted to a ...formatted floppy d is done. 4. Insert the MSI CD into the CD-ROM drive. 2. Leave the disk in Windows Vista / XP / 2000 † New Windows Vista / XP / 2000 Installation The following details the installation of the drivers while installing W indows XP...
User Guide
Page 108
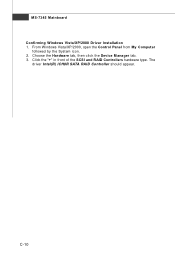
Click the "+" in front of the SCSI and RAID Controllers hardware type. The driver Intel(R) ICH9R SATA RAID Controller should appear. C-10 From W indows Vista/XP/2000, open the Control Panel from My Computer followed by the System icon. 2. MS-7345 Mainboard † Confirming Windows Vista/XP/2000 Driver Installation 1. Choose the Hardware tab, then click the Device M anager tab. 3.
Click the "+" in front of the SCSI and RAID Controllers hardware type. The driver Intel(R) ICH9R SATA RAID Controller should appear. C-10 From W indows Vista/XP/2000, open the Control Panel from My Computer followed by the System icon. 2. MS-7345 Mainboard † Confirming Windows Vista/XP/2000 Driver Installation 1. Choose the Hardware tab, then click the Device M anager tab. 3.

User Guide
Page 110
MS-7345 Mainboard The InstallShield Wizard will begin automatically for installation showed as following: Click on the Next button to proceed the installation in the welcoming window. C-12
MS-7345 Mainboard The InstallShield Wizard will begin automatically for installation showed as following: Click on the Next button to proceed the installation in the welcoming window. C-12

User Guide
Page 111
After reading the license agreement in the following window, click Yes button to be installed. Intel ICH9R SATA RAID The window shows the components to continue. Click Next button to continue. C-13
After reading the license agreement in the following window, click Yes button to be installed. Intel ICH9R SATA RAID The window shows the components to continue. Click Next button to continue. C-13

User Guide
Page 112
C-14 MS-7345 Mainboard The following window appears. Once the installation is complete, the following window appears to show the Readme File Information. It shows the system requirements and installation information.
C-14 MS-7345 Mainboard The following window appears. Once the installation is complete, the following window appears to show the Readme File Information. It shows the system requirements and installation information.
RAID Migration
Page 1
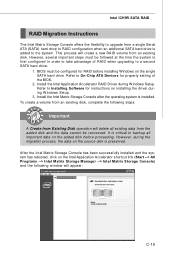
However, several important steps must be followed at the time the system is preserved. To create a volume from an existing disk, complete the following window will create a new RAID volume from the added disk and the data cannot be recovered. Refer to On-Chip ATA Devices for instructions on the ...
However, several important steps must be followed at the time the system is preserved. To create a volume from an existing disk, complete the following window will create a new RAID volume from the added disk and the data cannot be recovered. Refer to On-Chip ATA Devices for instructions on the ...

RAID Migration
Page 7
Then you can still continue using your system to complete, meanwhile a popup dialogue at the taskbar will also show the migration status. C-21 A dialogue window will appear stating that the migration process may take considerable time to use the full capacity of the disks being used and the strip size ...
Then you can still continue using your system to complete, meanwhile a popup dialogue at the taskbar will also show the migration status. C-21 A dialogue window will appear stating that the migration process may take considerable time to use the full capacity of the disks being used and the strip size ...


