User Guide
Page 8
Hardware Setup 2-1 Quick Components Guide 2-2 CPU (Central Processing Unit 2-2 Memory ...2-7 Power Supply ...2-8 Back Panel ...2-11 Connectors ...2-12 Jumper ...2-19 Button ...2-20 Slots ...2-21 LED Status Indicators 2-23 Chapter 3 BIOS Setup 3-1 Entering ...
Hardware Setup 2-1 Quick Components Guide 2-2 CPU (Central Processing Unit 2-2 Memory ...2-7 Power Supply ...2-8 Back Panel ...2-11 Connectors ...2-12 Jumper ...2-19 Button ...2-20 Slots ...2-21 LED Status Indicators 2-23 Chapter 3 BIOS Setup 3-1 Entering ...
User Guide
Page 11
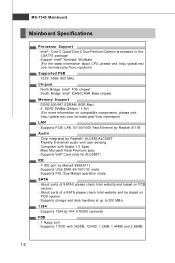
... and data transfers at up to 300 MB/s 1394 - Support Intel® Yorkfield, Wolfdale (For the latest information about CPU, please visit http://global.msi. Supports 1 FDD with jack sensing - North Bridge: Intel® P35 chipset - South Bridge: Intel® ICH9/ICH9R Base chipset Memory Support - c om . Supports PCIE LAN 10/100/1000...
... and data transfers at up to 300 MB/s 1394 - Support Intel® Yorkfield, Wolfdale (For the latest information about CPU, please visit http://global.msi. Supports 1 FDD with jack sensing - North Bridge: Intel® P35 chipset - South Bridge: Intel® ICH9/ICH9R Base chipset Memory Support - c om . Supports PCIE LAN 10/100/1000...
User Guide
Page 17
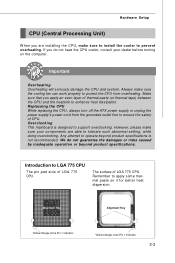
... to apply some thermal paste on the computer. We do not have the CPU cooler, consult your components are installing the CPU, make sure the cooling fan can work properly to protect the CPU from the grounded outlet first to ensure the safety of thermal paste (or ...to support overclocking. However, please make sure your dealer before turning on it for better heat dispersion. Replaceing the CPU While replacing the CPU, always turn off the ATX power supply or unplug the power supply's power cord from overheating. Any attempt to operate beyond product specifications. ...
... to apply some thermal paste on the computer. We do not have the CPU cooler, consult your components are installing the CPU, make sure the cooling fan can work properly to protect the CPU from the grounded outlet first to ensure the safety of thermal paste (or ...to support overclocking. However, please make sure your dealer before turning on it for better heat dispersion. Replaceing the CPU While replacing the CPU, always turn off the ATX power supply or unplug the power supply's power cord from overheating. Any attempt to operate beyond product specifications. ...
User Guide
Page 18
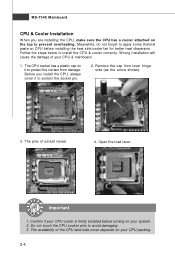
... touch the CPU socket pins to install the CPU & cooler correctly. Before you are installing the CPU, make sure the CPU has a cooler attached on your CPU & mainboard. 1. Open the load lever. Important 1. The availability of socket reveal. 4. The CPU socket has a plastic cap on your CPU cooler is ...do not forget to apply some thermal paste on CPU before turning on it to protect the socket pin. 2. Follow the steps below to avoid damaging. 3. MS-7345 Mainboard CPU & Cooler Installation W hen you install the CPU, always cover it to protect the contact from lever...
... touch the CPU socket pins to install the CPU & cooler correctly. Before you are installing the CPU, make sure the CPU has a cooler attached on your CPU & mainboard. 1. Open the load lever. Important 1. The availability of socket reveal. 4. The CPU socket has a plastic cap on your CPU cooler is ...do not forget to apply some thermal paste on CPU before turning on it to protect the socket pin. 2. Follow the steps below to avoid damaging. 3. MS-7345 Mainboard CPU & Cooler Installation W hen you install the CPU, always cover it to protect the contact from lever...

User Guide
Page 19
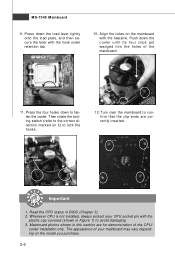
Lift the load lever up and open the load plate. 6. Visually inspect if the CPU is seated well into the socket. Note that the alignment keys are matched. If not, take out the CPU with pure vertical motion and reinstall. 8. Hardware Setup 5. After confirming the CPU direction for correct mating, put down the CPU in the socket housing frame. Cover the load plate onto the p ac kage. 2-5 alignment key 7. Be sure to grasp on the edge of the CPU base.
Lift the load lever up and open the load plate. 6. Visually inspect if the CPU is seated well into the socket. Note that the alignment keys are matched. If not, take out the CPU with pure vertical motion and reinstall. 8. Hardware Setup 5. After confirming the CPU direction for correct mating, put down the CPU in the socket housing frame. Cover the load plate onto the p ac kage. 2-5 alignment key 7. Be sure to grasp on the edge of the CPU base.
User Guide
Page 20
...hooks down the load lever lightly onto the load plate, and then secure the lever with the hook under retention tab. 10. Read the CPU status in Figure 1) to avoid damaging. 3. Mainboard photos shown in this section are correctly inserted. Press down to the correct direction marked on... the model you purchase. 2-6 Push down the cooler until its four clips get wedged into the holes of the CPU/ cooler installation only. locking switch Important 1. The appearance of your CPU socket pin with the heatsink. Then rotate the locking switch (refer to fasten the cooler. Whenever...
...hooks down the load lever lightly onto the load plate, and then secure the lever with the hook under retention tab. 10. Read the CPU status in Figure 1) to avoid damaging. 3. Mainboard photos shown in this section are correctly inserted. Press down to the correct direction marked on... the model you purchase. 2-6 Push down the cooler until its four clips get wedged into the holes of the CPU/ cooler installation only. locking switch Important 1. The appearance of your CPU socket pin with the heatsink. Then rotate the locking switch (refer to fasten the cooler. Whenever...

User Guide
Page 23
...4 POWER1 1 GND 2 GND 3 GND 4 GND 5 +12V 6 +12V 7 +12V 8 +12V 1 2 JPWR1 3 4 5V GND GND 12V Important 1. If you'd like to use the bundled ATX Extender to ensure stable operation of the power supply is highly recommended for system stability. 3. Make sure that all the connectors are aligned. To connect... into the connector. It can prevent the power cable to the CPU. And the JPW R1 12V power connector is used to provide power to connect an ATX 24-pin power supply. Hardware Setup Power Supply ATX 24-Pin Power Connector: ATX1 This connector allows you like. If...
...4 POWER1 1 GND 2 GND 3 GND 4 GND 5 +12V 6 +12V 7 +12V 8 +12V 1 2 JPWR1 3 4 5V GND GND 12V Important 1. If you'd like to use the bundled ATX Extender to ensure stable operation of the power supply is highly recommended for system stability. 3. Make sure that all the connectors are aligned. To connect... into the connector. It can prevent the power cable to the CPU. And the JPW R1 12V power connector is used to provide power to connect an ATX 24-pin power supply. Hardware Setup Power Supply ATX 24-Pin Power Connector: ATX1 This connector allows you like. If...

User Guide
Page 28
...OR SE NS OR +1 2V GND CPUFAN SYSFAN1 SE NS OR +1 2V GND SYSFAN2 SYSFAN3/4 SYSFAN5 Important 1. The system will automatically control the CPU fan speed according to the +12V; CPUFAN supports fan control. the black wire is opened, the chassis intrusion mechanism will be activated. You ...can install Dual Core Center utility that the red wire is the positive and should be connected to the actual CPU temperature. 3. To clear the warning, you must enter the BIOS utility and clear the record. Fan cooler set with +12V. If the...
...OR SE NS OR +1 2V GND CPUFAN SYSFAN1 SE NS OR +1 2V GND SYSFAN2 SYSFAN3/4 SYSFAN5 Important 1. The system will automatically control the CPU fan speed according to the +12V; CPUFAN supports fan control. the black wire is opened, the chassis intrusion mechanism will be activated. You ...can install Dual Core Center utility that the red wire is the positive and should be connected to the actual CPU temperature. 3. To clear the warning, you must enter the BIOS utility and clear the record. Fan cooler set with +12V. If the...

User Guide
Page 38
... Group1 Initializing Keyboard Controller. Group4 Group3 Group2 Group1 Operating System Booting LED Signal Description Group4 Group3 Group2 Group1 Initializing Video Interface This will start detecting CPU clock, checking type ofvideo onboard. The D-LED will hang here if the processor is damaged or not installed properly. Group4 Group3 Group2 Group1 BIOS Sign...
... Group1 Initializing Keyboard Controller. Group4 Group3 Group2 Group1 Operating System Booting LED Signal Description Group4 Group3 Group2 Group1 Initializing Video Interface This will start detecting CPU clock, checking type ofvideo onboard. The D-LED will hang here if the processor is damaged or not installed properly. Group4 Group3 Group2 Group1 BIOS Sign...
User Guide
Page 46
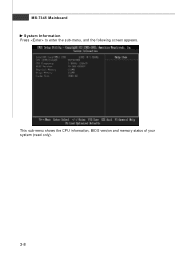
This sub-menu shows the CPU information, BIOS version and memory status of your system (read only). 3-8 MS-7345 Mainboard System Information Press to enter the sub-menu, and the following screen appears.
This sub-menu shows the CPU information, BIOS version and memory status of your system (read only). 3-8 MS-7345 Mainboard System Information Press to enter the sub-menu, and the following screen appears.
User Guide
Page 48
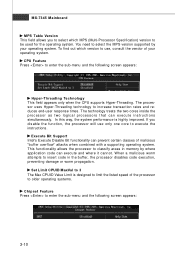
...operating systems. Chipset Feature Press to enter the sub-menu and the following screen appears: Hyper-Threading Technology This field appears only when the CPU supports Hyper-Threading. The processor uses Hyper-Threading technology to 3 The Max CPUID Value Limit is highly improved. If you to select ... can execute and where it cannot. W hen a malicious worm attempts to enter the sub-menu and the following screen appears: 3-10 CPU Feature Press to insert code in memory by your operating system. Set Limit CPUID MaxVal to increase transaction rates and reduces end-user response ...
...operating systems. Chipset Feature Press to enter the sub-menu and the following screen appears: Hyper-Threading Technology This field appears only when the CPU supports Hyper-Threading. The processor uses Hyper-Threading technology to 3 The Max CPUID Value Limit is highly improved. If you to select ... can execute and where it cannot. W hen a malicious worm attempts to enter the sub-menu and the following screen appears: 3-10 CPU Feature Press to insert code in memory by your operating system. Set Limit CPUID MaxVal to increase transaction rates and reduces end-user response ...
User Guide
Page 52
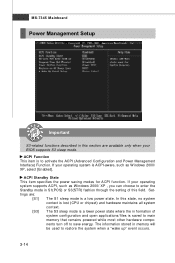
... supports ACPI, such as W indows 2000/ XP, select [Enabled]. In this field. The information stored in formation of this state, no system context is lost (CPU or chipset) and hardware maintains all system context. [S3] The S3 sleep mode is to restore the system when a "wake up" event occurs. 3-14 ACPI...
... supports ACPI, such as W indows 2000/ XP, select [Enabled]. In this field. The information stored in formation of this state, no system context is lost (CPU or chipset) and hardware maintains all system context. [S3] The S3 sleep mode is to restore the system when a "wake up" event occurs. 3-14 ACPI...
User Guide
Page 53
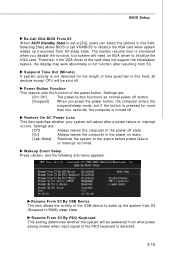
... from S3. Settings are : [Off] Always leaves the computer in the power off state. [On] Always leaves the computer in this field, all devices except CPU will be shut off button. [Suspend] W hen you disable the function, but if the button is pressed for the length of the card does not...
... from S3. Settings are : [Off] Always leaves the computer in the power off state. [On] Always leaves the computer in this field, all devices except CPU will be shut off button. [Suspend] W hen you disable the function, but if the button is pressed for the length of the card does not...
User Guide
Page 55
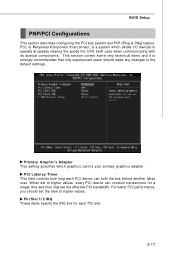
... values. PCI Latency Timer This item controls how long each PCI slot. 3-17 W hen set the item to operate at speeds nearing the speed the CPU itself uses when communicating with its special components. PCI Slot 1/ 2 IRQ These items specify the IRQ line for each PCI device can conduct transactions for...
... values. PCI Latency Timer This item controls how long each PCI slot. 3-17 W hen set the item to operate at speeds nearing the speed the CPU itself uses when communicating with its special components. PCI Slot 1/ 2 IRQ These items specify the IRQ line for each PCI device can conduct transactions for...
User Guide
Page 57
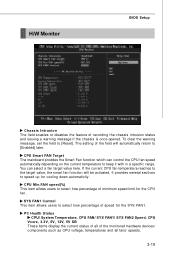
...to select how percentage of speed for the SYS FAN1. To clear the warning message, set the field to speed up for the CPU f an . If the current CPU fan temperature reaches to the target value, the smart fan function will automatically return to keep it with in a specific range. ... FAN Target The mainboard provides the Smart Fan function which can select a fan target value here. PC Health Status CPU/ System Temperature, CPU FAN/ SYS FAN1/ SYS FAN2 Speed, CPU Vcore, 3.3V, 5V, 12V, 5V SB These items display the current status of all of recording the chassis intrusion status and ...
...to select how percentage of speed for the SYS FAN1. To clear the warning message, set the field to speed up for the CPU f an . If the current CPU fan temperature reaches to the target value, the smart fan function will automatically return to keep it with in a specific range. ... FAN Target The mainboard provides the Smart Fan function which can select a fan target value here. PC Health Status CPU/ System Temperature, CPU FAN/ SYS FAN1/ SYS FAN2 Speed, CPU Vcore, 3.3V, 5V, 12V, 5V SB These items display the current status of all of recording the chassis intrusion status and ...

User Guide
Page 58
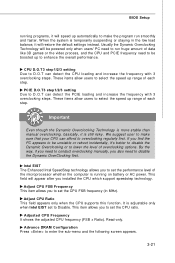
... PCIE while running programs, and to be controlled under D. It is designed to detect the load balance of CPU and PCIE to adjust the best frequency automatically. O.T. W hen the motherboard detects system is an automatic overclocking function, included in the MSITM's newly developed Dual CoreCellTM Technology. MS-7345 Mainboard Cell Menu Important...
... PCIE while running programs, and to be controlled under D. It is designed to detect the load balance of CPU and PCIE to adjust the best frequency automatically. O.T. W hen the motherboard detects system is an automatic overclocking function, included in the MSITM's newly developed Dual CoreCellTM Technology. MS-7345 Mainboard Cell Menu Important...
User Guide
Page 59
... enhance the overall performance. Advance DRAM Configuration Press to D.O.T can detect the PCIE loading and increase the frequency with 3 overclocking steps. CPU D.O.T3 step1/2/3 setting Due to enter the sub-menu and the following screen appears. 3-21 PCIE D.O.T3 step1/2/3 setting Due to overclocking...The Enhanced Intel SpeedStep technology allows you also need to conduct overclocking manually, you to disable the Dynamic OverClocking first. Adjust CPU FSB Frequency This item allows you to set the performance level of overclocking options. This item allows you to set to lower...
... enhance the overall performance. Advance DRAM Configuration Press to D.O.T can detect the PCIE loading and increase the frequency with 3 overclocking steps. CPU D.O.T3 step1/2/3 setting Due to enter the sub-menu and the following screen appears. 3-21 PCIE D.O.T3 step1/2/3 setting Due to overclocking...The Enhanced Intel SpeedStep technology allows you also need to conduct overclocking manually, you to disable the Dynamic OverClocking first. Adjust CPU FSB Frequency This item allows you to set the performance level of overclocking options. This item allows you to set to lower...
User Guide
Page 61
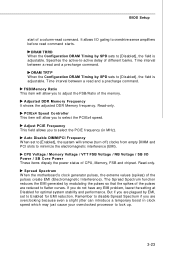
...that the spikes of the memory. Adjust PCIE Frequency This field allows you to select the PCIEx4 speed. Spread Spectrum W hen the motherboard's clock generator pulses, the extreme values (spikes) of a column-read and a precharge command. But if you to adjust the...command. If you are reduced to [Disabled], the field is adjustable. BIOS Setup start of the pulses create EMI (Electromagnetic Interference). Read-only. CPU Voltage / Momory Voltage / VTT FSB Voltage / NB Voltage / SB I /O gating to Enabled for optimal system stability and performance. Remember ...
...that the spikes of the memory. Adjust PCIE Frequency This field allows you to select the PCIEx4 speed. Spread Spectrum W hen the motherboard's clock generator pulses, the extreme values (spikes) of a column-read and a precharge command. But if you to adjust the...command. If you are reduced to [Disabled], the field is adjustable. BIOS Setup start of the pulses create EMI (Electromagnetic Interference). Read-only. CPU Voltage / Momory Voltage / VTT FSB Voltage / NB Voltage / SB I /O gating to Enabled for optimal system stability and performance. Remember ...

User Guide
Page 63
...is restored to the defaults setting, Press any key to overclock the CPU and the Memory. This motherboard supports overclocking greatly. At the fourth reboot, BIOS will not be under our product warranty. CPU Speed = CPU Frequency * CPU Ratio 2. Press the Power button to save your peripherals and components ... refer to the descriptions of these fields for more information about how to "chapter 2" for more information. BIOS Setup CPU and Memory Clock Overclocking The D.O.T Control, Adjust CPU FSB Frequency, Adjust CPU Ratio, FSB/Memory Ratio are bearable for some special settings.
...is restored to the defaults setting, Press any key to overclock the CPU and the Memory. This motherboard supports overclocking greatly. At the fourth reboot, BIOS will not be under our product warranty. CPU Speed = CPU Frequency * CPU Ratio 2. Press the Power button to save your peripherals and components ... refer to the descriptions of these fields for more information about how to "chapter 2" for more information. BIOS Setup CPU and Memory Clock Overclocking The D.O.T Control, Adjust CPU FSB Frequency, Adjust CPU Ratio, FSB/Memory Ratio are bearable for some special settings.
User Guide
Page 88
... Dual CoreCenter, the most useful and powerful utility that MSI has spent much research and efforts to develop, helps users to monitor or configure the hardware status of MSI Mainboard & MSI Graphics card in windows, such as CPU/GPU clock, voltage, fan speed and temperature. CD-...ROM drive for software installation. 4. Intel Pentium4 / Celeron, AMD Athlon XP/ Sempron or compatible CPU with PCI Express slot. 2. 256MB system memory...
... Dual CoreCenter, the most useful and powerful utility that MSI has spent much research and efforts to develop, helps users to monitor or configure the hardware status of MSI Mainboard & MSI Graphics card in windows, such as CPU/GPU clock, voltage, fan speed and temperature. CD-...ROM drive for software installation. 4. Intel Pentium4 / Celeron, AMD Athlon XP/ Sempron or compatible CPU with PCI Express slot. 2. 256MB system memory...

