
User Guide
Page 4
... and adjust properly 110/220V be noted. 10. com.tw/program/service/faq/faq/esc_faq_list.php h Contact our technical staff at: support@msi.com.tw Safety Instructions 1. Keep this equipment on a reliable flat surface before inserting any liquid into the equipment. fore connecting the equipment ...situations arises, get it work well or you can not step on the enclosure are for technical guide, BIOS updates, driver updates, and other information: http://www.msi.com.tw & http://www.msi. h The equipment has not work according to User's Manual. If any of breakage. 12. Technical...
... and adjust properly 110/220V be noted. 10. com.tw/program/service/faq/faq/esc_faq_list.php h Contact our technical staff at: support@msi.com.tw Safety Instructions 1. Keep this equipment on a reliable flat surface before inserting any liquid into the equipment. fore connecting the equipment ...situations arises, get it work well or you can not step on the enclosure are for technical guide, BIOS updates, driver updates, and other information: http://www.msi.com.tw & http://www.msi. h The equipment has not work according to User's Manual. If any of breakage. 12. Technical...

User Guide
Page 6
... Mode 4-8 Live Update ...4-9 MEGASTICK ...4-10 Basic Function 4-10 vi BIOS Setup 3-1 Entering Setup ...3-2 Selecting the First Boot Device 3-2 Control Keys 3-3 Getting Help 3-3 The Main Menu 3-4 Standard CMOS Features 3-6 Advanced BIOS Features 3-8 Advanced Chipset Features 3-10 Integrated Peripherals 3-14 Power Management... Setup 3-19 PNP/PCI Configurations 3-21 H/W Monitor ...3-23 Cell Menu ...3-24 Optimized Defaults 3-28 BIOS Setting Password 3-29 Chapter 4. Front USB Connectors: JUSB1/JUSB2/JUSB3 2-19 Front Panel Audio Connector: JAUD1 2-20 IrDA...
... Mode 4-8 Live Update ...4-9 MEGASTICK ...4-10 Basic Function 4-10 vi BIOS Setup 3-1 Entering Setup ...3-2 Selecting the First Boot Device 3-2 Control Keys 3-3 Getting Help 3-3 The Main Menu 3-4 Standard CMOS Features 3-6 Advanced BIOS Features 3-8 Advanced Chipset Features 3-10 Integrated Peripherals 3-14 Power Management... Setup 3-19 PNP/PCI Configurations 3-21 H/W Monitor ...3-23 Cell Menu ...3-24 Optimized Defaults 3-28 BIOS Setting Password 3-29 Chapter 4. Front USB Connectors: JUSB1/JUSB2/JUSB3 2-19 Front Panel Audio Connector: JAUD1 2-20 IrDA...

User Guide
Page 7
...RAID10 (Disk Mirroring and Striping 6-2 RAID5 (Parrity RAID 6-3 JBOD (Just Bunch of RAID Configurations 5-2 RAID Configuration 5-3 Basic Configuration Instructions 5-3 Setting Up the NVRAID BIOS 5-3 NVIDIA RAID Untility Installation 5-7 Installing the RAID Driver (for bootable RAID Array 5-7 Installing the NVIDIA RAID Software Under Windows (for AMD K8 Processor 4-14 Audio...Mirrored Array 5-20 Chapter 6. nVIDIA RAID Introduction 5-1 Introduction ...5-2 System Requirement 5-2 RAID Arrays 5-2 Summary of Disks 6-3 Creating and Deleting Legacy RAID Groups with BIOS Utility 6-5 vii
...RAID10 (Disk Mirroring and Striping 6-2 RAID5 (Parrity RAID 6-3 JBOD (Just Bunch of RAID Configurations 5-2 RAID Configuration 5-3 Basic Configuration Instructions 5-3 Setting Up the NVRAID BIOS 5-3 NVIDIA RAID Untility Installation 5-7 Installing the RAID Driver (for bootable RAID Array 5-7 Installing the NVIDIA RAID Software Under Windows (for AMD K8 Processor 4-14 Audio...Mirrored Array 5-20 Chapter 6. nVIDIA RAID Introduction 5-1 Introduction ...5-2 System Requirement 5-2 RAID Arrays 5-2 Summary of Disks 6-3 Creating and Deleting Legacy RAID Groups with BIOS Utility 6-5 vii

User Guide
Page 12
...operating system onto the bootable RAID volume. Dimension h ATX Form Factor (30.4 cm X 24.4 cm) Mounting h 9 mounting holes MSI Reminds You... 1. As the end user cannot boot without SP4, a combination installation CD must be created before attempting to the following ...website: http://www.microsoft.com/windows2000/downloads/ servicepacks/sp4/HFdeploy.htm 1-4 MS-7125 ATX Mainboard BIOS h The mainboard BIOS provides "Plug & Play" BIOS which records your mainboard specifications. To create a bootable RAID volume for a Windows 2000 environment, Microsoft's Windows 2000...
...operating system onto the bootable RAID volume. Dimension h ATX Form Factor (30.4 cm X 24.4 cm) Mounting h 9 mounting holes MSI Reminds You... 1. As the end user cannot boot without SP4, a combination installation CD must be created before attempting to the following ...website: http://www.microsoft.com/windows2000/downloads/ servicepacks/sp4/HFdeploy.htm 1-4 MS-7125 ATX Mainboard BIOS h The mainboard BIOS provides "Plug & Play" BIOS which records your mainboard specifications. To create a bootable RAID volume for a Windows 2000 environment, Microsoft's Windows 2000...

User Guide
Page 31
MSI Reminds You... If the chassis is connected to Slave mode by setting the jumper accordingly. To clear the warning, you must configure second hard drive ... IDE Connector) IDE2 can connect up to Slave mode by hard disk vendors for jumper setting instructions. GND 2 CINTRU 1 JCI1 2-17 You must enter the BIOS utility and clear the record. If you must configure the second drive to four hard disk drives, CD-ROM, or other devices. Chassis Intrusion Switch...
MSI Reminds You... If the chassis is connected to Slave mode by setting the jumper accordingly. To clear the warning, you must configure second hard drive ... IDE Connector) IDE2 can connect up to Slave mode by hard disk vendors for jumper setting instructions. GND 2 CINTRU 1 JCI1 2-17 You must enter the BIOS utility and clear the record. If you must configure the second drive to four hard disk drives, CD-ROM, or other devices. Chassis Intrusion Switch...

User Guide
Page 34
You must configure the setting through the BIOS setup to IrDA Infrared module. Otherwise, the Line-Out connector on the back panel will not function. 6 10 59 IrDA Infrared Module Header: JIR1 The ... to connect to use to control headphone amplifier No pin Left channel audio signal to front panel Left channel audio signal return from front panel MSI Reminds You... JIR1 is compliant with Intel® Front Panel I /O Connectivity Design Guide. MS-7125 ATX Mainboard Front Panel Audio Connector: JAUD1 The JAUD1 front...
You must configure the setting through the BIOS setup to IrDA Infrared module. Otherwise, the Line-Out connector on the back panel will not function. 6 10 59 IrDA Infrared Module Header: JIR1 The ... to connect to use to control headphone amplifier No pin Left channel audio signal to front panel Left channel audio signal return from front panel MSI Reminds You... JIR1 is compliant with Intel® Front Panel I /O Connectivity Design Guide. MS-7125 ATX Mainboard Front Panel Audio Connector: JAUD1 The JAUD1 front...

User Guide
Page 37
Testing VGA BIOS This will hang if the memory module is damaged or not installed properly. The LEDs provide up to 16 combinations of signals to RAM for ... overclocking users. This special feature is damaged or 3 4 not installed properly. The D-LED will start writing VGA sign-on message to the screen. 2-23 Decompressing BIOS image to debug the system. Hardware Setup D-Bracket™ 2 is an external USB bracket integrating four Diagnostic LEDs, which use the feature to detect if...
Testing VGA BIOS This will hang if the memory module is damaged or not installed properly. The LEDs provide up to 16 combinations of signals to RAM for ... overclocking users. This special feature is damaged or 3 4 not installed properly. The D-LED will start writing VGA sign-on message to the screen. 2-23 Decompressing BIOS image to debug the system. Hardware Setup D-Bracket™ 2 is an external USB bracket integrating four Diagnostic LEDs, which use the feature to detect if...

User Guide
Page 38
... will initialize IDE drive and controller. Operating System Booting 2-24 Initializing Floppy Drive Controller This will start detecting CPU clock, checking type of video onboard. BIOS Sign On This will initialize Floppy Drive and controller.
... will initialize IDE drive and controller. Operating System Booting 2-24 Initializing Floppy Drive Controller This will start detecting CPU clock, checking type of video onboard. BIOS Sign On This will initialize Floppy Drive and controller.

User Guide
Page 40
... Desktop Platforms with transfer rates starting at 2.5 Giga transfers per second over a PCI Express x16 lane for the expansion card, such as jumpers, switches or BIOS configuration. When adding or removing expansion cards, make sure that you unplug the power supply first. When adding or removing expansion cards, make any necessary...
... Desktop Platforms with transfer rates starting at 2.5 Giga transfers per second over a PCI Express x16 lane for the expansion card, such as jumpers, switches or BIOS configuration. When adding or removing expansion cards, make sure that you unplug the power supply first. When adding or removing expansion cards, make any necessary...

User Guide
Page 42
...061704 where: 1st digit refers to change the default settings for better system performance. BIOS Setup BIOS Setup This chapter provides information on the screen during the system booting up , the BIOS version is released. 3-1 MSI Reminds You... 1. While booting up , and requests you to the customer, MS...=all standard customers. The items under continuous update for customized features. It is usually in this BIOS is shown in the 1st line ...
...061704 where: 1st digit refers to change the default settings for better system performance. BIOS Setup BIOS Setup This chapter provides information on the screen during the system booting up , the BIOS version is released. 3-1 MSI Reminds You... 1. While booting up , and requests you to the customer, MS...=all standard customers. The items under continuous update for customized features. It is usually in this BIOS is shown in the 1st line ...

User Guide
Page 43
...restart the system and press after around 2 or 3 seconds to activate the boot menu similar to select the 1st boot device without entering the BIOS setup utility by pressing . The system will boot from by turning it OFF and On or pressing the RESET button. You may be slightly different...menu. When the message below appears on the system, it will not make changes to the settings in the BIOS setup utility, so next time when you still wish to boot up. MSI Reminds You... Therefore, the description may also restart the system by too quickly for better system performance. The...
...restart the system and press after around 2 or 3 seconds to activate the boot menu similar to select the 1st boot device without entering the BIOS setup utility by pressing . The system will boot from by turning it OFF and On or pressing the RESET button. You may be slightly different...menu. When the message below appears on the system, it will not make changes to the settings in the BIOS setup utility, so next time when you still wish to boot up. MSI Reminds You... Therefore, the description may also restart the system by too quickly for better system performance. The...

User Guide
Page 44
Press to . The on-line description of the highlighted setup function is the Main Menu. General Help The BIOS setup program provides a General Help screen. You can use arrow keys ( ↑↓ ) to highlight the field and press to call up the sub-menu. ... hand Move to the item in the left of certain fields that means a sub-menu can be launched from field to field within a sub-menu. BIOS Setup Control Keys Enter> Move to the previous item Move to the next item Move to the item in the right hand Select the item...
Press to . The on-line description of the highlighted setup function is the Main Menu. General Help The BIOS setup program provides a General Help screen. You can use arrow keys ( ↑↓ ) to highlight the field and press to call up the sub-menu. ... hand Move to the item in the left of certain fields that means a sub-menu can be launched from field to field within a sub-menu. BIOS Setup Control Keys Enter> Move to the previous item Move to the next item Move to the item in the right hand Select the item...

User Guide
Page 45
Standard CMOS Features Use this menu to setup the items of AWARD® special enhanced features. Advanced BIOS Features Use this menu for basic system configurations, such as time, date etc. Use arrow keys to select among the items and press to specify ... this menu to change the values in the chipset registers and optimize your settings for hardware. The Main Menu allows you enter Phoenix-Award® BIOS CMOS Setup Utility, the Main Menu will appear on the screen. Advanced Chipset Features Use this menu to specify your system's performance. MS-7125 ATX...
Standard CMOS Features Use this menu to setup the items of AWARD® special enhanced features. Advanced BIOS Features Use this menu for basic system configurations, such as time, date etc. Use arrow keys to select among the items and press to specify ... this menu to change the values in the chipset registers and optimize your settings for hardware. The Main Menu allows you enter Phoenix-Award® BIOS CMOS Setup Utility, the Main Menu will appear on the screen. Advanced Chipset Features Use this menu to specify your system's performance. MS-7125 ATX...

User Guide
Page 46
BIOS Setting Password Use this menu to load the BIOS values for BIOS. Save & Exit Setup Save changes to CMOS and exit setup. BIOS Setup Load Optimized Defaults Use this menu to set the password for the best system performance, but the system stability may be affected. Exit Without Saving Abandon all changes and exit setup. 3-5
BIOS Setting Password Use this menu to load the BIOS values for BIOS. Save & Exit Setup Save changes to CMOS and exit setup. BIOS Setup Load Optimized Defaults Use this menu to set the password for the best system performance, but the system stability may be affected. Exit Without Saving Abandon all changes and exit setup. 3-5

User Guide
Page 47
... . If your hard disk drive type is asked to be adjusted by users. Cylinder Number of the storage device. This information should be keyed by BIOS. Access Mode The settings are CHS, LBA, Large, Auto. Capacity The formatted size of cylinders. 3-6 The format is . date The date from Sun to 31...
... . If your hard disk drive type is asked to be adjusted by users. Cylinder Number of the storage device. This information should be keyed by BIOS. Access Mode The settings are CHS, LBA, Large, Auto. Capacity The formatted size of cylinders. 3-6 The format is . date The date from Sun to 31...

User Guide
Page 48
...Drive A This item allows you to enter the sub-menu and the following screen appears: CPU Type/BIOS Version/System Memory/Total Memory The items show the CPU type, BIOS version and memory status of your system (read only). 3-7 System Information Press to set the type of...], [360K, 5.25 in.], [1.2M, 5.25 in.], [720K, 3.5 in.], [1.44M, 3.5 in.], [2.88M, 3.5 in.]. The system doesn't stop for a keyboard error. BIOS Setup Head Precomp Landing Zone Sector Number of floppy drive installed. Available options are: [All Errors] [No Errors] [All, But Keyboard] [All, But Diskette] [All...
...Drive A This item allows you to enter the sub-menu and the following screen appears: CPU Type/BIOS Version/System Memory/Total Memory The items show the CPU type, BIOS version and memory status of your system (read only). 3-7 System Information Press to set the type of...], [360K, 5.25 in.], [1.2M, 5.25 in.], [720K, 3.5 in.], [1.44M, 3.5 in.], [2.88M, 3.5 in.]. The system doesn't stop for a keyboard error. BIOS Setup Head Precomp Landing Zone Sector Number of floppy drive installed. Available options are: [All Errors] [No Errors] [All, But Keyboard] [All, But Diskette] [All...

User Guide
Page 49
... 64MB. MPS Table Version This field allows you cannot run the OS/2® operating system with DRAM larger than 64MB. MS-7125 ATX Mainboard Advanced BIOS Features Quick Boot Setting the item to [Enabled] allows the system to run in APIC mode. When you choose [No], you to select which version...
... 64MB. MPS Table Version This field allows you cannot run the OS/2® operating system with DRAM larger than 64MB. MS-7125 ATX Mainboard Advanced BIOS Features Quick Boot Setting the item to [Enabled] allows the system to run in APIC mode. When you choose [No], you to select which version...

User Guide
Page 50
Then you to set the sequence of boot devices where BIOS attempts to load the disk operating system. BIOS Setup Boot Sequence Press to enter the sub-menu and the following screen appears: 1st/2nd/3rd Boot Device The items allow you may use ...
Then you to set the sequence of boot devices where BIOS attempts to load the disk operating system. BIOS Setup Boot Sequence Press to enter the sub-menu and the following screen appears: 1st/2nd/3rd Boot Device The items allow you may use ...

User Guide
Page 52
... set to [Manual], the field is adjustable.This controls the CAS latency, which determines the timing delay (in the system. Auto-refresh -active to precharge. BIOS Setup CAS# Latency (Tcl) When the Timing Mode is set to [Manual], the field is adjustable. When DRAM is allowed for Row Address Strobe (RAS...
... set to [Manual], the field is adjustable.This controls the CAS latency, which determines the timing delay (in the system. Auto-refresh -active to precharge. BIOS Setup CAS# Latency (Tcl) When the Timing Mode is set to [Manual], the field is adjustable. When DRAM is allowed for Row Address Strobe (RAS...
User Guide
Page 54
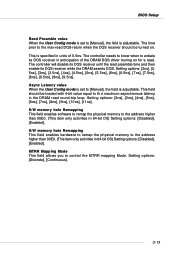
...]. This is adjustable. The controller will disable its DQS receiver until the read preamble time and then enable its DQS receiver in anticipation of 0.5ns. BIOS Setup Read Preamble value When the User Config mode is set to [Manual], the field is specified in units of the DRAM DQS driver truning...
...]. This is adjustable. The controller will disable its DQS receiver until the read preamble time and then enable its DQS receiver in anticipation of 0.5ns. BIOS Setup Read Preamble value When the User Config mode is set to [Manual], the field is specified in units of the DRAM DQS driver truning...


