

User Guide
Page 2
...Technologies Ltd. Alternatively, please try the following help resources for FAQ, technical guide, BIOS updates, driver updates, and other countries. func=faqIndex Contact our technical staff at: http://support.msi.com.tw/ ii PS/2 and OS®/2 are under continual improvement and we ...reserve the right to the correctness of its contents. Our products are registered trademarks of International Business Machines Corporation. Visit the MSI website for further guidance. NVIDIA, the NVIDIA logo, DualNet, and nForce are registered trademarks or trademarks of NVIDIA Corporation ...
...Technologies Ltd. Alternatively, please try the following help resources for FAQ, technical guide, BIOS updates, driver updates, and other countries. func=faqIndex Contact our technical staff at: http://support.msi.com.tw/ ii PS/2 and OS®/2 are under continual improvement and we ...reserve the right to the correctness of its contents. Our products are registered trademarks of International Business Machines Corporation. Visit the MSI website for further guidance. NVIDIA, the NVIDIA logo, DualNet, and nForce are registered trademarks or trademarks of NVIDIA Corporation ...

User Guide
Page 8
... Memory ...2-6 Power Supply ...2-8 Back Panel ...2-9 Connectors ...2-11 Jumpers ...2-19 Slots ...2-20 Chapter 3 BIOS Setup 3-1 Entering Setup ...3-2 The Main Menu ...3-4 Standard CMOS Features 3-6 Advanced BIOS Features 3-8 Advanced Chipset Features 3-10 Integrated Peripherals 3-11 Power Management Setup 3-13 PNP/PCI Configurations 3-...16 H/W Monitor ...3-18 Load Optimized Defaults 3-22 BIOS Setting Password 3-22 Appendix A Realtek ALC888 Audio A-1 Installing the Realtek HD Audio Driver A-2 Setup audio outpur to...
... Memory ...2-6 Power Supply ...2-8 Back Panel ...2-9 Connectors ...2-11 Jumpers ...2-19 Slots ...2-20 Chapter 3 BIOS Setup 3-1 Entering Setup ...3-2 The Main Menu ...3-4 Standard CMOS Features 3-6 Advanced BIOS Features 3-8 Advanced Chipset Features 3-10 Integrated Peripherals 3-11 Power Management Setup 3-13 PNP/PCI Configurations 3-...16 H/W Monitor ...3-18 Load Optimized Defaults 3-22 BIOS Setting Password 3-22 Appendix A Realtek ALC888 Audio A-1 Installing the Realtek HD Audio Driver A-2 Setup audio outpur to...

User Guide
Page 19
... the CPU, make sure the CPU has a heat sink and a cooling fan attached on the top to hook first. 2. Fixed Lever 3. Mainboard photos shown in BIOS (Chapter 3). 2. Hardware Setup Installing AMD Socket AM2 CPU Cooler Set W hen you are for demonstration of the CPU/ cooler installation only.
... the CPU, make sure the CPU has a heat sink and a cooling fan attached on the top to hook first. 2. Fixed Lever 3. Mainboard photos shown in BIOS (Chapter 3). 2. Hardware Setup Installing AMD Socket AM2 CPU Cooler Set W hen you are for demonstration of the CPU/ cooler installation only.

User Guide
Page 27
... take advantage of the CPU fan control. If the chassis is the positive and should be activated. To clear the warning, you must enter the BIOS utility and clear the record. 2 GND 1 CINTRU JCI1 CD-In Connector: JCD1 This connector is Ground and should be connected to GND. CPUFAN1 supports fan...
... take advantage of the CPU fan control. If the chassis is the positive and should be activated. To clear the warning, you must enter the BIOS utility and clear the record. 2 GND 1 CINTRU JCI1 CD-In Connector: JCD1 This connector is Ground and should be connected to GND. CPUFAN1 supports fan...

User Guide
Page 34
... Slot The PCI Express slot supports the PCI Express interface expansion card. Meanwhile, read the documentation for the expansion card, such as jumpers, switches or BIOS configuration. 2-20 The PCI Express x 16 supports up to 4.0 GB/s transfer rate. The PCI Express x 8 supports up to 2.0 GB/s transfer rate...
... Slot The PCI Express slot supports the PCI Express interface expansion card. Meanwhile, read the documentation for the expansion card, such as jumpers, switches or BIOS configuration. 2-20 The PCI Express x 16 supports up to 4.0 GB/s transfer rate. The PCI Express x 8 supports up to 2.0 GB/s transfer rate...

User Guide
Page 36
Chapter 3 BIOS Setup BIOS Setup This chapter provides information on the screen during the system booting up, and requests you to change the default settings for optimum use. You may need to run the Setup program when: ² An error message appears on the BIOS Setup program and allows you to run SETUP. ² You want to configure the system for customized features. 3-1
Chapter 3 BIOS Setup BIOS Setup This chapter provides information on the screen during the system booting up, and requests you to change the default settings for optimum use. You may need to run the Setup program when: ² An error message appears on the BIOS Setup program and allows you to run SETUP. ² You want to configure the system for customized features. 3-1

User Guide
Page 37
... 1st line appearing after the memory count is usually in this chapter are under continuous update for reference only. 2. V1.0 refers to the BIOS version. 3-2 W hen the message below appears on the computer and the system will start POST (Power On Self Test) process. The items ... N = nVidia, A = ATi and V = VIA. 7th - 8th digit refers to the customer as MS = all standard customers. You may be slightly different from the latest BIOS and should be held for better system performance. Important 1. MS-7367 Mainboard Entering Setup Power on the screen, press key to enter Setup. It is...
... 1st line appearing after the memory count is usually in this chapter are under continuous update for reference only. 2. V1.0 refers to the BIOS version. 3-2 W hen the message below appears on the computer and the system will start POST (Power On Self Test) process. The items ... N = nVidia, A = ATi and V = VIA. 7th - 8th digit refers to the customer as MS = all standard customers. You may be slightly different from the latest BIOS and should be held for better system performance. Important 1. MS-7367 Mainboard Entering Setup Power on the screen, press key to enter Setup. It is...

User Guide
Page 38
... program provides a General Help screen. BIOS Setup Control Keys Enter> Move to the previous item Move to the next item Move to the item in the right hand Select the item ...
... program provides a General Help screen. BIOS Setup Control Keys Enter> Move to the previous item Move to the next item Move to the item in the right hand Select the item ...
User Guide
Page 39
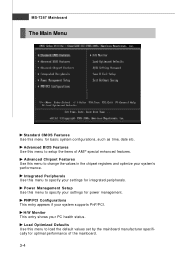
... the items of the mainboard. 3-4 Load Optimized Defaults Use this menu to specify your settings for basic system configurations, such as time, date etc. Advanced BIOS Features Use this menu to specify your settings for optimal performance of AMI® special enhanced features. H/W Monitor This entry shows your system supports PnP...
... the items of the mainboard. 3-4 Load Optimized Defaults Use this menu to specify your settings for basic system configurations, such as time, date etc. Advanced BIOS Features Use this menu to specify your settings for optimal performance of AMI® special enhanced features. H/W Monitor This entry shows your system supports PnP...

User Guide
Page 40
Save & Exit Setup Save changes to set the password for BIOS. Exit Without Saving Abandon all changes and exit setup. BIOS Setup 3-5 BIOS Setting Password Use this menu to CMOS and exit setup.
Save & Exit Setup Save changes to set the password for BIOS. Exit Without Saving Abandon all changes and exit setup. BIOS Setup 3-5 BIOS Setting Password Use this menu to CMOS and exit setup.
User Guide
Page 41
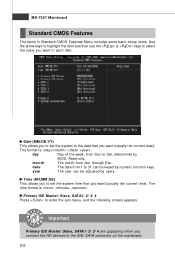
.... The format is . Important Primary IDE Master/ Slave, SATA1/ 2/ 3/ 4 are appearing when you want (usually the current date). year The year can be adjusted by BIOS. day Day of the week, from Jan. MS-7367 Mainboard Standard CMOS Features The items in each item. through Dec.
.... The format is . Important Primary IDE Master/ Slave, SATA1/ 2/ 3/ 4 are appearing when you want (usually the current date). year The year can be adjusted by BIOS. day Day of the week, from Jan. MS-7367 Mainboard Standard CMOS Features The items in each item. through Dec.

User Guide
Page 42
... to activate the S.M.A.R.T. (Self-Monitoring Analysis & Reporting Technology) capability for the hard disks. CPU Infromation/ BIOS Version/ M emory Information These items show the CPU information, BIOS version and memory status of floppy drives installed. Hard Disk S.M.A.R.T. Floppy A This item allows you to predict... hard disk failure. S.M.A.R.T is not already formatted with LBA mode disabled. BIOS Setup Device/ Vender/ Size It will showing the device information that you connected to enter the sub-menu, and the following screen...
... to activate the S.M.A.R.T. (Self-Monitoring Analysis & Reporting Technology) capability for the hard disks. CPU Infromation/ BIOS Version/ M emory Information These items show the CPU information, BIOS version and memory status of floppy drives installed. Hard Disk S.M.A.R.T. Floppy A This item allows you to predict... hard disk failure. S.M.A.R.T is not already formatted with LBA mode disabled. BIOS Setup Device/ Vender/ Size It will showing the device information that you connected to enter the sub-menu, and the following screen...

User Guide
Page 43
... to enable or disable the APIC (Advanced Programmable Interrupt Controller). W hen you choose [No], you to use the arrow keys on . MS-7367 Mainboard Advanced BIOS Features Full Screen LOGO Display This item enables you cannot run the OS/2® operating system with DRAM larger than 64MB. But it will allow...
... to enable or disable the APIC (Advanced Programmable Interrupt Controller). W hen you choose [No], you to use the arrow keys on . MS-7367 Mainboard Advanced BIOS Features Full Screen LOGO Display This item enables you cannot run the OS/2® operating system with DRAM larger than 64MB. But it will allow...

User Guide
Page 44
... MPS Table Version This field allows you to select which version to use, consult the vendor of boot devices where BIOS attempts to load the disk operating system. You need to select the MPS version supported by your operating system. Boot Sequence Press to enter the ...
... MPS Table Version This field allows you to select which version to use, consult the vendor of boot devices where BIOS attempts to load the disk operating system. You need to select the MPS version supported by your operating system. Boot Sequence Press to enter the ...

User Guide
Page 46
... to invoke the Boot ROM of the onboard LAN. Onboard Audio Controller This setting is used to enable/disable the onboard audio controller. Integrated Peripherals BIOS Setup USB Controller This setting allows you need to use a USB-interfaced device in the operating system. USB Device Legacy Support Select [Enabled] if you...
... to invoke the Boot ROM of the onboard LAN. Onboard Audio Controller This setting is used to enable/disable the onboard audio controller. Integrated Peripherals BIOS Setup USB Controller This setting allows you need to use a USB-interfaced device in the operating system. USB Device Legacy Support Select [Enabled] if you...

User Guide
Page 47
I /O port addresses of the onboard Serial Port. 3-12 MS-7367 Mainboard PCI IDE BusMaster This item allows you have to choose the RAID for reading/ writing to enter the sub-menu: COM Port This item specifies the base I /O Devices Configuration Press to IDE drives. Before configure the RAID set, you to enable/ disable BIOS to used to define the SATA type. OnChip SATA Type This item is used PCI busmastering for the SATA devices.
I /O port addresses of the onboard Serial Port. 3-12 MS-7367 Mainboard PCI IDE BusMaster This item allows you have to choose the RAID for reading/ writing to enter the sub-menu: COM Port This item specifies the base I /O Devices Configuration Press to IDE drives. Before configure the RAID set, you to enable/ disable BIOS to used to define the SATA type. OnChip SATA Type This item is used PCI busmastering for the SATA devices.

User Guide
Page 48
... S1(POS) or S3(STR) fashion through the setting of this field. In this state, no system context is to save energy. Power Management Setup BIOS Setup Important S3-related functions described in this section are : [S1/POS] The S1 sleep mode is a low power state. ACPI Function This item is...
... S1(POS) or S3(STR) fashion through the setting of this field. In this state, no system context is to save energy. Power Management Setup BIOS Setup Important S3-related functions described in this section are : [S1/POS] The S1 sleep mode is a low power state. ACPI Function This item is...

User Guide
Page 50
Resume by PCIE Device W hen set to [Enabled], the feature allows your system to enable or disable the feature of booting up the system on PCIE device. BIOS Setup Resume by RTC Alarm The field is used to be awakened from the power saving modes through any event on a scheduled time/date. 3-15
Resume by PCIE Device W hen set to [Enabled], the feature allows your system to enable or disable the feature of booting up the system on PCIE device. BIOS Setup Resume by RTC Alarm The field is used to be awakened from the power saving modes through any event on a scheduled time/date. 3-15

User Guide
Page 52
If more DMAs must be removed from the available DMAs passed to devices that are configurable by reading the NVRAM. BIOS Setup DMA Resources Setup Press and you will enter the sub-menu of the items.DMA Resources 0/1/3/5/ 6/7 for setting determine if BIOS should remove a DMA from the pool, the end user can reserve the DMA. 3-17 The available DMA pool is determined by the system BIOS.
If more DMAs must be removed from the available DMAs passed to devices that are configurable by reading the NVRAM. BIOS Setup DMA Resources Setup Press and you will enter the sub-menu of the items.DMA Resources 0/1/3/5/ 6/7 for setting determine if BIOS should remove a DMA from the pool, the end user can reserve the DMA. 3-17 The available DMA pool is determined by the system BIOS.

User Guide
Page 54
PC Health Status Press to keep it with in a specific range. CPU/System Temperature, CPU FAN/ SYSTEM FAN Speed, CPU Vcore, 3.3VCC, 5V, 12V, 3.3V SB These items display the current status of all of the monitored hardware devices/ components such as CPU voltage, temperatures and all fans' speeds. 3-19 BIOS Setup Smart Fan Target The mainboard provides the Smart Fan system which can control the fan speed automatically depending on the current temperature to enter the sub-menu and following screen appears.
PC Health Status Press to keep it with in a specific range. CPU/System Temperature, CPU FAN/ SYSTEM FAN Speed, CPU Vcore, 3.3VCC, 5V, 12V, 3.3V SB These items display the current status of all of the monitored hardware devices/ components such as CPU voltage, temperatures and all fans' speeds. 3-19 BIOS Setup Smart Fan Target The mainboard provides the Smart Fan system which can control the fan speed automatically depending on the current temperature to enter the sub-menu and following screen appears.


