User Guide
Page 12
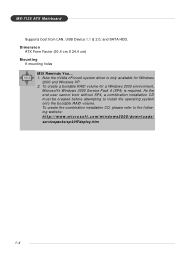
Dimension † ATX Form Factor (30.4 cm X 24.4 cm) Mounting † 9 mounting holes MSI Reminds You... 1. To create a bootable RAID volume for a Windows 2000 environment, Microsoft's Windows 2000 Service Pack 4 (SP4) is only available for Windows 2000 and Windows XP. 2. As the end user cannot boot without SP4, a combination installation CD must be ...driver is required. To create the combination installation CD, please refer to install the operating system onto the bootable RAID volume. M S-7125 ATX M ainboard † Supports boot from LAN, USB Device 1.1 & 2.0, and SATA HDD.
Dimension † ATX Form Factor (30.4 cm X 24.4 cm) Mounting † 9 mounting holes MSI Reminds You... 1. To create a bootable RAID volume for a Windows 2000 environment, Microsoft's Windows 2000 Service Pack 4 (SP4) is only available for Windows 2000 and Windows XP. 2. As the end user cannot boot without SP4, a combination installation CD must be ...driver is required. To create the combination installation CD, please refer to install the operating system onto the bootable RAID volume. M S-7125 ATX M ainboard † Supports boot from LAN, USB Device 1.1 & 2.0, and SATA HDD.

User Guide
Page 60
Options are available only when your operating system supports ACPI, such as Windows 98SE, Windows ME, Windows 2000, and Windows XP, you can choose to enter the Standby mode in S1(POS) or S3(STR) fashion through the setting of system configuration and open applications/... that remains powered while most other hardware components turn off to save energy. If your BIOS supports S3 sleep mode. Power Management Setup BIOS Setup MSI Reminds You... ACPI Standby State This item specifies the power saving modes for ACPI function. In this state, no system context is lost (CPU or...
Options are available only when your operating system supports ACPI, such as Windows 98SE, Windows ME, Windows 2000, and Windows XP, you can choose to enter the Standby mode in S1(POS) or S3(STR) fashion through the setting of system configuration and open applications/... that remains powered while most other hardware components turn off to save energy. If your BIOS supports S3 sleep mode. Power Management Setup BIOS Setup MSI Reminds You... ACPI Standby State This item specifies the power saving modes for ACPI function. In this state, no system context is lost (CPU or...

User Guide
Page 62
... further request. 3-21 This section covers some very technical items and it is set each of device using a Plug and Play operating system such as Windows® 95/98. IRQ Resources The items are adjustable only when Resources Controlled By is strongly recommended that follows this capability means absolutely nothing unless...
... further request. 3-21 This section covers some very technical items and it is set each of device using a Plug and Play operating system such as Windows® 95/98. IRQ Resources The items are adjustable only when Resources Controlled By is strongly recommended that follows this capability means absolutely nothing unless...

User Guide
Page 73
...-menu, you have your MEGA STICK connected to your system, this sub-menu, you can take advantage of your system and to overclock under Windows OS if your MEGA STICK or the system, and edit the preferred playlist. Core Center You can configure date, time and auto-executed programs... of the power-on Agent In this icon will bring you can load media files from your system supports overclocking function. MSI Reminds You... Power on , power-off and restarting features. Introduction to DigiCell Live Update You can configure and test the multi-channel audio function...
...-menu, you have your MEGA STICK connected to your system, this sub-menu, you can take advantage of your system and to overclock under Windows OS if your MEGA STICK or the system, and edit the preferred playlist. Core Center You can configure date, time and auto-executed programs... of the power-on Agent In this icon will bring you can load media files from your system supports overclocking function. MSI Reminds You... Power on , power-off and restarting features. Introduction to DigiCell Live Update You can configure and test the multi-channel audio function...

User Guide
Page 85
..."Default" to restore the default values. Under Cell Menu, find Cool'n'Quiet Support, and set for the temperatures are the minimum thresholds. Enter Windows, and select [Start]->[Settings]-> [Control Pannel]->[Power Options]. Or you may use the "+" and "-" buttons to adjust, then click "OK" to apply... the changes. MSI Reminds You... Introduction to DigiCell Left-side: Current system status In the left sub-menu, you can configure the settings of FSB, PCI-E, ...
..."Default" to restore the default values. Under Cell Menu, find Cool'n'Quiet Support, and set for the temperatures are the minimum thresholds. Enter Windows, and select [Start]->[Settings]-> [Control Pannel]->[Power Options]. Or you may use the "+" and "-" buttons to adjust, then click "OK" to apply... the changes. MSI Reminds You... Introduction to DigiCell Left-side: Current system status In the left sub-menu, you can configure the settings of FSB, PCI-E, ...

User Guide
Page 90
...function allows the system to power on automatically, you may have to enable this Auto Login function in the following operating systems: Win9X, Windows ME, Windows 2000 & Windows XP. If you are using a computer with one specific user. If you are using a computer belonging to a domain in office...in office, and you boot up your login password in office, please enter your computer. 2. Default User Name It is only available for Windows 2000 & Windows XP. -- If you are using a computer belonging to a domain in this setting if you want to enter your user name & password...
...function allows the system to power on automatically, you may have to enable this Auto Login function in the following operating systems: Win9X, Windows ME, Windows 2000 & Windows XP. If you are using a computer with one specific user. If you are using a computer belonging to a domain in office...in office, and you boot up your login password in office, please enter your computer. 2. Default User Name It is only available for Windows 2000 & Windows XP. -- If you are using a computer belonging to a domain in this setting if you want to enter your user name & password...

User Guide
Page 92
... for different uses. Small databases or any other small capacity environment requiring fault tolerance. Multiple Fault Tolerance None Yes Yes No MSI Reminds You... Under these two OSs, SATA can not support. 5-2 RAID 1: RAID 1 defines techniques for 2 the storage... of odd size drives. Allows spare disks. MS-7125 ATX Mainboard Introduction System Requirement Operating System Support NVRAID supports the following operating systems: Windows XP Home Edition Windows XP Professional Edition Windows 2000 Professional RAID Arrays NVRAID supports the following types of RAID...
... for different uses. Small databases or any other small capacity environment requiring fault tolerance. Multiple Fault Tolerance None Yes Yes No MSI Reminds You... Under these two OSs, SATA can not support. 5-2 RAID 1: RAID 1 defines techniques for 2 the storage... of odd size drives. Allows spare disks. MS-7125 ATX Mainboard Introduction System Requirement Operating System Support NVRAID supports the following operating systems: Windows XP Home Edition Windows XP Professional Edition Windows 2000 Professional RAID Arrays NVRAID supports the following types of RAID...
User Guide
Page 93
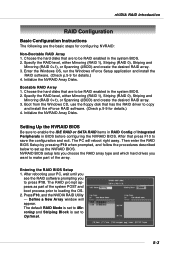
...is set to loading the OS. 2. The RAID prompt appears as part of Integrated Peripherals in the system BIOS. 2. Enter the Windows OS, run the Windows nForce Setup application and install the RAID software. (Check p.5-9 for configuring NVRAID: Non-Bootable RAID Array 1. NVRAID BIOS setup lets ...create the desired RAID array. 3. Initialize the NVRAID Array Disks. Define a New Array window will reboot right away. Press F10, and the NVIDIA RAID Utility --- Bootable RAID Array 1. Boot from the Windows CD, use the floppy disk that are to be RAID enabled in RAID Config of...
...is set to loading the OS. 2. The RAID prompt appears as part of Integrated Peripherals in the system BIOS. 2. Enter the Windows OS, run the Windows nForce Setup application and install the RAID software. (Check p.5-9 for configuring NVRAID: Non-Bootable RAID Array 1. NVRAID BIOS setup lets ...create the desired RAID array. 3. Initialize the NVRAID Array Disks. Define a New Array window will reboot right away. Press F10, and the NVIDIA RAID Utility --- Bootable RAID Array 1. Boot from the Windows CD, use the floppy disk that are to be RAID enabled in RAID Config of...

User Guide
Page 94
... a one to one connection between the drive and the controller. 5-4 MS-7125 ATX Mainboard Understanding the "Define a New Array" Window Use the Define a New Array window to • Select the RAID Mode • Set up the Striping Block •... 0, controller 1, Slave Serial ATA 1.0.M Channel 1, controller 0, Master 1.1.M Channel 1, controller 1, Master 2.0.M Channel 2, controller 0, Master 2.1.M Channel 2, controller 1, Master MSI Reminds You... There is set to be Master since there is a list of each channel has a slave and a master. In the example above, 1.0.M means the...
... a one to one connection between the drive and the controller. 5-4 MS-7125 ATX Mainboard Understanding the "Define a New Array" Window Use the Define a New Array window to • Select the RAID Mode • Set up the Striping Block •... 0, controller 1, Slave Serial ATA 1.0.M Channel 1, controller 0, Master 1.1.M Channel 1, controller 1, Master 2.0.M Channel 2, controller 0, Master 2.1.M Channel 2, controller 1, Master MSI Reminds You... There is set to be Master since there is a list of each channel has a slave and a master. In the example above, 1.0.M means the...

User Guide
Page 95
... the Free Disks block. These are the drives that are available for use as a RAID array disk, 1. nVIDIA RAID Introduction Using the Define a New Array Window If necessary, press the tab key to move from field to field until the mode that you enabled from the Free Disks block to the...
... the Free Disks block. These are the drives that are available for use as a RAID array disk, 1. nVIDIA RAID Introduction Using the Define a New Array Window If necessary, press the tab key to move from field to field until the mode that you enabled from the Free Disks block to the...
User Guide
Page 96
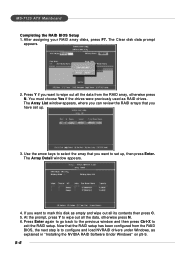
... your RAID array disks, press F7. You must choose Yes if the drives were previously used as explained in "Installing the NVIDIA RAID Software Under Windows" on p5-9. 5-6 Now that the RAID setup has been configured from the RAID array, otherwise press N. If you have set up . 3. ...empty and wipe out all the data, otherwise press N. 6. The Array Detail window appears. 4. Press Enter again to go back to the previous window and then press Ctrl-X to wipe out all its contents then press C. 5. MS-7125 ATX Mainboard Completing the RAID BIOS Setup 1. At the prompt, press Y to ...
... your RAID array disks, press F7. You must choose Yes if the drives were previously used as explained in "Installing the NVIDIA RAID Software Under Windows" on p5-9. 5-6 Now that the RAID setup has been configured from the RAID array, otherwise press N. If you have set up . 3. ...empty and wipe out all the data, otherwise press N. 6. The Array Detail window appears. 4. Press Enter again to go back to the previous window and then press Ctrl-X to wipe out all its contents then press C. 5. MS-7125 ATX Mainboard Completing the RAID BIOS Setup 1. At the prompt, press Y to ...
User Guide
Page 97
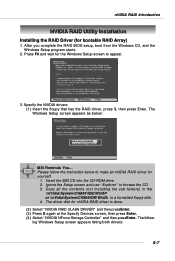
... the RAID driver, press S, then press Enter. Ignore the Setup screen and use "Explorer" to make an nVIDIA RAID driver for the Windows Setup screen to a formatted floppy disk. 4. nVIDIA RAID Introduction NVIDIA RAID Utility Installation Installing the RAID Driver (for nVIDIA RAID driver is ... the Specify Devices screen, then press Enter. (4) Select "NVIDIA NForce Storage Controller" and then pressEnter. Please follow the instruction below : MSI Reminds You... The following Windows Setup screen appears listing both drivers: 5-7 After you complete the RAID BIOS setup, boot from the...
... the RAID driver, press S, then press Enter. Ignore the Setup screen and use "Explorer" to make an nVIDIA RAID driver for the Windows Setup screen to a formatted floppy disk. 4. nVIDIA RAID Introduction NVIDIA RAID Utility Installation Installing the RAID Driver (for nVIDIA RAID driver is ... the Specify Devices screen, then press Enter. (4) Select "NVIDIA NForce Storage Controller" and then pressEnter. Please follow the instruction below : MSI Reminds You... The following Windows Setup screen appears listing both drivers: 5-7 After you complete the RAID BIOS setup, boot from the...
User Guide
Page 98
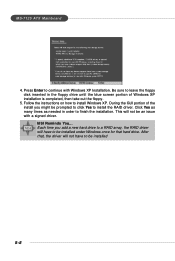
... click Yes to install the RAID driver. Press Enter to be an issue with Windows XP Installation. Be sure to leave the floppy disk inserted in order to install Windows XP. During the GUI portion of Windows XP installation is completed, then take out the floppy. 5. Click Yes as many... times as needed in the floppy drive until the blue screen portion of the install you add a new hard drive to a RAID array, the RAID driver will have to continue with a signed driver. MSI Reminds You... MS-7125 ATX...
... click Yes to install the RAID driver. Press Enter to be an issue with Windows XP Installation. Be sure to leave the floppy disk inserted in order to install Windows XP. During the GUI portion of Windows XP installation is completed, then take out the floppy. 5. Click Yes as many... times as needed in the floppy drive until the blue screen portion of the install you add a new hard drive to a RAID array, the RAID driver will have to continue with a signed driver. MSI Reminds You... MS-7125 ATX...
User Guide
Page 99
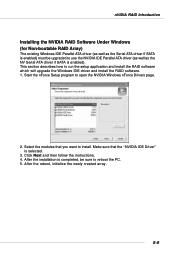
...Parallel ATA driver (as well as the NV Serial ATA driver if SATA is selected. 3. This section describes how to open the NVIDIA Windows nForce Drivers page. 2. Start the nForce Setup program to run the setup application and install the RAID software which will upgrade the... Windows IDE driver and install the RAID software. 1. Click Next and then follow the instructions. 4. nVIDIA RAID Introduction Installing the NVIDIA RAID Software Under Windows (for Non-bootable RAID Array) The existing Windows IDE Parallel ATA driver (as well as the ...
...Parallel ATA driver (as well as the NV Serial ATA driver if SATA is selected. 3. This section describes how to open the NVIDIA Windows nForce Drivers page. 2. Start the nForce Setup program to run the setup application and install the RAID software which will upgrade the... Windows IDE driver and install the RAID software. 1. Click Next and then follow the instructions. 4. nVIDIA RAID Introduction Installing the NVIDIA RAID Software Under Windows (for Non-bootable RAID Array) The existing Windows IDE Parallel ATA driver (as well as the ...

User Guide
Page 100
..."Settings" --> "Control Panel" --> "Switch to Convert window appears. 5-10 Click Next. The Select Disks to Classic View" then open the "Administrative Tools" folder and double click on how many arrays you have configured. 4. MS-7125 ATX Mainboard Initializing and Using the Disk Array The RAID array ...is now ready to Initialize window appears. The Initialize and Convert Disk Wizards appears. 3. Click Next. The disks listed depend...
..."Settings" --> "Control Panel" --> "Switch to Convert window appears. 5-10 Click Next. The Select Disks to Classic View" then open the "Administrative Tools" folder and double click on how many arrays you have configured. 4. MS-7125 ATX Mainboard Initializing and Using the Disk Array The RAID array ...is now ready to Initialize window appears. The Initialize and Convert Disk Wizards appears. 3. Click Next. The disks listed depend...

User Guide
Page 101
... disk in order to make the array a dynamic disk, then click Next. Format the unallocated disk space. The "Computer Management" window appears. The Completing the Initialize and Convert Disk Wizard window appears. 6. and follow the wizard. You must format the unallocated disk space in the list if you want to use . 5-11...
... disk in order to make the array a dynamic disk, then click Next. Format the unallocated disk space. The "Computer Management" window appears. The Completing the Initialize and Convert Disk Wizard window appears. 6. and follow the wizard. You must format the unallocated disk space in the list if you want to use . 5-11...

User Guide
Page 102
... 5-12 The RAID configuration information appears in the right-side pane, as Slave. MSI Reminds You... The information in the figures in this part may very from Windows, launch the NVRAID Management utility by clicking Start-->Programs-->NVIDIA Corporation-->RAID Manager-->RAID ...Manager (the default location of NvRaidMan.exe is in \\nVidia\System\CK804\IDE\WinXP\raidtool or \\nVidia\System\CK804\ide\win2k\raidtool of the setup CD accompanied with your system. MS-7125 ATX...
... 5-12 The RAID configuration information appears in the right-side pane, as Slave. MSI Reminds You... The information in the figures in this part may very from Windows, launch the NVRAID Management utility by clicking Start-->Programs-->NVIDIA Corporation-->RAID Manager-->RAID ...Manager (the default location of NvRaidMan.exe is in \\nVidia\System\CK804\IDE\WinXP\raidtool or \\nVidia\System\CK804\ide\win2k\raidtool of the setup CD accompanied with your system. MS-7125 ATX...

User Guide
Page 104
Boot into Windows and run the NVRAIDMAN program. Assigning a Free Disk To mark a disk as free, or not a part of the NVRAIDMAN display if you have a system with ... as free is RAID enabled. 2. Enter the RAID BIOS and make sure that the drive that is automatic and doesn't require any array, 1. MS-7125 ATX Mainboard Setting Up a Spare RAID Disk You can designate a hard drive to and not by any other array, unlike a free disk which can be used...
Boot into Windows and run the NVRAIDMAN program. Assigning a Free Disk To mark a disk as free, or not a part of the NVRAIDMAN display if you have a system with ... as free is RAID enabled. 2. Enter the RAID BIOS and make sure that the drive that is automatic and doesn't require any array, 1. MS-7125 ATX Mainboard Setting Up a Spare RAID Disk You can designate a hard drive to and not by any other array, unlike a free disk which can be used...

User Guide
Page 105
... Spare from the menu to an array. 1. Method 1: Select a free disk and then assign it to launch the Spare Disk Allocation Wizard. 5-15 Boot into Windows and run the NVRAIDMAN program. Both methods are equally simple ways of accomplishing the same task.
... Spare from the menu to an array. 1. Method 1: Select a free disk and then assign it to launch the Spare Disk Allocation Wizard. 5-15 Boot into Windows and run the NVRAIDMAN program. Both methods are equally simple ways of accomplishing the same task.

User Guide
Page 110
Rebuilding Instructions After creating a mirrored array, you can rebuild the array using the following steps: 1. This only applies to Windows and run the NVRAID Management utility. The figure below shows an example of recovering data from one mirrored array. 2. From the popup menu..., click Rebuild Array. Go to RAID 1 array as well as a RAID 0+1 array. MS-7125 ATX Mainboard Rebuilding a RAID Mirrored Array Rebuilding is synchronized between the two hard drives. The NVIDIA Rebuild Array Wizard appears. 5-20 All data is copied from...
Rebuilding Instructions After creating a mirrored array, you can rebuild the array using the following steps: 1. This only applies to Windows and run the NVRAID Management utility. The figure below shows an example of recovering data from one mirrored array. 2. From the popup menu..., click Rebuild Array. Go to RAID 1 array as well as a RAID 0+1 array. MS-7125 ATX Mainboard Rebuilding a RAID Mirrored Array Rebuilding is synchronized between the two hard drives. The NVIDIA Rebuild Array Wizard appears. 5-20 All data is copied from...


