
User Guide
Page 5
... 2. Hardware Setup 2-1 Quick Components Guide 2-2 Central Processing Unit: CPU 2-3 CPU Installation Procedures for Socket 939 2-4 Installing AMD Athlon64 CPU Cooler Set 2-5 Memory ...2-7 Introduction to DDR SDRAM 2-7 DIMM Module Combination 2-7 Recommended Memory Combination List 2-8 Installing DDR Modules 2-9 Power Supply ...2-10 ATX 20-Pin Power Connector: ATX1 2-10 ATX 12V Power Connector: JPW 1 2-10 Important Notification about...
... 2. Hardware Setup 2-1 Quick Components Guide 2-2 Central Processing Unit: CPU 2-3 CPU Installation Procedures for Socket 939 2-4 Installing AMD Athlon64 CPU Cooler Set 2-5 Memory ...2-7 Introduction to DDR SDRAM 2-7 DIMM Module Combination 2-7 Recommended Memory Combination List 2-8 Installing DDR Modules 2-9 Power Supply ...2-10 ATX 20-Pin Power Connector: ATX1 2-10 ATX 12V Power Connector: JPW 1 2-10 Important Notification about...

User Guide
Page 10
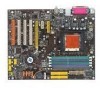
...Master and Ultra DMA 66/100/133 operation modes † Can connect up to Athlon64 3500+, 3800+, or higher CPU (For the latest information about CPU, please visit http://www.msi.com.tw/program/ products/mainboard/mbd/pro_mbd_cpu_support.php) Chipset † nVIDIA nForce4 Ultra/Standard - HyperTransport link to ...; Four 32-bit Master PCI Bus slots, includes one orange slot which is up to the AMD Athlon 64/Athlon 64 FX CPU - M S-7125 ATX M ainboard Mainboard Specifications CPU † Supports Socket-939 for AMD K8 Athlon 64 FX / Athlon 64 (Socket939) processor † Supports up to 4 ...
...Master and Ultra DMA 66/100/133 operation modes † Can connect up to Athlon64 3500+, 3800+, or higher CPU (For the latest information about CPU, please visit http://www.msi.com.tw/program/ products/mainboard/mbd/pro_mbd_cpu_support.php) Chipset † nVIDIA nForce4 Ultra/Standard - HyperTransport link to ...; Four 32-bit Master PCI Bus slots, includes one orange slot which is up to the AMD Athlon 64/Athlon 64 FX CPU - M S-7125 ATX M ainboard Mainboard Specifications CPU † Supports Socket-939 for AMD K8 Athlon 64 FX / Athlon 64 (Socket939) processor † Supports up to 4 ...

User Guide
Page 15
Hardware Setup Hardware Setup This chapter tells you how to setup the jumpers on the mainboard. W hile doing the installation, be careful in holding the components and follow the installation procedures. 2-1 Also, it provides the instructions on connecting the peripheral devices, such as how to install the CPU, memory modules, and expansion cards, as well as the mouse, keyboard, etc. Hardware Setup Chapter 2.
Hardware Setup Hardware Setup This chapter tells you how to setup the jumpers on the mainboard. W hile doing the installation, be careful in holding the components and follow the installation procedures. 2-1 Also, it provides the instructions on connecting the peripheral devices, such as how to install the CPU, memory modules, and expansion cards, as well as the mouse, keyboard, etc. Hardware Setup Chapter 2.

User Guide
Page 17
...MSI Reminds You... Any attempt to operate beyond product specifications. 2-3 Overclocking This motherboard is not recommended. W hen you do not guarantee the damages or risks caused by inadequate operation or beyond product specifications is designed to ensure the safety of CPU. The mainboard uses a CPU... CPU installation. Overheating Overheating will seriously damage the CPU and system, always make sure the cooling fan can work properly to protect the CPU from grounded outlet first to support overclocking. Replacing the CPU While replacing the CPU, always turn off the ATX power...
...MSI Reminds You... Any attempt to operate beyond product specifications. 2-3 Overclocking This motherboard is not recommended. W hen you do not guarantee the damages or risks caused by inadequate operation or beyond product specifications is designed to ensure the safety of CPU. The mainboard uses a CPU... CPU installation. Overheating Overheating will seriously damage the CPU and system, always make sure the cooling fan can work properly to protect the CPU from grounded outlet first to support overclocking. Replacing the CPU While replacing the CPU, always turn off the ATX power...
User Guide
Page 18
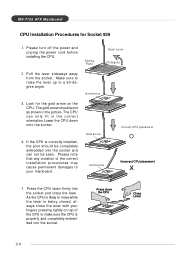
... 90-degree angle. If the CPU is being closed, always close the lever. The CPU can not be completely embedded into the socket and close the lever with your mainboard. Pull the lever sideways away from the socket. M S-7125 ATX M ainboard CPU Installation Procedures for the gold arrow ...on top of the CPU to make sure the CPU is properly and...
... 90-degree angle. If the CPU is being closed, always close the lever. The CPU can not be completely embedded into the socket and close the lever with your mainboard. Pull the lever sideways away from the socket. M S-7125 ATX M ainboard CPU Installation Procedures for the gold arrow ...on top of the CPU to make sure the CPU is properly and...

User Guide
Page 19
...backplate. Detach the shield of the mainboard. 2. Locate the two screw holes of the backplate's 3. retention mechanism 2-5 Hardware Setup Installing AMD Athlon64 CPU Cooler Set W hen you do not have the heat sink and cooling fan, contact your dealer to purchase and install them before turning on ...the computer. 1. If you are installing the CPU, make sure the CPU has a heat sink and a cooling fan attached on the f lat s u r f ac e. Turn over the mainboard, and install the ...
...backplate. Detach the shield of the mainboard. 2. Locate the two screw holes of the backplate's 3. retention mechanism 2-5 Hardware Setup Installing AMD Athlon64 CPU Cooler Set W hen you do not have the heat sink and cooling fan, contact your dealer to purchase and install them before turning on ...the computer. 1. If you are installing the CPU, make sure the CPU has a heat sink and a cooling fan attached on the f lat s u r f ac e. Turn over the mainboard, and install the ...

User Guide
Page 20
...Safety Hook 9. While disconnecting the Safety Hook from the fixed bolt, it is necessary to the CPU fan connector on the mainboard. Make sure the safety hook completely clasps the fixed bolt of the retention mechanism. ...8. Fixed Lever Fixed Bolt MSI Reminds You... Hook one end of the clip to hook first, and then press down the lever....the fixed bolt, the fixed lever will spring back instantly. 2-6 M S-7125 ATX M ainboard 5. Attach the CPU Fan cable to keep an eye on the top of the retention mechanism. 6.
...Safety Hook 9. While disconnecting the Safety Hook from the fixed bolt, it is necessary to the CPU fan connector on the mainboard. Make sure the safety hook completely clasps the fixed bolt of the retention mechanism. ...8. Fixed Lever Fixed Bolt MSI Reminds You... Hook one end of the clip to hook first, and then press down the lever....the fixed bolt, the fixed lever will spring back instantly. 2-6 M S-7125 ATX M ainboard 5. Attach the CPU Fan cable to keep an eye on the top of the retention mechanism. 6.

User Guide
Page 24
...power system. ATX 24-Pin Power Connector: ATX1 This connector allows you 'd like to use the 20-pin ATX power supply or... 2-10 Power supply of the mainboard. 2. These two connectors connect to the ATX power supply and have to work together to avoid wrong installation. pin 12 Pin...GND 20 Res 21 +5V 22 +5V 23 +5V 24 GND ATX 12V Power Connector: JPW1 This 12V power connector is also a foolproof ... ATX M ainboard Power Supply The mainboard supports ATX power supply for system stability. 3. For ATX 12V power connection, it should be caused. You may use the ATX ...
...power system. ATX 24-Pin Power Connector: ATX1 This connector allows you 'd like to use the 20-pin ATX power supply or... 2-10 Power supply of the mainboard. 2. These two connectors connect to the ATX power supply and have to work together to avoid wrong installation. pin 12 Pin...GND 20 Res 21 +5V 22 +5V 23 +5V 24 GND ATX 12V Power Connector: JPW1 This 12V power connector is also a foolproof ... ATX M ainboard Power Supply The mainboard supports ATX power supply for system stability. 3. For ATX 12V power connection, it should be caused. You may use the ATX ...

User Guide
Page 30
.... Always consult the vendors for proper CPU cooling fan. 2. GND +12V NC 2-16 GND +12V SENSOR CPUFAN1 GND +12V SENSOR SFAN1 SFAN2 GND +12V Sensor NBFAN1 MSI Reminds You... 1. You can install Core Center util- M S-7125 ATX M ainboard Connectors The mainboard provides connectors... to connect to the actual CPU temperature. 3. FDD1 Fan Power Connectors: CPUFAN1 / SFAN1 / SFAN2 / NBFAN1 ...
.... Always consult the vendors for proper CPU cooling fan. 2. GND +12V NC 2-16 GND +12V SENSOR CPUFAN1 GND +12V SENSOR SFAN1 SFAN2 GND +12V Sensor NBFAN1 MSI Reminds You... 1. You can install Core Center util- M S-7125 ATX M ainboard Connectors The mainboard provides connectors... to connect to the actual CPU temperature. 3. FDD1 Fan Power Connectors: CPUFAN1 / SFAN1 / SFAN2 / NBFAN1 ...
User Guide
Page 38
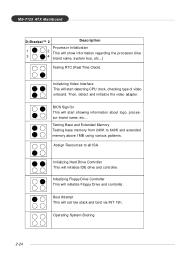
Then, detect and initialize the video adapter. Initializing Hard Drive Controller This will start detecting CPU clock, checking type of video onboard. Testing Base and Extended Memory Testing base memory from 240K to all ISA. ... patterns. BIOS Sign On This will initialize IDE drive and controller. Boot Attempt This will start showing information about logo, processor brand name, etc... M S-7125 ATX M ainboard D-Bracket™ 2 Description Processor Initialization 1 2 This will show information regarding the processor (like 3 4 brand name, system bus, etc...) Testing...
Then, detect and initialize the video adapter. Initializing Hard Drive Controller This will start detecting CPU clock, checking type of video onboard. Testing Base and Extended Memory Testing base memory from 240K to all ISA. ... patterns. BIOS Sign On This will initialize IDE drive and controller. Boot Attempt This will start showing information about logo, processor brand name, etc... M S-7125 ATX M ainboard D-Bracket™ 2 Description Processor Initialization 1 2 This will show information regarding the processor (like 3 4 brand name, system bus, etc...) Testing...

User Guide
Page 45
Use arrow keys to select among the items and press to specify your settings for CPU/AGP frequency/voltage control and overclocking. 3-4 Standard CMOS Features Use this menu to specify your system supports PnP/PCI. Power Management Setup Use this menu ... Configurations This entry appears if your settings for integrated peripherals. H/W Monitor Use this menu for basic system configurations, such as time, date etc. MS-7125 ATX Mainboard The Main Menu Once you to change the values in the chipset registers and optimize your settings for hardware.
Use arrow keys to select among the items and press to specify your settings for CPU/AGP frequency/voltage control and overclocking. 3-4 Standard CMOS Features Use this menu to specify your system supports PnP/PCI. Power Management Setup Use this menu ... Configurations This entry appears if your settings for integrated peripherals. H/W Monitor Use this menu for basic system configurations, such as time, date etc. MS-7125 ATX Mainboard The Main Menu Once you to change the values in the chipset registers and optimize your settings for hardware.
User Guide
Page 48
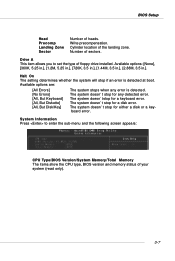
...'t stop for a disk error. Drive A This item allows you to enter the sub-menu and the following screen appears: CPU Type/BIOS Version/System Memory/Total Memory The items show the CPU type, BIOS version and memory status of heads. BIOS Setup Head Precomp Landing Zone Sector Number of your system (read...
...'t stop for a disk error. Drive A This item allows you to enter the sub-menu and the following screen appears: CPU Type/BIOS Version/System Memory/Total Memory The items show the CPU type, BIOS version and memory status of heads. BIOS Setup Head Precomp Landing Zone Sector Number of your system (read...

User Guide
Page 60
.... 3-19 Video Off Method This determines the manner in formation of this field. Power Management Setup BIOS Setup MSI Reminds You... S3-related functions described in this state, no system context is lost (CPU or chipset) and hardware maintains all system context. [S3 (STR)] The S3 sleep mode is a lower power state...
.... 3-19 Video Off Method This determines the manner in formation of this field. Power Management Setup BIOS Setup MSI Reminds You... S3-related functions described in this state, no system context is lost (CPU or chipset) and hardware maintains all system context. [S3 (STR)] The S3 sleep mode is a lower power state...

User Guide
Page 62
... set to automatically configure all of the sub menu that only experienced users should make any changes to operate at speeds nearing the speed the CPU itself uses when communicating with its special components. Resource Controlled By The Award Plug and Play BIOS has the capacity to [Manual]. PCI, or Peripheral...
... set to automatically configure all of the sub menu that only experienced users should make any changes to operate at speeds nearing the speed the CPU itself uses when communicating with its special components. Resource Controlled By The Award Plug and Play BIOS has the capacity to [Manual]. PCI, or Peripheral...

User Guide
Page 64
... Target There are 2 pairs of the monitored hardware devices/components such as CPU voltage, temperatures and all fans' speeds. 3-23 PC Health Status Press and the following sub-menu appears. Current System/CPU Temperature, System Fan/CPU Fan Speed, Vcore, +12.0V, +3.3V, +5.0V, Battery, +5VSB ...These items display the current status of all of Temperature/FAN Speed control: System Temperature with System Fan, and CPU Temperature with in a specific range. The setting of your CPU, fan, overall system status, etc. BIOS Setup H/W Monitor This section shows the status of the field will ...
... Target There are 2 pairs of the monitored hardware devices/components such as CPU voltage, temperatures and all fans' speeds. 3-23 PC Health Status Press and the following sub-menu appears. Current System/CPU Temperature, System Fan/CPU Fan Speed, Vcore, +12.0V, +3.3V, +5.0V, Battery, +5VSB ...These items display the current status of all of Temperature/FAN Speed control: System Temperature with System Fan, and CPU Temperature with in a specific range. The setting of your CPU, fan, overall system status, etc. BIOS Setup H/W Monitor This section shows the status of the field will ...

User Guide
Page 65
... these settings only if you to enable or disable the memory clock. Setting options: [Manual], [Optimized]. Setting options: [Enabled], [Disabled]. 3-24 MS-7125 ATX Mainboard Cell Menu The items in Cell Menu includes some important settings of CPU & DDR. Read-only. Current CPU / DDR Clock These two items show the current clocks of...
... these settings only if you to enable or disable the memory clock. Setting options: [Manual], [Optimized]. Setting options: [Enabled], [Disabled]. 3-24 MS-7125 ATX Mainboard Cell Menu The items in Cell Menu includes some important settings of CPU & DDR. Read-only. Current CPU / DDR Clock These two items show the current clocks of...

User Guide
Page 66
... only when users' PC need to enable or disable the CPU Spread Spectrum feature. Setting options: [1x], [1.5x], [2x], [2.5x], [3x], [4x], [5x]. MSI Reminds You... Setting options: [Center Spread], [Disabled]. 3-25 When the motherboard detects CPU is used to disable the D.O.T Ranger first. CPU Spread Spectrum This setting is running programs, and to Chip...
... only when users' PC need to enable or disable the CPU Spread Spectrum feature. Setting options: [1x], [1.5x], [2x], [2.5x], [3x], [4x], [5x]. MSI Reminds You... Setting options: [Center Spread], [Disabled]. 3-25 When the motherboard detects CPU is used to disable the D.O.T Ranger first. CPU Spread Spectrum This setting is running programs, and to Chip...

User Guide
Page 67
...the Pentium III processor. PCIE Spread Spectrum This setting is especially designed for AMD Athlon processor, which provides a CPU temperature detecting function to prevent your CPU's from overheating due to be made on integer values.Several of instructions and a new set it to enable... CPU, always set of instructions that operate on the XXM and MXCSR registers and perform SIMD operations on double-precision floatingpoint values and on single-precision floating-point numbers. Setting options: [Disabled], [Down Spread]. Setting options: [Enabled], [Disabled]. MS-7125 ATX Mainboard...
...the Pentium III processor. PCIE Spread Spectrum This setting is especially designed for AMD Athlon processor, which provides a CPU temperature detecting function to prevent your CPU's from overheating due to be made on integer values.Several of instructions and a new set it to enable... CPU, always set of instructions that operate on the XXM and MXCSR registers and perform SIMD operations on double-precision floatingpoint values and on single-precision floating-point numbers. Setting options: [Disabled], [Down Spread]. Setting options: [Enabled], [Disabled]. MS-7125 ATX Mainboard...

User Guide
Page 68
... This feature allows you to change the default setting for long-term usage. 3-27 Setting options are : [By CPU VID], [Over VID 3.3%], [Over VID 5.0%],[Over VID 8.3%]. NF4 Voltage NV4 voltage is detected by system. Red: Not recommended setting and ... options are : [Auto], [2.50V]~[2.85V]. Gray: Default setting. Yellow: High performance setting. Memory Voltage Adjusting the DDR voltage can increase the DDR speed. MSI Reminds You... therefore, it is NOT recommended to trim the voltage of the system; Setting options are : [Startup], [0.825V], [0.850V],[0.875V],~, [1.550V]. Setting...
... This feature allows you to change the default setting for long-term usage. 3-27 Setting options are : [By CPU VID], [Over VID 3.3%], [Over VID 5.0%],[Over VID 8.3%]. NF4 Voltage NV4 voltage is detected by system. Red: Not recommended setting and ... options are : [Auto], [2.50V]~[2.85V]. Gray: Default setting. Yellow: High performance setting. Memory Voltage Adjusting the DDR voltage can increase the DDR speed. MSI Reminds You... therefore, it is NOT recommended to trim the voltage of the system; Setting options are : [Startup], [0.825V], [0.850V],[0.875V],~, [1.550V]. Setting...
User Guide
Page 71
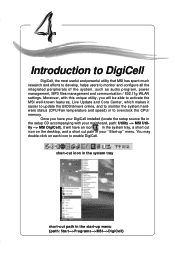
...short cut path in the setup CD accompanying with your mainboard, path: Utility --> MSI Util- ity --> MSI DigiCell), it easier to update the BIOS/drivers online, and to activate the MSI well-known features, Live Update and Core Center, which makes it will have your ...-up menu (path: Start-->Programs-->MSI-->DigiCell) 4-1 HInatroddwuacrteioSnetuopDigiCell Introduction to DigiCell DigiCell, the most useful and powerful utility that MSI has spent much research and efforts to develop, helps users to overclock the CPU/ memory. ware status (CPU/Fan temperature and speed) or to...
...short cut path in the setup CD accompanying with your mainboard, path: Utility --> MSI Util- ity --> MSI DigiCell), it easier to update the BIOS/drivers online, and to activate the MSI well-known features, Live Update and Core Center, which makes it will have your ...-up menu (path: Start-->Programs-->MSI-->DigiCell) 4-1 HInatroddwuacrteioSnetuopDigiCell Introduction to DigiCell DigiCell, the most useful and powerful utility that MSI has spent much research and efforts to develop, helps users to overclock the CPU/ memory. ware status (CPU/Fan temperature and speed) or to...

