User Guide
Page 2
... obtained from the user's manual, please contact your place of MICRO-STAR INTERNATIONAL. Trademarks All trademarks are under continual improvement and we reserve the right to the correctness of LucidLogix Technologies, Ltd. Revision History Revision V1.1 Revision History Update cover page for FAQ, technical guide, BIOS updates, driver updates, and other information: http://www.msi.com/index.php?func=service ◙ Contact...
... obtained from the user's manual, please contact your place of MICRO-STAR INTERNATIONAL. Trademarks All trademarks are under continual improvement and we reserve the right to the correctness of LucidLogix Technologies, Ltd. Revision History Revision V1.1 Revision History Update cover page for FAQ, technical guide, BIOS updates, driver updates, and other information: http://www.msi.com/index.php?func=service ◙ Contact...
User Guide
Page 8
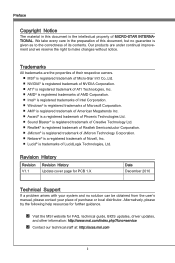
...ii Technical Support ii Safety Instructions iii FCC-B Radio Frequency Interference Statement iv WEEE (Waste Electrical and Electronic Equipment) Statement v Chapter 1 Getting Started 1-1 Mainboard Specifications 1-2 Mainboard Layout 1-4 Packing Checklist 1-5 Chapter 2 Hardware Setup 2-1 Quick Components Guide 2-2 Screw Holes 2-3 CPU (Central Processing Unit 2-4 Memory 2-8 Power Supply 2-10 Back Panel 2-11 Connectors 2-13 Jumpers 2-19 Slots 2-20 Chapter 3 BIOS Setup 3-1 Entering Setup 3-2 The Main Menu 3-4 Green Power 3-5 Utility 3-6 OC 3-7 Game 3-13 Settings 3-14 viii
...ii Technical Support ii Safety Instructions iii FCC-B Radio Frequency Interference Statement iv WEEE (Waste Electrical and Electronic Equipment) Statement v Chapter 1 Getting Started 1-1 Mainboard Specifications 1-2 Mainboard Layout 1-4 Packing Checklist 1-5 Chapter 2 Hardware Setup 2-1 Quick Components Guide 2-2 Screw Holes 2-3 CPU (Central Processing Unit 2-4 Memory 2-8 Power Supply 2-10 Back Panel 2-11 Connectors 2-13 Jumpers 2-19 Slots 2-20 Chapter 3 BIOS Setup 3-1 Entering Setup 3-2 The Main Menu 3-4 Green Power 3-5 Utility 3-6 OC 3-7 Game 3-13 Settings 3-14 viii
User Guide
Page 12
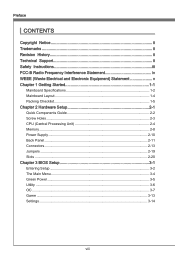
...® H67 chipset Memory Support ■ 2 DDR3 DIMMs support DDR3 1333/ 1066 DRAM (8GB Max) ■ Supports Dual-Channel mode (For more information on compatible components, please visit http://www.msi.com/index.php?func=testreport) LAN ■ Supports LAN 10/100/1000 by Realtek® RTL8111E Audio ■ Chip integrated by Realtek® ALC892 ■ Flexible 8-channel audio with jack sensing ■ Compliant with Azalia 1.0 Spec SATA ■ 2 SATA 6Gb/s ports (SATA1...
...® H67 chipset Memory Support ■ 2 DDR3 DIMMs support DDR3 1333/ 1066 DRAM (8GB Max) ■ Supports Dual-Channel mode (For more information on compatible components, please visit http://www.msi.com/index.php?func=testreport) LAN ■ Supports LAN 10/100/1000 by Realtek® RTL8111E Audio ■ Chip integrated by Realtek® ALC892 ■ Flexible 8-channel audio with jack sensing ■ Compliant with Azalia 1.0 Spec SATA ■ 2 SATA 6Gb/s ports (SATA1...
User Guide
Page 20
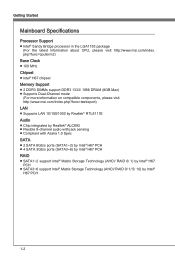
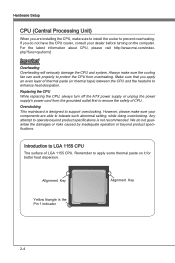
... the computer. Hardware Setup CPU (Central Processing Unit) When you are able to tolerate such abnormal setting, while doing overclocking. Make sure that you do not guarantee the damages or risks caused by inadequate operation or beyond product specifications is not recommended. Replacing the CPU While replacing the CPU, always turn off the ATX power supply or unplug the power supply's power cord from overheating. However...
... the computer. Hardware Setup CPU (Central Processing Unit) When you are able to tolerate such abnormal setting, while doing overclocking. Make sure that you do not guarantee the damages or risks caused by inadequate operation or beyond product specifications is not recommended. Replacing the CPU While replacing the CPU, always turn off the ATX power supply or unplug the power supply's power cord from overheating. However...
User Guide
Page 27
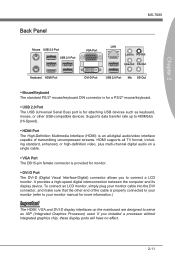
... plug your monitor manual for more information.) Important The HDMI, VGA and DVI-D display interfaces on a single cable. ▶ VGA Port The DB15-pin female connector is provided for attaching USB devices such as keyboard, mouse, or other end of transmitting uncompressed streams. HDMI supports all -digital audio/video interface capable of the cable is an all TV format, including standard, enhanced, or high-definition video, plus multi-channel digital audio on the mainboard...
... plug your monitor manual for more information.) Important The HDMI, VGA and DVI-D display interfaces on a single cable. ▶ VGA Port The DB15-pin female connector is provided for attaching USB devices such as keyboard, mouse, or other end of transmitting uncompressed streams. HDMI supports all -digital audio/video interface capable of the cable is an all TV format, including standard, enhanced, or high-definition video, plus multi-channel digital audio on the mainboard...
User Guide
Page 30
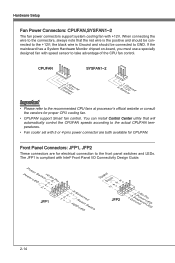
... Hardware Monitor chipset on-board, you must use a specially designed fan with Intel® Front Panel I/O Connectivity Design Guide. CPUFAN SYSFAN1~2 4.3C.oS2n.e+1tnr.1osG2lorVround 3.S2.e+1n1.sG2orVround Important • Please refer to the recommended CPU fans at processor's official website or consult the vendors for proper CPU cooling fan. • CPUFAN support Smart fan control. When connecting the wire to the connectors, always note that will automatically control the CPUFAN speeds...
... Hardware Monitor chipset on-board, you must use a specially designed fan with Intel® Front Panel I/O Connectivity Design Guide. CPUFAN SYSFAN1~2 4.3C.oS2n.e+1tnr.1osG2lorVround 3.S2.e+1n1.sG2orVround Important • Please refer to the recommended CPU fans at processor's official website or consult the vendors for proper CPU cooling fan. • CPUFAN support Smart fan control. When connecting the wire to the connectors, always note that will automatically control the CPUFAN speeds...

User Guide
Page 35
it is on; Avoid clearing the CMOS while the system is turned on board with an external battery power supply to preserve the system configuration data. With the CMOS RAM, the system can clear CMOS by shorting 2-3 pin while the system is a CMOS RAM on . Then return to clear data. 1 JBAT1 1 Keep Data 1 Clear Data Important You can automatically boot OS every time it will damage the mainboard. 2-19 If you want to clear the system configuration, set the jumper to 12 pin position. Chapter 2 MS-7680 Jumpers Clear CMOS Jumper: JBAT1 There is off.
it is on; Avoid clearing the CMOS while the system is turned on board with an external battery power supply to preserve the system configuration data. With the CMOS RAM, the system can clear CMOS by shorting 2-3 pin while the system is a CMOS RAM on . Then return to clear data. 1 JBAT1 1 Keep Data 1 Clear Data Important You can automatically boot OS every time it will damage the mainboard. 2-19 If you want to clear the system configuration, set the jumper to 12 pin position. Chapter 2 MS-7680 Jumpers Clear CMOS Jumper: JBAT1 There is off.
User Guide
Page 36
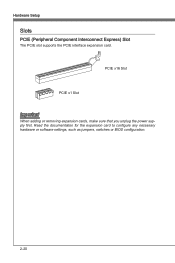
PCIE x16 Slot PCIE x1 Slot Important When adding or removing expansion cards, make sure that you unplug the power supply first. Read the documentation for the expansion card to configure any necessary hardware or software settings, such as jumpers, switches or BIOS configuration. 2-20 Hardware Setup Slots PCIE (Peripheral Component Interconnect Express) Slot The PCIE slot supports the PCIE interface expansion card.
PCIE x16 Slot PCIE x1 Slot Important When adding or removing expansion cards, make sure that you unplug the power supply first. Read the documentation for the expansion card to configure any necessary hardware or software settings, such as jumpers, switches or BIOS configuration. 2-20 Hardware Setup Slots PCIE (Peripheral Component Interconnect Express) Slot The PCIE slot supports the PCIE interface expansion card.
User Guide
Page 42
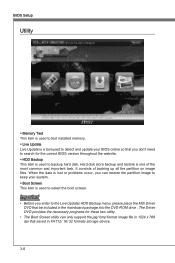
... problems occur, you can only support the jpg/ bmp format image file in 1024 x 768 dpi that saved in the mainboard package into the DVD-ROM drive . The Driver DVD provides the necessary programs for the correct BIOS version throughout the website. ▶ HDD Backup This item is used to backup hard disk. BIOS Setup Utility ▶ Memory Test This item is used to test installed memory. ▶ Live Update Live Update is a tool used...
... problems occur, you can only support the jpg/ bmp format image file in 1024 x 768 dpi that saved in the mainboard package into the DVD-ROM drive . The Driver DVD provides the necessary programs for the correct BIOS version throughout the website. ▶ HDD Backup This item is used to backup hard disk. BIOS Setup Utility ▶ Memory Test This item is used to test installed memory. ▶ Live Update Live Update is a tool used...

User Guide
Page 46
... voltage of CPU, Memory, GPU and chipset. ▶ Current CPU Vcore/ Current DRAM Voltage/ Current GPU Voltage These items show current CPU Vcore/ DRAM/ GPU voltage. In the sub-menu, these items are used to save the current settings, and you to enable/ disable the overclocking of integrated graphics. ▶ GT Ratio This setting controls the ratio of installed CPU. ▶ CPU Technology Support Press to enter the sub-menu. The submenu shows the information of integrated graphics frequency...
... voltage of CPU, Memory, GPU and chipset. ▶ Current CPU Vcore/ Current DRAM Voltage/ Current GPU Voltage These items show current CPU Vcore/ DRAM/ GPU voltage. In the sub-menu, these items are used to save the current settings, and you to enable/ disable the overclocking of integrated graphics. ▶ GT Ratio This setting controls the ratio of installed CPU. ▶ CPU Technology Support Press to enter the sub-menu. The submenu shows the information of integrated graphics frequency...
User Guide
Page 51
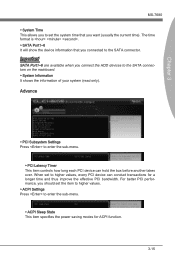
...; ACPI Settings Press to enter the sub-menu. ▶ PCI Latency Timer This item controls how long each PCI device can conduct transactions for ACPI function. 3-15 Advance ▶ PCI Subsystem Settings Press to enter the sub-menu. ▶ ACPI Sleep State This item specifies the power saving modes for a longer time and thus improve the effective PCI bandwidth. When set the system time that you connected to higher values, every PCI device...
...; ACPI Settings Press to enter the sub-menu. ▶ PCI Latency Timer This item controls how long each PCI device can conduct transactions for ACPI function. 3-15 Advance ▶ PCI Subsystem Settings Press to enter the sub-menu. ▶ ACPI Sleep State This item specifies the power saving modes for a longer time and thus improve the effective PCI bandwidth. When set the system time that you connected to higher values, every PCI device...
User Guide
Page 52
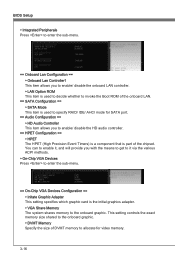
... specify RAID/ IDE/ AHCI mode for video memory. 3-16 This setting controls the exact memory size shared to the onboard graphic. ▶ DVMT Memory Specify the size of the chipset. BIOS Setup ▶ Integrated Peripherals Press to enter the sub-menu. == Onboard Lan Configuration == ▶ Onboard Lan Controller1 This item allows you to enable/ disable the onboard LAN controller. ▶ LAN Option ROM This item is used to decide whether to invoke the Boot ROM of the onboard LAN. == SATA Configuration == ▶ SATA Mode This item is part of DVMT memory to the onboard graphic.
... specify RAID/ IDE/ AHCI mode for video memory. 3-16 This setting controls the exact memory size shared to the onboard graphic. ▶ DVMT Memory Specify the size of the chipset. BIOS Setup ▶ Integrated Peripherals Press to enter the sub-menu. == Onboard Lan Configuration == ▶ Onboard Lan Controller1 This item allows you to enable/ disable the onboard LAN controller. ▶ LAN Option ROM This item is used to decide whether to invoke the Boot ROM of the onboard LAN. == SATA Configuration == ▶ SATA Mode This item is part of DVMT memory to the onboard graphic.
User Guide
Page 55
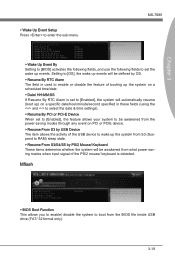
... power saving modes through any event on PCI or PCIE device. ▶ Resume From S3 by OS. ▶ Resume By RTC Alarm The field is used to enable or disable the feature of booting up events. Setting to [OS], the wake up events will be awakened from the BIOS file inside USB drive (FAT/ 32 format only). 3-19 Mflash ▶ BIOS Boot Function This allows you to enable/ disable...
... power saving modes through any event on PCI or PCIE device. ▶ Resume From S3 by OS. ▶ Resume By RTC Alarm The field is used to enable or disable the feature of booting up events. Setting to [OS], the wake up events will be awakened from the BIOS file inside USB drive (FAT/ 32 format only). 3-19 Mflash ▶ BIOS Boot Function This allows you to enable/ disable...
User Guide
Page 56
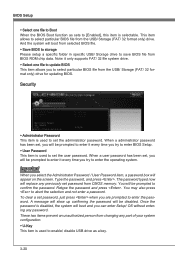
... storage Please setup a specific folder in specific USB/ Storage drive to set the administrator password. The password typed now will boot from BIOS ROM chip data. And the system will replace any part of your system configuration. ▶ U-Key This item is used to enter the operating system. To clear a set , you will be prompted to enter it every time you are prompted to select particular BIOS file from the USB/ Storage (FAT/ 32 format only) drive for updating BIOS. When a user password...
... storage Please setup a specific folder in specific USB/ Storage drive to set the administrator password. The password typed now will boot from BIOS ROM chip data. And the system will replace any part of your system configuration. ▶ U-Key This item is used to enter the operating system. To clear a set , you will be prompted to enter it every time you are prompted to select particular BIOS file from the USB/ Storage (FAT/ 32 format only) drive for updating BIOS. When a user password...
User Guide
Page 57
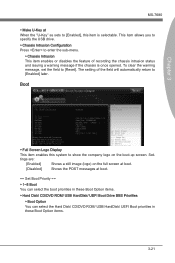
... ▶ Boot Option You can select the Hard Disk/ CD/DVD ROM/ USB HardDisk/ UEFI Boot priorities in these Boot Option items. 3-21 To clear the warning message, set the field to [Enabled] later. Boot Chapter 3 ▶ Full Screen Logo Display This item enables this item is once opened. This item allows you to specify the USB drive. ▶ Chassis Intrusion Configuration Press to enter the sub-menu. ▶ Chassis Intrusion This item enables or disables the...
... ▶ Boot Option You can select the Hard Disk/ CD/DVD ROM/ USB HardDisk/ UEFI Boot priorities in these Boot Option items. 3-21 To clear the warning message, set the field to [Enabled] later. Boot Chapter 3 ▶ Full Screen Logo Display This item enables this item is once opened. This item allows you to specify the USB drive. ▶ Chassis Intrusion Configuration Press to enter the sub-menu. ▶ Chassis Intrusion This item enables or disables the...

User Guide
Page 60
... the DVD-ROM drive. Click AUDIO button. Click here 4. Click Next to start installing the drivers. 5. cally appear. 2. Click Driver tab. 3. A-2 The following illustrations are based on -screen instructions to install drivers. 7. Realtek Audio Installing the Realtek HD Audio Driver You need to install the HD audio driver for reference only. channel or 7.1+2 channel audio operations. Select Realtek HD Audio Drivers to install the Realtek High Definition Audio Driver. 6. Click Finish to enhance audio applications. Important The HD Audio Configuration software utility is...
... the DVD-ROM drive. Click AUDIO button. Click here 4. Click Next to start installing the drivers. 5. cally appear. 2. Click Driver tab. 3. A-2 The following illustrations are based on -screen instructions to install drivers. 7. Realtek Audio Installing the Realtek HD Audio Driver You need to install the HD audio driver for reference only. channel or 7.1+2 channel audio operations. Select Realtek HD Audio Drivers to install the Realtek High Definition Audio Driver. 6. Click Finish to enhance audio applications. Important The HD Audio Configuration software utility is...
User Guide
Page 66
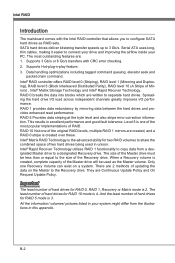
... size of the Master drive must be used in your PC. All the information/ volumes/ pictures listed in unison. Intel RAID Introduction The mainboard comes with CRC error checking. 2. SATA hard drives deliver blistering transfer speeds up to configure SATA hard drives as the Master volume. Supports 3 Gb/s or 6 Gb/s transfers with the Intel RAID controller that allows you to 3 Gb/s. Supports Hot-plug-n-play feature. 3. Spreading the hard drive I/O load across independent channels...
... size of the Master drive must be used in your PC. All the information/ volumes/ pictures listed in unison. Intel RAID Introduction The mainboard comes with CRC error checking. 2. SATA hard drives deliver blistering transfer speeds up to configure SATA hard drives as the Master volume. Supports 3 Gb/s or 6 Gb/s transfers with the Intel RAID controller that allows you to 3 Gb/s. Supports Hot-plug-n-play feature. 3. Spreading the hard drive I/O load across independent channels...
User Guide
Page 67
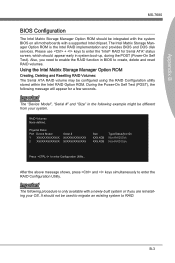
... Matrix Storage Manager Option ROM Creating, Deleting and Resetting RAID Volumes: The Serial ATA RAID volume may be used to migrate an existing system to enable the RAID function in system boot-up, during the POST (Power-On Self Test). After the above message shows, press and keys simultaneously to enter Configuration Utility.. Physical Disks: Port Device Model 1 XXXXXXXXXXXXX 2 XXXXXXXXXXXXX Serial # XXXXXXXXXXXXX XXXXXXXXXXXXX Size XXX.XGB XXX.XGB Type/Status(Vol ID) Non-RAID Disk Non-RAID Disk...
... Matrix Storage Manager Option ROM Creating, Deleting and Resetting RAID Volumes: The Serial ATA RAID volume may be used to migrate an existing system to enable the RAID function in system boot-up, during the POST (Power-On Self Test). After the above message shows, press and keys simultaneously to enter Configuration Utility.. Physical Disks: Port Device Model 1 XXXXXXXXXXXXX 2 XXXXXXXXXXXXX Serial # XXXXXXXXXXXXX XXXXXXXXXXXXX Size XXX.XGB XXX.XGB Type/Status(Vol ID) Non-RAID Disk Non-RAID Disk...
User Guide
Page 74
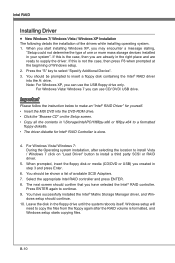
... the location to install Vista / Windows 7 click on "Load Driver" button to a formatted floppy diskette. • The driver diskette for yourself. • Insert the MSI DVD into the A: drive. Note: For Windows XP, you are ready to supply the driver. You should be shown a list of Windows setup. 2. The next screen should continue. 10. If this is formatted, and Windows setup starts copying files. If this is done. 4. Important Please follow the instruction...
... the location to install Vista / Windows 7 click on "Load Driver" button to a formatted floppy diskette. • The driver diskette for yourself. • Insert the MSI DVD into the A: drive. Note: For Windows XP, you are ready to supply the driver. You should be shown a list of Windows setup. 2. The next screen should continue. 10. If this is formatted, and Windows setup starts copying files. If this is done. 4. Important Please follow the instruction...
User Guide
Page 75
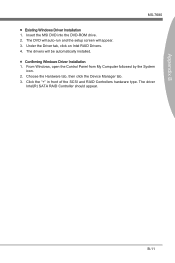
... SCSI and RAID Controllers hardware type. The drivers will appear. 3. From Windows, open the Control Panel from My Computer followed by the System icon. 2. B-11 The DVD will auto-run and the setup screen will be automatically installed. ■ Confirming Windows Driver Installation 1. Insert the MSI DVD into the DVD-ROM drive. 2. Under the Driver tab, click on Intel RAID Drivers. 4. Choose the Hardware tab, then click the Device Manager tab. 3. The driver Intel(R) SATA RAID Controller should...
... SCSI and RAID Controllers hardware type. The drivers will appear. 3. From Windows, open the Control Panel from My Computer followed by the System icon. 2. B-11 The DVD will auto-run and the setup screen will be automatically installed. ■ Confirming Windows Driver Installation 1. Insert the MSI DVD into the DVD-ROM drive. 2. Under the Driver tab, click on Intel RAID Drivers. 4. Choose the Hardware tab, then click the Device Manager tab. 3. The driver Intel(R) SATA RAID Controller should...


