
User Manual
Page 4
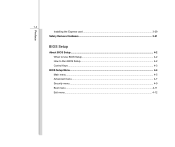
Preface 1-4 Installing the Express card ...3-29 Safely Remove Hardware ...3-31 BIOS Setup About BIOS Setup...4-2 When to Use BIOS Setup...4-2 How to Run BIOS Setup...4-2 Control Keys ...4-3 BIOS Setup Menu...4-4 Main menu...4-5 Advanced menu...4-7 Security menu...4-9 Boot menu ...4-11 Exit menu...4-12
Preface 1-4 Installing the Express card ...3-29 Safely Remove Hardware ...3-31 BIOS Setup About BIOS Setup...4-2 When to Use BIOS Setup...4-2 How to Run BIOS Setup...4-2 Control Keys ...4-3 BIOS Setup Menu...4-4 Main menu...4-5 Advanced menu...4-7 Security menu...4-9 Boot menu ...4-11 Exit menu...4-12
User Manual
Page 24
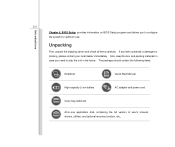
... optional recovery function, etc.. Also, keep the box and packing materials in case you to ship the unit in the future. Introductions 2-3 Chapter 4, BIOS Setup, provides information on BIOS Setup program and allows you need to configure the system for optimum use. If any item contained is damaged or missing, please contact...
... optional recovery function, etc.. Also, keep the box and packing materials in case you to ship the unit in the future. Introductions 2-3 Chapter 4, BIOS Setup, provides information on BIOS Setup program and allows you need to configure the system for optimum use. If any item contained is damaged or missing, please contact...
User Manual
Page 28
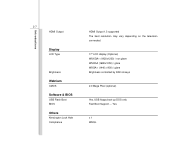
Yes x 1 WHQL Introductions 2-7 HDMI Output Display LCD Type Brightness WebCam CMOS Software & BIOS USB Flash Boot BIOS Others Kensington Lock Hole Compliance HDMI Output 1.3 supported The best resolution may vary depending on the television connected. 17" LCD display (Optional) WUXGA+ (1920x1200) / non glare WSXGA (1680x1050) / glare WXGA+ (1440 x 900) / glare Brightness controlled by K/B hot-keys 2.0 Mega Pixel (optional) Yes, USB floppy boot up DOS only Fast Boot Support ---
Yes x 1 WHQL Introductions 2-7 HDMI Output Display LCD Type Brightness WebCam CMOS Software & BIOS USB Flash Boot BIOS Others Kensington Lock Hole Compliance HDMI Output 1.3 supported The best resolution may vary depending on the television connected. 17" LCD display (Optional) WUXGA+ (1920x1200) / non glare WSXGA (1680x1050) / glare WXGA+ (1440 x 900) / glare Brightness controlled by K/B hot-keys 2.0 Mega Pixel (optional) Yes, USB floppy boot up DOS only Fast Boot Support ---
User Manual
Page 76
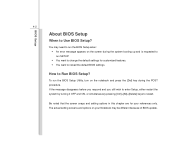
Be noted that the screen snaps and setting options in this chapter are for customized features. Š You want to Use BIOS Setup? To run SETUP. Š You want to change the default settings for your references only. How to restart. If the message disappears before ...it OFF and ON, or simultaneously pressing [Ctrl]+[Alt]+[Delete] keys to Run BIOS Setup? BIOS Setup 4-2 About BIOS Setup When to reload the default BIOS settings. The actual setting screens and options on your Notebook may need to run the BIOS Setup when: Š An error message appears on the screen during the ...
Be noted that the screen snaps and setting options in this chapter are for customized features. Š You want to Use BIOS Setup? To run SETUP. Š You want to change the default settings for your references only. How to restart. If the message disappears before ...it OFF and ON, or simultaneously pressing [Ctrl]+[Alt]+[Delete] keys to Run BIOS Setup? BIOS Setup 4-2 About BIOS Setup When to reload the default BIOS settings. The actual setting screens and options on your Notebook may need to run the BIOS Setup when: Š An error message appears on the screen during the ...
User Manual
Page 77
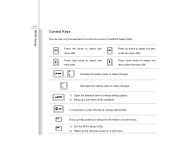
.... In some items, press this key to control the cursor in a sub-menu. Press up arrow to the previous screen in the BIOS Setup Utility. BIOS Setup 4-3 Control Keys You can use only the keyboard to change setting options. 2) Bring up help screen providing the information of control ...keys. 1) Exit the BIOS Setup Utility. 2) Return to select one menu title. Increase the setting value or make changes. + Decrease the setting value or make changes. 1)...
.... In some items, press this key to control the cursor in a sub-menu. Press up arrow to the previous screen in the BIOS Setup Utility. BIOS Setup 4-3 Control Keys You can use only the keyboard to change setting options. 2) Bring up help screen providing the information of control ...keys. 1) Exit the BIOS Setup Utility. 2) Return to select one menu title. Increase the setting value or make changes. + Decrease the setting value or make changes. 1)...
User Manual
Page 78
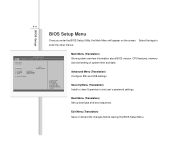
... screen. F1: General Help F2: Previous Values F9: Optimized Default F4: Save Main Menu (Translation) Show system overview information about BIOS version, CPU features, memory size and setting of system time and date. Main Advanced BISO SETUP UTILITY Security Boot Exit Market Name...Detected] System Infomation :Select Screen :Select Item Enter: Select +/-: Change Opt. Exit Menu (Translation) Save or discard the changes before leaving the BIOS Setup Menu. Advanced Menu (Translation) Configure IDE and USB settings. Boot Menu (Translation) Set up boot type and boot sequence. Select the ...
... screen. F1: General Help F2: Previous Values F9: Optimized Default F4: Save Main Menu (Translation) Show system overview information about BIOS version, CPU features, memory size and setting of system time and date. Main Advanced BISO SETUP UTILITY Security Boot Exit Market Name...Detected] System Infomation :Select Screen :Select Item Enter: Select +/-: Change Opt. Exit Menu (Translation) Save or discard the changes before leaving the BIOS Setup Menu. Advanced Menu (Translation) Configure IDE and USB settings. Boot Menu (Translation) Set up boot type and boot sequence. Select the ...

User Manual
Page 79
Year (Year) The year can be adjusted by BIOS (read-only). The time format is [day:month:date:year]. Day (Translation) Day of the week, from 01 to Sat, which is determined by users. &#.../ SATA devices installed in the notebook. Month (Month) The month from 01 (January) to set the system date. Press [Enter] to set the system time. BIOS Setup 4-5 Main Menu (Translation) Š System Time (Translation) This item allows you to 12 (December).
Year (Year) The year can be adjusted by BIOS (read-only). The time format is [day:month:date:year]. Day (Translation) Day of the week, from 01 to Sat, which is determined by users. &#.../ SATA devices installed in the notebook. Month (Month) The month from 01 (January) to set the system date. Press [Enter] to set the system time. BIOS Setup 4-5 Main Menu (Translation) Š System Time (Translation) This item allows you to 12 (December).
User Manual
Page 80
BIOS Setup 4-6 Š System Information (Translation) This item provides the information about the firmware, processor, and system memory.
BIOS Setup 4-6 Š System Information (Translation) This item provides the information about the firmware, processor, and system memory.
User Manual
Page 81
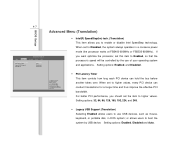
... mouse, keyboard, or portable disk, in a conserve power mode (the processor works at FSB400-600MHz or FSB533-800MHz). When set the item to higher values. 4-7 BIOS Setup Main Advanced BISO SETUP UTILITY Security Boot Exit Intel (R) Speedstep (tm) PCI Legacy Timer Legacy USB Support AHCI Mode [Enabled] [64] [Enabled] [Enabled] Advanced...
... mouse, keyboard, or portable disk, in a conserve power mode (the processor works at FSB400-600MHz or FSB533-800MHz). When set the item to higher values. 4-7 BIOS Setup Main Advanced BISO SETUP UTILITY Security Boot Exit Intel (R) Speedstep (tm) PCI Legacy Timer Legacy USB Support AHCI Mode [Enabled] [64] [Enabled] [Enabled] Advanced...
User Manual
Page 82
Setting options: Disabled and Enabled. BIOS Setup 4-8 Š AHCI Mode (Advanced Host Controller Interface) Use this item to enable or disable the AHCI Mode. The default setting is Disabled.
Setting options: Disabled and Enabled. BIOS Setup 4-8 Š AHCI Mode (Advanced Host Controller Interface) Use this item to enable or disable the AHCI Mode. The default setting is Disabled.
User Manual
Page 83
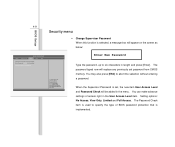
You can make advance settings of BIOS password protection that is selected, a message box will appear on the screen as below: Main Advanced BISO SETUP UTILITY Security Boot Exit Supervisor Password :Not ... set password from CMOS memory. Setting options: No Access, View Only, Limited and Full Access. The password typed now will be added in the menu. BIOS Setup 4-9 Security menu Š Change Supervisor Password When this function is implemented.
You can make advance settings of BIOS password protection that is selected, a message box will appear on the screen as below: Main Advanced BISO SETUP UTILITY Security Boot Exit Supervisor Password :Not ... set password from CMOS memory. Setting options: No Access, View Only, Limited and Full Access. The password typed now will be added in the menu. BIOS Setup 4-9 Security menu Š Change Supervisor Password When this function is implemented.
User Manual
Page 84
... settings of the setup menu; User Password only allows the user to enter the setup menu, but do not have the right to run Setup. BIOS Setup 4-10 Settings are prompted to enter the password. To clear a set password, just press [Enter] when you can enter Setup without entering any password...
... settings of the setup menu; User Password only allows the user to enter the setup menu, but do not have the right to run Setup. BIOS Setup 4-10 Settings are prompted to enter the password. To clear a set password, just press [Enter] when you can enter Setup without entering any password...

User Manual
Page 85
Main Advanced BISO SETUP UTILITY Security Boot Exit Boot Settings Configuration Boot Device Priority Š Boot Device Priority These items showing the sequence of boot devices where BIOS attempts to load the disk operating system. :Select Screen :Select Item Enter: Select +/-: Change Opt. F1: General Help F2: Previous Values F9: Optimized Default F4: Save BIOS Setup 4-11 Boot menu Š Boot Settings Configuration Configure settings during system boot.
Main Advanced BISO SETUP UTILITY Security Boot Exit Boot Settings Configuration Boot Device Priority Š Boot Device Priority These items showing the sequence of boot devices where BIOS attempts to load the disk operating system. :Select Screen :Select Item Enter: Select +/-: Change Opt. F1: General Help F2: Previous Values F9: Optimized Default F4: Save BIOS Setup 4-11 Boot menu Š Boot Settings Configuration Configure settings during system boot.
User Manual
Page 86
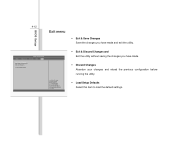
... BISO SETUP UTILITY Security Boot Exit Exit & Save Changes Exit & Discard Changes Discard Changes Load Setup Defaults :Select Screen :Select Item Enter: Select +/-: Change Opt. BIOS Setup 4-12 Exit menu Š Exit & Save Changes Save the changes you have made . Š Discard Changes Abandon your changes and reload the previous configuration...
... BISO SETUP UTILITY Security Boot Exit Exit & Save Changes Exit & Discard Changes Discard Changes Load Setup Defaults :Select Screen :Select Item Enter: Select +/-: Change Opt. BIOS Setup 4-12 Exit menu Š Exit & Save Changes Save the changes you have made . Š Discard Changes Abandon your changes and reload the previous configuration...


