
User Manual
Page 3
... View...2-21 Bottom SideView ...2-23 Getting Started Power Management ...3-2 ECO Engine -- Power Saving Function (optional 3-2 AC Adapter ...3-4 Battery Pack ...3-6 Using the Battery Pack...3-9 Basic Operations ...3-11 Safety and Comfort Tips...3-11 Having a Good Work Habit...3-12 Knowing the Keyboard ...3-13 Knowing the Touchpad ...3-17 About Hard Disk Drive...3-20 Using the Optical Storage Device 3-21 Connecting the External Devices 3-24 Connecting the Peripheral Devices 3-24 Connecting the Communication Devices 3-27 ExpressCard Installation...3-29 Removing the Expresscard ...3-29
... View...2-21 Bottom SideView ...2-23 Getting Started Power Management ...3-2 ECO Engine -- Power Saving Function (optional 3-2 AC Adapter ...3-4 Battery Pack ...3-6 Using the Battery Pack...3-9 Basic Operations ...3-11 Safety and Comfort Tips...3-11 Having a Good Work Habit...3-12 Knowing the Keyboard ...3-13 Knowing the Touchpad ...3-17 About Hard Disk Drive...3-20 Using the Optical Storage Device 3-21 Connecting the External Devices 3-24 Connecting the Peripheral Devices 3-24 Connecting the Communication Devices 3-27 ExpressCard Installation...3-29 Removing the Expresscard ...3-29
User Manual
Page 8
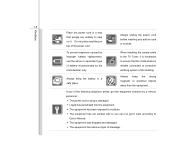
... equipment has not worked well or you can not get it . When installing the coaxial cable to the TV Tuner, it is necessary to ensure that people are unlikely to step on it work according to protective earthing system of the power cord. If any...by a service personnel: Š The power cord or plug is reliable connected to User's Manual. Š The equipment was dropped and damaged. Š The equipment has obvious signs of battery recommended by improper battery replacement, use the same or equivalent type of breakage. 1-8 Preface Place the power cord in a safe place. To...
... equipment has not worked well or you can not get it . When installing the coaxial cable to the TV Tuner, it is necessary to ensure that people are unlikely to step on it work according to protective earthing system of the power cord. If any...by a service personnel: Š The power cord or plug is reliable connected to User's Manual. Š The equipment was dropped and damaged. Š The equipment has obvious signs of battery recommended by improper battery replacement, use the same or equivalent type of breakage. 1-8 Preface Place the power cord in a safe place. To...
User Manual
Page 23
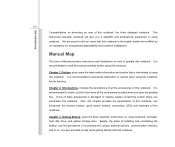
... the procedures of connecting the various external devices, communication devices, and so on, are proud to read this notebook. Beside, the steps of installing and uninstalling the battery; It is interrelated to check out that this notebook is damaged or missing, please contact the vendor where you purchased this notebook. Chapter 3, Getting Started, gives the basic operation instructions on using this notebook for unsurpassed...
... the procedures of connecting the various external devices, communication devices, and so on, are proud to read this notebook. Beside, the steps of installing and uninstalling the battery; It is interrelated to check out that this notebook is damaged or missing, please contact the vendor where you purchased this notebook. Chapter 3, Getting Started, gives the basic operation instructions on using this notebook for unsurpassed...

User Manual
Page 27
... / Blu-ray/ HD DVD (SATA) (Devices listed here may vary without notice) Communication Port (Items listed here may vary without notice) 56K Fax/MODEM MDC Controller Azalia Embeded Wake on Ring Support on S3/S4 state Wake on LAN Support on S3/S4/S5 state LAN 10/100/1000 Ethernet Bluetooth Supported (Optional) Wireless Lan Supported Audio Internal Speaker Sound Volume 4 speakers + subwoofer Adjust by volume button, K/B hot-key & SW Video (optional) Graphics LCD MXM III series WSXGA+ (1680...
... / Blu-ray/ HD DVD (SATA) (Devices listed here may vary without notice) Communication Port (Items listed here may vary without notice) 56K Fax/MODEM MDC Controller Azalia Embeded Wake on Ring Support on S3/S4 state Wake on LAN Support on S3/S4/S5 state LAN 10/100/1000 Ethernet Bluetooth Supported (Optional) Wireless Lan Supported Audio Internal Speaker Sound Volume 4 speakers + subwoofer Adjust by volume button, K/B hot-key & SW Video (optional) Graphics LCD MXM III series WSXGA+ (1680...

User Manual
Page 31
User Defined ECO (optional) Power Saving Touch the sensor repeatedly to enable or disable this sensor to turn the WLAN function on or off sub-woofer and increase LCD brightness Cinema Pro & volume. Webcam Touch the sensor to turn the Webcam function on or off Bluetooth Touch the sensor to turn the Bluetooth function on or off Touch the sensor to turn the notebook power ON and OFF. With the help of these quick launch touch sensors, users will be...
User Defined ECO (optional) Power Saving Touch the sensor repeatedly to enable or disable this sensor to turn the WLAN function on or off sub-woofer and increase LCD brightness Cinema Pro & volume. Webcam Touch the sensor to turn the Webcam function on or off Bluetooth Touch the sensor to turn the Bluetooth function on or off Touch the sensor to turn the notebook power ON and OFF. With the help of these quick launch touch sensors, users will be...
User Manual
Page 32
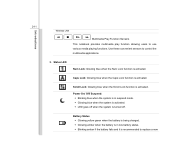
... Wireless LAN Introductions Multimedia Play Function Sensors This notebook provides multimedia play function allowing users to control the multimedia applications. 3. Status LED Num Lock: Glowing blue when the Num Lock function is activated. Scroll Lock: Glowing blue when the Scroll Lock function is activated. Use these convenient sensors to use various media playing functions. Caps Lock: Glowing blue when the Caps Lock function is recommended to replace a new Battery Status Š Glowing yellow green when the battery is being charged...
... Wireless LAN Introductions Multimedia Play Function Sensors This notebook provides multimedia play function allowing users to control the multimedia applications. 3. Status LED Num Lock: Glowing blue when the Num Lock function is activated. Scroll Lock: Glowing blue when the Scroll Lock function is activated. Use these convenient sensors to use various media playing functions. Caps Lock: Glowing blue when the Caps Lock function is recommended to replace a new Battery Status Š Glowing yellow green when the battery is being charged...

User Manual
Page 33
... functions of the notebook. 5. Wireless LAN and Bluetooth: Š LED indicator glows blue when Wireless LAN or Bluetooth function is accessing the hard disk drive or the optical drive device. 4. Stereo Speakers Give high quality sound blaster with stereo system and Hi-Fi function supported. Touchpad This is disconnected. Keyboard The built-in fight. Hard Disk/ Optical Drive Device In-use: Blinking blue when the system is enabled. Š LED indicators go off when it is fully charged or when the AC adapter...
... functions of the notebook. 5. Wireless LAN and Bluetooth: Š LED indicator glows blue when Wireless LAN or Bluetooth function is accessing the hard disk drive or the optical drive device. 4. Stereo Speakers Give high quality sound blaster with stereo system and Hi-Fi function supported. Touchpad This is disconnected. Keyboard The built-in fight. Hard Disk/ Optical Drive Device In-use: Blinking blue when the system is enabled. Š LED indicators go off when it is fully charged or when the AC adapter...
User Manual
Page 39
... ventilator is designed to connect an external Serial ATA hard disk device. DO NOT block the ventilator for air circulation. 8. plug the supplied TV-Tuner adaptor into the connector. Users can now utilize shielded cable outside the notebook to take advantage of adaptor. USB Port The USB 2.0 port allows you to cool the system. Introductions 2-18 5. TV-Tuner Antenna Connector (Optional) Notebook with Digital TV tuner...
... ventilator is designed to connect an external Serial ATA hard disk device. DO NOT block the ventilator for air circulation. 8. plug the supplied TV-Tuner adaptor into the connector. Users can now utilize shielded cable outside the notebook to take advantage of adaptor. USB Port The USB 2.0 port allows you to cool the system. Introductions 2-18 5. TV-Tuner Antenna Connector (Optional) Notebook with Digital TV tuner...
User Manual
Page 43
VGA Port The 15-pin-D-sub VGA port allows you to connect an external monitor or other standard VGA-compatible device (such as a projector) for a great view of the computer display. 5. Battery Pack This notebook will be powered by the battery pack when the AC adapter is disconnected. Introductions 2-22 4.
VGA Port The 15-pin-D-sub VGA port allows you to connect an external monitor or other standard VGA-compatible device (such as a projector) for a great view of the computer display. 5. Battery Pack This notebook will be powered by the battery pack when the AC adapter is disconnected. Introductions 2-22 4.
User Manual
Page 60
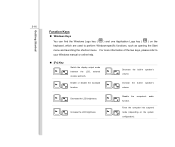
... shortcut menu. Getting Started 3-16 Function Keys „ Windows Keys You can find the Windows Logo key ( ) and one Application Logo key ( ) on the system + configuration). Increase the built-in speaker's + volume. Decrease the built-in speaker's + volume. Enable or disable the touchpad function. Force the computer into suspend mode (depending on the keyboard, which are used to your Windows manual or online help. „ [Fn] Key + + Switch the display output mode between the LCD, external monitor and...
... shortcut menu. Getting Started 3-16 Function Keys „ Windows Keys You can find the Windows Logo key ( ) and one Application Logo key ( ) on the system + configuration). Increase the built-in speaker's + volume. Decrease the built-in speaker's + volume. Enable or disable the touchpad function. Force the computer into suspend mode (depending on the keyboard, which are used to your Windows manual or online help. „ [Fn] Key + + Switch the display output mode between the LCD, external monitor and...

User Manual
Page 61
... on and control the cursor on the screen and making selection with standard mouse, allowing you to control the notebook by pointing the location of the cursor on the screen by moving one of your notebook is a pointing device that users purchased Getting Started 3-17 Knowing the Touchpad The touchpad integrated in your finger. 2. Right / Left Buttons Acts as the mouse's right/ left button. 1 2 2 The touchpad figures shown...
... on and control the cursor on the screen and making selection with standard mouse, allowing you to control the notebook by pointing the location of the cursor on the screen by moving one of your notebook is a pointing device that users purchased Getting Started 3-17 Knowing the Touchpad The touchpad integrated in your finger. 2. Right / Left Buttons Acts as the mouse's right/ left button. 1 2 2 The touchpad figures shown...
User Manual
Page 62
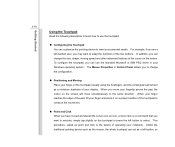
To configure the touchpad, you can use the touchpad: „ Configuring the Touchpad You can customize the pointing device to meet your Windows operating system. The Mouse Properties in your personal needs. When you move simultaneously to the same direction. Getting Started 3-18 Using the Touchpad Read the following description to learn how to use the standard Microsoft or IBM PS/2 driver in Control Panel allows you to change the...
To configure the touchpad, you can use the touchpad: „ Configuring the Touchpad You can customize the pointing device to meet your Windows operating system. The Mouse Properties in your personal needs. When you move simultaneously to the same direction. Getting Started 3-18 Using the Touchpad Read the following description to learn how to use the standard Microsoft or IBM PS/2 driver in Control Panel allows you to change the...

User Manual
Page 65
... 25GB disk. Blu-ray supports the more advanced H.264 and VC-1 video encoding algorithms (codecs) as well as a multi-functional DVD Dual Drive and a DVD RAM Drive. „ Blu-ray: It is a high-density optical disc format designed for DVD. Getting Started 3-21 Using the Optical Storage Device Your notebook is used for the storage of high-definition video (HD) on the model you purchased. „ Super Multi: Works as...
... 25GB disk. Blu-ray supports the more advanced H.264 and VC-1 video encoding algorithms (codecs) as well as a multi-functional DVD Dual Drive and a DVD RAM Drive. „ Blu-ray: It is a high-density optical disc format designed for DVD. Getting Started 3-21 Using the Optical Storage Device Your notebook is used for the storage of high-definition video (HD) on the model you purchased. „ Super Multi: Works as...

User Manual
Page 68
...please manually enable the USB devices by going to Start Menu / Control Panel / Add Hardware to connect peripheral devices. All devices listed here are for each device first if necessary, and then connect the device to the notebook. Getting Started 3-24 Connecting the External Devices The I/O (input/output) ports on the notebook allow you to add the new device. Connecting the Peripheral Devices Connecting the USB devices This notebook provides USB ports for connecting various USB devices, such as mouse, keyboard, digital camera, webcam, printer, and external optical storage device, ete...
...please manually enable the USB devices by going to Start Menu / Control Panel / Add Hardware to connect peripheral devices. All devices listed here are for each device first if necessary, and then connect the device to the notebook. Getting Started 3-24 Connecting the External Devices The I/O (input/output) ports on the notebook allow you to add the new device. Connecting the Peripheral Devices Connecting the USB devices This notebook provides USB ports for connecting various USB devices, such as mouse, keyboard, digital camera, webcam, printer, and external optical storage device, ete...

User Manual
Page 69
Getting Started 3-25 Connecting the External Display Devices This notebook provides a VGA port for a great view of the notebook display. The 15-pin-D-sub VGA port allows users to connect an external monitor or other standard VGA-compatible device (such as a projector) for connecting a larger display with higher resolution.
Getting Started 3-25 Connecting the External Display Devices This notebook provides a VGA port for a great view of the notebook display. The 15-pin-D-sub VGA port allows users to connect an external monitor or other standard VGA-compatible device (such as a projector) for connecting a larger display with higher resolution.
User Manual
Page 70
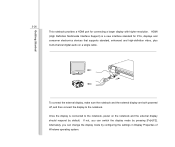
... display to the notebook, power on a single cable. Alternately, you can change the display mode by configuring the settings in Display Properties of Windows operating system. HDMI (High Definition Multimedia Interface Support) is connected to the notebook. If not, you can switch the display mode by pressing [Fn]+[F2]. Once the display is a new interface standard for connecting a larger display with higher resolution. Getting Started 3-26 This notebook provides a HDMI port for PCs, displays and consumer electronics devices that supports...
... display to the notebook, power on a single cable. Alternately, you can change the display mode by configuring the settings in Display Properties of Windows operating system. HDMI (High Definition Multimedia Interface Support) is connected to the notebook. If not, you can switch the display mode by pressing [Fn]+[F2]. Once the display is a new interface standard for connecting a larger display with higher resolution. Getting Started 3-26 This notebook provides a HDMI port for PCs, displays and consumer electronics devices that supports...
User Manual
Page 72
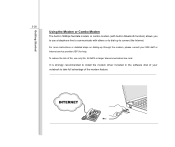
... your notebook to take full advantage of the modem feature. It is strongly recommended to install the modem driver included in Bluetooth function) allows you to communicate with built-in the software disk of fire, use a telephone line to use only No. 26 AWG or larger telecommunication line cord. To reduce the risk of your MIS staff or Internet service provider...
... your notebook to take full advantage of the modem feature. It is strongly recommended to install the modem driver included in Bluetooth function) allows you to communicate with built-in the software disk of fire, use a telephone line to use only No. 26 AWG or larger telecommunication line cord. To reduce the risk of your MIS staff or Internet service provider...
User Manual
Page 79
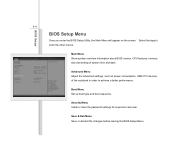
... performance. Security Menu Install or clear the password settings for supervisor and user. Main Menu Show system overview information about BIOS version, CPU features, memory size and setting of the notebook in order to enter the other menus. BIOS Setup 4-4 BIOS Setup Menu Once you enter the BIOS Setup Utility, the Main Menu will appear on the screen. Save & Exit Menu Save or discard the changes before leaving the BIOS Setup Menu. Advanced Menu Adjust the advanced settings, such as power consumption, USB/ PCI devices, of...
... performance. Security Menu Install or clear the password settings for supervisor and user. Main Menu Show system overview information about BIOS version, CPU features, memory size and setting of the notebook in order to enter the other menus. BIOS Setup 4-4 BIOS Setup Menu Once you enter the BIOS Setup Utility, the Main Menu will appear on the screen. Save & Exit Menu Save or discard the changes before leaving the BIOS Setup Menu. Advanced Menu Adjust the advanced settings, such as power consumption, USB/ PCI devices, of...
User Manual
Page 82
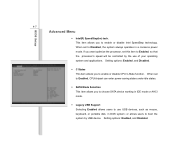
... set to Enabled, CPU/chipset can enter power-saving states under idle states. Š SATA Mode Selection This item allows you to boot the system by the use USB devices, such as mouse, keyboard, or portable disk, in a conserve power mode. This item allows you to choose SATA device working in IDE mode or AHCI mode. Š Legacy USB Support Selecting Enabled allows users to Disabled, the system always operates in DOS system; When set to use...
... set to Enabled, CPU/chipset can enter power-saving states under idle states. Š SATA Mode Selection This item allows you to boot the system by the use USB devices, such as mouse, keyboard, or portable disk, in a conserve power mode. This item allows you to choose SATA device working in IDE mode or AHCI mode. Š Legacy USB Support Selecting Enabled allows users to Disabled, the system always operates in DOS system; When set to use...
User Manual
Page 85
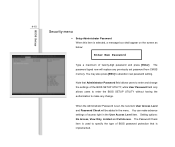
... set , the new item User Access Level and Password Check will replace any change the settings of twenty-digit password and press [Enter]. Note that is set password from CMOS memory. BIOS Setup 4-10 Security menu Š Setup Administrator Password When this item is selected, a message box shall appear on the screen as below: Enter New Password Type a maximum of the BIOS SETUP UTILITY, while User Password field only allows users to enter the BIOS SETUP UTILITY without having the authorization to abandon new password setting. Setting options: No Access...
... set , the new item User Access Level and Password Check will replace any change the settings of twenty-digit password and press [Enter]. Note that is set password from CMOS memory. BIOS Setup 4-10 Security menu Š Setup Administrator Password When this item is selected, a message box shall appear on the screen as below: Enter New Password Type a maximum of the BIOS SETUP UTILITY, while User Password field only allows users to enter the BIOS SETUP UTILITY without having the authorization to abandon new password setting. Setting options: No Access...


