
User Manual
Page 3
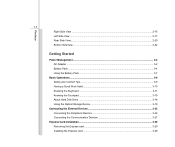
......2-17 Rear Side View...2-20 Bottom SideView ...2-22 Getting Started Power Management ...3-2 AC Adapter ...3-2 Battery Pack ...3-4 Using the Battery Pack...3-7 Basic Operations ...3-9 Safety and Comfort Tips...3-9 Having a Good Work Habit...3-10 Knowing the Keyboard ...3-11 Knowing the Touchpad ...3-15 About Hard Disk Drive...3-18 Using the Optical Storage Device 3-19 Connecting the External Devices 3-22 Connecting the Peripheral Devices 3-22 Connecting the Communication Devices 3-27 Express Card Installation...3-29 Removing the Express card 3-29 Installing the Express card ...3-29
......2-17 Rear Side View...2-20 Bottom SideView ...2-22 Getting Started Power Management ...3-2 AC Adapter ...3-2 Battery Pack ...3-4 Using the Battery Pack...3-7 Basic Operations ...3-9 Safety and Comfort Tips...3-9 Having a Good Work Habit...3-10 Knowing the Keyboard ...3-11 Knowing the Touchpad ...3-15 About Hard Disk Drive...3-18 Using the Optical Storage Device 3-19 Connecting the External Devices 3-22 Connecting the Peripheral Devices 3-22 Connecting the Communication Devices 3-27 Express Card Installation...3-29 Removing the Express card 3-29 Installing the Express card ...3-29
User Manual
Page 20
... use this model properly, read the instruction manual carefully and keep this model, please contact your future reference. In case of electric shock from the network interface. „ Note the cautions when installing or modifying telephone lines. „ Avoid using the telephone function (other than a cordless type) during an electrical storm. To use the telephone function to disassemble the enclosure. Preface 1-20 Optical Device Drive...
... use this model properly, read the instruction manual carefully and keep this model, please contact your future reference. In case of electric shock from the network interface. „ Note the cautions when installing or modifying telephone lines. „ Avoid using the telephone function (other than a cordless type) during an electrical storm. To use the telephone function to disassemble the enclosure. Preface 1-20 Optical Device Drive...
User Manual
Page 23
... operation instructions on using notebook. We are also provided to help users getting familiar with this notebook. Chapter 2, Introductions, includes the descriptions of all the accessories included when you a delightful and professional experience in using keyboard, touchpad, hard disk drive, and optical storage drive. Also, this chapter provides the specification of this notebook, and introduces the function buttons, quick launch buttons, connectors, LEDs and externals of this notebook. and the procedures of connecting...
... operation instructions on using notebook. We are also provided to help users getting familiar with this notebook. Chapter 2, Introductions, includes the descriptions of all the accessories included when you a delightful and professional experience in using keyboard, touchpad, hard disk drive, and optical storage drive. Also, this chapter provides the specification of this notebook, and introduces the function buttons, quick launch buttons, connectors, LEDs and externals of this notebook. and the procedures of connecting...

User Manual
Page 24
... to ship the unit in -one application disk, containing the full version of user's manual, drivers, utilities, and optional recovery function, etc.. Introductions Chapter 4, BIOS Setup, provides information on BIOS Setup program and allows you need to configure the system for optimum use. The package should contain the following items: Notebook Quick Start Manual High-capacity Li-ion battery AC adapter and power cord Carry bag (optional) All-in the future. Unpacking First...
... to ship the unit in -one application disk, containing the full version of user's manual, drivers, utilities, and optional recovery function, etc.. Introductions Chapter 4, BIOS Setup, provides information on BIOS Setup program and allows you need to configure the system for optimum use. The package should contain the following items: Notebook Quick Start Manual High-capacity Li-ion battery AC adapter and power cord Carry bag (optional) All-in the future. Unpacking First...

User Manual
Page 32
... of the notebook. 6. Wireless LAN: Glowing blue when wireless LAN function is activated. Quick Launch Touch Sensors Touch the quick launch touch sensors to activate the Webcam function. Webcam Touch this sensor to activate the specific applications or tools. Scroll Lock: Glowing blue when the Scroll Lock function is enabled. 5. Touchpad This is activated. Caps Lock: Glowing blue when the Caps Lock function is disconnected. Introductions 2-11 type of battery recommended by the manufacturer. Š Battery LED goes out when it is fully charged or...
... of the notebook. 6. Wireless LAN: Glowing blue when wireless LAN function is activated. Quick Launch Touch Sensors Touch the quick launch touch sensors to activate the Webcam function. Webcam Touch this sensor to activate the specific applications or tools. Scroll Lock: Glowing blue when the Scroll Lock function is enabled. 5. Touchpad This is activated. Caps Lock: Glowing blue when the Caps Lock function is disconnected. Introductions 2-11 type of battery recommended by the manufacturer. Š Battery LED goes out when it is fully charged or...

User Manual
Page 33
Introductions 2-12 Wireless LAN Š Touch this sensor to turn the WLAN function on or off Bluetooth(optional) Š Touch this sensor to turn the Bluetooth function on the CPU you use. „ Factory warranty will be void if the original equipped CPU or DRAM is designed to tolerate such abnormal setting, while doing overclocking. Press the (optional) button again to return to achieve a higher performance. However, please make sure...
Introductions 2-12 Wireless LAN Š Touch this sensor to turn the WLAN function on or off Bluetooth(optional) Š Touch this sensor to turn the Bluetooth function on the CPU you use. „ Factory warranty will be void if the original equipped CPU or DRAM is designed to tolerate such abnormal setting, while doing overclocking. Press the (optional) button again to return to achieve a higher performance. However, please make sure...
User Manual
Page 37
Card Reader The built-in card reader may vary without notice. 5. Users can now utilize shielded cable outside the notebook to take advantage of memory card, such as the mouse, keyboard, modem, portable hard disk module, printer and more. 7. Introductions 2-16 3. E-SATA Connector (External Serial ATA)/ USB Port The E-SATA Connector allows you to connect USB-interface peripheral devices, such as MMC (Multi-Media Card), XD (eXtreme Digital), SD (Secure Digital) or MS (Memory Stick) cards. RJ...
Card Reader The built-in card reader may vary without notice. 5. Users can now utilize shielded cable outside the notebook to take advantage of memory card, such as the mouse, keyboard, modem, portable hard disk module, printer and more. 7. Introductions 2-16 3. E-SATA Connector (External Serial ATA)/ USB Port The E-SATA Connector allows you to connect USB-interface peripheral devices, such as MMC (Multi-Media Card), XD (eXtreme Digital), SD (Secure Digital) or MS (Memory Stick) cards. RJ...
User Manual
Page 40
... device allows you to use the CD/ DVD/ Blu-ray disc for installing software, accessing data and playing music/movie on a single-sided, single-layer 25GB disk. Introductions 2-19 2. The end of high-definition video (HD) on the computer. Š Super Multi works as a multi-functional DVD Dual Drive and a DVD RAM Drive. Š Blu-ray is a high-capacity optical disc that allows you to connect USB-interface peripheral devices...
... device allows you to use the CD/ DVD/ Blu-ray disc for installing software, accessing data and playing music/movie on a single-sided, single-layer 25GB disk. Introductions 2-19 2. The end of high-definition video (HD) on the computer. Š Super Multi works as a multi-functional DVD Dual Drive and a DVD RAM Drive. Š Blu-ray is a high-capacity optical disc that allows you to connect USB-interface peripheral devices...
User Manual
Page 41
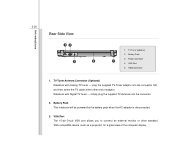
... device (such as a projector) for a great view of adaptor. Notebook with Analog TV tuner - VGA Port The 15-pin-D-sub VGA port allows you to connect an external monitor or other end of the computer display. plug the supplied TV-Tuner adaptor into the connector. 2. Power connector 1 4. TV-Tuner Antenna Connector (Optional) Notebook with Digital TV tuner - Battery Pack This notebook will be powered...
... device (such as a projector) for a great view of adaptor. Notebook with Analog TV tuner - VGA Port The 15-pin-D-sub VGA port allows you to connect an external monitor or other end of the computer display. plug the supplied TV-Tuner adaptor into the connector. 2. Power connector 1 4. TV-Tuner Antenna Connector (Optional) Notebook with Digital TV tuner - Battery Pack This notebook will be powered...
User Manual
Page 51
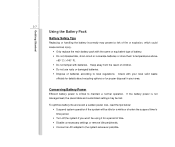
... your local solid waste officials for details about recycling options or for proper disposal in your area. Check with batteries. Getting Started 3-7 Using the Battery Pack Battery Safety Tips Replacing or handling the battery incorrectly may be using it for a period of time. Š Disable unnecessary settings or remove idle peripherals. Š Connect an AC adapter to the system whenever possible. Keep away from...
... your local solid waste officials for details about recycling options or for proper disposal in your area. Check with batteries. Getting Started 3-7 Using the Battery Pack Battery Safety Tips Replacing or handling the battery incorrectly may be using it for a period of time. Š Disable unnecessary settings or remove idle peripherals. Š Connect an AC adapter to the system whenever possible. Keep away from...
User Manual
Page 58
... display output mode between the LCD, external monitor and both. Decrease the LCD brightness. + Increase the LCD brightness. + Disable the computer's audio + function. Decrease the built-in speaker's + volume. Enable or disable the touchpad function. For more information of the two keys, please refer to perform Windows-specific functions, such as opening the Start menu and launching the shortcut menu. Getting Started 3-14 Function Keys „ Windows Keys You can find the Windows Logo key ( ) and one Application Logo key ( ) on the system + configuration...
... display output mode between the LCD, external monitor and both. Decrease the LCD brightness. + Increase the LCD brightness. + Disable the computer's audio + function. Decrease the built-in speaker's + volume. Enable or disable the touchpad function. For more information of the two keys, please refer to perform Windows-specific functions, such as opening the Start menu and launching the shortcut menu. Getting Started 3-14 Function Keys „ Windows Keys You can find the Windows Logo key ( ) and one Application Logo key ( ) on the system + configuration...
User Manual
Page 60
... user, you can use the touchpad: „ Configuring the Touchpad You can change the configuration. „ Positioning and Moving Place your finger on the touchpad or press the left button to the same direction. Getting Started 3-16 Using the Touchpad Read the following description to learn how to use the standard Microsoft or IBM PS/2 driver in Control Panel allows you want to swap the functions of...
... user, you can use the touchpad: „ Configuring the Touchpad You can change the configuration. „ Positioning and Moving Place your finger on the touchpad or press the left button to the same direction. Getting Started 3-16 Using the Touchpad Read the following description to learn how to use the standard Microsoft or IBM PS/2 driver in Control Panel allows you want to swap the functions of...
User Manual
Page 63
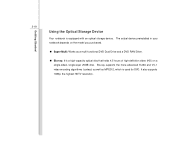
... is used for DVD. It also supports 1080p, the highest HDTV resolution. Getting Started 3-19 Using the Optical Storage Device Your notebook is a high-capacity optical disc that holds 4.5 hours of high-definition video (HD) on a single-sided, single-layer 25GB disk. Blu-ray supports the more advanced H.264 and VC-1 video encoding algorithms (codecs) as well as a multi-functional DVD Dual Drive and a DVD RAM Drive. „...
... is used for DVD. It also supports 1080p, the highest HDTV resolution. Getting Started 3-19 Using the Optical Storage Device Your notebook is a high-capacity optical disc that holds 4.5 hours of high-definition video (HD) on a single-sided, single-layer 25GB disk. Blu-ray supports the more advanced H.264 and VC-1 video encoding algorithms (codecs) as well as a multi-functional DVD Dual Drive and a DVD RAM Drive. „...
User Manual
Page 66
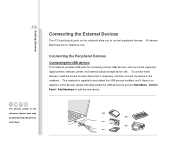
... enable the USB devices by going to Start Menu / Control Panel / Add Hardware to connect peripheral devices. To connect these devices, install the drivers for connecting various USB devices, such as mouse, keyboard, digital camera, webcam, printer, and external optical storage device, ete.. Connecting the Peripheral Devices Connecting the USB devices This notebook provides USB ports for each device first if necessary, and then connect the device to the notebook. Getting Started 3-22 Connecting the External Devices The I/O (input/output) ports on the notebook allow you to add the new...
... enable the USB devices by going to Start Menu / Control Panel / Add Hardware to connect peripheral devices. To connect these devices, install the drivers for connecting various USB devices, such as mouse, keyboard, digital camera, webcam, printer, and external optical storage device, ete.. Connecting the Peripheral Devices Connecting the USB devices This notebook provides USB ports for each device first if necessary, and then connect the device to the notebook. Getting Started 3-22 Connecting the External Devices The I/O (input/output) ports on the notebook allow you to add the new...
User Manual
Page 67
... device, simply connect the cable of the device to the IEEE 1394 port of up to connect many high-end peripheral devices and consumer electronic appliances, such as the DV (digital video camera). Getting Started 3-23 Connecting the IEEE 1394 devices The IEEE 1394 port of the notebook is a next-generation serial bus that you to 63 devices, allowing you can connect and remove the IEEE 1394 devices without turning...
... device, simply connect the cable of the device to the IEEE 1394 port of up to connect many high-end peripheral devices and consumer electronic appliances, such as the DV (digital video camera). Getting Started 3-23 Connecting the IEEE 1394 devices The IEEE 1394 port of the notebook is a next-generation serial bus that you to 63 devices, allowing you can connect and remove the IEEE 1394 devices without turning...
User Manual
Page 68
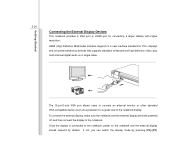
... electronics devices that supports standard, enhanced and high-definition video, plus multi-channel digital audio on the notebook and the external display should respond by pressing [Fn]+[F2]. If not, you can switch the display mode by default. The 15-pin-D-sub VGA port allows users to the notebook. To connect the external display, make sure the notebook and the external display are both powered off, and then connect the display to connect an external monitor or...
... electronics devices that supports standard, enhanced and high-definition video, plus multi-channel digital audio on the notebook and the external display should respond by pressing [Fn]+[F2]. If not, you can switch the display mode by default. The 15-pin-D-sub VGA port allows users to the notebook. To connect the external display, make sure the notebook and the external display are both powered off, and then connect the display to connect an external monitor or...
User Manual
Page 72
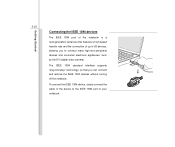
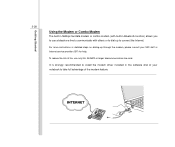
... MIS staff or Internet service provider (ISP) for help. It is strongly recommended to install the modem driver included in Bluetooth function) allows you to use only No. 26 AWG or larger telecommunication line cord. To reduce the risk of fire, use a telephone line to communicate with built-in the software disk of the modem feature. Getting Started 3-28 Using the Modem...
... MIS staff or Internet service provider (ISP) for help. It is strongly recommended to install the modem driver included in Bluetooth function) allows you to use only No. 26 AWG or larger telecommunication line cord. To reduce the risk of fire, use a telephone line to communicate with built-in the software disk of the modem feature. Getting Started 3-28 Using the Modem...
User Manual
Page 82
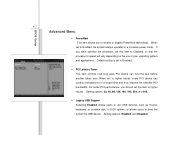
... want optimize the processor, set to Enabled, the system always operates in DOS system; When set this item to Disabled, so that the processor's speed will vary depending on the use USB devices, such as mouse, keyboard, or portable disk, in a conserve power mode. For better PCI performance, you to enable or disable PowerNow technology. When set the item to higher values. BIOS Setup 4-7 Advanced Menu Š PowerNow This...
... want optimize the processor, set to Enabled, the system always operates in DOS system; When set this item to Disabled, so that the processor's speed will vary depending on the use USB devices, such as mouse, keyboard, or portable disk, in a conserve power mode. For better PCI performance, you to enable or disable PowerNow technology. When set the item to higher values. BIOS Setup 4-7 Advanced Menu Š PowerNow This...
User Manual
Page 83
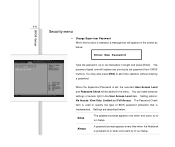
... Supervisor Password is set password from CMOS memory. You can make advance settings of BIOS password protection that is implemented. Always A password prompt appears every time when the Notebook is powered on the screen as below : Setup The password prompt appears only when end users try to run Setup. The Password Check item is used to specify the type of access right in the User Access Level item. BIOS Setup 4-8 Security menu Š Change Supervisor Password When this function...
... Supervisor Password is set password from CMOS memory. You can make advance settings of BIOS password protection that is implemented. Always A password prompt appears every time when the Notebook is powered on the screen as below : Setup The password prompt appears only when end users try to run Setup. The Password Check item is used to specify the type of access right in the User Access Level item. BIOS Setup 4-8 Security menu Š Change Supervisor Password When this function...

User Manual
Page 84
User Password only allows the user to enter the setup menu, but do not have the right to enter and change the settings of the setup menu; Once the password is disabled, the system will be disabled. A message box will show up confirming the password will boot and you are prompted to enter the password. Supervisor Password allows the user to make changes. BIOS Setup 4-9 To clear a set password, just press [Enter] when you can enter Setup without entering any password.
User Password only allows the user to enter the setup menu, but do not have the right to enter and change the settings of the setup menu; Once the password is disabled, the system will be disabled. A message box will show up confirming the password will boot and you are prompted to enter the password. Supervisor Password allows the user to make changes. BIOS Setup 4-9 To clear a set password, just press [Enter] when you can enter Setup without entering any password.


