
User Manual
Page 6
The openings on the power cord. 8. Keep this equipment on the equipment should be authorized by U.S. Do not cover the openings. 6. Do not place anything on the enclosure are unlikely to step on card or module. 9. Reverse engineering or disassembly is intended for home and other intellectual property rights. Safety Instructions 1. Save this copyright protection technology must be noted...
The openings on the power cord. 8. Keep this equipment on the equipment should be authorized by U.S. Do not cover the openings. 6. Do not place anything on the enclosure are unlikely to step on card or module. 9. Reverse engineering or disassembly is intended for home and other intellectual property rights. Safety Instructions 1. Save this copyright protection technology must be noted...
User Manual
Page 13
... View 2-13 Rear View 2-15 Bottom View 2-16 Power Management 2-17 AC Adapter 2-17 Battery Pack 2-18 Using the Battery Pack 2-21 Basic Operations 2-23 Safety and Comfort Tips 2-23 Have a Good Work Habit 2-24 Knowing the Keyboard 2-25 Knowing the Touchpad 2-30 About Hard Disk Drive 2-33 Using the Optical Storage 2-34 Customizing this Notebook Connecting the External Devices 3-2 Connecting the Peripheral Devices 3-3 Connecting the Communication Devices 3-6 Express Card Installation 3-7 Installing the Express card 3-7 XIII
... View 2-13 Rear View 2-15 Bottom View 2-16 Power Management 2-17 AC Adapter 2-17 Battery Pack 2-18 Using the Battery Pack 2-21 Basic Operations 2-23 Safety and Comfort Tips 2-23 Have a Good Work Habit 2-24 Knowing the Keyboard 2-25 Knowing the Touchpad 2-30 About Hard Disk Drive 2-33 Using the Optical Storage 2-34 Customizing this Notebook Connecting the External Devices 3-2 Connecting the Peripheral Devices 3-3 Connecting the Communication Devices 3-6 Express Card Installation 3-7 Installing the Express card 3-7 XIII
User Manual
Page 16
... using this notebook, the finely designed notebook. Also, this chapter instructs the correct procedure of installing or uninstalling the battery pack, and the brief ideas on becoming a new user of this notebook. 1-2 It is thoroughly tested and certified by our reputation for unsurpassed dependability and customer satisfaction. Chapter 2, Getting Started, provides the specification of this notebook, and introduces the function buttons, quick launch buttons, connectors, LEDs and externals...
... using this notebook, the finely designed notebook. Also, this chapter instructs the correct procedure of installing or uninstalling the battery pack, and the brief ideas on becoming a new user of this notebook. 1-2 It is thoroughly tested and certified by our reputation for unsurpassed dependability and customer satisfaction. Chapter 2, Getting Started, provides the specification of this notebook, and introduces the function buttons, quick launch buttons, connectors, LEDs and externals...
User Manual
Page 17
Chapter 4, BIOS setup, provides information on BIOS Setup program and allows you to configure the system for optimum use. 1-3 General Introductions Chapter 3, Customizing this Notebook, gives instructions not only in connecting the mouse, keyboard, webcam, printer, external monitor, IEEE 1394 devices, and communication devices, but also in installing and removing the PC card.
Chapter 4, BIOS setup, provides information on BIOS Setup program and allows you to configure the system for optimum use. 1-3 General Introductions Chapter 3, Customizing this Notebook, gives instructions not only in connecting the mouse, keyboard, webcam, printer, external monitor, IEEE 1394 devices, and communication devices, but also in installing and removing the PC card.
User Manual
Page 18
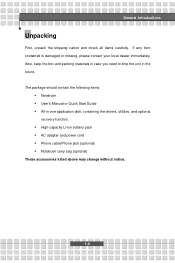
... cable/Phone jack (optional) w Notebook carry bag (optional) These accessories listed above may change without notice. 1-4 General Introductions Unpacking First, unpack the shipping carton and check all items carefully. Also, keep the box and packing materials in case you need to ship the unit in -one application disk, containing the drivers, utilities, and optional recovery function. The package should contain the following items: w Notebook w User's Manual or Quick Start Guide...
... cable/Phone jack (optional) w Notebook carry bag (optional) These accessories listed above may change without notice. 1-4 General Introductions Unpacking First, unpack the shipping carton and check all items carefully. Also, keep the box and packing materials in case you need to ship the unit in -one application disk, containing the drivers, utilities, and optional recovery function. The package should contain the following items: w Notebook w User's Manual or Quick Start Guide...
User Manual
Page 22
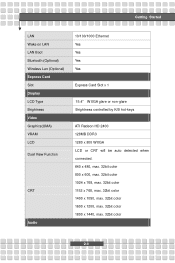
Getting Started LAN Wake on LAN LAN Boot Bluetooth (Optional) Wireless Lan (Optional) Express Card Slot Display LCD Type Brightness Video Graphics(UMA) VRAM LCD Dual View Function CRT Audio 10/100/1000 Ethernet Yes Yes Yes Yes Express Card Slot x 1 15.4" WXGA glare or non-glare Brightness controlled by K/B hot-keys ATI Radeon HD 2400 128MB DDR3 1280 x 800 WXGA LCD or CRT will be auto detected when connected. 640 x 480, max. 32bit color 800 x 600, max. 32bit...
Getting Started LAN Wake on LAN LAN Boot Bluetooth (Optional) Wireless Lan (Optional) Express Card Slot Display LCD Type Brightness Video Graphics(UMA) VRAM LCD Dual View Function CRT Audio 10/100/1000 Ethernet Yes Yes Yes Yes Express Card Slot x 1 15.4" WXGA glare or non-glare Brightness controlled by K/B hot-keys ATI Radeon HD 2400 128MB DDR3 1280 x 800 WXGA LCD or CRT will be auto detected when connected. 640 x 480, max. 32bit color 800 x 600, max. 32bit...

User Manual
Page 26
... is in suspend mode. Wireless LAN and Bluetooth (Optional) w Glowing Green when wireless LAN function is enabled. w Glowing Blue when Bluetooth function is enabled. w Glowing Blue when the system is turned off. w LED goes out when the system is activated. w Glowing Orange when the battery is in low battery status. Scroll Lock: Glowing Green when the Scroll Lock function is being charged. Battery Status w Glowing Green when the battery is activated. w Blinking Orange if the battery fails and...
... is in suspend mode. Wireless LAN and Bluetooth (Optional) w Glowing Green when wireless LAN function is enabled. w Glowing Blue when Bluetooth function is enabled. w Glowing Blue when the system is turned off. w LED goes out when the system is activated. w Glowing Orange when the battery is in low battery status. Scroll Lock: Glowing Green when the Scroll Lock function is being charged. Battery Status w Glowing Green when the battery is activated. w Blinking Orange if the battery fails and...
User Manual
Page 30
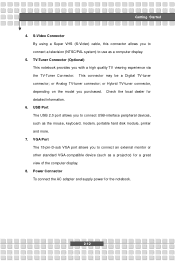
... Started 4. S-Video Connector By using a Super VHS (S-Video) cable, this connector allows you to connect a television (NTSC/PAL system) to use as the mouse, keyboard, modem, portable hard disk module, printer and more. 7. VGA Port The 15-pin-D-sub VGA port allows you to connect an external monitor or other standard VGA-compatible device (such as a projector) for the notebook. 2-12 TV-Tuner Connector (Optional) This notebook provides you purchased. Power Connector...
... Started 4. S-Video Connector By using a Super VHS (S-Video) cable, this connector allows you to connect a television (NTSC/PAL system) to use as the mouse, keyboard, modem, portable hard disk module, printer and more. 7. VGA Port The 15-pin-D-sub VGA port allows you to connect an external monitor or other standard VGA-compatible device (such as a projector) for the notebook. 2-12 TV-Tuner Connector (Optional) This notebook provides you purchased. Power Connector...
User Manual
Page 31
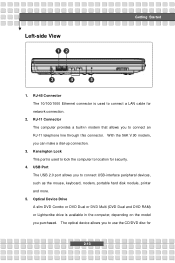
... connector. Kensington Lock This port is used to lock the computer to connect a LAN cable for security. 4. RJ-45 Connector The 10/100/1000 Ethernet connector is used to location for network connection. 2. The optical device allows you to use the CD/DVD disc for 2-13 USB Port The USB 2.0 port allows you to connect USB-interface peripheral devices, such as the mouse, keyboard, modem, portable hard disk module, printer and more. 5. Left-side View 1 2 Getting Started 3 4 5 1. RJ...
... connector. Kensington Lock This port is used to lock the computer to connect a LAN cable for security. 4. RJ-45 Connector The 10/100/1000 Ethernet connector is used to location for network connection. 2. The optical device allows you to use the CD/DVD disc for 2-13 USB Port The USB 2.0 port allows you to connect USB-interface peripheral devices, such as the mouse, keyboard, modem, portable hard disk module, printer and more. 5. Left-side View 1 2 Getting Started 3 4 5 1. RJ...
User Manual
Page 39
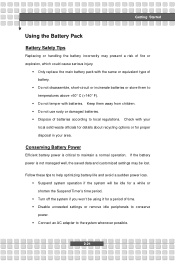
... a normal operation. w Connect an AC adapter to local regulations. w Dispose of battery. Conserving Battery Power Efficient battery power is not managed well, the saved data and customized settings may present a risk of time. Check with batteries. w Only replace the main battery pack with the same or equivalent type of batteries according to the system whenever possible. 2-21 w Do not use rusty or damaged batteries. w Suspend system operation if...
... a normal operation. w Connect an AC adapter to local regulations. w Dispose of battery. Conserving Battery Power Efficient battery power is not managed well, the saved data and customized settings may present a risk of time. Check with batteries. w Only replace the main battery pack with the same or equivalent type of batteries according to the system whenever possible. 2-21 w Do not use rusty or damaged batteries. w Suspend system operation if...
User Manual
Page 47
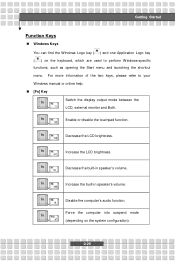
n [Fn] Key Switch the display output mode between the + LCD, external monitor and Both. Enable or disable the touchpad function. + Decrease the LCD brightness. + Increase the LCD brightness. + Decrease the built-in speaker's volume. + Increase the built-in speaker's volume. + Disable the computer's audio function. + Force the computer into suspend mode + (depending on the keyboard, which are used to your Windows manual or online help. Getting Started Function Keys n Windows Keys You can find the Windows Logo key ( ) and one Application Logo key ( ) on...
n [Fn] Key Switch the display output mode between the + LCD, external monitor and Both. Enable or disable the touchpad function. + Decrease the LCD brightness. + Increase the LCD brightness. + Decrease the built-in speaker's volume. + Increase the built-in speaker's volume. + Disable the computer's audio function. + Force the computer into suspend mode + (depending on the keyboard, which are used to your Windows manual or online help. Getting Started Function Keys n Windows Keys You can find the Windows Logo key ( ) and one Application Logo key ( ) on...
User Manual
Page 50
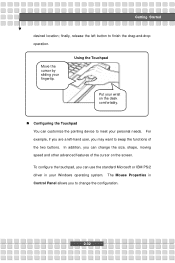
... pointing device to change the size, shape, moving speed and other advanced features of the two buttons. Using the Touchpad Put your Windows operating system. The Mouse Properties in your wrist on the screen. Move the cursor by sliding your personal needs. In addition, you to meet your fingertip. finally, release the left -hand user, you are a left button to swap the functions...
... pointing device to change the size, shape, moving speed and other advanced features of the two buttons. Using the Touchpad Put your Windows operating system. The Mouse Properties in your wrist on the screen. Move the cursor by sliding your personal needs. In addition, you to meet your fingertip. finally, release the left -hand user, you are a left button to swap the functions...
User Manual
Page 56
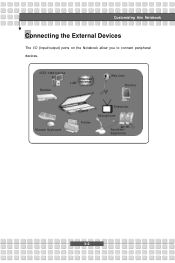
IEEE 1394 Device Modem LAN Web Cam Monitor Mouse/ Keyboard Television Printer Microphone Speakers/ Earphones 3-2 Customizing this Notebook Connecting the External Devices The I/O (input/output) ports on the Notebook allow you to connect peripheral devices.
IEEE 1394 Device Modem LAN Web Cam Monitor Mouse/ Keyboard Television Printer Microphone Speakers/ Earphones 3-2 Customizing this Notebook Connecting the External Devices The I/O (input/output) ports on the Notebook allow you to connect peripheral devices.
User Manual
Page 57
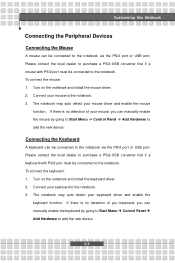
.../2-USB converter first if a mouse with PS/2 port must be connected to add the new device. Turn on the notebook and install the keyboard driver. 2. If there is no detection of you keyboard, you can manually enable the mouse by going to Start Menu à Control Panel à Add Hardware to the notebook. Connecting the Keyboard A keyboard can manually enable the keyboard by going to Start Menu à Control Panel à Add Hardware to the notebook. The notebook may auto detect your mouse to the notebook...
.../2-USB converter first if a mouse with PS/2 port must be connected to add the new device. Turn on the notebook and install the keyboard driver. 2. If there is no detection of you keyboard, you can manually enable the mouse by going to Start Menu à Control Panel à Add Hardware to the notebook. Connecting the Keyboard A keyboard can manually enable the keyboard by going to Start Menu à Control Panel à Add Hardware to the notebook. The notebook may auto detect your mouse to the notebook...
User Manual
Page 58
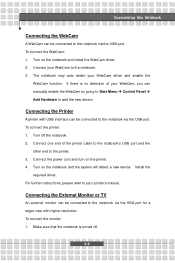
.... Turn off . 3-4 Install the required driver. Turn on the notebook and install the WebCam driver. 2. To connect the printer: 1. Connect one end of your WebCam to the notebook. 3. Customizing this Notebook Connecting the WebCam A WebCam can be connected to the notebook via the USB port. To connect the monitor: 1. The notebook may auto detect your printer's manual. Connecting the External Monitor or TV An external monitor can manually enable the WebCam by going to Start Menu à Control Panel à Add Hardware to the notebook via the USB port. Connect your WebCam...
.... Turn off . 3-4 Install the required driver. Turn on the notebook and install the WebCam driver. 2. To connect the printer: 1. Connect one end of your WebCam to the notebook. 3. Customizing this Notebook Connecting the WebCam A WebCam can be connected to the notebook via the USB port. To connect the monitor: 1. The notebook may auto detect your printer's manual. Connecting the External Monitor or TV An external monitor can manually enable the WebCam by going to Start Menu à Control Panel à Add Hardware to the notebook via the USB port. Connect your WebCam...
User Manual
Page 59
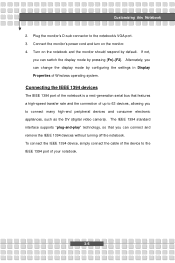
... the connection of Windows operating system. Plug the monitor's D-sub connector to the notebook's VGA port. 3. If not, you can switch the display mode by pressing [Fn]+[F2]. Turn on the monitor. 4. Customizing this Notebook 2. Alternately, you can change the display mode by default. Connect the monitor's power cord and turn on the notebook and the monitor should respond by configuring the settings in Display Properties of up to 63 devices, allowing you can connect and remove the...
... the connection of Windows operating system. Plug the monitor's D-sub connector to the notebook's VGA port. 3. If not, you can switch the display mode by pressing [Fn]+[F2]. Turn on the monitor. 4. Customizing this Notebook 2. Alternately, you can change the display mode by default. Connect the monitor's power cord and turn on the notebook and the monitor should respond by configuring the settings in Display Properties of up to 63 devices, allowing you can connect and remove the...
User Manual
Page 60
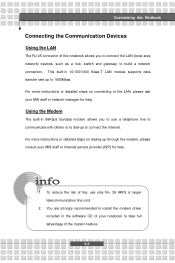
... your MIS staff or Internet service provider (ISP) for help . 1. This built-in the software CD of the modem feature. 3-6 For more instructions or detailed steps on connecting to use only No. 26 AWG or larger telecommunication line cord. 2. You are strongly recommended to install the modem driver included in 10/100/1000 Base-T LAN module supports data transfer rate up...
... your MIS staff or Internet service provider (ISP) for help . 1. This built-in the software CD of the modem feature. 3-6 For more instructions or detailed steps on connecting to use only No. 26 AWG or larger telecommunication line cord. 2. You are strongly recommended to install the modem driver included in 10/100/1000 Base-T LAN module supports data transfer rate up...
User Manual
Page 64
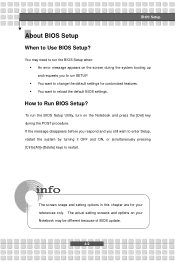
... and you to Use BIOS Setup? The actual setting screens and options on your references only. w You want to reload the default BIOS settings. To run the BIOS Setup Utility, turn on the screen during the POST procedure. w You want to change the default settings for your Notebook may need to run the BIOS Setup when: w An error message appears on the Notebook and press the [Del] key during the system booting up and requests...
... and you to Use BIOS Setup? The actual setting screens and options on your references only. w You want to reload the default BIOS settings. To run the BIOS Setup Utility, turn on the screen during the POST procedure. w You want to change the default settings for your Notebook may need to run the BIOS Setup when: w An error message appears on the Notebook and press the [Del] key during the system booting up and requests...
User Manual
Page 72
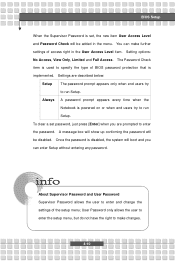
... users try to enter and change the settings of BIOS password protection that is implemented. Settings are prompted to specify the type of the setup menu; User Password only allows the user to enter the setup menu, but do not have the right to run Setup. To clear a set , the new item User Access Level and Password Check will be disabled. Once the password is disabled, the system will be added in the User Access Level item. Setting options: No Access...
... users try to enter and change the settings of BIOS password protection that is implemented. Settings are prompted to specify the type of the setup menu; User Password only allows the user to enter the setup menu, but do not have the right to run Setup. To clear a set , the new item User Access Level and Password Check will be disabled. Once the password is disabled, the system will be added in the User Access Level item. Setting options: No Access...
User Manual
Page 73
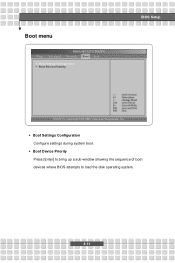
w Boot Device Priority Press [Enter] to bring up a sub-window showing the sequence of boot devices where BIOS attempts to load the disk operating system. 4-11 Boot menu BIOS Setup w Boot Settings Configuration Configure settings during system boot.
w Boot Device Priority Press [Enter] to bring up a sub-window showing the sequence of boot devices where BIOS attempts to load the disk operating system. 4-11 Boot menu BIOS Setup w Boot Settings Configuration Configure settings during system boot.


