User Guide
Page 14
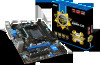
x 8.5 in . English BIOS Features Form Factor ■ 64 Mb flash ■ UEFI AMI BIOS ■ ACPI 5.0, PnP 1.0a, SM BIOS 2.7, DMI 2.0 ■ Multi-language ■ Micro-ATX Form Factor ■ 8.9 in . (22.6 cm x 21.6 cm) For the latest information about CPU, please visit http://www.msi.com/service/cpu-support/ For more information on compatible components, please visit http://www.msi.com/service/test-report/ 14
x 8.5 in . English BIOS Features Form Factor ■ 64 Mb flash ■ UEFI AMI BIOS ■ ACPI 5.0, PnP 1.0a, SM BIOS 2.7, DMI 2.0 ■ Multi-language ■ Micro-ATX Form Factor ■ 8.9 in . (22.6 cm x 21.6 cm) For the latest information about CPU, please visit http://www.msi.com/service/cpu-support/ For more information on compatible components, please visit http://www.msi.com/service/test-report/ 14

User Guide
Page 21
.... The Command Center utility can be plugged into any fan blades. 21 A system fan can be activated. To clear the warning, you must enter the BIOS utility and clear the record. 2.C1.IGNTroRuUnd CPUFAN,SYSFAN1~2: Fan Power Connectors The fan power connectors support system cooling fans with a speed sensor to connect...
.... The Command Center utility can be plugged into any fan blades. 21 A system fan can be activated. To clear the warning, you must enter the BIOS utility and clear the record. 2.C1.IGNTroRuUnd CPUFAN,SYSFAN1~2: Fan Power Connectors The fan power connectors support system cooling fans with a speed sensor to connect...
User Guide
Page 25
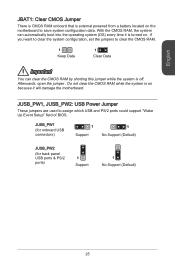
... the CMOS RAM while the system is on the motherboard to assign which USB and PS/2 ports could support "Wake Up Event Setup" field of BIOS. JUSB_PW1 (for onboard USB connectors) 1 Support 1 No Support (Default) JUSB_PW2 (for back panel USB ports & PS/2 ports) 1 Support 1 No Support (Default) 25 English JBAT1: Clear...
... the CMOS RAM while the system is on the motherboard to assign which USB and PS/2 ports could support "Wake Up Event Setup" field of BIOS. JUSB_PW1 (for onboard USB connectors) 1 Support 1 No Support (Default) JUSB_PW2 (for back panel USB ports & PS/2 ports) 1 Support 1 No Support (Default) 25 English JBAT1: Clear...
User Guide
Page 27
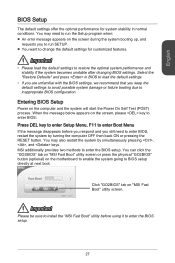
... settings to avoid possible system damage or failure booting due to enter the BIOS setup. Entering BIOS Setup Power on "MSI Fast Boot" utility screen. When the message below appears on the screen, please key to enter BIOS: Press DEL key to enter Setup Menu, F11 to enter Boot Menu ... RESET button. Important • Please load the default settings to enter the BIOS setup. 27 English BIOS Setup The default settings offer the optimal performance for customized features. Important Please be sure to install the "MSI Fast Boot" utility before you respond and you still need to run the ...
... settings to avoid possible system damage or failure booting due to enter the BIOS setup. Entering BIOS Setup Power on "MSI Fast Boot" utility screen. When the message below appears on the screen, please key to enter BIOS: Press DEL key to enter Setup Menu, F11 to enter Boot Menu ... RESET button. Important • Please load the default settings to enter the BIOS setup. 27 English BIOS Setup The default settings offer the optimal performance for customized features. Important Please be sure to install the "MSI Fast Boot" utility before you respond and you still need to run the ...

User Guide
Page 28
English Overview After entering BIOS, the following screen is not guaranteed, and if done improperly, can void your warranty or severely damage your hardware. • If you are unfamiliar with overclocking, we advise you to use OC Genie for easy overclocking. 28 Temperature monitor Language Model name Virtual OC Genie Button BIOS menu selection System information Boot device priority bar BIOS menu selection OC Menu Menu display Important • Overclocking your PC manually is only recommended for advanced users. • Overclocking is displayed.
English Overview After entering BIOS, the following screen is not guaranteed, and if done improperly, can void your warranty or severely damage your hardware. • If you are unfamiliar with overclocking, we advise you to use OC Genie for easy overclocking. 28 Temperature monitor Language Model name Virtual OC Genie Button BIOS menu selection System information Boot device priority bar BIOS menu selection OC Menu Menu display Important • Overclocking your PC manually is only recommended for advanced users. • Overclocking is displayed.

User Guide
Page 30
... channel. ▶ Advanced DRAM Configuration Press to enter the sub-menu. When the XMP is Enabled, the AMP will be forced to "Auto", BIOS will set DRAM voltage automatically or you can set it occurs, please clear the CMOS data and restore the default settings. (Refer to the Clear... CMOS jumper/ button section to clear the CMOS data, and enter the BIOS to reduce the EMI (Electromagnetic Interference) problem. [Disabled] Enhances the overclocking ability of CPU Base clock. 30 If set to be available when you...
... channel. ▶ Advanced DRAM Configuration Press to enter the sub-menu. When the XMP is Enabled, the AMP will be forced to "Auto", BIOS will set DRAM voltage automatically or you can set it occurs, please clear the CMOS data and restore the default settings. (Refer to the Clear... CMOS jumper/ button section to clear the CMOS data, and enter the BIOS to reduce the EMI (Electromagnetic Interference) problem. [Disabled] Enhances the overclocking ability of CPU Base clock. 30 If set to be available when you...

User Guide
Page 31
... Spectrum if you do not have any EMI problem, leave the setting at [Disabled] for new devices. [Disabled] Disables this function and keeps the current BIOS settings. ▶ OC Retry Count When overclocking has failed, setting this function. If overclocking has failed every time, the system will allow system to load...
... Spectrum if you do not have any EMI problem, leave the setting at [Disabled] for new devices. [Disabled] Disables this function and keeps the current BIOS settings. ▶ OC Retry Count When overclocking has failed, setting this function. If overclocking has failed every time, the system will allow system to load...

User Guide
Page 49
한국어 BIOS 설정 SETUP 중요사항 • BIOS BIOS Enter • BIOS POST (Power On Self Test DEL Press DEL key to enter Setup Menu, F11 to enter Boot Menu (DEL F11 BIOS RESET Ctrl>, 및
한국어 BIOS 설정 SETUP 중요사항 • BIOS BIOS Enter • BIOS POST (Power On Self Test DEL Press DEL key to enter Setup Menu, F11 to enter Boot Menu (DEL F11 BIOS RESET Ctrl>, 및

User Guide
Page 52
한국어 ▶ Intel Extreme Memory Profile (XMP) [Disabled] XMP XMP XMP AMP [Disabled] [Profile 1] XMP 1 [Profile 2] XMP 2 ▶ AMD Memory Profile (AMP) [Disabled] AMP AMP AMP XMP [Disabled] [Profile 1] AMP 1 [Profile 2] AMP 2 ▶ DRAM Timing Mode [Auto] [Auto] DRAM SPD (Serial Presence Detect [Link] DRAM [UnLink] DRAM ▶ Advanced DRAM Configuration
한국어 ▶ Intel Extreme Memory Profile (XMP) [Disabled] XMP XMP XMP AMP [Disabled] [Profile 1] XMP 1 [Profile 2] XMP 2 ▶ AMD Memory Profile (AMP) [Disabled] AMP AMP AMP XMP [Disabled] [Profile 1] AMP 1 [Profile 2] AMP 2 ▶ DRAM Timing Mode [Auto] [Auto] DRAM SPD (Serial Presence Detect [Link] DRAM [UnLink] DRAM ▶ Advanced DRAM Configuration

User Guide
Page 181
日本語 BIOSの設定 BIOS SETUP 注意 • BIOS Restore Defaults BIOS Enter • BIOS BIOS BIOS POST(Power On Self Test DEL BIOS Press DEL key to enter Setup Menu, F11 to enter Boot Menu (、と
日本語 BIOSの設定 BIOS SETUP 注意 • BIOS Restore Defaults BIOS Enter • BIOS BIOS BIOS POST(Power On Self Test DEL BIOS Press DEL key to enter Setup Menu, F11 to enter Boot Menu (、と


