User Guide
Page 4
.... 7. Always read the safety instructions carefully. 2. Keep this User's Manual for technical guide, BIOS updates, driver updates, and other information: http://www.msi.com.tw & http://www.msi. Never pour any liquid into the equipment. The openings on the equipment should be noted. 10...can be obtained from humidity. 4. Place the power cord such a way that could damage or cause electrical shock. 11. h Visit the MSI homepage & FAQ site for future reference. 3. Technical Support If a problem arises with the same or equivalent type recommended by a service personnel:...
.... 7. Always read the safety instructions carefully. 2. Keep this User's Manual for technical guide, BIOS updates, driver updates, and other information: http://www.msi.com.tw & http://www.msi. Never pour any liquid into the equipment. The openings on the equipment should be noted. 10...can be obtained from humidity. 4. Place the power cord such a way that could damage or cause electrical shock. 11. h Visit the MSI homepage & FAQ site for future reference. 3. Technical Support If a problem arises with the same or equivalent type recommended by a service personnel:...
User Guide
Page 6
... Device 3-2 Control Keys 3-3 Getting Help 3-3 Main Menu 3-3 Default Settings 3-3 The Main Menu 3-4 Standard CMOS Features 3-6 Advanced BIOS Features 3-8 Advanced Chipset Features 3-11 Power Management Features 3-13 PNP/PCI Configurations 3-16 Integrated Peripherals 3-19 PC Health Status 3-23... Frequency/Voltage Control 3-24 Set Supervisor/User Password 3-27 Load High Performance/BIOS Setup Defaults 3-28 vi CD-In Connector: CD1 2-14 ATA100 Hard Disk Connectors: IDE1 & IDE2 2-15 Front USB Connectors: JUSB2...
... Device 3-2 Control Keys 3-3 Getting Help 3-3 Main Menu 3-3 Default Settings 3-3 The Main Menu 3-4 Standard CMOS Features 3-6 Advanced BIOS Features 3-8 Advanced Chipset Features 3-11 Power Management Features 3-13 PNP/PCI Configurations 3-16 Integrated Peripherals 3-19 PC Health Status 3-23... Frequency/Voltage Control 3-24 Set Supervisor/User Password 3-27 Load High Performance/BIOS Setup Defaults 3-28 vi CD-In Connector: CD1 2-14 ATA100 Hard Disk Connectors: IDE1 & IDE2 2-15 Front USB Connectors: JUSB2...
User Guide
Page 9
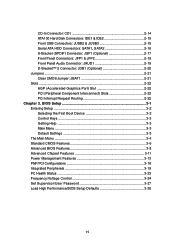
...The mainboard provides a Desktop Management Interface (DMI) function which detects the peripheral devices and expansion cards of the board automatically. Dimension h ATX Form Factor: 29.5 cm (L) x 21.0 cm (W). Getting Started On-Board Peripherals h On-Board Peripherals includes: - 1 floppy...with PCI v2.2. - h 6 channels software audio codec ALC655. - Integrated Fast Ethernet MAC and PHY in ICH5. BIOS h The mainboard BIOS provides "Plug & Play" BIOS which records your mainboard specifications. Supports 10Mb/s, 100Mb/s and 1000Mb/s (1000Mb/s is only for Realtek 8110S) auto-negotiation...
...The mainboard provides a Desktop Management Interface (DMI) function which detects the peripheral devices and expansion cards of the board automatically. Dimension h ATX Form Factor: 29.5 cm (L) x 21.0 cm (W). Getting Started On-Board Peripherals h On-Board Peripherals includes: - 1 floppy...with PCI v2.2. - h 6 channels software audio codec ALC655. - Integrated Fast Ethernet MAC and PHY in ICH5. BIOS h The mainboard BIOS provides "Plug & Play" BIOS which records your mainboard specifications. Supports 10Mb/s, 100Mb/s and 1000Mb/s (1000Mb/s is only for Realtek 8110S) auto-negotiation...

User Guide
Page 10
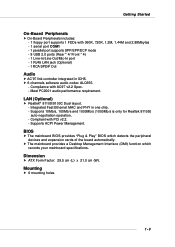
MS-6788 ATX Mainboard Mainboard Layout Top : mouse Bottom: keyboard CP UFAN1 T:SP DIF Out B:USB ports T:LAN jack (Optional) B:USB ports T: L i n e - I n M:Line-Out B:Mic JPW1 ATX Power Supply Intel 865PE chipset DIMM 1 DIMM 2 DIMM 3 Winb ond W83627THF BIOS AGP Slot PCI Slot 1 Realtek 8110S/8100C PCI Slot 2 PCI Slot 3 CD1 Codec JSP1 PCI Slot 4 PCI Slot 5 JAUD1 JDB1 ICH 5 S ATA 2 S ATA 1 IDE 2 IDE 1 SYSFAN1 BATT + USB2 USB3 FDD1 J B AT 1 JFP1 JFP2 865PE Neo2-V (MS-6788 v2.X) ATX Mainboard 1-4
MS-6788 ATX Mainboard Mainboard Layout Top : mouse Bottom: keyboard CP UFAN1 T:SP DIF Out B:USB ports T:LAN jack (Optional) B:USB ports T: L i n e - I n M:Line-Out B:Mic JPW1 ATX Power Supply Intel 865PE chipset DIMM 1 DIMM 2 DIMM 3 Winb ond W83627THF BIOS AGP Slot PCI Slot 1 Realtek 8110S/8100C PCI Slot 2 PCI Slot 3 CD1 Codec JSP1 PCI Slot 4 PCI Slot 5 JAUD1 JDB1 ICH 5 S ATA 2 S ATA 1 IDE 2 IDE 1 SYSFAN1 BATT + USB2 USB3 FDD1 J B AT 1 JFP1 JFP2 865PE Neo2-V (MS-6788 v2.X) ATX Mainboard 1-4
User Guide
Page 11
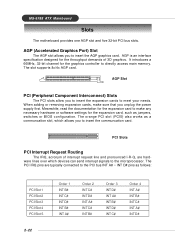
Getting Started Top : mouse Bottom: keyboard CP UFAN1 T:SP DIF Out B:USB ports T:LAN jack (Optional) B:USB ports T: L i n e - I n M:Line-Out B:Mic JPW1 ATX Power Supply Intel 848P chipset DIMM 1 DIMM 2 Winb ond W83627THF BIOS AGP Slot PCI Slot 1 Realtek 8110S/8100C PCI Slot 2 PCI Slot 3 CD1 Codec JSP1 PCI Slot 4 PCI Slot 5 JAUD1 JDB1 ICH 5 S ATA 2 S ATA 1 IDE 2 IDE 1 SYSFAN 1 BATT + USB2 USB3 FDD1 J B AT 1 JFP1 JFP2 848P Neo-V (MS-6788 v2.X) ATX Mainboard 1-5
Getting Started Top : mouse Bottom: keyboard CP UFAN1 T:SP DIF Out B:USB ports T:LAN jack (Optional) B:USB ports T: L i n e - I n M:Line-Out B:Mic JPW1 ATX Power Supply Intel 848P chipset DIMM 1 DIMM 2 Winb ond W83627THF BIOS AGP Slot PCI Slot 1 Realtek 8110S/8100C PCI Slot 2 PCI Slot 3 CD1 Codec JSP1 PCI Slot 4 PCI Slot 5 JAUD1 JDB1 ICH 5 S ATA 2 S ATA 1 IDE 2 IDE 1 SYSFAN 1 BATT + USB2 USB3 FDD1 J B AT 1 JFP1 JFP2 848P Neo-V (MS-6788 v2.X) ATX Mainboard 1-5
User Guide
Page 33
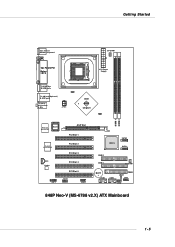
... Interconnect) Slots The PCI slots allow you unplug the power supply first. Meanwhile, read the documentation for the expansion card, such as jumpers, switches or BIOS configuration. PCI Slots PCI Interrupt Request Routing The IRQ, acronym of 3D graphics. The slot supports 8x/4x AGP card. The orange PCI slot (PCI5... 1 INT B# INT C# INT D# INT B# INT A# Order 2 INT C# INT D# INT A# INT C# INT B# Order 3 INT D# INT A# INT B# INT D# INT C# Order 4 INT A# INT B# INT C# INT A# INT D# MS-6788 ATX Mainboard Slots The motherboard provides one AGP slot and five 32-bit PCI bus slots.
... Interconnect) Slots The PCI slots allow you unplug the power supply first. Meanwhile, read the documentation for the expansion card, such as jumpers, switches or BIOS configuration. PCI Slots PCI Interrupt Request Routing The IRQ, acronym of 3D graphics. The slot supports 8x/4x AGP card. The orange PCI slot (PCI5... 1 INT B# INT C# INT D# INT B# INT A# Order 2 INT C# INT D# INT A# INT C# INT B# Order 3 INT D# INT A# INT B# INT D# INT C# Order 4 INT A# INT B# INT C# INT A# INT D# MS-6788 ATX Mainboard Slots The motherboard provides one AGP slot and five 32-bit PCI bus slots.
User Guide
Page 34
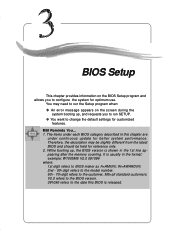
...only. 2. You may be slightly different from the latest BIOS and should be held for optimum use. V2.0 refers to the BIOS version. 091096 refers to change the default settings for better system performance. MSI Reminds You... 1. BIOS Setup Chapter 3. Therefore, the description may need to ...run the Setup program when: ” An error message appears on the BIOS Setup program and allows you to run SETUP. ” You...
...only. 2. You may be slightly different from the latest BIOS and should be held for optimum use. V2.0 refers to the BIOS version. 091096 refers to change the default settings for better system performance. MSI Reminds You... 1. BIOS Setup Chapter 3. Therefore, the description may need to ...run the Setup program when: ” An error message appears on the BIOS Setup program and allows you to run SETUP. ” You...
User Guide
Page 35
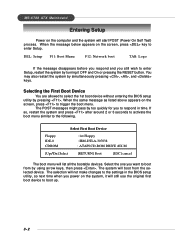
... respond and you to boot up. 3-2 When the message below appears on the screen, press to select the 1st boot device without entering the BIOS setup utility by pressing . MS-6788 ATX Mainboard Entering Setup Power on the system, it will still use the original first boot device to respond in the... BIOS setup utility, so next time when you want to enter Setup, restart the system by turning it OFF and On or pressing the RESET button...
... respond and you to boot up. 3-2 When the message below appears on the screen, press to select the 1st boot device without entering the BIOS setup utility by pressing . MS-6788 ATX Mainboard Entering Setup Power on the system, it will still use the original first boot device to respond in the... BIOS setup utility, so next time when you want to enter Setup, restart the system by turning it OFF and On or pressing the RESET button...
User Guide
Page 36
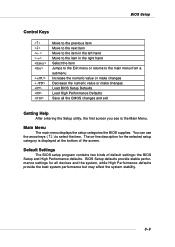
...;↓ ) to the main menu from a submenu Increase the numeric value or make changes Decrease the numeric value or make changes Load BIOS Setup Defaults Load High Performance Defaults Save all devices and the system, while High Performance defaults provide the best system performance but may affect ...the system stability. 3-3 Main Menu The main menu displays the setup categories the BIOS supplies. The on-line description for all the CMOS changes and exit Getting Help After entering the Setup utility, the first screen you...
...;↓ ) to the main menu from a submenu Increase the numeric value or make changes Decrease the numeric value or make changes Load BIOS Setup Defaults Load High Performance Defaults Save all devices and the system, while High Performance defaults provide the best system performance but may affect ...the system stability. 3-3 Main Menu The main menu displays the setup categories the BIOS supplies. The on-line description for all the CMOS changes and exit Getting Help After entering the Setup utility, the first screen you...
User Guide
Page 37
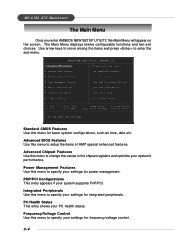
Advanced BIOS Features Use this menu to setup the items of AMI® special enhanced features. Integrated Peripherals Use this menu to specify your settings for integrated peripherals. MS-6788 ATX Mainboard The Main Menu Once you enter AMIBIOS NEW SETUP UTILITY, the Main Menu will appear on the screen. Frequency/Voltage Control...
Advanced BIOS Features Use this menu to setup the items of AMI® special enhanced features. Integrated Peripherals Use this menu to specify your settings for integrated peripherals. MS-6788 ATX Mainboard The Main Menu Once you enter AMIBIOS NEW SETUP UTILITY, the Main Menu will appear on the screen. Frequency/Voltage Control...
User Guide
Page 38
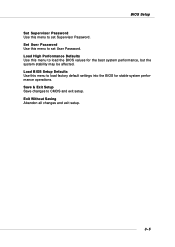
Load BIOS Setup Defaults Use this menu to load the BIOS values for stable system performance operations. BIOS Setup Set Supervisor Password Use this menu to set Supervisor Password. Save & Exit Setup Save changes to load factory default settings into the BIOS for the best system performance, but the system stability may be affected. Set User Password Use this menu to set User Password. Exit Without Saving Abandon all changes and exit setup. 3-5 Load High Performance Defaults Use this menu to CMOS and exit setup.
Load BIOS Setup Defaults Use this menu to load the BIOS values for stable system performance operations. BIOS Setup Set Supervisor Password Use this menu to set Supervisor Password. Save & Exit Setup Save changes to load factory default settings into the BIOS for the best system performance, but the system stability may be affected. Set User Password Use this menu to set User Password. Exit Without Saving Abandon all changes and exit setup. 3-5 Load High Performance Defaults Use this menu to CMOS and exit setup.
User Guide
Page 39
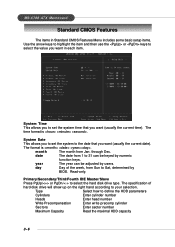
...The month from 1 to 31 can be keyed by numeric function keys. date The date from Jan. year The year can be adjusted by BIOS. Type Select how to select the hard disk drive type. The time format is . The format is . System Date This allows you to ...Heads Enter head number Write Precompensation Enter write precomp cylinder Sectors Enter sector number Maximum Capacity Read the maximal HDD capacity 3-6 MS-6788 ATX Mainboard Standard CMOS Features The items in Standard CMOS Features Menu includes some basic setup items. Use the arrow keys to highlight the ...
...The month from 1 to 31 can be keyed by numeric function keys. date The date from Jan. year The year can be adjusted by BIOS. Type Select how to select the hard disk drive type. The time format is . The format is . System Date This allows you to ...Heads Enter head number Write Precompensation Enter write precomp cylinder Sectors Enter sector number Maximum Capacity Read the maximal HDD capacity 3-6 MS-6788 ATX Mainboard Standard CMOS Features The items in Standard CMOS Features Menu includes some basic setup items. Use the arrow keys to highlight the ...
User Guide
Page 40
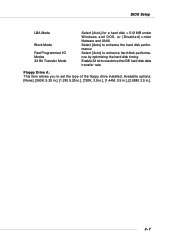
Available options: [None], [360K, 5.25 in.], [1.2M, 5.25 in.], [720K, 3.5 in.], [1.44M, 3.5 in.], [2.88M, 3.5 in.]. 3-7 BIOS Setup LBA Mode Block Mode Fast Programmed I/O Modes 32 Bit Transfer Mode Select [Auto] for a hard disk > 512 MB under Windows and DOS, or [Disabled] under Netware and UNIX Select [Auto] to enhance the hard disk performance Select [Auto] to enhance hard disk performance by optimizing the hard disk timing Enable 32 bit to maximize the IDE hard disk data transfer rate Floppy Drive A: This item allows you to set the type of the floppy drive installed.
Available options: [None], [360K, 5.25 in.], [1.2M, 5.25 in.], [720K, 3.5 in.], [1.44M, 3.5 in.], [2.88M, 3.5 in.]. 3-7 BIOS Setup LBA Mode Block Mode Fast Programmed I/O Modes 32 Bit Transfer Mode Select [Auto] for a hard disk > 512 MB under Windows and DOS, or [Disabled] under Netware and UNIX Select [Auto] to enhance the hard disk performance Select [Auto] to enhance hard disk performance by optimizing the hard disk timing Enable 32 bit to maximize the IDE hard disk data transfer rate Floppy Drive A: This item allows you to set the type of the floppy drive installed.
User Guide
Page 41
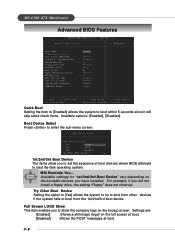
...Shows a still image (logo) on the bootable devices you to boot within 5 seconds since it will skip some check items. Available options: [Enabled], [Disabled]. MSI Reminds You... Try Other Boot Device Setting the option to [Yes] allows the system to try to boot from the 1st/2nd/3rd boot device...allow you did not install a floppy drive, the setting "Floppy" does not show the company logo on the bootup screen. MS-6788 ATX Mainboard Advanced BIOS Features Quick Boot Setting the item to [Enabled] allows the system to show up. Full Screen LOGO Show This item enables you have ...
...Shows a still image (logo) on the bootable devices you to boot within 5 seconds since it will skip some check items. Available options: [Enabled], [Disabled]. MSI Reminds You... Try Other Boot Device Setting the option to [Yes] allows the system to try to boot from the 1st/2nd/3rd boot device...allow you did not install a floppy drive, the setting "Floppy" does not show the company logo on the bootup screen. MS-6788 ATX Mainboard Advanced BIOS Features Quick Boot Setting the item to [Enabled] allows the system to show up. Full Screen LOGO Show This item enables you have ...
User Guide
Page 42
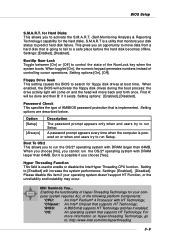
... the S.M.A.R.T. (Self-Monitoring Analysis & Reporting Technology) capability for floppy disk drives at boot time. Settings: [Enabled], [Disabled]. MSI Reminds You... When you choose [No], you to run Setup. puter system requires ALL of Hyper-Threading Technology for Hard Disks...you cannot run the OS/2® operating system with HT Technology; *Chipset: An Intel® Chipset that supports HT Technology; *BIOS: A BIOS that monitors your operating system doesn't support HT Function, or the unreliability and instability may occur. Hyper Threading Function This field is...
... the S.M.A.R.T. (Self-Monitoring Analysis & Reporting Technology) capability for floppy disk drives at boot time. Settings: [Enabled], [Disabled]. MSI Reminds You... When you choose [No], you to run Setup. puter system requires ALL of Hyper-Threading Technology for Hard Disks...you cannot run the OS/2® operating system with HT Technology; *Chipset: An Intel® Chipset that supports HT Technology; *BIOS: A BIOS that monitors your operating system doesn't support HT Function, or the unreliability and instability may occur. Hyper Threading Function This field is...
User Guide
Page 43
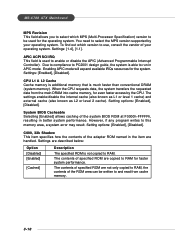
...specifies how the contents of the ROM area can be used to this memory area, a system error may result. MS-6788 ATX Mainboard MPS Revision This field allows you to select which version to use, consult the vendor of your operating system. The settings .... Settings: [Enabled], [Disabled]. Due to compliance to PC2001 design guide, the system is much faster than conventional DRAM (system memory). System BIOS Cacheable Selecting [Enabled] allows caching of specified ROM are described below: Option [Disabled] [Enabled] [Cached] Description The specified ROM is used for...
...specifies how the contents of the ROM area can be used to this memory area, a system error may result. MS-6788 ATX Mainboard MPS Revision This field allows you to select which version to use, consult the vendor of your operating system. The settings .... Settings: [Enabled], [Disabled]. Due to compliance to PC2001 design guide, the system is much faster than conventional DRAM (system memory). System BIOS Cacheable Selecting [Enabled] allows caching of specified ROM are described below: Option [Disabled] [Enabled] [Cached] Description The specified ROM is used for...
User Guide
Page 44
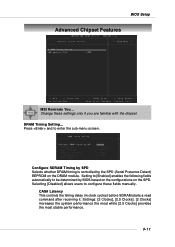
... are familiar with the chipset. Settings: [2 Clocks], [2.5 Clocks]. [2 Clocks] increases the system performance the most while [2.5 Clocks] provides the most stable performance. 3-11 BIOS Setup Advanced Chipset Features MSI Reminds You... Setting to [Enabled] enables the following fields automatically to be determined by the SPD (Serial Presence Detect) EEPROM on the SPD...
... are familiar with the chipset. Settings: [2 Clocks], [2.5 Clocks]. [2 Clocks] increases the system performance the most while [2.5 Clocks] provides the most stable performance. 3-11 BIOS Setup Advanced Chipset Features MSI Reminds You... Setting to [Enabled] enables the following fields automatically to be determined by the SPD (Serial Presence Detect) EEPROM on the SPD...
User Guide
Page 46
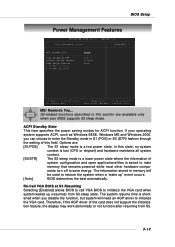
...Windows 2000, you disable the function, but system will be used to restore the system when a "wake up (resumes) from S3. 3-13 If your BIOS supports S3 sleep mode. nents turn off to initialize the VGA card. The system resume time is a low power state.... BIOS Setup Power Management Features MSI Reminds You... Re-Call VGA BIOS at S3 Resuming Selecting [Enabled] allows BIOS to call VGA BIOS to main memory that remains powered while most other hardware compo- S3-related functions described in...
...Windows 2000, you disable the function, but system will be used to restore the system when a "wake up (resumes) from S3. 3-13 If your BIOS supports S3 sleep mode. nents turn off to initialize the VGA card. The system resume time is a low power state.... BIOS Setup Power Management Features MSI Reminds You... Re-Call VGA BIOS at S3 Resuming Selecting [Enabled] allows BIOS to call VGA BIOS to main memory that remains powered while most other hardware compo- S3-related functions described in...

User Guide
Page 47
...Events Press and the following sub-menu appears. 3-14 FDC/LPT/COM Ports, Primary/Secondary Master/Slave IDE These items specify if the BIOS will be shut off. Set WakeUp Events Press and the following sub-menu appears. Settings: [Monitor], [Ignore]. Suspend Time Out (... Saving mode and stop CPU internal clock. Settings: [Disabled], [1], [2], [4], [8], [10], [20], [30], [40], [50], [60]. MS-6788 ATX Mainboard Power Management/APM Setting to [Enabled] will activate an Advanced Power Management (APM) device to configure the Power Button function. Settings: [Enabled], [Disabled]. ...
...Events Press and the following sub-menu appears. 3-14 FDC/LPT/COM Ports, Primary/Secondary Master/Slave IDE These items specify if the BIOS will be shut off. Set WakeUp Events Press and the following sub-menu appears. Settings: [Monitor], [Ignore]. Suspend Time Out (... Saving mode and stop CPU internal clock. Settings: [Disabled], [1], [2], [4], [8], [10], [20], [30], [40], [50], [60]. MS-6788 ATX Mainboard Power Management/APM Setting to [Enabled] will activate an Advanced Power Management (APM) device to configure the Power Button function. Settings: [Enabled], [Disabled]. ...

User Guide
Page 48
BIOS Setup USB Device Wakeup From S3 This item allows the activity of booting up the system on a scheduled time/date from the soft off (S5) ... password to enable for each item are: Alarm Date 01 ~ 31, Every Day Alarm Hour 00 ~ 23 Alarm Minute 00 ~ 59 Alarm Second 00 ~ 59 MSI Reminds You... Resume On RTC Alarm This is used to enable or disable the feature of the USB device to power on the system. RTC...
BIOS Setup USB Device Wakeup From S3 This item allows the activity of booting up the system on a scheduled time/date from the soft off (S5) ... password to enable for each item are: Alarm Date 01 ~ 31, Every Day Alarm Hour 00 ~ 23 Alarm Minute 00 ~ 59 Alarm Second 00 ~ 59 MSI Reminds You... Resume On RTC Alarm This is used to enable or disable the feature of the USB device to power on the system. RTC...


