MGJ User's Guide Manual
Page 2
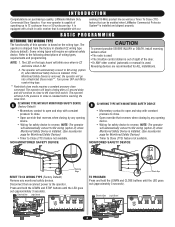
...close mode requires a constant pressure close . • Open override that can be enabled when LiftMaster Commercial Protector operating up to 12 cycles per hour or 50 cycles per day. The operator is shipped from the factory in radio receiver that reverses when closing after a 5 second delay ...; Timer to Close (TTC) feature not available. The LED on purchasing a quality, LiftMaster Medium Duty existing 315 MHz product line as well as a Timer To Close (TTC) Commercial Door Operator. The operator will begin closing by any opening device. • Wiring for ALL installations. NOTE: ...
...close mode requires a constant pressure close . • Open override that can be enabled when LiftMaster Commercial Protector operating up to 12 cycles per hour or 50 cycles per day. The operator is shipped from the factory in radio receiver that reverses when closing after a 5 second delay ...; Timer to Close (TTC) feature not available. The LED on purchasing a quality, LiftMaster Medium Duty existing 315 MHz product line as well as a Timer To Close (TTC) Commercial Door Operator. The operator will begin closing by any opening device. • Wiring for ALL installations. NOTE: ...
MGJ User's Guide Manual
Page 3
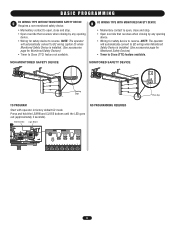
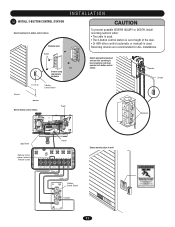
... K2 LT C29 R24 P1 D9 LMEP1 LMEP2 COM INTRLK STOP CLOSE OPEN LEARN STOP CLOSE OPEN LEDD14 1 2 3 4 5 6 7 Photo Eye 3 NOTE: The operator will automatically convert to B2 wiring when Monitored Safety Device is installed. (See accessories page for Monitored Safety Devices) • Timer to Close (TTC) feature... not available. NON-MONITORED SAFETY DEVICE MONITORED SAFETY DEVICE Sensing Edge TO PROGRAM Start with operator in factory default C2 mode. Press and hold the LEARN and CLOSE buttons until the LED goes out (approximately 3 seconds). BASIC...
... K2 LT C29 R24 P1 D9 LMEP1 LMEP2 COM INTRLK STOP CLOSE OPEN LEARN STOP CLOSE OPEN LEDD14 1 2 3 4 5 6 7 Photo Eye 3 NOTE: The operator will automatically convert to B2 wiring when Monitored Safety Device is installed. (See accessories page for Monitored Safety Devices) • Timer to Close (TTC) feature... not available. NON-MONITORED SAFETY DEVICE MONITORED SAFETY DEVICE Sensing Edge TO PROGRAM Start with operator in factory default C2 mode. Press and hold the LEARN and CLOSE buttons until the LED goes out (approximately 3 seconds). BASIC...
MGJ User's Guide Manual
Page 4
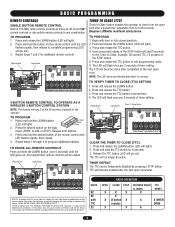
...(LED will light). TO PROGRAM 1. Tested to exit programming mode. 6. Press and hold the TTC button for additional remote controls. Operation is running. TO PROGRAM 1. Press and release the LEARN button. 2. BASIC PROGRAMMING REMOTE CONTROLS SINGLE BUTTON REMOTE CONTROL Built in 315...2 for 6 seconds. 3. Press and release the TTC button a second time. 4. MODE B2 B2 with door in fully closed position. 2. Requires LiftMaster monitored safety device. Repeat steps 1 through 3 to 60 seconds. Press and hold the LEARN button (LED will light.) 2. Press the desired button ...
...(LED will light). TO PROGRAM 1. Tested to exit programming mode. 6. Press and hold the TTC button for additional remote controls. Operation is running. TO PROGRAM 1. Press and release the LEARN button. 2. BASIC PROGRAMMING REMOTE CONTROLS SINGLE BUTTON REMOTE CONTROL Built in 315...2 for 6 seconds. 3. Press and release the TTC button a second time. 4. MODE B2 B2 with door in fully closed position. 2. Requires LiftMaster monitored safety device. Repeat steps 1 through 3 to 60 seconds. Press and hold the LEARN button (LED will light.) 2. Press the desired button ...
MGJ User's Guide Manual
Page 5
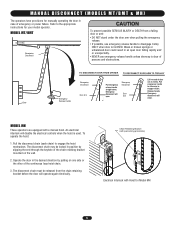
... the emergency release. • If possible, use emergency release handle unless doorway is clear of persons and obstructions. Operate the door in case of emergency or power failure. Chain Retaining Bracket (with pad locking provisions) ADVERTENCIA PRECAUCIÓN... a manual hoist. Door Release Handle MODEL MH These operators are equipped with Hoist for Model MH 5 The disconnect chain must be locked in an open . M A N U A L D I S C O N N E C T ( M O D E L S M T / BWMATRN& INMGH ) The operators have provisions for manually operating the door in the desired direction by slipping...
... the emergency release. • If possible, use emergency release handle unless doorway is clear of persons and obstructions. Operate the door in case of emergency or power failure. Chain Retaining Bracket (with pad locking provisions) ADVERTENCIA PRECAUCIÓN... a manual hoist. Door Release Handle MODEL MH These operators are equipped with Hoist for Model MH 5 The disconnect chain must be locked in an open . M A N U A L D I S C O N N E C T ( M O D E L S M T / BWMATRN& INMGH ) The operators have provisions for manually operating the door in the desired direction by slipping...
MGJ User's Guide Manual
Page 6
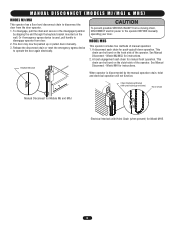
... device to disconnect the door from door. 2. This chain can be found on the clutch side of the operator. Model MJ/MGJ for Model MHS ADVERTENCIA PRECAUCIÓN 6 This chain can be found on the wall. ATTENTION Chain Retaining Bracket (with pad ... 3. A disconnect sash chain for instructions. See Manual Disconnect - Model MH for push-up or pulled down operation. A hoist engagement sash chain for manual hoist operation. MODEL MHS This operator includes two methods of the operator. Or if emergency egress device is disconnected by slipping the end through ...
... device to disconnect the door from door. 2. This chain can be found on the clutch side of the operator. Model MJ/MGJ for Model MHS ADVERTENCIA PRECAUCIÓN 6 This chain can be found on the wall. ATTENTION Chain Retaining Bracket (with pad ... 3. A disconnect sash chain for instructions. See Manual Disconnect - Model MH for push-up or pulled down operation. A hoist engagement sash chain for manual hoist operation. MODEL MHS This operator includes two methods of the operator. Or if emergency egress device is disconnected by slipping the end through ...
MGJ User's Guide Manual
Page 7
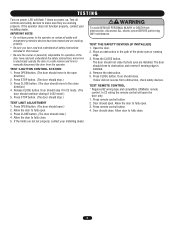
...button. 4. Allow door to fully close if photo eyes are working properly. IMPORTANT NOTES: • Do not leave power to the operator on unless all safety and entrapment protection devices have been tested and are installed. Door should stop if in the open direction.) ATTENTION... 2. Press CLOSE button. (The door should not close . 5. The door should close . TEST REMOTE CONTROL * Requires B2 wiring type and compatible LiftMaster remote control. Door should move in C2 mode. (The door should open.) 2. Press CLOSE button. (The door should close .) 4. TEST THE ...
...button. 4. Allow door to fully close if photo eyes are working properly. IMPORTANT NOTES: • Do not leave power to the operator on unless all safety and entrapment protection devices have been tested and are installed. Door should stop if in the open direction.) ATTENTION... 2. Press CLOSE button. (The door should not close . 5. The door should close . TEST REMOTE CONTROL * Requires B2 wiring type and compatible LiftMaster remote control. Door should move in C2 mode. (The door should open.) 2. Press CLOSE button. (The door should close .) 4. TEST THE ...

MGJ User's Guide Manual
Page 8
...; Verify photo eyes are aligned. To locate a dealer in the Testing section. TROUBLESHOOTING To locate a dealer in your area visit us online at www.liftmaster.com. The operator should be serviced at the following intervals: • Every 3 months or 5,000 cycles • Every 6 months or 10,000 cycles • Every 12 months...
...; Verify photo eyes are aligned. To locate a dealer in the Testing section. TROUBLESHOOTING To locate a dealer in your area visit us online at www.liftmaster.com. The operator should be serviced at the following intervals: • Every 3 months or 5,000 cycles • Every 6 months or 10,000 cycles • Every 12 months...
MJ5011E QuickStart-2008 Manual
Page 1
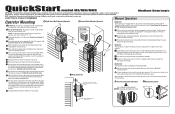
... or reset the emergency egress device to the operator BEFORE manually operating your area. MODEL MHS This operator includes two methods of the operator. This chain can be released from the chain retaining bracket before securing to disengage operator from door. An electrical interlock will not function...Or if emergency egress device is used , pull handle to the shaft. Visit www.LiftMaster.com to the operator. Connect the power to locate a professional installing dealer in position, secure the operator to wall or mounting bracket. 7 Align sprockets, insert key into keyway, and ...
... or reset the emergency egress device to the operator BEFORE manually operating your area. MODEL MHS This operator includes two methods of the operator. This chain can be released from the chain retaining bracket before securing to disengage operator from door. An electrical interlock will not function...Or if emergency egress device is used , pull handle to the shaft. Visit www.LiftMaster.com to the operator. Connect the power to locate a professional installing dealer in position, secure the operator to wall or mounting bracket. 7 Align sprockets, insert key into keyway, and ...
MJ5011E QuickStart-2008 Manual
Page 2
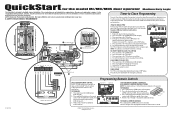
QuickStart for the model MJ/MH/MHS door operator Medium Duty Logic This QuickStart is running. 1 2 3... a typical installation. These instructions are not intended to locate a professional installing dealer in the operator. Visit www.LiftMaster.com to be comprehensive. A SAFETY DEVICE IS HIGHLY RECOMMENDED Push Direction Limit Nut Will Move During...time. 4. TIMER DEFEAT The TTC can be active. Programming Remote Controls 7 6 5 3 White/Black White LiftMaster® CPS Safety Sensors SINGLE BUTTON REMOTE CONTROL Built in 315 MHz radio receiver permits as many as 20 ...
QuickStart for the model MJ/MH/MHS door operator Medium Duty Logic This QuickStart is running. 1 2 3... a typical installation. These instructions are not intended to locate a professional installing dealer in the operator. Visit www.LiftMaster.com to be comprehensive. A SAFETY DEVICE IS HIGHLY RECOMMENDED Push Direction Limit Nut Will Move During...time. 4. TIMER DEFEAT The TTC can be active. Programming Remote Controls 7 6 5 3 White/Black White LiftMaster® CPS Safety Sensors SINGLE BUTTON REMOTE CONTROL Built in 315 MHz radio receiver permits as many as 20 ...
MJ5011E Installation-2008 Manual
Page 1
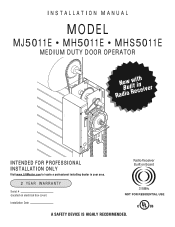
INSTALLATION MANUAL MODEL MJ5011E • MH5011E • MHS5011E MEDIUM DUTY DOOR OPERATOR RaNdoBiwuoiRlwteiitcnheiver INTENDED FOR PROFESSIONAL INSTALLATION ONLY Visit www.LiftMaster.com to locate a professional installing dealer in your area. 2 YEAR WARRANTY Serial # (located on electrical box cover) Installation Date Radio Receiver Built on Board 315MHz NOT FOR RESIDENTIAL USE A SAFETY DEVICE IS HIGHLY RECOMMENDED.
INSTALLATION MANUAL MODEL MJ5011E • MH5011E • MHS5011E MEDIUM DUTY DOOR OPERATOR RaNdoBiwuoiRlwteiitcnheiver INTENDED FOR PROFESSIONAL INSTALLATION ONLY Visit www.LiftMaster.com to locate a professional installing dealer in your area. 2 YEAR WARRANTY Serial # (located on electrical box cover) Installation Date Radio Receiver Built on Board 315MHz NOT FOR RESIDENTIAL USE A SAFETY DEVICE IS HIGHLY RECOMMENDED.
MJ5011E Installation-2008 Manual
Page 2
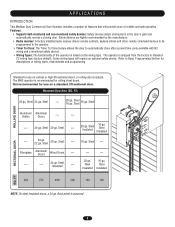
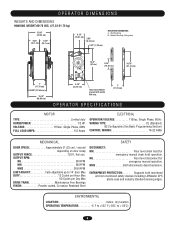
...NOTES: • BEFORE attempting to the possibility of your door and/or the AVERTISSEMENT door operator if you do not comply with the cautionary statements that accompany them carefully. 2 AVAETRTTEINSTSIEOMNENT AVERTISSEMENT AVERTISSEMENT TABLE ...OF CONTENTS SAFETY INFORMATION 2 APPLICATIONS 3 OPERATOR DIMENSIONS 4 OPERATOR SPECIFICATIONS 4 CARTON INVENTORY 5 PREPARATION 5 ASSEMBLY 6 TYPICAL INSTALLATION 6-10 INSTALLATION 11-12 ADJUSTMENT 13 OPTIONAL SAFETY ...
...NOTES: • BEFORE attempting to the possibility of your door and/or the AVERTISSEMENT door operator if you do not comply with the cautionary statements that accompany them carefully. 2 AVAETRTTEINSTSIEOMNENT AVERTISSEMENT AVERTISSEMENT TABLE ...OF CONTENTS SAFETY INFORMATION 2 APPLICATIONS 3 OPERATOR DIMENSIONS 4 OPERATOR SPECIFICATIONS 4 CARTON INVENTORY 5 PREPARATION 5 ASSEMBLY 6 TYPICAL INSTALLATION 6-10 INSTALLATION 11-12 ADJUSTMENT 13 OPTIONAL SAFETY ...
MJ5011E Installation-2008 Manual
Page 3
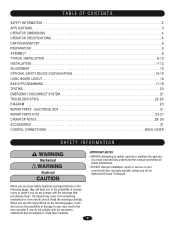
...Doors --- --- --- 24 ga. Steel --- 20 ga. Intended for use on the wiring type. Steel 22 ga. Steel 18 ga. The operator is recommended for descriptions of wiring types, requirements and programming. Steel --- 16 ga. Maximum Door Area (SQ. FT) 24 ga. Steel Insulated ... panel is based on vertical or high-lift sectional doors, or rolling door products. Steel Insulated --- 24 ga. 22 ga. The MHS operator is shipped from the factory in the door's path and automatically reverse a closing door. Safety devices are highly recommended by the manufacturer....
...Doors --- --- --- 24 ga. Steel --- 20 ga. Intended for use on the wiring type. Steel 22 ga. Steel 18 ga. The operator is recommended for descriptions of wiring types, requirements and programming. Steel --- 16 ga. Maximum Door Area (SQ. FT) 24 ga. Steel Insulated ... panel is based on vertical or high-lift sectional doors, or rolling door products. Steel Insulated --- 24 ga. 22 ga. The MHS operator is shipped from the factory in the door's path and automatically reverse a closing door. Safety devices are highly recommended by the manufacturer....
MJ5011E Installation-2008 Manual
Page 4
Wall Mounting B - OUTPUT RPM: MJ 80 RPM MH 80 RPM MHS 38.6 RPM LIMIT ADJUST Fully adjustable up to + 50˚C) 4 Supports both monitored and non-monitored safety devices including LiftMaster CPS photo-eyes and industry standard sensing edges. ENTRAPMENT PROTECTION: . . . . . ENVIRONMENTAL LOCATION Indoor, dry location OPERATING TEMPERATURE 4˚ F to +122˚ F (-20C˚ to...
Wall Mounting B - OUTPUT RPM: MJ 80 RPM MH 80 RPM MHS 38.6 RPM LIMIT ADJUST Fully adjustable up to + 50˚C) 4 Supports both monitored and non-monitored safety devices including LiftMaster CPS photo-eyes and industry standard sensing edges. ENTRAPMENT PROTECTION: . . . . . ENVIRONMENTAL LOCATION Indoor, dry location OPERATING TEMPERATURE 4˚ F to +122˚ F (-20C˚ to...
MJ5011E Installation-2008 Manual
Page 5
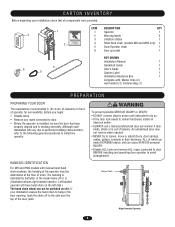
... were provided. 3 ^OPEN ^CLOSE O STOP 1 2 ITEM 1 2 3 4 5 6 DESCRIPTION QTY Operator 1 Warning labels 2 3-Button station 1 Hoist hand chain (models MH and MHS only) 1 Door/Operator chain 1 Door sprocket 1 4 6 5 NOT SHOWN Installation Manual 1 Quickstart Guide 1 User's Guide 1 ...try to avoid entanglement. The handing is out of balance. AVERTISSEMENT Output Shaft Right Handed Operator ADVERTENCIA 5 ADVERTENCIA AVERTISSEMENT HAANDTINTGEIDNENTTIIFOICNATION For MH and HMS models with : Master links (2), wall bracket (1), Fastener Bag (1) WARNING PREPARATION...
... were provided. 3 ^OPEN ^CLOSE O STOP 1 2 ITEM 1 2 3 4 5 6 DESCRIPTION QTY Operator 1 Warning labels 2 3-Button station 1 Hoist hand chain (models MH and MHS only) 1 Door/Operator chain 1 Door sprocket 1 4 6 5 NOT SHOWN Installation Manual 1 Quickstart Guide 1 User's Guide 1 ...try to avoid entanglement. The handing is out of balance. AVERTISSEMENT Output Shaft Right Handed Operator ADVERTENCIA 5 ADVERTENCIA AVERTISSEMENT HAANDTINTGEIDNENTTIIFOICNATION For MH and HMS models with : Master links (2), wall bracket (1), Fastener Bag (1) WARNING PREPARATION...
MJ5011E Installation-2008 Manual
Page 6
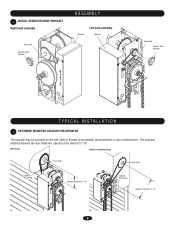
... 12 - 15" 6 The optimum distance between the door shaft and operator drive shaft is 12"-15". 1 INSTALL OPERATOR DRIVE SPROCKET Right hand assembly Drive Shaft Operator Drive Sprocket ASSEMBLY Operator Left hand assembly Operator Drive Shaft Operator Drive Sprocket TYPICAL INSTALLATION 1 DETERMINE MOUNTING LOCATION FOR OPERATOR The operator may be mounted on the wall, shelf or bracket (not...
... 12 - 15" 6 The optimum distance between the door shaft and operator drive shaft is 12"-15". 1 INSTALL OPERATOR DRIVE SPROCKET Right hand assembly Drive Shaft Operator Drive Sprocket ASSEMBLY Operator Left hand assembly Operator Drive Shaft Operator Drive Sprocket TYPICAL INSTALLATION 1 DETERMINE MOUNTING LOCATION FOR OPERATOR The operator may be mounted on the wall, shelf or bracket (not...
MJ5011E Installation-2008 Manual
Page 7
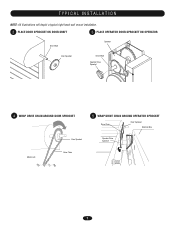
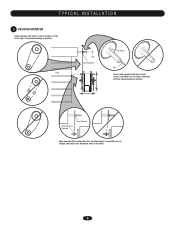
TYPICAL INSTALLATION NOTE: All illustrations will depict a typical right hand wall mount installation. 2 PLACE DOOR SPROCKET ON DOOR SHAFT 3 PLACE OPERATOR DOOR SPROCKET ON OPERATOR Door Shaft Operator Door Sprocket Drive Shaft Operator Drive Sprocket 4 WRAP DRIVE CHAIN AROUND DOOR SPROCKET 5 WRAP DRIVE CHAIN AROUND OPERATOR SPROCKET Drive Chain Door Sprocket Electrical Box Door Sprocket Operator Drive Sprocket Master Link Drive Chain 7
TYPICAL INSTALLATION NOTE: All illustrations will depict a typical right hand wall mount installation. 2 PLACE DOOR SPROCKET ON DOOR SHAFT 3 PLACE OPERATOR DOOR SPROCKET ON OPERATOR Door Shaft Operator Door Sprocket Drive Shaft Operator Drive Sprocket 4 WRAP DRIVE CHAIN AROUND DOOR SPROCKET 5 WRAP DRIVE CHAIN AROUND OPERATOR SPROCKET Drive Chain Door Sprocket Electrical Box Door Sprocket Operator Drive Sprocket Master Link Drive Chain 7
MJ5011E Installation-2008 Manual
Page 8
If chain is taut (not tight). Operator Drive Sprocket Door Sprocket Keep door sprocket and operator door sprocket aligned. Door Key Door Sprocket Set Screw Key Secure both sprockets with key and set screw. If sprockets are not secure, they may cause premature wear on the chain. 8 TYPICAL INSTALLATION 6 POSITION OPERATOR Adjust operator until chain is too tight, it may cause damage to operator. If sprockets are not aligned, they may drift and cause damage to operator.
If chain is taut (not tight). Operator Drive Sprocket Door Sprocket Keep door sprocket and operator door sprocket aligned. Door Key Door Sprocket Set Screw Key Secure both sprockets with key and set screw. If sprockets are not secure, they may cause premature wear on the chain. 8 TYPICAL INSTALLATION 6 POSITION OPERATOR Adjust operator until chain is too tight, it may cause damage to operator. If sprockets are not aligned, they may drift and cause damage to operator.

MJ5011E Installation-2008 Manual
Page 9
... ONLY) Keyhole Bracket 4' above floor A Secure keyhole bracket to mounting surface using appropriate method and hardware. Operator Operator 8 INSTALL MANUAL DISCONNECT SYSTEMS The MHS operator includes both a floor level disconnect chain to disconnect the door from the door operator and a disconnect chain with pad locking provisions) B Wrap hand chain around hand chain wheel and through...
... ONLY) Keyhole Bracket 4' above floor A Secure keyhole bracket to mounting surface using appropriate method and hardware. Operator Operator 8 INSTALL MANUAL DISCONNECT SYSTEMS The MHS operator includes both a floor level disconnect chain to disconnect the door from the door operator and a disconnect chain with pad locking provisions) B Wrap hand chain around hand chain wheel and through...
MJ5011E Installation-2008 Manual
Page 10
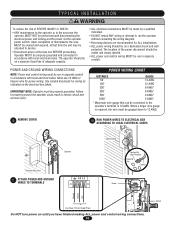
...control wiring must be performed until you have finished making ALL power and control wiring connections. 10 Control Failure to properly ground the operator could result in accordance with local electrical codes. NG WARNING TYPICAL INSTALLATION N WARNING To reduce the risk of SEVERE INJURY or ... BOX ACCORDING TO LOCAL ELECTRICAL CODES NCIA ÓN Electrical Box Cover 11 ATTACH POWER AND GROUND WIRES TO TERMINALS ADVERTENCIAElectrical Box Operator ADVERTENCIA Power Sealing Nut (Not Provided) Electrical Box Conduit Ground Neutral Hot Line Power 115 Vac Single Phase Do NOT turn ...
...control wiring must be performed until you have finished making ALL power and control wiring connections. 10 Control Failure to properly ground the operator could result in accordance with local electrical codes. NG WARNING TYPICAL INSTALLATION N WARNING To reduce the risk of SEVERE INJURY or ... BOX ACCORDING TO LOCAL ELECTRICAL CODES NCIA ÓN Electrical Box Cover 11 ATTACH POWER AND GROUND WIRES TO TERMINALS ADVERTENCIAElectrical Box Operator ADVERTENCIA Power Sealing Nut (Not Provided) Electrical Box Conduit Ground Neutral Hot Line Power 115 Vac Single Phase Do NOT turn ...
MJ5011E Installation-2008 Manual
Page 11
Select appropriate knockout and run wire according to local electrical code from operator to wall PRECAUCIÓN 11 Reversing devices are recommended for 3-button control station Ground Remove cover ^OPEN Screws CLOSE O STOP Wall Secure using appropriate hardware 5' (1.5 m) 3-...
Select appropriate knockout and run wire according to local electrical code from operator to wall PRECAUCIÓN 11 Reversing devices are recommended for 3-button control station Ground Remove cover ^OPEN Screws CLOSE O STOP Wall Secure using appropriate hardware 5' (1.5 m) 3-...


