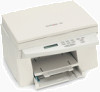
User's Guide (3.6 MB)
Page 3
... "Remarketer". and Canada, refer to that user. Lexmark Z82 Scan/ Print/ Copy This Statement of this statement as warranted during the warranty period, contact a Remarketer or Lexmark for the remainder of Limited Warranty Lexmark International, Inc., Lexington, KY This warranty applies to Lexmark's official published specifications, and • Is in good working order. You should transfer proof of original purchase and this...
... "Remarketer". and Canada, refer to that user. Lexmark Z82 Scan/ Print/ Copy This Statement of this statement as warranted during the warranty period, contact a Remarketer or Lexmark for the remainder of Limited Warranty Lexmark International, Inc., Lexington, KY This warranty applies to Lexmark's official published specifications, and • Is in good working order. You should transfer proof of original purchase and this...
User's Guide (3.6 MB)
Page 4
... and the nearest Lexmark authorized servicer in transit to deliver your area, please contact Lexmark at a Remarketer or a Lexmark designated location. Replacement is not available to a Lexmark designated location. For products no longer covered by anyone other than Lexmark or a Lexmark authorized servicer • Operation of a product beyond repair. Extent of Warranty We do not warrant uninterrupted or error-free operation of a repair not included in need of a product...
... and the nearest Lexmark authorized servicer in transit to deliver your area, please contact Lexmark at a Remarketer or a Lexmark designated location. Replacement is not available to a Lexmark designated location. For products no longer covered by anyone other than Lexmark or a Lexmark authorized servicer • Operation of a product beyond repair. Extent of Warranty We do not warrant uninterrupted or error-free operation of a repair not included in need of a product...

User's Guide (3.6 MB)
Page 5
...apply to state. Electronic Emission Notices Federal Communications Commission (FCC) Compliance Information Statement The Lexmark Z82 Scanner, Printer and Copier has been tested and found to comply with the instructions, may not cause harmful interference, and (2) this device must accept any lost profits...Part 15 of the FCC Rules. However, there is connected. • Consult your point of purchase or service representative for any cause whatsoever will not occur in this section. This limitation of liability will Lexmark be determined by turning the equipment off and on, the user...
...apply to state. Electronic Emission Notices Federal Communications Commission (FCC) Compliance Information Statement The Lexmark Z82 Scanner, Printer and Copier has been tested and found to comply with the instructions, may not cause harmful interference, and (2) this device must accept any lost profits...Part 15 of the FCC Rules. However, there is connected. • Consult your point of purchase or service representative for any cause whatsoever will not occur in this section. This limitation of liability will Lexmark be determined by turning the equipment off and on, the user...
User's Guide (3.6 MB)
Page 9
3 Chapter Using the Control Panel Overview 3-1 Control Panel Buttons 3-2 Control Panel Display 3-4 4 Chapter Print Media Overview 4-1 Media Size 4-2 Print Media Characteristics 4-3 Paper Guideline 4-4 Using the Manual Feed Slot 4-5 5 Chapter Printing Tasks Overview 5-1 Selecting the Printer 5-2 Printing a Document 5-3 Using Features in the Printer Driver 5-7 vii Introduction vii
3 Chapter Using the Control Panel Overview 3-1 Control Panel Buttons 3-2 Control Panel Display 3-4 4 Chapter Print Media Overview 4-1 Media Size 4-2 Print Media Characteristics 4-3 Paper Guideline 4-4 Using the Manual Feed Slot 4-5 5 Chapter Printing Tasks Overview 5-1 Selecting the Printer 5-2 Printing a Document 5-3 Using Features in the Printer Driver 5-7 vii Introduction vii
User's Guide (3.6 MB)
Page 11
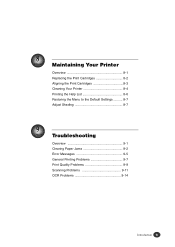
8 Chapter Maintaining Your Printer Overview 8-1 Replacing the Print Cartridges 8-2 Aligning the Print Cartridges 8-3 Cleaning Your Printer 8-4 Printing the Help List 8-6 Restoring the Menu to the Default Settings .......... 8-7 Adjust Shading 8-7 9 Chapter Troubleshooting Overview 9-1 Clearing Paper Jams 9-2 Error Messages 9-5 General Printing Problems 9-7 Print Quality Problems 9-9 Scanning Problems 9-11 OCR Problems 9-14 ix Introduction ix
8 Chapter Maintaining Your Printer Overview 8-1 Replacing the Print Cartridges 8-2 Aligning the Print Cartridges 8-3 Cleaning Your Printer 8-4 Printing the Help List 8-6 Restoring the Menu to the Default Settings .......... 8-7 Adjust Shading 8-7 9 Chapter Troubleshooting Overview 9-1 Clearing Paper Jams 9-2 Error Messages 9-5 General Printing Problems 9-7 Print Quality Problems 9-9 Scanning Problems 9-11 OCR Problems 9-14 ix Introduction ix
User's Guide (3.6 MB)
Page 20
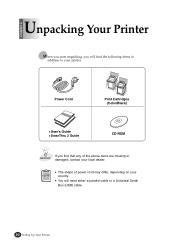
G The shape of the above items are missing or damaged, contact your local dealer. G You will find that any of power cord may differ, depending on your country. Power Cord Print Cartridges (Color/Black) G User's Guide G SmarThru 2 Guide CD-ROM If you will need either a parallel cable or a Universal Serial Bus (USB) cable. 2-2 Setting Up Your Printer Chapter 2 Unpacking Your Printer When you start unpacking, you find the following items in addition to your printer.
G The shape of the above items are missing or damaged, contact your local dealer. G You will find that any of power cord may differ, depending on your country. Power Cord Print Cartridges (Color/Black) G User's Guide G SmarThru 2 Guide CD-ROM If you will need either a parallel cable or a Universal Serial Bus (USB) cable. 2-2 Setting Up Your Printer Chapter 2 Unpacking Your Printer When you start unpacking, you find the following items in addition to your printer.
User's Guide (3.6 MB)
Page 33
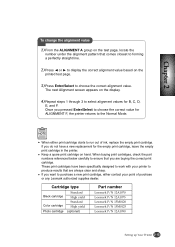
G Keep a spare print cartridge on the printed test page. 3) Press Enter/Select to choose the correct alignment value. Cartridge type Black cartridge Color cartridge Photo cartridge Standard High yield Standard High yield (optional) Part number Lexmark P/N 12A1970 Lexmark P/N 12A1975 Lexmark P/N 15M0120 Lexmark P/N 15M0125 Lexmark P/N 12A1990 Setting up Your Printer 2-15 Once you do not have been specifically designed to work with your printer to purchase a new print cartridge, either print cartridge starts to the Normal Mode. If you pressed Enter/Select to choose the...
G Keep a spare print cartridge on the printed test page. 3) Press Enter/Select to choose the correct alignment value. Cartridge type Black cartridge Color cartridge Photo cartridge Standard High yield Standard High yield (optional) Part number Lexmark P/N 12A1970 Lexmark P/N 12A1975 Lexmark P/N 15M0120 Lexmark P/N 15M0125 Lexmark P/N 12A1990 Setting up Your Printer 2-15 Once you do not have been specifically designed to work with your printer to purchase a new print cartridge, either print cartridge starts to the Normal Mode. If you pressed Enter/Select to choose the...

User's Guide (3.6 MB)
Page 35
... the printer. To use your printer. Printer software (printer driver) The printer driver accesses the printer features and allows the computer to convert scanned images into text documents suitable for more features than the stand-alone printer. G AnyPage Lite Optical Character Recognition (OCR) software gives you manage your new machine as a printer, the printer software must be installed. G An Image Manager that supports operations on CD-ROM. G Scan Manager that can send, receive and store e-mail and fax messages...
... the printer. To use your printer. Printer software (printer driver) The printer driver accesses the printer features and allows the computer to convert scanned images into text documents suitable for more features than the stand-alone printer. G AnyPage Lite Optical Character Recognition (OCR) software gives you manage your new machine as a printer, the printer software must be installed. G An Image Manager that supports operations on CD-ROM. G Scan Manager that can send, receive and store e-mail and fax messages...

User's Guide (3.6 MB)
Page 39
... option only allows you to install the printer driver, SmarThru software and OCR software. G The files are copied onto your screen as the program files are automatically installed. Chapter 2 11 Choose the Setup type and click the Next button. The installation program will restart. G The progress window appears on your computer. 13 After the installation is completed, click on Finish. The Windows will prompt you to...
... option only allows you to install the printer driver, SmarThru software and OCR software. G The files are copied onto your screen as the program files are automatically installed. Chapter 2 11 Choose the Setup type and click the Next button. The installation program will restart. G The progress window appears on your computer. 13 After the installation is completed, click on Finish. The Windows will prompt you to...
User's Guide (3.6 MB)
Page 49
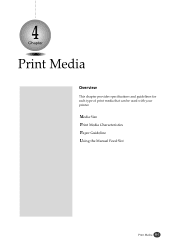
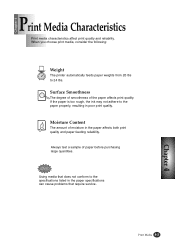
4 Chapter Print Media Overview This chapter provides specifications and guidelines for each type of print media that can be used with your printer. Media Size Print Media Characteristics Paper Guideline Using the Manual Feed Slot Print Media 4-1
4 Chapter Print Media Overview This chapter provides specifications and guidelines for each type of print media that can be used with your printer. Media Size Print Media Characteristics Paper Guideline Using the Manual Feed Slot Print Media 4-1
User's Guide (3.6 MB)
Page 51
If the paper is too rough, the ink may not adhere to the specifications listed in the paper specifications can cause problems that require service. Always test a sample of moisture in poor print quality. Using media that does not conform to the paper properly, resulting in the paper affects both print quality and paper feeding reliability. When you choose print media, consider the following: Weight The printer automatically feeds paper weights from 20...
If the paper is too rough, the ink may not adhere to the specifications listed in the paper specifications can cause problems that require service. Always test a sample of moisture in poor print quality. Using media that does not conform to the paper properly, resulting in the paper affects both print quality and paper feeding reliability. When you choose print media, consider the following: Weight The printer automatically feeds paper weights from 20...

User's Guide (3.6 MB)
Page 58
These images show the amount of your print job. Click to print a test page. These items provide specific details about the status of ink remaining in each cartridge. Click this button again to cancel the current print job. Continued Printing a Document About Printer Control Program Window When the Lexmark Z82 Control Program on LPT1 window appears, click the appropriate tab for the options. Click to resume the paused print job. 5-4 Printing Tasks Using the Status Tab This tab...
These images show the amount of your print job. Click to print a test page. These items provide specific details about the status of ink remaining in each cartridge. Click this button again to cancel the current print job. Continued Printing a Document About Printer Control Program Window When the Lexmark Z82 Control Program on LPT1 window appears, click the appropriate tab for the options. Click to resume the paused print job. 5-4 Printing Tasks Using the Status Tab This tab...
User's Guide (3.6 MB)
Page 62
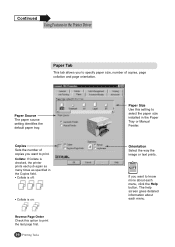
... checked, the printer prints each job again as many times as specified in the Copies field. • Collate is off: • Collate is on: Reverse Page Order Check this option to print the last page first. 5-8 Printing Tasks Paper Size Use this setting to select the paper size installed in the Printer Driver Paper Tab This tab allows you to specify paper size, number of copies you want to know more about each menu, click the Help button...
... checked, the printer prints each job again as many times as specified in the Copies field. • Collate is off: • Collate is on: Reverse Page Order Check this option to print the last page first. 5-8 Printing Tasks Paper Size Use this setting to select the paper size installed in the Printer Driver Paper Tab This tab allows you to specify paper size, number of copies you want to know more about each menu, click the Help button...
User's Guide (3.6 MB)
Page 77
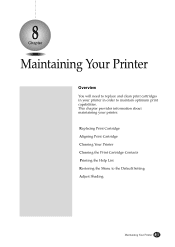
8 Chapter Maintaining Your Printer Overview You will need to replace and clean print cartridges in your printer. This chapter provides information about maintaining your printer in order to the Default Setting Adjust Shading Maintaining Your Printer 8-1 Replacing Print Cartridge Aligning Print Cartridge Cleaning Your Printer Cleaning the Print Cartridge Contacts Printing the Help List Restoring the Menu to maintain optimum print capabilities.
8 Chapter Maintaining Your Printer Overview You will need to replace and clean print cartridges in your printer. This chapter provides information about maintaining your printer in order to the Default Setting Adjust Shading Maintaining Your Printer 8-1 Replacing Print Cartridge Aligning Print Cartridge Cleaning Your Printer Cleaning the Print Cartridge Contacts Printing the Help List Restoring the Menu to maintain optimum print capabilities.
User's Guide (3.6 MB)
Page 81
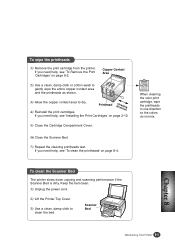
Printhead dcirleeacntiionng If you need help, see 'To clean the printheads' on page 8-4. To clean the Scanner Bed The printer slows down copying and scanning performance if the Scanner Bed is dirty. Keep the bed clean. 1) Unplug the power cord. 2) Lift the Printer Top Cover. 3) Use a clean, damp cloth to dry. 4) Reinstall the print cartridges. Copper Contact Area 2) Use a clean, damp cloth or cotton swab to gently wipe the entire copper contact area and...
Printhead dcirleeacntiionng If you need help, see 'To clean the printheads' on page 8-4. To clean the Scanner Bed The printer slows down copying and scanning performance if the Scanner Bed is dirty. Keep the bed clean. 1) Unplug the power cord. 2) Lift the Printer Top Cover. 3) Use a clean, damp cloth to dry. 4) Reinstall the print cartridges. Copper Contact Area 2) Use a clean, damp cloth or cotton swab to gently wipe the entire copper contact area and...
User's Guide (3.6 MB)
Page 86
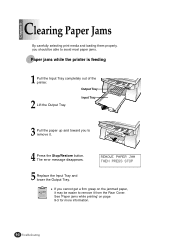
... remove it from the Rear Cover. See 'Paper jams while printing' on the jammed paper, it may be able to avoid most paper jams. Paper jams while the printer is feeding 1 Pull the Input Tray completely out of the printer. Chapter 9 Clearing Paper Jams By carefully selecting print media and loading them properly, you to remove it. 4 Press the Stop/Restore button. G If you cannot get a firm grasp on page 9-3 for more information. 9-2 Troubleshooting Output Tray 2 Lift the Output Tray...
... remove it from the Rear Cover. See 'Paper jams while printing' on the jammed paper, it may be able to avoid most paper jams. Paper jams while the printer is feeding 1 Pull the Input Tray completely out of the printer. Chapter 9 Clearing Paper Jams By carefully selecting print media and loading them properly, you to remove it. 4 Press the Stop/Restore button. G If you cannot get a firm grasp on page 9-3 for more information. 9-2 Troubleshooting Output Tray 2 Lift the Output Tray...
User's Guide (3.6 MB)
Page 91
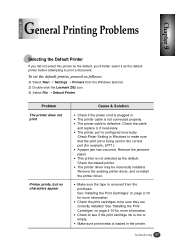
... the Lexmark Z82 icon. 3) Select File ➝ Default Printer. Check the cable and replace it as the default printer before attempting to print a document. G A paper jam has occurred. G The printer driver may be sure they are correctly installed. G Make sure the tape is not connected properly. G Check to be incorrectly installed. Troubleshooting 9-7 Problem The printer does not print Printer prints, but no characters appear 9-7 Cause & Solution G Check if the power cord is low or empty. G The printer cable is configured incorrectly. Remove the existing printer driver...
... the Lexmark Z82 icon. 3) Select File ➝ Default Printer. Check the cable and replace it as the default printer before attempting to print a document. G A paper jam has occurred. G The printer driver may be sure they are correctly installed. G Make sure the tape is not connected properly. G Check to be incorrectly installed. Troubleshooting 9-7 Problem The printer does not print Printer prints, but no characters appear 9-7 Cause & Solution G Check if the power cord is low or empty. G The printer cable is configured incorrectly. Remove the existing printer driver...
User's Guide (3.6 MB)
Page 94
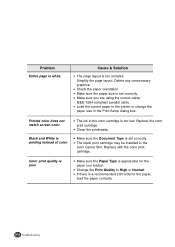
.... G Clean the printheads. G Change the Print Quality to High or Normal. G Check the paper orientation. Color print quality is poor G Make sure the Paper Type is a recommended print side for the paper you are using the correct cable; G If there is appropriate for the paper, load the paper correctly. 9-10 Troubleshooting 9-10 Simplify the page layout. G Make sure the paper size is too low. IEEE-1284 compliant parallel cable. Replace with the color print cartridge. G Make sure you loaded. G The black print cartridge may be installed...
.... G Clean the printheads. G Change the Print Quality to High or Normal. G Check the paper orientation. Color print quality is poor G Make sure the Paper Type is a recommended print side for the paper you are using the correct cable; G If there is appropriate for the paper, load the paper correctly. 9-10 Troubleshooting 9-10 Simplify the page layout. G Make sure the paper size is too low. IEEE-1284 compliant parallel cable. Replace with the color print cartridge. G Make sure you loaded. G The black print cartridge may be installed...
User's Guide (3.6 MB)
Page 96
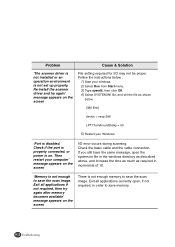
...' message appears on the screen File setting required for I /O error occurs during scanning. If you still have the same message, open , if not required, in order to save memory. 9-12 Troubleshooting 9-12 Check if the port is properly connected, or power is not enough to save the scan image. Check the basic cable and the cable connection. Problem Cause & Solution 'The scanner driver is not installed or an operation environment is not set the file as...
...' message appears on the screen File setting required for I /O error occurs during scanning. If you still have the same message, open , if not required, in order to save memory. 9-12 Troubleshooting 9-12 Check if the port is properly connected, or power is not enough to save the scan image. Check the basic cable and the cable connection. Problem Cause & Solution 'The scanner driver is not installed or an operation environment is not set the file as...
User's Guide (3.6 MB)
Page 104
...Operating System Optical Resolution Options Tab Orientation P Paper Guideline Input Tray Jams Output Tray Size Source Tab Type Parallel Interface Part number Photo Cartridge Post card Poster Copy Power Connector Power Cord ppm Pre-scan Mode 5-9 3-3, 6-4 3-3, 6-8 1-3, 2-17, 9-17 A-2 A-2, A-3 5-5 5-8 4-4 1-4, 2-8 9-2 1-4 5-8, 7-2 5-8 5-8 7-3, 5-9, 9-13 1-5 2-15 2-11, 2-15 4-2 3-3, 6-9 1-5 2-2 1-3, A-2 A-2 Print Button Cartridge Aligning Install Remove Replacing Speed Quality Resolution Printheads Clean Wipe Q Quality Tab R Rear Cover Reduction Remove, Paper Jam Restore Default S Scan Button...
...Operating System Optical Resolution Options Tab Orientation P Paper Guideline Input Tray Jams Output Tray Size Source Tab Type Parallel Interface Part number Photo Cartridge Post card Poster Copy Power Connector Power Cord ppm Pre-scan Mode 5-9 3-3, 6-4 3-3, 6-8 1-3, 2-17, 9-17 A-2 A-2, A-3 5-5 5-8 4-4 1-4, 2-8 9-2 1-4 5-8, 7-2 5-8 5-8 7-3, 5-9, 9-13 1-5 2-15 2-11, 2-15 4-2 3-3, 6-9 1-5 2-2 1-3, A-2 A-2 Print Button Cartridge Aligning Install Remove Replacing Speed Quality Resolution Printheads Clean Wipe Q Quality Tab R Rear Cover Reduction Remove, Paper Jam Restore Default S Scan Button...


