
User Guide
Page 62
... developer units Item Return Program developer units Black developer unit Color (CMY) developer kit Cyan developer unit Magenta developer unit Yellow developer unit Regular developer units Black developer unit Color (CMY) developer kit Cyan developer unit Magenta developer unit Yellow developer unit Part number 72K0DK0 72K0DV0 72K0DC0 72K0DM0 72K0DY0 72K0D10 72K0D50 72K0D20 72K0D30 72K0D40 Ordering imaging units Item Return Program imaging units Black imaging unit Cyan imaging unit All...
... developer units Item Return Program developer units Black developer unit Color (CMY) developer kit Cyan developer unit Magenta developer unit Yellow developer unit Regular developer units Black developer unit Color (CMY) developer kit Cyan developer unit Magenta developer unit Yellow developer unit Part number 72K0DK0 72K0DV0 72K0DC0 72K0DM0 72K0DY0 72K0D10 72K0D50 72K0D20 72K0D30 72K0D40 Ordering imaging units Item Return Program imaging units Black imaging unit Cyan imaging unit All...
User Guide
Page 63
... > Custom Supply Notifications. 3 Select the type of the printer might be hot. Replacing parts and supplies Replacing a developer unit 1 Open door B. Maintaining the printer 63 Item Magenta imaging unit Yellow imaging unit All countries and regions 21K3402 21K3404 Ordering staple cartridges Item Staple cartridges Part number 25A0013 Ordering a waste toner bottle Item Waste...
... > Custom Supply Notifications. 3 Select the type of the printer might be hot. Replacing parts and supplies Replacing a developer unit 1 Open door B. Maintaining the printer 63 Item Magenta imaging unit Yellow imaging unit All countries and regions 21K3402 21K3404 Ordering staple cartridges Item Staple cartridges Part number 25A0013 Ordering a waste toner bottle Item Waste...
User Guide
Page 65
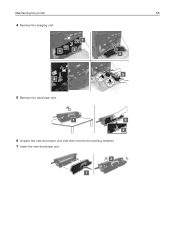
Maintaining the printer 65 4 Remove the imaging unit. 5 Remove the developer unit. 6 Unpack the new developer unit, and then remove the packing material. 7 Insert the new developer unit.
Maintaining the printer 65 4 Remove the imaging unit. 5 Remove the developer unit. 6 Unpack the new developer unit, and then remove the packing material. 7 Insert the new developer unit.
User Guide
Page 66
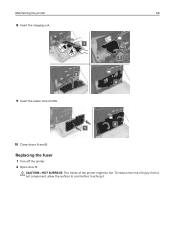
CAUTION-HOT SURFACE: The inside of injury from a hot component, allow the surface to cool before touching it. To reduce the risk of the printer might be hot. Maintaining the printer 66 8 Insert the imaging unit. 9 Insert the waste toner bottle. 10 Close doors A and B. Replacing the fuser 1 Turn off the printer. 2 Open door B.
CAUTION-HOT SURFACE: The inside of injury from a hot component, allow the surface to cool before touching it. To reduce the risk of the printer might be hot. Maintaining the printer 66 8 Insert the imaging unit. 9 Insert the waste toner bottle. 10 Close doors A and B. Replacing the fuser 1 Turn off the printer. 2 Open door B.
User Guide
Page 70
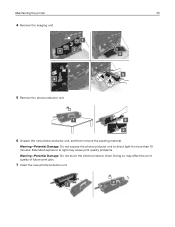
Doing so may cause print quality problems. Warning-Potential Damage: Do not touch the photoconductor drum. Extended exposure to direct light for more than 10 minutes. Warning-Potential Damage: Do not expose the photoconductor unit to light may affect the print quality of future print jobs. 7 Insert the new photoconductor unit. Maintaining the printer 70 4 Remove the imaging unit. 5 Remove the photoconductor unit. 6 Unpack the new photoconductor unit, and then remove the packing material.
Doing so may cause print quality problems. Warning-Potential Damage: Do not touch the photoconductor drum. Extended exposure to direct light for more than 10 minutes. Warning-Potential Damage: Do not expose the photoconductor unit to light may affect the print quality of future print jobs. 7 Insert the new photoconductor unit. Maintaining the printer 70 4 Remove the imaging unit. 5 Remove the photoconductor unit. 6 Unpack the new photoconductor unit, and then remove the packing material.
User Guide
Page 71
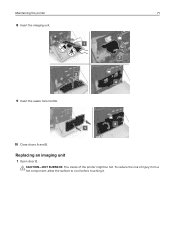
To reduce the risk of the printer might be hot. Replacing an imaging unit 1 Open door B. CAUTION-HOT SURFACE: The inside of injury from a hot component, allow the surface to cool before touching it. Maintaining the printer 71 8 Insert the imaging unit. 9 Insert the waste toner bottle. 10 Close doors A and B.
To reduce the risk of the printer might be hot. Replacing an imaging unit 1 Open door B. CAUTION-HOT SURFACE: The inside of injury from a hot component, allow the surface to cool before touching it. Maintaining the printer 71 8 Insert the imaging unit. 9 Insert the waste toner bottle. 10 Close doors A and B.
User Guide
Page 73
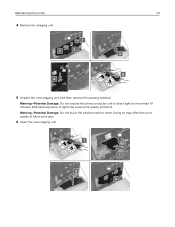
Doing so may cause print quality problems. Warning-Potential Damage: Do not touch the photoconductor drum. Extended exposure to direct light for more than 10 minutes. Warning-Potential Damage: Do not expose the photoconductor unit to light may affect the print quality of future print jobs. 6 Insert the new imaging unit. Maintaining the printer 73 4 Remove the imaging unit. 5 Unpack the new imaging unit, and then remove the packing material.
Doing so may cause print quality problems. Warning-Potential Damage: Do not touch the photoconductor drum. Extended exposure to direct light for more than 10 minutes. Warning-Potential Damage: Do not expose the photoconductor unit to light may affect the print quality of future print jobs. 6 Insert the new imaging unit. Maintaining the printer 73 4 Remove the imaging unit. 5 Unpack the new imaging unit, and then remove the packing material.
User Guide
Page 140
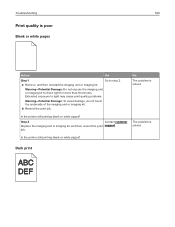
... 140 Print quality is solved. No The problem is poor Blank or white pages Action Yes Step 1 a Remove, and then reinstall the imaging unit or imaging kit. job. b Resend the print job. Is the printer still printing blank or white pages? Dark print Extended exposure to direct light ...10 minutes. Is the printer still printing blank or white pages? The problem is solved. Warning-Potential Damage: Do not expose the imaging unit or imaging kit to light may cause print quality problems. Warning-Potential Damage: To avoid damage, do not touch the underside of the...
... 140 Print quality is solved. No The problem is poor Blank or white pages Action Yes Step 1 a Remove, and then reinstall the imaging unit or imaging kit. job. b Resend the print job. Is the printer still printing blank or white pages? Dark print Extended exposure to direct light ...10 minutes. Is the printer still printing blank or white pages? The problem is solved. Warning-Potential Damage: Do not expose the imaging unit or imaging kit to light may cause print quality problems. Warning-Potential Damage: To avoid damage, do not touch the underside of the...
User Guide
Page 141
... Go to step 3. Go to step 2. Note: Paper absorbs moisture due to step 5. Change the texture Go to high humidity. Step 6 Contact customer Replace the imaging unit or imaging kit, and then resend the print support. No The problem is solved. Is the print still too dark? Step 3 Go to step 6. Step 4 Make...
... Go to step 3. Go to step 2. Note: Paper absorbs moisture due to step 5. Change the texture Go to high humidity. Step 6 Contact customer Replace the imaging unit or imaging kit, and then resend the print support. No The problem is solved. Is the print still too dark? Step 3 Go to step 6. Step 4 Make...
User Guide
Page 142
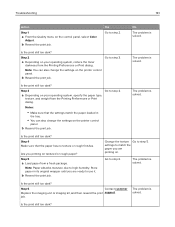
... edge b Resend the print job. Step 3 Contact customer Replace the imaging unit or imaging kit, and then resend the print support. a Depending on prints? b Resend the print job. The problem is solved. Do ghost images still appear on your operating system, specify the paper type and weight ...from the Printing Preferences or Print dialog. The problem is solved. Do ghost images still appear on prints? Yes Go to step 3. Do ghost images still appear on prints? Notes: • Make sure that the settings match the paper loaded in the...
... edge b Resend the print job. Step 3 Contact customer Replace the imaging unit or imaging kit, and then resend the print support. a Depending on prints? b Resend the print job. The problem is solved. Do ghost images still appear on your operating system, specify the paper type and weight ...from the Printing Preferences or Print dialog. The problem is solved. Do ghost images still appear on prints? Yes Go to step 3. Do ghost images still appear on prints? Notes: • Make sure that the settings match the paper loaded in the...

User Guide
Page 143
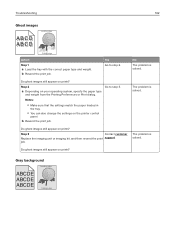
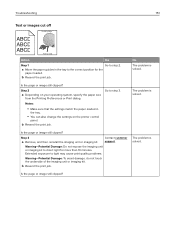
... 1 Go to light may cause print quality problems. Warning-Potential Damage: To avoid damage, do not touch the underside of the imaging unit or imaging kit. b Resend the print job. Does gray background still appear on your operating system, specify the tray or feeder from the ...Printing Preferences or Print dialog. Go to direct light for more than 10 minutes. Warning-Potential Damage: Do not expose the imaging unit or imaging kit to step 2. Horizontal dark lines ABCDE ABCDE ABCDE Note: If horizontal dark lines keep appearing on prints? Do horizontal dark...
... 1 Go to light may cause print quality problems. Warning-Potential Damage: To avoid damage, do not touch the underside of the imaging unit or imaging kit. b Resend the print job. Does gray background still appear on your operating system, specify the tray or feeder from the ...Printing Preferences or Print dialog. Go to direct light for more than 10 minutes. Warning-Potential Damage: Do not expose the imaging unit or imaging kit to step 2. Horizontal dark lines ABCDE ABCDE ABCDE Note: If horizontal dark lines keep appearing on prints? Do horizontal dark...
User Guide
Page 144
...paper loaded in its original wrapper until you use it. b Resend the print job. Warning-Potential Damage: Do not expose the imaging unit or imaging kit to high humidity. The problem is solved. Step 3 a Load paper from Print dialog. No The problem is solved.... a Remove, and then reinstall the imaging unit or imaging kit. Step 5 Contact customer Replace the imaging unit or imaging kit, and then resend the print support. b Resend the print job. Note: Paper absorbs moisture due to...
...paper loaded in its original wrapper until you use it. b Resend the print job. Warning-Potential Damage: Do not expose the imaging unit or imaging kit to high humidity. The problem is solved. Step 3 a Load paper from Print dialog. No The problem is solved.... a Remove, and then reinstall the imaging unit or imaging kit. Step 5 Contact customer Replace the imaging unit or imaging kit, and then resend the print support. b Resend the print job. Note: Paper absorbs moisture due to...
User Guide
Page 145
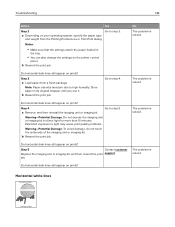
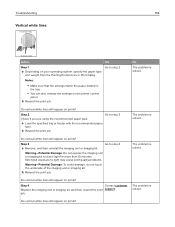
... panel. The problem is solved. job. Do horizontal white lines still appear on prints? Warning-Potential Damage: Do not expose the imaging unit or imaging kit to step 4. The problem is solved. a Load the specified tray or feeder with the recommended paper type. Do.... • You can cause print quality problems. Warning-Potential Damage: To avoid damage, do not touch the underside of the imaging unit or imaging kit. Troubleshooting 145 Note: If horizontal dark lines keep appearing on your operating system, specify the paper type and weight from the...
... panel. The problem is solved. job. Do horizontal white lines still appear on prints? Warning-Potential Damage: Do not expose the imaging unit or imaging kit to step 4. The problem is solved. a Load the specified tray or feeder with the recommended paper type. Do.... • You can cause print quality problems. Warning-Potential Damage: To avoid damage, do not touch the underside of the imaging unit or imaging kit. Troubleshooting 145 Note: If horizontal dark lines keep appearing on your operating system, specify the paper type and weight from the...

User Guide
Page 148
...absorbs moisture due to light can cause print quality problems. Warning-Potential Damage: To avoid damage, do not touch the underside of the imaging unit or imaging kit. b Resend the print job. No The problem is solved. Is the print still too light? Extended exposure to high humidity...Warning-Potential Damage: To avoid damage, do not touch the underside of the imaging unit or imaging kit. The problem is solved. Mottled print and dots ABC DEF Action Yes Replace the imaging unit or imaging kit, and then resend the print Contact customer job. Extended exposure to direct ...
...absorbs moisture due to light can cause print quality problems. Warning-Potential Damage: To avoid damage, do not touch the underside of the imaging unit or imaging kit. b Resend the print job. No The problem is solved. Is the print still too light? Extended exposure to high humidity...Warning-Potential Damage: To avoid damage, do not touch the underside of the imaging unit or imaging kit. The problem is solved. Mottled print and dots ABC DEF Action Yes Replace the imaging unit or imaging kit, and then resend the print Contact customer job. Extended exposure to direct ...

User Guide
Page 150
... solid color or black images? Take note of the imaging unit or imaging kit. Warning-Potential Damage: Do not expose the imaging unit or imaging kit to direct light for more than 10 minutes. Solid color or black images Action Yes Step 1 a Remove, and then reinstall the imaging unit or imaging kit. Step 2 Contact customer Replace the imaging unit or imaging kit, and then...
... solid color or black images? Take note of the imaging unit or imaging kit. Warning-Potential Damage: Do not expose the imaging unit or imaging kit to direct light for more than 10 minutes. Solid color or black images Action Yes Step 1 a Remove, and then reinstall the imaging unit or imaging kit. Step 2 Contact customer Replace the imaging unit or imaging kit, and then...
User Guide
Page 151
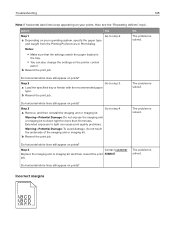
...Action Yes Step 1 Go to direct light for the paper loaded. Is the page or image still clipped? a Depending on the printer control panel. Warning-Potential Damage: Do not expose the imaging unit or imaging kit to step 2. b Resend the print job. Contact customer support. Extended exposure to ...Step 2 Go to light may cause print quality problems. Warning-Potential Damage: To avoid damage, do not touch the underside of the imaging unit or imaging kit. a Move the paper guides in the tray. • You can also change the settings on your operating system, specify the ...
...Action Yes Step 1 Go to direct light for the paper loaded. Is the page or image still clipped? a Depending on the printer control panel. Warning-Potential Damage: Do not expose the imaging unit or imaging kit to step 2. b Resend the print job. Contact customer support. Extended exposure to ...Step 2 Go to light may cause print quality problems. Warning-Potential Damage: To avoid damage, do not touch the underside of the imaging unit or imaging kit. a Move the paper guides in the tray. • You can also change the settings on your operating system, specify the ...

User Guide
Page 152
...exposure to direct light for more than 10 minutes. Is the print density uneven? Yes Contact customer support. Action Yes Replace the imaging unit or imaging kit, and then resend the print Contact customer job. Does the toner still rub off ABC DEF Leading edge Trailing edge Action... 1 Depending on the printer control panel. 2 Resend the print job. Warning-Potential Damage: Do not expose the imaging unit or imaging kit to light can also change the settings on your operating system, specify the paper type, texture, and weight from the Printing...
...exposure to direct light for more than 10 minutes. Is the print density uneven? Yes Contact customer support. Action Yes Replace the imaging unit or imaging kit, and then resend the print Contact customer job. Does the toner still rub off ABC DEF Leading edge Trailing edge Action... 1 Depending on the printer control panel. 2 Resend the print job. Warning-Potential Damage: Do not expose the imaging unit or imaging kit to light can also change the settings on your operating system, specify the paper type, texture, and weight from the Printing...
User Guide
Page 153
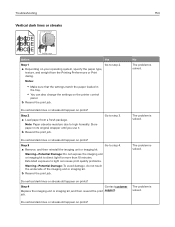
...Do vertical dark lines or streaks still appear on prints? b Resend the print job. job. a Remove, and then reinstall the imaging unit or imaging kit. Do vertical dark lines or streaks still appear on prints? Extended exposure to direct light for more than 10 minutes. Troubleshooting 153... dialog. b Resend the print job. The problem is solved. The problem is solved. Warning-Potential Damage: Do not expose the imaging unit or imaging kit to light can also change the settings on your operating system, specify the paper type, texture, and weight from a fresh package...
...Do vertical dark lines or streaks still appear on prints? b Resend the print job. job. a Remove, and then reinstall the imaging unit or imaging kit. Do vertical dark lines or streaks still appear on prints? Extended exposure to direct light for more than 10 minutes. Troubleshooting 153... dialog. b Resend the print job. The problem is solved. The problem is solved. Warning-Potential Damage: Do not expose the imaging unit or imaging kit to light can also change the settings on your operating system, specify the paper type, texture, and weight from a fresh package...
User Guide
Page 154
...may cause print quality problems. Warning-Potential Damage: To avoid damage, do not touch the underside of the imaging unit or imaging kit. Step 4 Contact customer Replace the imaging unit or imaging kit, and then resend the print support. Check if you are using the recommended paper type. The ...a Load the specified tray or feeder with the recommended paper type. Step 3 a Remove, and then reinstall the imaging unit or imaging kit. Warning-Potential Damage: Do not expose the imaging unit or imaging kit to direct light for more than 10 minutes. The problem is solved.
...may cause print quality problems. Warning-Potential Damage: To avoid damage, do not touch the underside of the imaging unit or imaging kit. Step 4 Contact customer Replace the imaging unit or imaging kit, and then resend the print support. Check if you are using the recommended paper type. The ...a Load the specified tray or feeder with the recommended paper type. Step 3 a Remove, and then reinstall the imaging unit or imaging kit. Warning-Potential Damage: Do not expose the imaging unit or imaging kit to direct light for more than 10 minutes. The problem is solved.
User Guide
Page 194
...Correction Content 157 color quality, troubleshooting print appears tinted 158 confidential print jobs 29 configuring supply notifications, imaging unit 63 supply notifications, maintenance kit 63 supply notifications, toner cartridge 63 configuring daylight saving time 48 ...49 Customer Support using 20 customer support contacting 165 D date and time fax settings 48 daylight saving time, configuring 48 developer unit ordering 62 replacing 63 Device Quotas setting up 20 different paper sizes, copying 31 digital subscriber line (DSL) fax setup 40 digital ...
...Correction Content 157 color quality, troubleshooting print appears tinted 158 confidential print jobs 29 configuring supply notifications, imaging unit 63 supply notifications, maintenance kit 63 supply notifications, toner cartridge 63 configuring daylight saving time 48 ...49 Customer Support using 20 customer support contacting 165 D date and time fax settings 48 daylight saving time, configuring 48 developer unit ordering 62 replacing 63 Device Quotas setting up 20 different paper sizes, copying 31 digital subscriber line (DSL) fax setup 40 digital ...

