
User Guide
Page 29
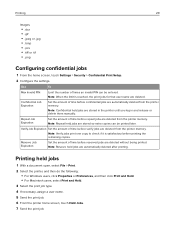
... if it is reached, the print jobs for that user name are stored in the printer until you log in and release or delete them manually. Printing 29 Images: • .dcx • .gif • .jpeg or .jpg • .bmp • .pcx • .tiff or .tif • .png Configuring con...
... if it is reached, the print jobs for that user name are stored in the printer until you log in and release or delete them manually. Printing 29 Images: • .dcx • .gif • .jpeg or .jpg • .bmp • .pcx • .tiff or .tif • .png Configuring con...

User Guide
Page 36
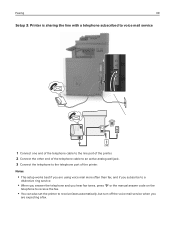
... to receive faxes automatically, then set up this product or make any number of the telephone cable to receive faxes automatically (Auto Answer On) or manually (Auto Answer Off). • If you want . Notes: • You can set the printer to an active analog wall jack. Faxing 36 Setting up fax...
... to receive faxes automatically, then set up this product or make any number of the telephone cable to receive faxes automatically (Auto Answer On) or manually (Auto Answer Off). • If you want . Notes: • You can set the printer to an active analog wall jack. Faxing 36 Setting up fax...
User Guide
Page 39
... often than fax, and if you subscribe to a distinctive ring service. • When you answer the telephone and you hear fax tones, press *9* or the manual answer code on the telephone to receive the fax. • You can also set the printer to the telephone port of the printer. Faxing 39...
... often than fax, and if you subscribe to a distinctive ring service. • When you answer the telephone and you hear fax tones, press *9* or the manual answer code on the telephone to receive the fax. • You can also set the printer to the telephone port of the printer. Faxing 39...
User Guide
Page 132
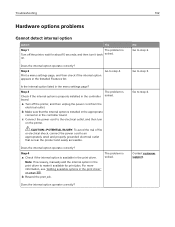
... solved. on page 188. b Make sure that is Turn off the printer, and then unplug the power cord from the electrical outlet. Note: If necessary, manually add the internal option in the print driver.
... solved. on page 188. b Make sure that is Turn off the printer, and then unplug the power cord from the electrical outlet. Note: If necessary, manually add the internal option in the print driver.
User Guide
Page 157
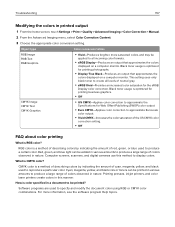
... only black toner to produce a large range of colors observed in printed output 1 From the home screen, touch Settings > Print > Quality > Advanced Imaging > Color Correction > Manual. 2 From the Advanced Imaging menu, select Color Correction Content. 3 Choose the appropriate color conversion setting. How is optimized for printing photographs. • Display‑True...
... only black toner to produce a large range of colors observed in printed output 1 From the home screen, touch Settings > Print > Quality > Advanced Imaging > Color Correction > Manual. 2 From the Advanced Imaging menu, select Color Correction Content. 3 Choose the appropriate color conversion setting. How is optimized for printing photographs. • Display‑True...
User Guide
Page 158
... Color Correction to use for a particular color‑matching problem depends on: • The Color Correction setting being used (Auto, Off, or Manual) • The type of object being printed (text, graphics, or images). It is also specific to the printer and is obtained ...tinted? The color combination labeled on the table selected. If the software program does not specify colors with RGB or CMYK combinations, then manual color correction is enabled, the printer employs user‑selected color conversion tables to process objects. c Resend the print job. By ...
... Color Correction to use for a particular color‑matching problem depends on: • The Color Correction setting being used (Auto, Off, or Manual) • The type of object being printed (text, graphics, or images). It is also specific to the printer and is obtained ...tinted? The color combination labeled on the table selected. If the software program does not specify colors with RGB or CMYK combinations, then manual color correction is enabled, the printer employs user‑selected color conversion tables to process objects. c Resend the print job. By ...
User Guide
Page 161
Can you want to dial. • Dial the telephone number manually. a From the home screen, touch Settings > Fax > Analog Fax Setup > Fax Receive Settings > Rings to step 3. Step 3 Replace the toner cartridge. Step 2 Set up the ...
Can you want to dial. • Dial the telephone number manually. a From the home screen, touch Settings > Fax > Analog Fax Setup > Fax Receive Settings > Rings to step 3. Step 3 Replace the toner cartridge. Step 2 Set up the ...
User Guide
Page 165
... chat You can chat directly with information to describe the problem you solve common problems. You can send an e-mail to the Lexmark team, describing your problem. back on the printer display, and the troubleshooting steps you with a service representative. Contacting customer support .... A service representative will need to help you solve your problem. b Copy or scan the document. Visit the Lexmark Web site at the back of manuals, support documentation, drivers, and other tasks to step 3. c Copy or scan the document. Telephone support is solved. You...
... chat You can chat directly with information to describe the problem you solve common problems. You can send an e-mail to the Lexmark team, describing your problem. back on the printer display, and the troubleshooting steps you with a service representative. Contacting customer support .... A service representative will need to help you solve your problem. b Copy or scan the document. Visit the Lexmark Web site at the back of manuals, support documentation, drivers, and other tasks to step 3. c Copy or scan the document. Telephone support is solved. You...
User Guide
Page 176
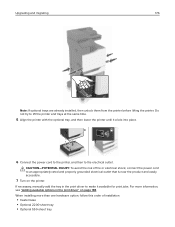
... electrical outlet. Upgrading and migrating 176 Note: If optional trays are already installed, then unlock them from the printer before lifting the printer. If necessary, manually add the tray in the print driver" on the printer.
... electrical outlet. Upgrading and migrating 176 Note: If optional trays are already installed, then unlock them from the printer before lifting the printer. If necessary, manually add the tray in the print driver" on the printer.
User Guide
Page 188
... earlier versions, select Properties. 3 Navigate to make it available for print jobs. Adding available options in the multiposition staple, hole punch finisher. If necessary, manually add the finisher in the Apple menu, navigate to your printer, and then select Options & Supplies. 2 Navigate to the electrical outlet. For Macintosh users...
... earlier versions, select Properties. 3 Navigate to make it available for print jobs. Adding available options in the multiposition staple, hole punch finisher. If necessary, manually add the finisher in the Apple menu, navigate to your printer, and then select Options & Supplies. 2 Navigate to the electrical outlet. For Macintosh users...
User Guide
Page 194
... 61 cleaning exterior of the printer 58 interior of the printer 58 scanner glass 58 cleaning the printer 58 collating copies copying 32 Color Correction manual 157 Color Correction Content 157 color quality, troubleshooting print appears tinted 158 confidential print jobs 29 configuring supply notifications...
... 61 cleaning exterior of the printer 58 interior of the printer 58 scanner glass 58 cleaning the printer 58 collating copies copying 32 Color Correction manual 157 Color Correction Content 157 color quality, troubleshooting print appears tinted 158 confidential print jobs 29 configuring supply notifications...
User Guide
Page 196
... stock 25 transparencies 25 loading envelopes multipurpose feeder 25 loading paper multipurpose feeder 25 loading trays 23 locating the security slot 53 M making copies 31 manual Color Correction applying 157 memory types installed on printer 54 memory card 166 installing 166 menu settings page printing 18 menus diagram 17 moving the...
... stock 25 transparencies 25 loading envelopes multipurpose feeder 25 loading paper multipurpose feeder 25 loading trays 23 locating the security slot 53 M making copies 31 manual Color Correction applying 157 memory types installed on printer 54 memory card 166 installing 166 menu settings page printing 18 menus diagram 17 moving the...


