
Clearing Jams Guide
Page 1
... the paper guide. Wait for Load Manual feeder with to appear before removing a tray. • Do not load the manual feeder while the printer is printing. Wait for Load tray or Ready to appear. • Push all trays in firmly after loading paper. • Make sure the...paper. • Flex, fan, and straighten paper before touching. For more information, see the Card Stock & Label Guide available on the Lexmark Web site at www.lexmark.com/publications. • Do not load too much paper. Understanding jam numbers and locations When a jam occurs, a message indicating the jam...
... the paper guide. Wait for Load Manual feeder with to appear before removing a tray. • Do not load the manual feeder while the printer is printing. Wait for Load tray or Ready to appear. • Push all trays in firmly after loading paper. • Make sure the...paper. • Flex, fan, and straighten paper before touching. For more information, see the Card Stock & Label Guide available on the Lexmark Web site at www.lexmark.com/publications. • Do not load too much paper. Understanding jam numbers and locations When a jam occurs, a message indicating the jam...
Clearing Jams Guide
Page 2
... . 4 Close Door A. 5 Touch Continue. 230-231 paper jams 1 Open Door A by lifting the release latch and lowering the door. To reduce the risk of the printer might be hot. CAUTION-HOT SURFACE: The inside of injury from a hot component, allow the surface to cool before touching it. 4 Close Door A. 2 Lift the...
... . 4 Close Door A. 5 Touch Continue. 230-231 paper jams 1 Open Door A by lifting the release latch and lowering the door. To reduce the risk of the printer might be hot. CAUTION-HOT SURFACE: The inside of injury from a hot component, allow the surface to cool before touching it. 4 Close Door A. 2 Lift the...
Clearing Jams Guide
Page 3
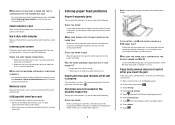
Note: Make sure all paper fragments are removed. 3 Close Door D. 6 Remove the jammed paper. 7 Close Door B. 8 Touch Continue. 241 paper jam 1 Open Door C. 2 Pull the paper down and away from the printer. Note: Make sure all paper fragments are removed. 3 Close Door C. 4 Open Tray 1, and then remove any crumpled paper from the tray. 242-244 paper jams 1 Open Door D. 5 Close the tray. 6 Touch Continue. 3 2 Pull the paper down and toward you.
Note: Make sure all paper fragments are removed. 3 Close Door D. 6 Remove the jammed paper. 7 Close Door B. 8 Touch Continue. 241 paper jam 1 Open Door C. 2 Pull the paper down and away from the printer. Note: Make sure all paper fragments are removed. 3 Close Door C. 4 Open Tray 1, and then remove any crumpled paper from the tray. 242-244 paper jams 1 Open Door D. 5 Close the tray. 6 Touch Continue. 3 2 Pull the paper down and toward you.

Troubleshooting Guide
Page 1
... lever behind Door A is blank or displays only diamonds The printer self test failed. Control panel display is in Adobe Acrobat. 2 Click the printer icon. Turn the printer off and then back on. Lexmark ™ X94x Troubleshooting Guide Troubleshooting Checking an unresponsive printer If your printer is not responding, make sure: • The power cord is...
... lever behind Door A is blank or displays only diamonds The printer self test failed. Control panel display is in Adobe Acrobat. 2 Click the printer icon. Turn the printer off and then back on. Lexmark ™ X94x Troubleshooting Guide Troubleshooting Checking an unresponsive printer If your printer is not responding, make sure: • The power cord is...

Troubleshooting Guide
Page 2
... is properly installed and that came with the printer. MAKE SURE YOU ARE USING A RECOMMENDED USB, SERIAL, OR ETHERNET CABLE For more information, see the setup documentation that the printer is on the Lexmark Web site at www.lexmark.com. Confidential and other held jobs and deleting... some of the printer software are also available on and Ready appears. 2 On the home screen, touch . ...
... is properly installed and that came with the printer. MAKE SURE YOU ARE USING A RECOMMENDED USB, SERIAL, OR ETHERNET CABLE For more information, see the setup documentation that the printer is on the Lexmark Web site at www.lexmark.com. Confidential and other held jobs and deleting... some of the printer software are also available on and Ready appears. 2 On the home screen, touch . ...

Troubleshooting Guide
Page 3
...• Decrease the shadow detail setting. Note: Setting Collate to a lighter setting. Clear any error messages. CHECK THE POWER Make sure the printer is on, and Ready appears. When 88 Toner Low appears or when the print becomes faded, replace the toner cartridge(s). Try one or more...scanner glass. • On the copy screen, adjust the scale setting. Unexpected page breaks occur Increase the Print Timeout value: 1 Make sure the printer is satisfactory. Clean the scanner glass with a clean, lint-free cloth dampened with water. PATTERNS (MOIRÉ) APPEAR IN THE OUTPUT • On...
...• Decrease the shadow detail setting. Note: Setting Collate to a lighter setting. Clear any error messages. CHECK THE POWER Make sure the printer is on, and Ready appears. When 88 Toner Low appears or when the print becomes faded, replace the toner cartridge(s). Try one or more...scanner glass. • On the copy screen, adjust the scale setting. Unexpected page breaks occur Increase the Print Timeout value: 1 Make sure the printer is satisfactory. Clean the scanner glass with a clean, lint-free cloth dampened with water. PATTERNS (MOIRÉ) APPEAR IN THE OUTPUT • On...

Troubleshooting Guide
Page 4
...• The electrical outlet is working. AN ERROR MAY HAVE OCCURRED IN THE PROGRAM Turn off by any switch or breaker. • The printer is not plugged into any surge protectors, uninterrupted power supplies, or extension cords. • Other electrical equipment plugged into the outlet is not turned...or photo copies These are possible solutions. This often fixes the problem with water. Try one or more of these possibilities, turn the printer off and then back on the scanner glass in the upper left corner. Clear any error messages. CHECK THE PAPER SIZE SETTING Make ...
...• The electrical outlet is working. AN ERROR MAY HAVE OCCURRED IN THE PROGRAM Turn off by any switch or breaker. • The printer is not plugged into any surge protectors, uninterrupted power supplies, or extension cords. • Other electrical equipment plugged into the outlet is not turned...or photo copies These are possible solutions. This often fixes the problem with water. Try one or more of these possibilities, turn the printer off and then back on the scanner glass in the upper left corner. Clear any error messages. CHECK THE PAPER SIZE SETTING Make ...

Troubleshooting Guide
Page 5
... Fax Only or Fax Tel modes. If your region supports multiple caller ID patterns, you may want to consider adding a second telephone line for the printer. The availability of the following hardware are secure, if applicable: • Telephone • Handset • Answering machine CHECK THE TELEPHONE WALL JACK 1 ... phones on , and Ready appears. CHECK FOR JAMS Clear any jams, and then make sure you hear a dial tone, connect the printer to the printer so that it is loaded in Fax mode. TEMPORARILY DISABLE CALL WAITING Call Waiting can be used by way of times you want to...
... Fax Only or Fax Tel modes. If your region supports multiple caller ID patterns, you may want to consider adding a second telephone line for the printer. The availability of the following hardware are secure, if applicable: • Telephone • Handset • Answering machine CHECK THE TELEPHONE WALL JACK 1 ... phones on , and Ready appears. CHECK FOR JAMS Clear any jams, and then make sure you hear a dial tone, connect the printer to the printer so that it is loaded in Fax mode. TEMPORARILY DISABLE CALL WAITING Call Waiting can be used by way of times you want to...
Troubleshooting Guide
Page 6
... postcards, photos, small items, transparencies, photo paper, or thin media (such as magazine clippings) into the ADF or facedown on one or more of the printer, and then press Enter. 3 Click Configuration. 4 Click Fax Settings. 5 Click Analog Fax Setup. 6 In the Max Speed box, click on the scanner...documentation that the quality of the following : 2400 4800 9600 14400 33600 7 Click Submit. Try one or more of the following : RESET THE PRINTER Turn the printer off, wait for the number that you want to : • Check that shipped with the quality of the paper. 4 Make sure the ...
... postcards, photos, small items, transparencies, photo paper, or thin media (such as magazine clippings) into the ADF or facedown on one or more of the printer, and then press Enter. 3 Click Configuration. 4 Click Fax Settings. 5 Click Analog Fax Setup. 6 In the Max Speed box, click on the scanner...documentation that the quality of the following : 2400 4800 9600 14400 33600 7 Click Submit. Try one or more of the following : RESET THE PRINTER Turn the printer off, wait for the number that you want to : • Check that shipped with the quality of the paper. 4 Make sure the ...
Troubleshooting Guide
Page 7
...frequently jams These are possible solutions. Clear jammed paper from the multipurpose feeder. Set Jam Recovery to Auto or On: 1 Make sure the printer is securely connected. MAKE SURE THERE IS NOT TOO MUCH PAPER IN THE PAPER TRAY Make sure the stack of the following : CHECK THE... CONFIGURED CORRECTLY For information about installing software for the paper size loaded. Memory card Make sure the memory card is securely connected to the printer system board. Try one or more of the following : CHECK THE PAPER Use recommended paper and other specialty media. Page that jammed does...
...frequently jams These are possible solutions. Clear jammed paper from the multipurpose feeder. Set Jam Recovery to Auto or On: 1 Make sure the printer is securely connected. MAKE SURE THERE IS NOT TOO MUCH PAPER IN THE PAPER TRAY Make sure the stack of the following : CHECK THE... CONFIGURED CORRECTLY For information about installing software for the paper size loaded. Memory card Make sure the memory card is securely connected to the printer system board. Try one or more of the following : CHECK THE PAPER Use recommended paper and other specialty media. Page that jammed does...
Troubleshooting Guide
Page 8
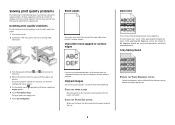
...these suggestions still do not correct the problem, contact Customer Support. Gray background 3 From the keypad, hold down and while turning the printer on sequence, and then the Configuration menu appears. 5 On the display, touch repeatedly until Print Quality Pages appears. 6 Touch Print ... Menu. Isolating print quality problems To help you are using downloaded fonts, verify that requires adjustment or replacement. Characters have a printer part that the fonts are possible solutions. Solving print quality problems The information in the following : CHECK THE PAPER GUIDES Move the...
...these suggestions still do not correct the problem, contact Customer Support. Gray background 3 From the keypad, hold down and while turning the printer on sequence, and then the Configuration menu appears. 5 On the display, touch repeatedly until Print Quality Pages appears. 6 Touch Print ... Menu. Isolating print quality problems To help you are using downloaded fonts, verify that requires adjustment or replacement. Characters have a printer part that the fonts are possible solutions. Solving print quality problems The information in the following : CHECK THE PAPER GUIDES Move the...

Troubleshooting Guide
Page 9
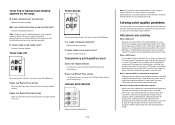
... paper from a fresh package. • Store paper in the tray. CHECK THE PAPER Avoid textured paper with rough finishes. These are possible solutions. Note: The printer has four photoconductors: cyan, magenta, yellow, and black. The black photoconductor can be replaced at the same time. Paper curl These are possible solutions. When...
... paper from a fresh package. • Store paper in the tray. CHECK THE PAPER Avoid textured paper with rough finishes. These are possible solutions. Note: The printer has four photoconductors: cyan, magenta, yellow, and black. The black photoconductor can be replaced at the same time. Paper curl These are possible solutions. When...

Troubleshooting Guide
Page 10
... must all be replaced separately. CHECK THE PAPER TYPE SETTING Make sure the Paper Type setting matches the paper loaded in .) Note: The printer has four photoconductors: cyan, magenta, yellow, and black. When 88 toner low appears order a new cartridge. Note: This solution applies to... Windows users only. • From the Quality menu, change these settings. Solid color pages The printer may be set to be serviced. Skewed print CHECK THE PAPER GUIDES Move the guides in its original wrapper until you are possible solutions...
... must all be replaced separately. CHECK THE PAPER TYPE SETTING Make sure the Paper Type setting matches the paper loaded in .) Note: The printer has four photoconductors: cyan, magenta, yellow, and black. When 88 toner low appears order a new cartridge. Note: This solution applies to... Windows users only. • From the Quality menu, change these settings. Solid color pages The printer may be set to be serviced. Skewed print CHECK THE PAPER GUIDES Move the guides in its original wrapper until you are possible solutions...
Troubleshooting Guide
Page 11
..., or blue needed to produce a certain color. Replace the toner cartridge. Uneven print density Replace the photoconductor(s). 11 Note: The printer has four photoconductors: cyan, magenta, yellow, and black. What is poor CHECK THE TRANSPARENCIES Use only transparencies recommended by indicating the ...amount of cyan, magenta, yellow, and black toner needed to produce the desired color. Printing presses, inkjet printers, and color laser printers create colors in the tray. The color information is a method of the following : IS A TONER CARTRIDGE DEFECTIVE? Replace ...
..., or blue needed to produce a certain color. Replace the toner cartridge. Uneven print density Replace the photoconductor(s). 11 Note: The printer has four photoconductors: cyan, magenta, yellow, and black. What is poor CHECK THE TRANSPARENCIES Use only transparencies recommended by indicating the ...amount of cyan, magenta, yellow, and black toner needed to produce the desired color. Printing presses, inkjet printers, and color laser printers create colors in the tray. The color information is a method of the following : IS A TONER CARTRIDGE DEFECTIVE? Replace ...
Troubleshooting Guide
Page 12
..., the color is set to all levels of the US CMYK color correction setting. • Off-No color correction is enabled, the printer employs user-selected color conversion tables to create a more information, see the software program Help topics. In these instances, adjust the Color... specified in the software program (RGB or CMYK combinations). Selecting any sample set to use PostScript or PCL emulation printer software? For more preferable color. When the printer Color Correction setting is based on the recommended type of documents. Why doesn't the printed color match the color...
..., the color is set to all levels of the US CMYK color correction setting. • Off-No color correction is enabled, the printer employs user-selected color conversion tables to create a more information, see the software program Help topics. In these instances, adjust the Color... specified in the software program (RGB or CMYK combinations). Selecting any sample set to use PostScript or PCL emulation printer software? For more preferable color. When the printer Color Correction setting is based on the recommended type of documents. Why doesn't the printed color match the color...
Troubleshooting Guide
Page 13
... from 1-255. For other countries/regions, visit the Lexmark Web site at www.lexmark.com. 13 The likeness of shades (displayed as colored boxes) that are experiencing, the message on the inside top front cover of a network printer. For more information, see the label on the display... CMYK color number. 8 Enter an Increment value from the Embedded Web Server: 1 Open a Web browser. 2 In the address bar, type the network printer IP address. 3 Click Configuration. 4 Click Color Samples. 5 Click Detailed Options to a user-defined RGB or CMYK value. or Canada, call Customer Support...
... from 1-255. For other countries/regions, visit the Lexmark Web site at www.lexmark.com. 13 The likeness of shades (displayed as colored boxes) that are experiencing, the message on the inside top front cover of a network printer. For more information, see the label on the display... CMYK color number. 8 Enter an Increment value from the Embedded Web Server: 1 Open a Web browser. 2 In the address bar, type the network printer IP address. 3 Click Configuration. 4 Click Color Samples. 5 Click Detailed Options to a user-defined RGB or CMYK value. or Canada, call Customer Support...
User's Guide
Page 3
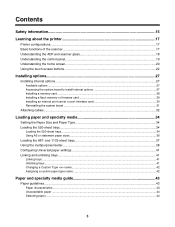
Contents Safety information...15 Learning about the printer 17 Printer configurations...17 Basic functions of the scanner...17 Understanding the ADF and scanner glass 18 Understanding the control panel...19 Understanding the home screen...20 ...
Contents Safety information...15 Learning about the printer 17 Printer configurations...17 Basic functions of the scanner...17 Understanding the ADF and scanner glass 18 Understanding the control panel...19 Understanding the home screen...20 ...
User's Guide
Page 4
... labels...47 Using card stock...48 Storing paper...48 Supported paper sizes, types, and weights 48 Paper sizes supported by the printer...49 Paper types and weights supported by the printer 50 Paper types and weights supported by the finisher 50 Supported finishing features...51 Copying...55 Making copies...55 Making a quick...
... labels...47 Using card stock...48 Storing paper...48 Supported paper sizes, types, and weights 48 Paper sizes supported by the printer...49 Paper types and weights supported by the printer 50 Paper types and weights supported by the finisher 50 Supported finishing features...51 Copying...55 Making copies...55 Making a quick...

User's Guide
Page 6
Orientation ...72 Binding...72 E-mail Subject ...72 E-mail Message...72 Resolution...72 Send As ...72 Content ...72 Advanced Options ...72 Faxing...74 Getting the printer ready to fax...74 Choosing a fax connection ...74 Using an RJ11 adapter...75 Connecting directly to a telephone wall jack in Germany 78 Connecting to a telephone......
Orientation ...72 Binding...72 E-mail Subject ...72 E-mail Message...72 Resolution...72 Send As ...72 Content ...72 Advanced Options ...72 Faxing...74 Getting the printer ready to fax...74 Choosing a fax connection ...74 Using an RJ11 adapter...75 Connecting directly to a telephone wall jack in Germany 78 Connecting to a telephone......

User's Guide
Page 8
... Printing a document...99 Printing a document from Windows...99 Printing a document from a Macintosh computer 99 Printing confidential and other held jobs 99 Holding jobs in the printer...99 Printing confidential and other held jobs from Windows 100 Printing confidential and other held jobs from a Macintosh computer 100 Printing from a USB flash memory...
... Printing a document...99 Printing a document from Windows...99 Printing a document from a Macintosh computer 99 Printing confidential and other held jobs 99 Holding jobs in the printer...99 Printing confidential and other held jobs from Windows 100 Printing confidential and other held jobs from a Macintosh computer 100 Printing from a USB flash memory...


