
Clearing Jams Guide
Page 1
...printer is located between the finisher output bins. Open Doors A and B, and then remove any jams. Open Door D, and then remove the jam. For staple jams, remove the paper from the multipurpose feeder. 2 Flex and stack the paper. 3 Reload the multipurpose feeder. 4 Adjust the paper guide. Wait ... 1 200-203 2 230-231 Area name Door A Door B 3 241 Door C 4 242-244 Door D Instructions Open Door A, and then remove the jam. Lexmark™ X94x Clearing Jams Guide Clearing jams Avoiding jams The following illustration and table list the paper jams that has been cut or trimmed by...
...printer is located between the finisher output bins. Open Doors A and B, and then remove any jams. Open Door D, and then remove the jam. For staple jams, remove the paper from the multipurpose feeder. 2 Flex and stack the paper. 3 Reload the multipurpose feeder. 4 Adjust the paper guide. Wait ... 1 200-203 2 230-231 Area name Door A Door B 3 241 Door C 4 242-244 Door D Instructions Open Door A, and then remove the jam. Lexmark™ X94x Clearing Jams Guide Clearing jams Avoiding jams The following illustration and table list the paper jams that has been cut or trimmed by...
Clearing Jams Guide
Page 6
If the paper is jammed in the rollers, rotate Knob G8 clockwise, and then remove the jammed paper. 2 Remove the jammed paper. 8 Close Door G. 9 Touch Continue. 284-286 paper jams 1 Open Door H. 3 Close Door H. 4 Touch Continue. 289 staple jam 1 Open Door G. 2 Slide the G5 stapler toward the front of the finisher. 3 Lift the lever, and then remove the staple cartridge. 6 7 Lift the inside cover.
If the paper is jammed in the rollers, rotate Knob G8 clockwise, and then remove the jammed paper. 2 Remove the jammed paper. 8 Close Door G. 9 Touch Continue. 284-286 paper jams 1 Open Door H. 3 Close Door H. 4 Touch Continue. 289 staple jam 1 Open Door G. 2 Slide the G5 stapler toward the front of the finisher. 3 Lift the lever, and then remove the staple cartridge. 6 7 Lift the inside cover.
Clearing Jams Guide
Page 7
4 Open the staple cover. 6 Place the staple cartridge into the upper stapler. 8 Remove the staple cartridge identified on the display. 5 Remove the jammed staple, and then close the cover. 7 Open the lower staple drawer. 9 Remove the jammed staples, and then place the staple cartridge into the stapler. 7
4 Open the staple cover. 6 Place the staple cartridge into the upper stapler. 8 Remove the staple cartridge identified on the display. 5 Remove the jammed staple, and then close the cover. 7 Open the lower staple drawer. 9 Remove the jammed staples, and then place the staple cartridge into the stapler. 7
Clearing Jams Guide
Page 8
10 Close the staple drawer. 5 Open the scanner cover, and then remove any jammed pages. 11 Close Door G. 12 Touch Continue. 290-295 paper jams 1 Remove all original documents from the ADF. 2 Open the ADF cover, and then remove any jammed paper. 4 Close the ADF cover. 3 Raise the sheet guard, and then remove any jammed paper. Note: If the jammed paper cannot be remove easily, rotate the paper advance wheel to the left. 8 6 Close the scanner cover. 7 Touch Continue.
10 Close the staple drawer. 5 Open the scanner cover, and then remove any jammed pages. 11 Close Door G. 12 Touch Continue. 290-295 paper jams 1 Remove all original documents from the ADF. 2 Open the ADF cover, and then remove any jammed paper. 4 Close the ADF cover. 3 Raise the sheet guard, and then remove any jammed paper. Note: If the jammed paper cannot be remove easily, rotate the paper advance wheel to the left. 8 6 Close the scanner cover. 7 Touch Continue.

User's Guide
Page 8
... jams...112 250 paper jam...114 280-282 paper jams...115 283-284 and 287-288 paper jams 116 284-286 paper jams...118 289 staple jam...119 290-295 paper jams...122 8
... jams...112 250 paper jam...114 280-282 paper jams...115 283-284 and 287-288 paper jams 116 284-286 paper jams...118 289 staple jam...119 290-295 paper jams...122 8
User's Guide
Page 10
...status of supplies from a network computer 203 Conserving supplies...204 Ordering supplies...204 Ordering toner cartridges...204 Ordering photoconductors ...204 Ordering staple cartridges ...204 Ordering a waste toner box ...205 Replacing supplies...205 Replacing the waste toner box ...205 Cleaning the printhead ... photoconductor...214 Replacing a toner cartridge ...217 Cleaning the exterior of the printer 219 Cleaning the scanner glass...220 Recycling Lexmark products...220 Moving the printer...220 Before moving the printer ...220 Moving the printer and options to another location within ...
...status of supplies from a network computer 203 Conserving supplies...204 Ordering supplies...204 Ordering toner cartridges...204 Ordering photoconductors ...204 Ordering staple cartridges ...204 Ordering a waste toner box ...205 Replacing supplies...205 Replacing the waste toner box ...205 Cleaning the printhead ... photoconductor...214 Replacing a toner cartridge ...217 Cleaning the exterior of the printer 219 Cleaning the scanner glass...220 Recycling Lexmark products...220 Moving the printer...220 Before moving the printer ...220 Moving the printer and options to another location within ...
User's Guide
Page 52
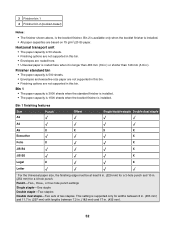
...432 mm). 52 Bin 2 is available only when the booklet finisher is the booklet finisher. Bin 1 finishing features Size Punch* A3 Offset Single/double staple Double dual staple A4 A5 X X X X Executive X Folio X X JIS B4 X JIS B5 X Legal X X Letter * For the Universal paper size,...least 9 in. (229 mm) for a 4-hole punch. Punch-Two-, three-, or four-hole punch settings Single staple-One staple Double staple-Two staples Double dual staple-Two sets of two staples. 3 Finisher bin 1 4 Finisher bin 2 (booklet-maker) Notes: • The finisher shown above, is installed....
...432 mm). 52 Bin 2 is available only when the booklet finisher is the booklet finisher. Bin 1 finishing features Size Punch* A3 Offset Single/double staple Double dual staple A4 A5 X X X X Executive X Folio X X JIS B4 X JIS B5 X Legal X X Letter * For the Universal paper size,...least 9 in. (229 mm) for a 4-hole punch. Punch-Two-, three-, or four-hole punch settings Single staple-One staple Double staple-Two staples Double dual staple-Two sets of two staples. 3 Finisher bin 1 4 Finisher bin 2 (booklet-maker) Notes: • The finisher shown above, is installed....
User's Guide
Page 53
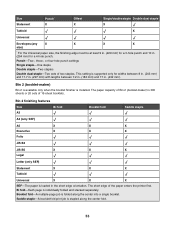
...-maker) Bin 2 is available only when the booklet finisher is individually folded and stacked separately. Bin 2 finishing features Size Bi fold A3 Booklet fold Saddle staple A4 (only SEF) A5 X X X Executive X X X Folio JIS B4 JIS B5 X X X Legal Letter (only SEF) Statement X X ...punch. Booklet fold-A multiple-page job is 300 sheets or 20 sets of 15-sheet booklets. Size Statement Punch* X Offset X Single/double staple Double dual staple X Tabloid X Universal Envelopes (any X X X X size) * For the Universal paper size, the finishing edge must be at least ...
...-maker) Bin 2 is available only when the booklet finisher is individually folded and stacked separately. Bin 2 finishing features Size Bi fold A3 Booklet fold Saddle staple A4 (only SEF) A5 X X X Executive X X X Folio JIS B4 JIS B5 X X X Legal Letter (only SEF) Statement X X ...punch. Booklet fold-A multiple-page job is 300 sheets or 20 sets of 15-sheet booklets. Size Statement Punch* X Offset X Single/double staple Double dual staple X Tabloid X Universal Envelopes (any X X X X size) * For the Universal paper size, the finishing edge must be at least ...

User's Guide
Page 54
Booklet fold-A multiple-page job is stapled along the center into a single booklet. Bi fold-Each page is loaded in the short edge orientation. The short edge of the paper enters the printer first. Saddle staple-A booklet-fold print job is folded along the center fold. 54 Size Bi fold Booklet fold Saddle staple Envelopes (any size) X X X SEF-The paper is individually folded and stacked separately.
Booklet fold-A multiple-page job is stapled along the center into a single booklet. Bi fold-Each page is loaded in the short edge orientation. The short edge of the paper enters the printer first. Saddle staple-A booklet-fold print job is folded along the center fold. 54 Size Bi fold Booklet fold Saddle staple Envelopes (any size) X X X SEF-The paper is individually folded and stacked separately.

User's Guide
Page 65
... a single page. The word you print two or more sheets of the original document and with an icon of that , when folded or folded and stapled, forms a booklet half the page size of an original document together on . When a custom overlay is different from a magazine or newspaper. 65 Paper Saver This...
... a single page. The word you print two or more sheets of the original document and with an icon of that , when folded or folded and stapled, forms a booklet half the page size of an original document together on . When a custom overlay is different from a magazine or newspaper. 65 Paper Saver This...
User's Guide
Page 107
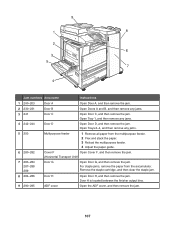
..., and then clear the staple jam. 8 284-286 Door H Open Door H, and then remove the jam. Open Tray 1, and then remove any jams. 3 241 Door C Open Door C, and then remove ... the jam. Door H is located between the finisher output bins. 9 290-295 ADF cover Open the ADF cover, and then remove the jam. 107 For staple jams, remove the paper from the multipurpose feeder. 2 Flex and stack the paper. 3 Reload the multipurpose feeder. 4 Adjust the paper guide. 6 280-282 Cover F Open...
..., and then clear the staple jam. 8 284-286 Door H Open Door H, and then remove the jam. Open Tray 1, and then remove any jams. 3 241 Door C Open Door C, and then remove ... the jam. Door H is located between the finisher output bins. 9 290-295 ADF cover Open the ADF cover, and then remove the jam. 107 For staple jams, remove the paper from the multipurpose feeder. 2 Flex and stack the paper. 3 Reload the multipurpose feeder. 4 Adjust the paper guide. 6 280-282 Cover F Open...

User's Guide
Page 119
289 staple jam 1 Open Door G. 2 Slide the G5 stapler toward the front of the finisher. 3 Lift the lever, and then remove the staple cartridge. 119
289 staple jam 1 Open Door G. 2 Slide the G5 stapler toward the front of the finisher. 3 Lift the lever, and then remove the staple cartridge. 119

User's Guide
Page 120
4 Open the staple cover. 5 Remove the jammed staple, and then close the cover. 6 Place the staple cartridge into the upper stapler. 120
4 Open the staple cover. 5 Remove the jammed staple, and then close the cover. 6 Place the staple cartridge into the upper stapler. 120

User's Guide
Page 121
7 Open the lower staple drawer. 8 Remove the staple cartridge identified on the display. 9 Remove the jammed staples, and then place the staple cartridge into the stapler. 121
7 Open the lower staple drawer. 8 Remove the staple cartridge identified on the display. 9 Remove the jammed staples, and then place the staple cartridge into the stapler. 121

User's Guide
Page 122
10 Close the staple drawer. 11 Close Door G. 12 Touch Continue. 290-295 paper jams 1 Remove all original documents from the ADF. 2 Open the ADF cover, and then remove any jammed paper. 3 Raise the sheet guard, and then remove any jammed paper. Note: If the jammed paper cannot be remove easily, rotate the paper advance wheel to the left. 122
10 Close the staple drawer. 11 Close Door G. 12 Touch Continue. 290-295 paper jams 1 Remove all original documents from the ADF. 2 Open the ADF cover, and then remove any jammed paper. 3 Raise the sheet guard, and then remove any jammed paper. Note: If the jammed paper cannot be remove easily, rotate the paper advance wheel to the left. 122

User's Guide
Page 124
Supplies Menu Cyan Toner Yellow Toner Magenta Toner Black Toner Cyan PC Unit Yellow PC Unit Magenta PC Unit Black PC Unit Waste Toner Box Staples G5 Staples G12 Staples G11 Hole Punch Box Paper Menu Default Source Paper Size/Type Configure MP Substitute Size Paper Texture Paper Loading Custom Types Custom Names Custom...
Supplies Menu Cyan Toner Yellow Toner Magenta Toner Black Toner Cyan PC Unit Yellow PC Unit Magenta PC Unit Black PC Unit Waste Toner Box Staples G5 Staples G12 Staples G11 Hole Punch Box Paper Menu Default Source Paper Size/Type Configure MP Substitute Size Paper Texture Paper Loading Custom Types Custom Names Custom...
User's Guide
Page 125
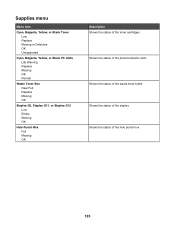
Supplies menu Menu item Cyan, Magenta, Yellow, or Black Toner Low Replace Missing or Defective OK Unsupported Cyan, Magenta, Yellow, or Black PC Units Life Warning Replace Missing OK Normal Waste Toner Box Near Full Replace Missing OK Staples G5, Staples G11, or Staples G12 Low Empty Missing OK Hole Punch Box Full Missing OK Description Shows the status of the toner cartridges Shows the status of the photoconductor units Shows the status of the waste toner bottle Shows the status of the staples Shows the status of the hole punch box 125
Supplies menu Menu item Cyan, Magenta, Yellow, or Black Toner Low Replace Missing or Defective OK Unsupported Cyan, Magenta, Yellow, or Black PC Units Life Warning Replace Missing OK Normal Waste Toner Box Near Full Replace Missing OK Staples G5, Staples G11, or Staples G12 Low Empty Missing OK Hole Punch Box Full Missing OK Description Shows the status of the toner cartridges Shows the status of the photoconductor units Shows the status of the waste toner bottle Shows the status of the staples Shows the status of the hole punch box 125

User's Guide
Page 138
...Job Scans On Off Scanner Jam Recovery Job level Page level Web Page Refresh Rate 30-300 Contact Name Location Alarms Alarm Control Toner Alarm Staple Alarm Hole Punch Alarm Description Specifies whether image background removal is allowed during copy, fax, e-mail, FTP, or scan to USB Note...printer requires operator intervention Available selections for each alarm type are available only when the finisher is the factory default setting for Toner Alarm, Staple Alarm, and Hole Punch Alarm. Sets an alarm to one file Note: On is the factory default setting for Alarm Control. Specifies ...
...Job Scans On Off Scanner Jam Recovery Job level Page level Web Page Refresh Rate 30-300 Contact Name Location Alarms Alarm Control Toner Alarm Staple Alarm Hole Punch Alarm Description Specifies whether image background removal is allowed during copy, fax, e-mail, FTP, or scan to USB Note...printer requires operator intervention Available selections for each alarm type are available only when the finisher is the factory default setting for Toner Alarm, Staple Alarm, and Hole Punch Alarm. Sets an alarm to one file Note: On is the factory default setting for Alarm Control. Specifies ...
User's Guide
Page 142
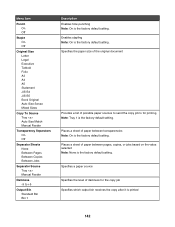
...level of paper between pages, copies, or jobs based on the value selected Note: None is the factory default setting. Menu item Punch On Off Staple On Off Original Size Letter Legal Executive Tabloid Folio A3 A4 A5 Statement JIS B4 JIS B5 Book Original Auto Size Sense Mixed Sizes Copy... Source Tray Manual Feeder Darkness -5 to for the copy job Specifies which output bin receives the copy after it is the factory default setting. Enables stapling Note: On is the factory default setting. Places a sheet of possible paper sources to send the copy job to +5 Output Bin Standard Bin Bin 1 ...
...level of paper between pages, copies, or jobs based on the value selected Note: None is the factory default setting. Menu item Punch On Off Staple On Off Original Size Letter Legal Executive Tabloid Folio A3 A4 A5 Statement JIS B4 JIS B5 Book Original Auto Size Sense Mixed Sizes Copy... Source Tray Manual Feeder Darkness -5 to for the copy job Specifies which output bin receives the copy after it is the factory default setting. Enables stapling Note: On is the factory default setting. Places a sheet of possible paper sources to send the copy job to +5 Output Bin Standard Bin Bin 1 ...

User's Guide
Page 148
Specifies the default staple setting for error Receive Error Log Print Never Print on Error Auto Print Logs On Off Log Paper Source Tray MP Feeder Description Specifies the ... ID specified Enables the list of recipient to Shortcut Block No Name Fax On Off Banned Fax List On Off Punch 2 holes 3 holes 4 holes Off Staple 1 staples 2 staples 4 staples Off Fax Log Settings Menu item Transmission Log Print log Do not print log Print only for the attached finisher Note: Only the settings associated...
Specifies the default staple setting for error Receive Error Log Print Never Print on Error Auto Print Logs On Off Log Paper Source Tray MP Feeder Description Specifies the ... ID specified Enables the list of recipient to Shortcut Block No Name Fax On Off Banned Fax List On Off Punch 2 holes 3 holes 4 holes Off Staple 1 staples 2 staples 4 staples Off Fax Log Settings Menu item Transmission Log Print log Do not print log Print only for the attached finisher Note: Only the settings associated...


