
User Guide
Page 9
... ...210 Replacing supplies...210 Replacing the waste toner box ...210 Cleaning the printhead lenses ...215 Replacing a photoconductor...219 Replacing a toner cartridge...222 Cleaning the exterior of the printer...224 Cleaning the scanner glass...225 Recycling Lexmark products...225 Moving the printer...226 Before moving the printer ...226 Moving the printer and options...
... ...210 Replacing supplies...210 Replacing the waste toner box ...210 Cleaning the printhead lenses ...215 Replacing a photoconductor...219 Replacing a toner cartridge...222 Cleaning the exterior of the printer...224 Cleaning the scanner glass...225 Recycling Lexmark products...225 Moving the printer...226 Before moving the printer ...226 Moving the printer and options...
User Guide
Page 128
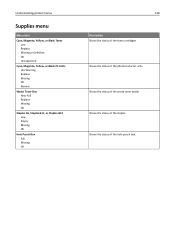
Understanding printer menus Supplies menu Menu item Cyan, Magenta, Yellow, or Black Toner Low Replace Missing or Defective OK Unsupported Cyan, Magenta, Yellow, or Black PC Units Life Warning Replace Missing OK Normal Waste Toner Box Near Full Replace Missing OK Staples G5, Staples G11, or Staples G12 Low Empty Missing OK Hole Punch Box Full Missing OK 128 Description Shows the status of the toner cartridges Shows the status of the photoconductor units Shows the status of the waste toner bottle Shows the status of the staples Shows the status of the hole punch box
Understanding printer menus Supplies menu Menu item Cyan, Magenta, Yellow, or Black Toner Low Replace Missing or Defective OK Unsupported Cyan, Magenta, Yellow, or Black PC Units Life Warning Replace Missing OK Normal Waste Toner Box Near Full Replace Missing OK Staples G5, Staples G11, or Staples G12 Low Empty Missing OK Hole Punch Box Full Missing OK 128 Description Shows the status of the toner cartridges Shows the status of the photoconductor units Shows the status of the waste toner bottle Shows the status of the staples Shows the status of the hole punch box
User Guide
Page 206
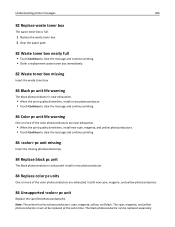
...Insert the waste toner box. 84 Black pc unit life warning The black photoconductor is near exhaustion. • When the print quality diminishes, install new cyan, magenta, and yellow photoconductors. • Touch Continue to clear the message and continue printing. 84 ... One or more of the color photoconductors are exhausted. The cyan, magenta, and yellow photoconductors must all be replaced separately. Install new cyan, magenta, and yellow photoconductors. 84 Unsupported pc unit Replace the specified photoconductor(s). Install a new photoconductor. 84 Replace color pc units One...
...Insert the waste toner box. 84 Black pc unit life warning The black photoconductor is near exhaustion. • When the print quality diminishes, install new cyan, magenta, and yellow photoconductors. • Touch Continue to clear the message and continue printing. 84 ... One or more of the color photoconductors are exhausted. The cyan, magenta, and yellow photoconductors must all be replaced separately. Install new cyan, magenta, and yellow photoconductors. 84 Unsupported pc unit Replace the specified photoconductor(s). Install a new photoconductor. 84 Replace color pc units One...
User Guide
Page 209
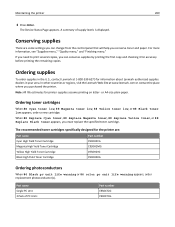
... pc unit life warning or 84 color pc unit life warning appears, order replacement photoconductor(s). A summary of PC Units Part number C930X72G C930X73G In other countries or regions, visit the Lexmark Web Site at 1-800-539-6275 for the printer are some settings you conserve toner...88 Replace Yellow toner, or 88 Replace Black toner appears, you purchased the printer. Ordering supplies To order supplies in the U.S., contact Lexmark at www.lexmark.com or contact the place where you must replace the specified toner cartridge. For more information, see "Supplies menu," "Quality menu,"...
... pc unit life warning or 84 color pc unit life warning appears, order replacement photoconductor(s). A summary of PC Units Part number C930X72G C930X73G In other countries or regions, visit the Lexmark Web Site at 1-800-539-6275 for the printer are some settings you conserve toner...88 Replace Yellow toner, or 88 Replace Black toner appears, you purchased the printer. Ordering supplies To order supplies in the U.S., contact Lexmark at www.lexmark.com or contact the place where you must replace the specified toner cartridge. For more information, see "Supplies menu," "Quality menu,"...

User Guide
Page 211
Maintaining the printer 211 3 Door E 4 Printhead lens cleaner 5 E6 Door tab 1 Unpack the replacement waste toner box and accessories. 2 Open Door E (front printer door). Warning-Potential Damage: To avoid overexposing the photoconductors, do not leave the door open for more than 10 minutes.
Maintaining the printer 211 3 Door E 4 Printhead lens cleaner 5 E6 Door tab 1 Unpack the replacement waste toner box and accessories. 2 Open Door E (front printer door). Warning-Potential Damage: To avoid overexposing the photoconductors, do not leave the door open for more than 10 minutes.

User Guide
Page 216
Note: If you are replacing the waste toner box, use the printhead lens cleaner that shipped with it. Warning-Potential Damage: To avoid overexposing the photoconductors, do not leave the door open for more than 10 minutes. 2 Grasp the E6 Door tab, and then push the door down. 3 Remove the waste toner box. 4 Locate and remove the printhead lens cleaner from Door E. Maintaining the printer 216 1 Open Door E (front door).
Note: If you are replacing the waste toner box, use the printhead lens cleaner that shipped with it. Warning-Potential Damage: To avoid overexposing the photoconductors, do not leave the door open for more than 10 minutes. 2 Grasp the E6 Door tab, and then push the door down. 3 Remove the waste toner box. 4 Locate and remove the printhead lens cleaner from Door E. Maintaining the printer 216 1 Open Door E (front door).

User Guide
Page 219
Maintaining the printer 219 11 Close Door E. Warning-Potential Damage: To avoid overexposing the photoconductors, do not leave the door open for more than 10 minutes. 2 Release the bar by pressing the E5 button located on the bottom of the E5 latch, lift the E5 latch, and then press the bar down. Replacing a photoconductor Replace the black photoconductor when 84 Replace black pc unit appears. Replace the cyan, magenta, and yellow photoconductors when 84 Replace color pc units appears. 1 Open Door E (front printer door).
Maintaining the printer 219 11 Close Door E. Warning-Potential Damage: To avoid overexposing the photoconductors, do not leave the door open for more than 10 minutes. 2 Release the bar by pressing the E5 button located on the bottom of the E5 latch, lift the E5 latch, and then press the bar down. Replacing a photoconductor Replace the black photoconductor when 84 Replace black pc unit appears. Replace the cyan, magenta, and yellow photoconductors when 84 Replace color pc units appears. 1 Open Door E (front printer door).

User Guide
Page 220
Photoconductor color Opening name Black E1 Cyan E2 Magenta E3 Yellow E4 4 Unpack the replacement photoconductor. 5 Align and insert the end of the photoconductor. Maintaining the printer 220 3 Remove the photoconductor(s) specified on the display.
Photoconductor color Opening name Black E1 Cyan E2 Magenta E3 Yellow E4 4 Unpack the replacement photoconductor. 5 Align and insert the end of the photoconductor. Maintaining the printer 220 3 Remove the photoconductor(s) specified on the display.

User Guide
Page 221
Maintaining the printer 221 6 Remove the tape from the top of the photoconductor. 7 Press the button forward to insert the photoconductor while removing the casing. 8 Lift the bar up, and then press latch E5 down so that it holds the bar in position.
Maintaining the printer 221 6 Remove the tape from the top of the photoconductor. 7 Press the button forward to insert the photoconductor while removing the casing. 8 Lift the bar up, and then press latch E5 down so that it holds the bar in position.

User Guide
Page 255
Troubleshooting 255 Dark lines ABCDE ABCDE ABCDE One or more of the photoconductors may be defective. CHECK THE PAPER SIZE SETTING Make sure the Paper Size setting matches the paper loaded in the tray to print. Gray background ... pc unit life warning, 84 Black pc unit life warning, 84 Replace color pc units, or 84 Replace black pc unit message appears, replace the photoconductor(s).
Troubleshooting 255 Dark lines ABCDE ABCDE ABCDE One or more of the photoconductors may be defective. CHECK THE PAPER SIZE SETTING Make sure the Paper Size setting matches the paper loaded in the tray to print. Gray background ... pc unit life warning, 84 Black pc unit life warning, 84 Replace color pc units, or 84 Replace black pc unit message appears, replace the photoconductor(s).

User Guide
Page 256
...• Load paper from a fresh package. • Store paper in Print Properties or the software program. Replace the photoconductor(s). The cyan, magenta, and yellow photoconductors must all be replaced separately. Paper curl These are possible solutions. Try one or more of the following : CHECK THE... SETTING Make sure the Paper Type setting matches the paper loaded in the tray. The black photoconductor can be replaced at the same time. Note: The printer has four photoconductors: cyan, magenta, yellow, and black. Replace the toner cartridge. IS THE TRANSFER BELT DEFECTIVE...
...• Load paper from a fresh package. • Store paper in Print Properties or the software program. Replace the photoconductor(s). The cyan, magenta, and yellow photoconductors must all be replaced separately. Paper curl These are possible solutions. Try one or more of the following : CHECK THE... SETTING Make sure the Paper Type setting matches the paper loaded in the tray. The black photoconductor can be replaced at the same time. Note: The printer has four photoconductors: cyan, magenta, yellow, and black. Replace the toner cartridge. IS THE TRANSFER BELT DEFECTIVE...

User Guide
Page 258
... all be replaced separately. CHECK THE PAPER Make sure you use it. Replace the photoconductor(s) if the defects occur every: • 44 mm (1.7 in.) • 94 mm (3.7 in its original wrapper until you are possible solutions. Note: This solution applies ... RGB Brightness setting is too dark, or the RGB Contrast setting is too light These are using paper that meets the printer specifications. The black photoconductor can be replaced at the same time. CHECK THE PAPER Avoid textured paper with rough finishes. Print is too high. • From Print Properties, change...
... all be replaced separately. CHECK THE PAPER Make sure you use it. Replace the photoconductor(s) if the defects occur every: • 44 mm (1.7 in.) • 94 mm (3.7 in its original wrapper until you are possible solutions. Note: This solution applies ... RGB Brightness setting is too dark, or the RGB Contrast setting is too light These are using paper that meets the printer specifications. The black photoconductor can be replaced at the same time. CHECK THE PAPER Avoid textured paper with rough finishes. Print is too high. • From Print Properties, change...

User Guide
Page 260
... fog or background shading appears on the page A TONER CARTRIDGE MAY BE DEFECTIVE Replace the toner cartridge. Replace the photoconductor(s). The black photoconductor can be replaced at the same time. Toner rubs off These are possible solutions. Note: The printer has four... photoconductors: cyan, magenta, yellow, and black. Contact Customer Support. Try one or more information, contact Customer Support. ARE THE PHOTOCONDUCTORS WORN OR DEFECTIVE? CHECK THE PAPER TEXTURE SETTING Make sure the Paper Texture...
... fog or background shading appears on the page A TONER CARTRIDGE MAY BE DEFECTIVE Replace the toner cartridge. Replace the photoconductor(s). The black photoconductor can be replaced at the same time. Toner rubs off These are possible solutions. Note: The printer has four... photoconductors: cyan, magenta, yellow, and black. Contact Customer Support. Try one or more information, contact Customer Support. ARE THE PHOTOCONDUCTORS WORN OR DEFECTIVE? CHECK THE PAPER TEXTURE SETTING Make sure the Paper Texture...

User Guide
Page 261
... cartridge. Transparency print quality is set to produce a certain color. Note: The printer has four photoconductors: cyan, magenta, yellow, and black. The cyan, magenta, and yellow photoconductors must all be replaced separately. IS THERE TONER IN THE PAPER PATH? CHECK THE PAPER TYPE SETTING...describes how some of describing colors by the printer manufacturer. Troubleshooting 261 These are possible solutions. Contact Customer Support. The black photoconductor can be used to solve typical color problems. FAQ about color printing What is a method of the features provided in ...
... cartridge. Transparency print quality is set to produce a certain color. Note: The printer has four photoconductors: cyan, magenta, yellow, and black. The cyan, magenta, and yellow photoconductors must all be replaced separately. IS THERE TONER IN THE PAPER PATH? CHECK THE PAPER TYPE SETTING...describes how some of describing colors by the printer manufacturer. Troubleshooting 261 These are possible solutions. Contact Customer Support. The black photoconductor can be used to solve typical color problems. FAQ about color printing What is a method of the features provided in ...
User Guide
Page 281
... 29 options, touch‑screen copy 63, 64 e‑mail 72, 73 fax 89, 90 FTP 95, 96 scan to computer 98, 99, 100 ordering photoconductors 209 staple cartridges 210 toner cartridges 209 waste toner box 210 output file type changing 71 P paper A5 34 characteristics 42 finishing features 51 letterhead... 41 paper types duplex support 50 supported by finisher 50 supported by printer 50 where to load 50 PCL Emul menu 171 PDF menu 173 photoconductors ordering 209 photos copying 55 port interface card 29 PostScript menu 170
... 29 options, touch‑screen copy 63, 64 e‑mail 72, 73 fax 89, 90 FTP 95, 96 scan to computer 98, 99, 100 ordering photoconductors 209 staple cartridges 210 toner cartridges 209 waste toner box 210 output file type changing 71 P paper A5 34 characteristics 42 finishing features 51 letterhead... 41 paper types duplex support 50 supported by finisher 50 supported by printer 50 where to load 50 PCL Emul menu 171 PDF menu 173 photoconductors ordering 209 photos copying 55 port interface card 29 PostScript menu 170

User Guide
Page 282
... OS X 107 canceling from Windows desktop 106 canceling from Windows taskbar 106 print quality cleaning the printhead lenses 215 cleaning the scanner glass 225 replacing photoconductor(s) 219 replacing the waste toner box 210 print quality test pages, printing 106 print quality troubleshooting blank pages 254 characters have jagged edges 254 clipped...
... OS X 107 canceling from Windows desktop 106 canceling from Windows taskbar 106 print quality cleaning the printhead lenses 215 cleaning the scanner glass 225 replacing photoconductor(s) 219 replacing the waste toner box 210 print quality test pages, printing 106 print quality troubleshooting blank pages 254 characters have jagged edges 254 clipped...

User Guide
Page 284
... shipping to e‑mail 71 Submitting Selection 200 Substitute Size menu 132 supplies conserving 209 status of 208 storing 208 Supplies menu 128 supplies, ordering photoconductors 209 staple cartridges 210 toner cartridges 209 waste toner box 210 system board accessing 25 reinstalling 30 System busy, preparing resources for job. 200 System...
... shipping to e‑mail 71 Submitting Selection 200 Substitute Size menu 132 supplies conserving 209 status of 208 storing 208 Supplies menu 128 supplies, ordering photoconductors 209 staple cartridges 210 toner cartridges 209 waste toner box 210 system board accessing 25 reinstalling 30 System busy, preparing resources for job. 200 System...

Maintenance Manual
Page 2
...the status of supplies from a network computer 3 Conserving supplies...4 Ordering supplies...4 Ordering toner cartridges ...4 Ordering photoconductors ...4 Ordering staple cartridges ...5 Ordering a waste toner box ...5 Replacing supplies...5 Replacing the waste toner box ...5 Cleaning the printhead lenses ...10... Replacing a photoconductor...14 Replacing a toner cartridge...17 Cleaning the exterior of the printer...19 Cleaning the scanner glass...20 Recycling Lexmark products...20 Moving the printer...21 Before moving the printer ...21 ...
...the status of supplies from a network computer 3 Conserving supplies...4 Ordering supplies...4 Ordering toner cartridges ...4 Ordering photoconductors ...4 Ordering staple cartridges ...5 Ordering a waste toner box ...5 Replacing supplies...5 Replacing the waste toner box ...5 Cleaning the printhead lenses ...10... Replacing a photoconductor...14 Replacing a toner cartridge...17 Cleaning the exterior of the printer...19 Cleaning the scanner glass...20 Recycling Lexmark products...20 Moving the printer...21 Before moving the printer ...21 ...

Maintenance Manual
Page 4
... on letter‑ or A4‑size plain paper. Note: All life estimates for information about Lexmark authorized supplies dealers in the U.S., contact Lexmark at www.lexmark.com or contact the place where you must replace the specified toner cartridge. The Device Status Page appears...Cartridge Black High Yield Toner Cartridge Part number C930H2CG C930H2MG C930H2YG C930H2KG Ordering photoconductors When 84 Black pc unit life warning or 84 color pc unit life warning appears, order replacement photoconductor(s). Ordering toner cartridges When 88 Cyan toner low, 88 Magenta toner low,...
... on letter‑ or A4‑size plain paper. Note: All life estimates for information about Lexmark authorized supplies dealers in the U.S., contact Lexmark at www.lexmark.com or contact the place where you must replace the specified toner cartridge. The Device Status Page appears...Cartridge Black High Yield Toner Cartridge Part number C930H2CG C930H2MG C930H2YG C930H2KG Ordering photoconductors When 84 Black pc unit life warning or 84 color pc unit life warning appears, order replacement photoconductor(s). Ordering toner cartridges When 88 Cyan toner low, 88 Magenta toner low,...

Maintenance Manual
Page 6
Maintaining the printer 6 Warning-Potential Damage: To avoid overexposing the photoconductors, do not leave the door open for more than 10 minutes. 3 Door E 4 Printhead lens cleaner 5 E6 Door tab 1 Unpack the replacement waste toner box and accessories. 2 Open Door E (front printer door).
Maintaining the printer 6 Warning-Potential Damage: To avoid overexposing the photoconductors, do not leave the door open for more than 10 minutes. 3 Door E 4 Printhead lens cleaner 5 E6 Door tab 1 Unpack the replacement waste toner box and accessories. 2 Open Door E (front printer door).


