
User's Guide
Page 2
...; Macintosh users-If your product supports Macintosh, see the Mac Help installed with this product or the manufacturer's authorized replacement power supply and power supply cord. The safety features of the leak. Lexmark is near water or wet locations. CAUTIONS Do not place or use..., during a lightning storm. This product is connected to meet strict global safety standards with the use of specific Lexmark components. SAVE THESE INSTRUCTIONS. Operating system notice All features and functions are operating system-dependent. Refer service or repairs, other replacement ...
...; Macintosh users-If your product supports Macintosh, see the Mac Help installed with this product or the manufacturer's authorized replacement power supply and power supply cord. The safety features of the leak. Lexmark is near water or wet locations. CAUTIONS Do not place or use..., during a lightning storm. This product is connected to meet strict global safety standards with the use of specific Lexmark components. SAVE THESE INSTRUCTIONS. Operating system notice All features and functions are operating system-dependent. Refer service or repairs, other replacement ...
User's Guide
Page 3
...to an answering machine ...24 Connecting to a computer with a modem...26 Networking the printer...28 Installing network printers...28 Networking the printer ...28 Installing the printer on a network ...28 Installing the printer on additional network computers 28 Using a wireless network connection ...28 Using an Ethernet ...connection ...29 Shared printing...29 Tips for installing a network printer...30 Assigning an IP address ...30 Finding your MAC address...31 Finding a printer/print server located...
...to an answering machine ...24 Connecting to a computer with a modem...26 Networking the printer...28 Installing network printers...28 Networking the printer ...28 Installing the printer on a network ...28 Installing the printer on additional network computers 28 Using a wireless network connection ...28 Using an Ethernet ...connection ...29 Shared printing...29 Tips for installing a network printer...30 Assigning an IP address ...30 Finding your MAC address...31 Finding a printer/print server located...
User's Guide
Page 7
... settings 139 Blocking junk faxes ...140 Maintaining the printer 142 Changing print cartridges...142 Removing a used print cartridge ...142 Installing print cartridges ...142 Achieving better print quality...144 Improving print quality ...144 Aligning print cartridges...144 Cleaning the print cartridge ... 148 Refilling a print cartridge...148 Recycling Lexmark products...148 Troubleshooting...149 Setup troubleshooting...149 Incorrect language appears on the display 149 Setting the date and time ...150 Power button is not lit...151 Software does not install ...151 Page does not print ...152...
... settings 139 Blocking junk faxes ...140 Maintaining the printer 142 Changing print cartridges...142 Removing a used print cartridge ...142 Installing print cartridges ...142 Achieving better print quality...144 Improving print quality ...144 Aligning print cartridges...144 Cleaning the print cartridge ... 148 Refilling a print cartridge...148 Recycling Lexmark products...148 Troubleshooting...149 Setup troubleshooting...149 Incorrect language appears on the display 149 Setting the date and time ...150 Power button is not lit...151 Software does not install ...151 Page does not print ...152...
User's Guide
Page 12
... supported by your printer) • Troubleshooting problems with the other information such as: • Using the software (on To access the Lexmark Solution Center: your CD. The installation screen appears. Note: If necessary, click Start ª Run, and then type D:\setup, where D is not on the...2 Click User's Guide. If the link to find While in any Lexmark software program, click Help, Tips ª Help, or Help ª Help Topics. Help Description The Help gives you install the printer software, the User's Guide will be installed. 1 Click Start ª Programs or All Programs ª...
... supported by your printer) • Troubleshooting problems with the other information such as: • Using the software (on To access the Lexmark Solution Center: your CD. The installation screen appears. Note: If necessary, click Start ª Run, and then type D:\setup, where D is not on the...2 Click User's Guide. If the link to find While in any Lexmark software program, click Help, Tips ª Help, or Help ª Help Topics. Help Description The Help gives you install the printer software, the User's Guide will be installed. 1 Click Start ª Programs or All Programs ª...

User's Guide
Page 14
... 2 Color print cartridge Cartridges to the power supply port located at the back of the printer. Note: The User's Guide can be installed into the printer. Note: If you are included for three connection methods: Wireless, USB, and Wired. 7 User's Guide or Setup ...Solutions Printed booklet that serves as a guide. A network cable is sometimes called an Ethernet cable. 6 Setup Guides Instructions on the installation software CD that shipped with the printer. 14 Setting up the printer for Windows and Macintosh operating systems. Instructions are connecting the printer using...
... 2 Color print cartridge Cartridges to the power supply port located at the back of the printer. Note: The User's Guide can be installed into the printer. Note: If you are included for three connection methods: Wireless, USB, and Wired. 7 User's Guide or Setup ...Solutions Printed booklet that serves as a guide. A network cable is sometimes called an Ethernet cable. 6 Setup Guides Instructions on the installation software CD that shipped with the printer. 14 Setting up the printer for Windows and Macintosh operating systems. Instructions are connecting the printer using...
User's Guide
Page 15
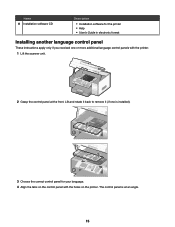
... correct control panel for the printer • Help • User's Guide in electronic format Installing another language control panel These instructions apply only if you received one is at the front. Name 8 Installation software CD Description • Installation software for your language. 4 Align the tabs on the control panel with the printer. 1 Lift...
... correct control panel for the printer • Help • User's Guide in electronic format Installing another language control panel These instructions apply only if you received one is at the front. Name 8 Installation software CD Description • Installation software for your language. 4 Align the tabs on the control panel with the printer. 1 Lift...

User's Guide
Page 16
5 Lower the control panel slightly at its underside. 2 Rotate the display forward to a comfortable viewing position. Press the control panel down until it snaps into place. 1 2 Adjusting the display for easy viewing You can purchase and install an optional Tray 2 to grasp the display from its front. Installing the optional Tray 2 You can tilt the control panel display to adjust it for easier viewing. 1 Place your finger in the finger groove to increase the paper loading capacity of the printer. 16
5 Lower the control panel slightly at its underside. 2 Rotate the display forward to a comfortable viewing position. Press the control panel down until it snaps into place. 1 2 Adjusting the display for easy viewing You can purchase and install an optional Tray 2 to grasp the display from its front. Installing the optional Tray 2 You can tilt the control panel display to adjust it for easier viewing. 1 Place your finger in the finger groove to increase the paper loading capacity of the printer. 16

User's Guide
Page 21
... the printer. 2 Connect your telecommunications equipment directly to the printer by the adapter, as shown, will not function properly. Note: Once this plug is a plug installed in the EXT port of the printer. Country/region • Germany • Austria • Switzerland There is removed, any country-
... the printer. 2 Connect your telecommunications equipment directly to the printer by the adapter, as shown, will not function properly. Note: Once this plug is a plug installed in the EXT port of the printer. Country/region • Germany • Austria • Switzerland There is removed, any country-

User's Guide
Page 28
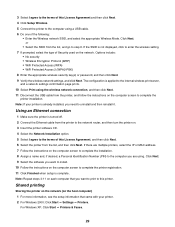
...29 depending on the network (WEP, WPA, WPA2) • Any applicable security keys or passwords used with the USB cable for each additional installation. • If you are using the USB cable and enable it . If you need to reconfigure the wireless print server for each computer ...you want to print to the printer. Make sure the selected network is set up in the installation. Installing the printer on additional network computers If you are three methods for networking the printer: • Connect the printer to a network router ...
...29 depending on the network (WEP, WPA, WPA2) • Any applicable security keys or passwords used with the USB cable for each additional installation. • If you are using the USB cable and enable it . If you need to reconfigure the wireless print server for each computer ...you want to print to the printer. Make sure the selected network is set up in the installation. Installing the printer on additional network computers If you are three methods for networking the printer: • Connect the printer to a network router ...
User's Guide
Page 29
...: • Enter the Wireless network SSID, and select the appropriate Wireless Mode. If the SSID is not displayed, click to complete the printer installation. Note: If your printer. 2 For Windows 2000: Click Start ª Settings ª Printers. The configuration is turned off. 2 Connect ...with your printer is complete. or • Select the SSID from the printer, and follow the instructions on the computer screen to complete the installation. 8 Assign a name and, if desired, a Personal Identification Number (PIN) to the computer you want to this License Agreement, and then ...
...: • Enter the Wireless network SSID, and select the appropriate Wireless Mode. If the SSID is not displayed, click to complete the printer installation. Note: If your printer. 2 For Windows 2000: Click Start ª Settings ª Printers. The configuration is turned off. 2 Connect ...with your printer is complete. or • Select the SSID from the printer, and follow the instructions on the computer screen to complete the installation. 8 Assign a name and, if desired, a Personal Identification Number (PIN) to the computer you want to this License Agreement, and then ...
User's Guide
Page 30
...USB cable yet. j From the computer, access the Printers folder. n Click Add Ports. p Click New port and enter the shared name of the installation, sends all print jobs across the network to the client computer. a Go to a network computer that you want to enable to print to your printer...30. When setup is complete. m Click the Ports tab. Move the printer back to the host computer and reconnect them using this procedure for installing a network printer Assigning an IP address An IP address may be created in step 4 on the screen to the client computer. Tips for each...
...USB cable yet. j From the computer, access the Printers folder. n Click Add Ports. p Click New port and enter the shared name of the installation, sends all print jobs across the network to the client computer. a Go to a network computer that you want to enable to print to your printer...30. When setup is complete. m Click the Ports tab. Move the printer back to the host computer and reconnect them using this procedure for installing a network printer Assigning an IP address An IP address may be created in step 4 on the screen to the client computer. Tips for each...

User's Guide
Page 31
... network Make sure: • The printer has power and the light is like a password and must manually enter an IP address during printer software installation. If you must follow these criteria: • WEP key-Exactly 10 or 26 Hexadecimal characters (using A-F and 0-9) • WPA-PSK key-... that may interfere with the wireless signal. 31 Many networks have the ability to complete network printer configuration. During the Direct IP printing installation of the print server to automatically assign an IP address. If the printer and print server are located on another network (called a ...
... network Make sure: • The printer has power and the light is like a password and must manually enter an IP address during printer software installation. If you must follow these criteria: • WEP key-Exactly 10 or 26 Hexadecimal characters (using A-F and 0-9) • WPA-PSK key-... that may interfere with the wireless signal. 31 Many networks have the ability to complete network printer configuration. During the Direct IP printing installation of the print server to automatically assign an IP address. If the printer and print server are located on another network (called a ...
User's Guide
Page 32
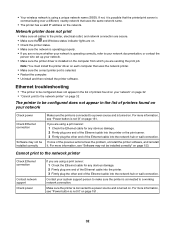
.... 3 Firmly plug the other end of printers found on your system support person to make sure the printer is connected to a power source and is installed on . For more information, see "Power button is not lit" on . • Check the printer status. • Make sure the network is...list of the Ethernet cable into the network hub or wall connection. Contact your network Check power Check Ethernet connection Software may not be installed correctly Make sure the printer is connected to your network documentation, or contact the person who set up your network is operating correctly,...
.... 3 Firmly plug the other end of printers found on your system support person to make sure the printer is connected to a power source and is installed on . For more information, see "Power button is not lit" on . • Check the printer status. • Make sure the network is...list of the Ethernet cable into the network hub or wall connection. Contact your network Check power Check Ethernet connection Software may not be installed correctly Make sure the printer is connected to your network documentation, or contact the person who set up your network is operating correctly,...

User's Guide
Page 34
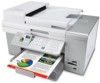
.../MMC) 4 CompactFlash/Microdrive (CF/MD) 5 PictBridge port for connecting a PictBridge-enabled digital camera, a flash drive, or a Bluetooth adapter to the printer If you purchased and installed the optional Tray 2, your fully assembled printer appears as follows with the parts identified. 34 The following illustration shows the memory card slots and the...
.../MMC) 4 CompactFlash/Microdrive (CF/MD) 5 PictBridge port for connecting a PictBridge-enabled digital camera, a flash drive, or a Bluetooth adapter to the printer If you purchased and installed the optional Tray 2, your fully assembled printer appears as follows with the parts identified. 34 The following illustration shows the memory card slots and the...

User's Guide
Page 35
1 Tray 2 base 2 Optional Tray 2 1 2 1 2 3 4 5 6 7 8 Use the To 1 Scanner unit Access the print cartridges. 2 Print cartridge carrier Install, replace, or remove the print cartridges. 35
1 Tray 2 base 2 Optional Tray 2 1 2 1 2 3 4 5 6 7 8 Use the To 1 Scanner unit Access the print cartridges. 2 Print cartridge carrier Install, replace, or remove the print cartridges. 35

User's Guide
Page 36
... machine to receive incoming fax calls. A duplex unit may not be connected to this telephone line to the printer. This connection method may not come installed on all countries or regions.
... machine to receive incoming fax calls. A duplex unit may not be connected to this telephone line to the printer. This connection method may not come installed on all countries or regions.

User's Guide
Page 43
... Black & White. It appears with different menu items depending on just one -sided original document and want to copy on whether the optional Tray 2 is installed. See the following table explains the function of an output sheet. • Specify if you do not want to copy on both sides of each...
... Black & White. It appears with different menu items depending on just one -sided original document and want to copy on whether the optional Tray 2 is installed. See the following table explains the function of an output sheet. • Specify if you do not want to copy on both sides of each...

User's Guide
Page 44
... that images of pages 1 and 2 of your original copy, such as photo, text only, line drawing, or text and graphics. Appears when Tray 2 is installed. Or you could scan one 4 x 6 photo and then print 16 images of the same photo on one side of a sheet of paper. Appears when Tray... of picture thumbnails. An index page, also called a proof sheet, is chosen, press to fill the entire area of a page. Appears when Tray 2 is installed. PictBridge Source1 Specify the source, Tray 1 or Tray 2, for the job. Once each of the menu items in the Copy Mode menu. Specify the contents...
... that images of pages 1 and 2 of your original copy, such as photo, text only, line drawing, or text and graphics. Appears when Tray 2 is installed. Or you could scan one 4 x 6 photo and then print 16 images of the same photo on one side of a sheet of paper. Appears when Tray... of picture thumbnails. An index page, also called a proof sheet, is chosen, press to fill the entire area of a page. Appears when Tray 2 is installed. PictBridge Source1 Specify the source, Tray 1 or Tray 2, for the job. Once each of the menu items in the Copy Mode menu. Specify the contents...

User's Guide
Page 47
... for the Photo Print Settings menu. Values are available to print. View Full Screen The photo previously selected appears on whether the optional Tray 2 is installed. For more information, see "Using print settings" on a page. • 1 Per Page • 2 Per Page • 3 Per Page • 4 Per Page • 6 Per Page •...
... for the Photo Print Settings menu. Values are available to print. View Full Screen The photo previously selected appears on whether the optional Tray 2 is installed. For more information, see "Using print settings" on a page. • 1 Per Page • 2 Per Page • 3 Per Page • 4 Per Page • 6 Per Page •...
User's Guide
Page 48
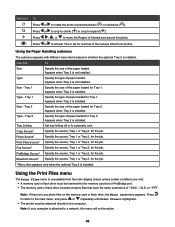
...whether the optional Tray 2 is unavailable from photos. Using the Print Files menu The Print Files menu is installed. Appears when Tray 2 is installed. Appears when Tray 2 is installed. Appears when Tray 2 is installed. Print Files Source1 Specify the source, Tray 1 or Tray 2, for the job. 1 Menu item appears... Specify the type of Interest box around the photo. Press to return to the main menu, and press or repeatedly until Print Files is installed. Press or to crop to shrink ( ) or crop to the computer. Tray 1 Specify the type of the paper loaded. Fax Source1...
...whether the optional Tray 2 is unavailable from photos. Using the Print Files menu The Print Files menu is installed. Appears when Tray 2 is installed. Appears when Tray 2 is installed. Appears when Tray 2 is installed. Print Files Source1 Specify the source, Tray 1 or Tray 2, for the job. 1 Menu item appears... Specify the type of Interest box around the photo. Press to return to the main menu, and press or repeatedly until Print Files is installed. Press or to crop to shrink ( ) or crop to the computer. Tray 1 Specify the type of the paper loaded. Fax Source1...


