
User's Guide
Page 2
...not always be obvious. Refer service or repairs, other replacement parts. The safety features of other than those described in the vicinity of specific Lexmark components. This product is near water or wet locations. For complete descriptions: • Windows users-See the User's Guide. • ...Macintosh users-If your product supports Macintosh, see the Mac Help installed with the use the telephone to report a gas leak in the user documentation, to meet strict global...
...not always be obvious. Refer service or repairs, other replacement parts. The safety features of other than those described in the vicinity of specific Lexmark components. This product is near water or wet locations. For complete descriptions: • Windows users-See the User's Guide. • ...Macintosh users-If your product supports Macintosh, see the Mac Help installed with the use the telephone to report a gas leak in the user documentation, to meet strict global...
User's Guide
Page 11
.... 2 Double-click the printer Help icon. need. You can find the Setup sheets in the printer box or on the Lexmark Web site at www.lexmark.com. Note: If your printer supports Macintosh operating systems, see the User's Guide instead. 11 The Setup Solutions booklet tells you how to solve printer setup problems...
.... 2 Double-click the printer Help icon. need. You can find the Setup sheets in the printer box or on the Lexmark Web site at www.lexmark.com. Note: If your printer supports Macintosh operating systems, see the User's Guide instead. 11 The Setup Solutions booklet tells you how to solve printer setup problems...
User's Guide
Page 12
... Click Start ª Programs or All Programs ª Lexmark connects to the User's Guide is the letter of your printer supports Macintosh operating systems, see the Mac Help: 1 From the Finder desktop, double-click the Lexmark 9300 Series folder. 2 Double-click the printer Help icon... Maintaining the printer • Connecting the printer to a network (if supported by your printer) • Troubleshooting problems with the other information such as: • Using the software (on the Lexmark Web site at www.lexmark.com. It installs with printing, copying, scanning, faxing, paper jams, ...
... Click Start ª Programs or All Programs ª Lexmark connects to the User's Guide is the letter of your printer supports Macintosh operating systems, see the Mac Help: 1 From the Finder desktop, double-click the Lexmark 9300 Series folder. 2 Double-click the printer Help icon... Maintaining the printer • Connecting the printer to a network (if supported by your printer) • Troubleshooting problems with the other information such as: • Using the software (on the Lexmark Web site at www.lexmark.com. It installs with printing, copying, scanning, faxing, paper jams, ...

User's Guide
Page 13
... find (North America) Where to find (rest of 12 1 Click CUSTOMER SUPPORT. Visit our Web site at www.lexmark.com. 2 Click Technical Support. Monday-Friday (8:00 AM-8:00 PM EST) Note: Support numbers and times may serve you faster: • Machine Type number •...printer model. Select a country or region, and then select the Customer Support link. Note: For additional information about contacting Lexmark, see the Statement of defects in some instances. 1 Click CUSTOMER SUPPORT. Customer Support link. 4 Select your printer family. furnishes this printer, warranty that ...
... find (North America) Where to find (rest of 12 1 Click CUSTOMER SUPPORT. Visit our Web site at www.lexmark.com. 2 Click Technical Support. Monday-Friday (8:00 AM-8:00 PM EST) Note: Support numbers and times may serve you faster: • Machine Type number •...printer model. Select a country or region, and then select the Customer Support link. Note: For additional information about contacting Lexmark, see the Statement of defects in some instances. 1 Click CUSTOMER SUPPORT. Customer Support link. 4 Select your printer family. furnishes this printer, warranty that ...
User's Guide
Page 32
... uses the same network name. • The printer has a valid IP address on the network. If none of printers found on your system support person to make sure the printer is selected. • Restart the computer. • Uninstall and then reinstall the printer software. For more information... Ethernet cable into the network hub or wall connection. Make sure the printer is connected to the network printer Check Ethernet connection Contact network support Check power If you are sending the print job. For more information, see "Power button is not lit" on page 151. Ethernet ...
... uses the same network name. • The printer has a valid IP address on the network. If none of printers found on your system support person to make sure the printer is selected. • Restart the computer. • Uninstall and then reinstall the printer software. For more information... Ethernet cable into the network hub or wall connection. Make sure the printer is connected to the network printer Check Ethernet connection Contact network support Check power If you are sending the print job. For more information, see "Power button is not lit" on page 151. Ethernet ...

User's Guide
Page 55
Change the country or region shown on the control panel to your system support person to block to prevent individual users on page 54. Values are Off, Low, and High. Allow your country or region. Specify whether the original ...
Change the country or region shown on the control panel to your system support person to block to prevent individual users on page 54. Values are Off, Low, and High. Allow your country or region. Specify whether the original ...
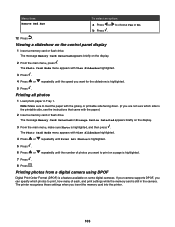
User's Guide
Page 103
Note: Make sure to print, how many of photos you insert the memory card into the printer. 103 If your camera supports DPOF, you are not sure which photos to load the paper with the glossy or printable side facing down. (If you can specify which side ...
Note: Make sure to print, how many of photos you insert the memory card into the printer. 103 If your camera supports DPOF, you are not sure which photos to load the paper with the glossy or printable side facing down. (If you can specify which side ...

User's Guide
Page 121
... can edit with the Scanning & Copying tab open. 5 Click Show Productivity Tools. The "Edit text in a scanned document (OCR). Note: The Preview function is not supported when you are using the scanner glass. 6 From the Edit menu, click Edit text found in a document" screen appears. 7 From the "Select your computer. The...
... can edit with the Scanning & Copying tab open. 5 Click Show Productivity Tools. The "Edit text in a scanned document (OCR). Note: The Preview function is not supported when you are using the scanner glass. 6 From the Edit menu, click Edit text found in a document" screen appears. 7 From the "Select your computer. The...
User's Guide
Page 127
... begins with step 4 on the scanner glass. 3 From the control panel, press or repeatedly until Fax is highlighted. 4 Press . Note: On Hook Dial does not support speed dial, group dial, or broadcast fax. c Press the keypad numbers to navigate through an automated answering system.
... begins with step 4 on the scanner glass. 3 From the control panel, press or repeatedly until Fax is highlighted. 4 Press . Note: On Hook Dial does not support speed dial, group dial, or broadcast fax. c Press the keypad numbers to navigate through an automated answering system.

User's Guide
Page 128
... time You can use any combination of the methods listed in -One. 6 Follow the instructions on the scanner glass. Notes: • Group Dial is not supported with broadcast fax. • You can include a calling card number as part of the fax number. • A fax number can scan a document to the computer...
... time You can use any combination of the methods listed in -One. 6 Follow the instructions on the scanner glass. Notes: • Group Dial is not supported with broadcast fax. • You can include a calling card number as part of the fax number. • A fax number can scan a document to the computer...

User's Guide
Page 131
.... To set up the telephone. The printer receives the fax. Using Caller ID Caller ID is a service provided by some countries and regions. The printer supports two distinct Caller ID patterns: Pattern 1 (FSK) and Pattern 2 (DTMF). Depending on the country or region you live in some telephone companies that identifies the...
.... To set up the telephone. The printer receives the fax. Using Caller ID Caller ID is a service provided by some countries and regions. The printer supports two distinct Caller ID patterns: Pattern 1 (FSK) and Pattern 2 (DTMF). Depending on the country or region you live in some telephone companies that identifies the...

User's Guide
Page 151
... the way into the power supply on the printer. 1 2 3 Plug the cord into an electrical outlet that your operating system The following operating systems are supported: Windows 2000, Windows XP, and Mac OS X. Software does not install Check your computer meets the minimum system requirements listed on the computer screen to...
... the way into the power supply on the printer. 1 2 3 Plug the cord into an electrical outlet that your operating system The following operating systems are supported: Windows 2000, Windows XP, and Mac OS X. Software does not install Check your computer meets the minimum system requirements listed on the computer screen to...

User's Guide
Page 161
... original document is loaded facedown on page 175. Cannot scan to an application Select a different application 1 From the Selected Application Does Not Support Multiple Pages dialog, click Cancel. 2 From the All-In-One Center Scanning & Copying tab, choose a different application from the "Send... scanned image to a lower value 1 Click Start ª Programs or All Programs ª Lexmark 9300 Series. 2 Select All-In-One Center. 3 From the Scan area, click See More Scan Settings. 4 Click Display Advanced Scan Settings. 5...
... original document is loaded facedown on page 175. Cannot scan to an application Select a different application 1 From the Selected Application Does Not Support Multiple Pages dialog, click Cancel. 2 From the All-In-One Center Scanning & Copying tab, choose a different application from the "Send... scanned image to a lower value 1 Click Start ª Programs or All Programs ª Lexmark 9300 Series. 2 Select All-In-One Center. 3 From the Scan area, click See More Scan Settings. 4 Click Display Advanced Scan Settings. 5...

User's Guide
Page 162
... checklist The fax modem is being used . • If you are using an ISDN telephone service, connect the printer to the printer so that will support analog use. Verify dial tone • Place a test call to the telephone number to which you are using the On Hook Dial feature, turn up...
... checklist The fax modem is being used . • If you are using an ISDN telephone service, connect the printer to the printer so that will support analog use. Verify dial tone • Place a test call to the telephone number to which you are using the On Hook Dial feature, turn up...

User's Guide
Page 166
... will take your fax to print. • This solution will reduce the speed for the printer to , you may not be set correctly The printer supports two distinct Caller ID patterns: Pattern 1 (FSK) and Pattern 2 (DTMF). Depending on the country or region you live in and the telecommunications company you subscribe...
... will take your fax to print. • This solution will reduce the speed for the printer to , you may not be set correctly The printer supports two distinct Caller ID patterns: Pattern 1 (FSK) and Pattern 2 (DTMF). Depending on the country or region you live in and the telecommunications company you subscribe...

User's Guide
Page 172
....) See "Loading various paper types in Tray 1" on page 78 for information about: • Maximum loading amounts per paper type • Specific loading instructions for supported paper and specialty media Remove each sheet as Remove each sheet as it exits, and let it dry completely before stacking. Check paper loading •...
....) See "Loading various paper types in Tray 1" on page 78 for information about: • Maximum loading amounts per paper type • Specific loading instructions for supported paper and specialty media Remove each sheet as Remove each sheet as it exits, and let it dry completely before stacking. Check paper loading •...
User's Guide
Page 176
... Feeder (ADF) is installed) are making more than one copy of a multiple-page document using a PictBridge-enabled camera to print a photo, the printer does not support the paper size you are highlighted. 6 Press or to enter the number of copies. To determine the default paper size, check the message on page...
... Feeder (ADF) is installed) are making more than one copy of a multiple-page document using a PictBridge-enabled camera to print a photo, the printer does not support the paper size you are highlighted. 6 Press or to enter the number of copies. To determine the default paper size, check the message on page...

User's Guide
Page 180
... to the printer so that digital telephone services can be used. • If you are using DSL, connect to a DSL filter or router that will support analog use. If none exists, consider installing an analog telephone line for the fax machine. For more information, contact your ISDN provider. • If you...
... to the printer so that digital telephone services can be used. • If you are using DSL, connect to a DSL filter or router that will support analog use. If none exists, consider installing an analog telephone line for the fax machine. For more information, contact your ISDN provider. • If you...

User's Guide
Page 184
... is 8 Press or until Fax Setup is highlighted. 2 Press . 3 Press or repeatedly until On appears. 9 Press . 184 The fax machine of the recipient does not support color or does not support the resolution of the telephone line connection.
... is 8 Press or until Fax Setup is highlighted. 2 Press . 3 Press or repeatedly until On appears. 9 Press . 184 The fax machine of the recipient does not support color or does not support the resolution of the telephone line connection.

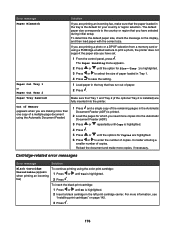
User's Guide
Page 185
Error message Unsupported Paper Size Solution The fax machine of the recipient does not support the size of your document, and then resending your fax. To resize hard-copy documents: 1 From the control panel, press or repeatedly until ...3 Press or repeatedly until the resizing option you may need to remove and reinstall the printer software. 1 Click Start ª Programs or All Programs ª Lexmark 9300 Series. 2 Select Uninstall. 3 Follow the instructions on the computer screen to factory settings? Resetting factory default settings Resetting all settings Resetting only menu settings...
Error message Unsupported Paper Size Solution The fax machine of the recipient does not support the size of your document, and then resending your fax. To resize hard-copy documents: 1 From the control panel, press or repeatedly until ...3 Press or repeatedly until the resizing option you may need to remove and reinstall the printer software. 1 Click Start ª Programs or All Programs ª Lexmark 9300 Series. 2 Select Uninstall. 3 Follow the instructions on the computer screen to factory settings? Resetting factory default settings Resetting all settings Resetting only menu settings...

