
User's Guide for Windows
Page 2
...that does not infringe any obligation to you supply in conjunction with other countries, contact your point of purchase. Safety information • Use only the power supply and power cord provided with local law: LEXMARK INTERNATIONAL, INC., PROVIDES THIS PUBLICATION "AS ...the manufacturer's authorized replacement power supply and power cord. • Connect the power supply cord to a properly grounded electrical outlet that the manufacturer intends to make any country where such provisions are the user's responsibility. © 2005 Lexmark International, Inc. References ...
...that does not infringe any obligation to you supply in conjunction with other countries, contact your point of purchase. Safety information • Use only the power supply and power cord provided with local law: LEXMARK INTERNATIONAL, INC., PROVIDES THIS PUBLICATION "AS ...the manufacturer's authorized replacement power supply and power cord. • Connect the power supply cord to a properly grounded electrical outlet that the manufacturer intends to make any country where such provisions are the user's responsibility. © 2005 Lexmark International, Inc. References ...
User's Guide for Windows
Page 7
... 97 Wiping the print cartridge nozzles and contacts 98 Improving print quality...98 Preserving the print cartridges 99 Cleaning the scanner glass 99 Ordering supplies...100 Recycling Lexmark products 100 Troubleshooting 101 Setup troubleshooting...101 Incorrect language appears on the display 101 Power button is not lit...102 Software does not install...102 7
... 97 Wiping the print cartridge nozzles and contacts 98 Improving print quality...98 Preserving the print cartridges 99 Cleaning the scanner glass 99 Ordering supplies...100 Recycling Lexmark products 100 Troubleshooting 101 Setup troubleshooting...101 Incorrect language appears on the display 101 Power button is not lit...102 Software does not install...102 7
User's Guide for Windows
Page 13
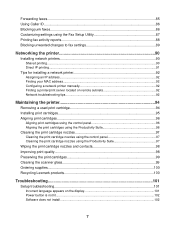
Instructions on setting up the printer Checking the box contents 12 3 4 5 x Name 1 Black print cartridge 2 Color print cartridge 3 Telephone cord 4 Power supply cord 5 Telephone line adapter 6 Setup sheet 7 Installation software CD 8 User's Guide or Setup Solutions 8 6 7 Description ...line adapter is not shipped to the telephone line and the answering machine, telephone, or other telecommunications equipment. Attaches to the power supply port located at the back of the printer. Installation software for the printer. Note: Installing the printer software also installs the...
Instructions on setting up the printer Checking the box contents 12 3 4 5 x Name 1 Black print cartridge 2 Color print cartridge 3 Telephone cord 4 Power supply cord 5 Telephone line adapter 6 Setup sheet 7 Installation software CD 8 User's Guide or Setup Solutions 8 6 7 Description ...line adapter is not shipped to the telephone line and the answering machine, telephone, or other telecommunications equipment. Attaches to the power supply port located at the back of the printer. Installation software for the printer. Note: Installing the printer software also installs the...
User's Guide for Windows
Page 22
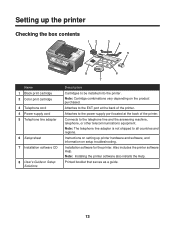
Note: Remove the plug to a computer using a USB cable. 22 Remove paper jams. Connect the printer to access the port. Access the print cartridges. 1 LINE EXT Use the 1 EXT port EXT 2 Power supply port 3 Rear access door 4 USB port 3 2 To Connect additional devices, such as a data/fax modem, telephone, or answering machine to a power source. Connect the printer to the printer. Use the 9 Control panel 10 Scanner unit LINE EXT 5 4 To Operate the printer. For more information, see "Using the control panel" on page 23.
Note: Remove the plug to a computer using a USB cable. 22 Remove paper jams. Connect the printer to access the port. Access the print cartridges. 1 LINE EXT Use the 1 EXT port EXT 2 Power supply port 3 Rear access door 4 USB port 3 2 To Connect additional devices, such as a data/fax modem, telephone, or answering machine to a power source. Connect the printer to the printer. Use the 9 Control panel 10 Scanner unit LINE EXT 5 4 To Operate the printer. For more information, see "Using the control panel" on page 23.
User's Guide for Windows
Page 102
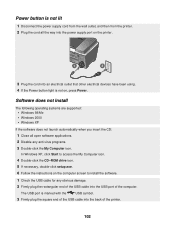
... 2000 • Windows XP If the software does not launch automatically when you insert the CD: 1 Close all the way into the power supply port on the printer. 1 2 3 Plug the cord into an electrical outlet that other electrical devices have been using. 4 If the...Computer icon. 4 Double-click the CD-ROM drive icon. 5 If necessary, double-click setup.exe. 6 Follow the instructions on , press Power. Power button is not lit 1 Disconnect the power supply cord from the wall outlet, and then from the printer. 2 Plug the cord all open software applications. 2 Disable any obvious damage. 2...
... 2000 • Windows XP If the software does not launch automatically when you insert the CD: 1 Close all the way into the power supply port on the printer. 1 2 3 Plug the cord into an electrical outlet that other electrical devices have been using. 4 If the...Computer icon. 4 Double-click the CD-ROM drive icon. 5 If necessary, double-click setup.exe. 6 Follow the instructions on , press Power. Power button is not lit 1 Disconnect the power supply cord from the wall outlet, and then from the printer. 2 Plug the cord all open software applications. 2 Disable any obvious damage. 2...
User's Guide for Windows
Page 104
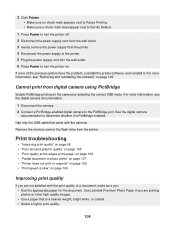
.... 4 Reconnect the power supply to the printer. 5 Plug the power supply cord into the wall outlet. 6 Press Power to determine whether it . Cannot print from the printer. Remove the memory card or the flash drive from digital camera using PictBridge Enable PictBridge printing on the camera by selecting the correct USB mode. Use Lexmark Premium Photo...
.... 4 Reconnect the power supply to the printer. 5 Plug the power supply cord into the wall outlet. 6 Press Power to determine whether it . Cannot print from the printer. Remove the memory card or the flash drive from digital camera using PictBridge Enable PictBridge printing on the camera by selecting the correct USB mode. Use Lexmark Premium Photo...
User's Guide for Windows
Page 111
... Check for and clear any paper jams. Make sure both print cartridges are installed. The printer works only if both the black and color print cartridges are installed. To enable both Voice Mail and the printer to the telephone line. The fax modem is working correctly, connect...your ISDN provider. • If you still do not hear a dial tone, connect the printer to make sure you are secure, if applicable: • Power supply • Telephone • Handset • Answering machine Check the telephone wall jack. 1 Plug a telephone into the wall jack. 2 Listen for the following ...
... Check for and clear any paper jams. Make sure both print cartridges are installed. The printer works only if both the black and color print cartridges are installed. To enable both Voice Mail and the printer to the telephone line. The fax modem is working correctly, connect...your ISDN provider. • If you still do not hear a dial tone, connect the printer to make sure you are secure, if applicable: • Power supply • Telephone • Handset • Answering machine Check the telephone wall jack. 1 Plug a telephone into the wall jack. 2 Listen for the following ...
User's Guide for Windows
Page 121
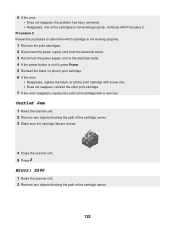
... the following cartridge errors: • 1105 • 1203 • 1204 • 1205 • 1206 Procedure 1 1 Remove the print cartridges. 2 Disconnect the power supply cord from the electrical outlet. 3 Reconnect the power supply cord to continue. Paper Jam See "Jams and misfeeds troubleshooting" on page 121. Error messages on display If an error message is...
... the following cartridge errors: • 1105 • 1203 • 1204 • 1205 • 1206 Procedure 1 1 Remove the print cartridges. 2 Disconnect the power supply cord from the electrical outlet. 3 Reconnect the power supply cord to continue. Paper Jam See "Jams and misfeeds troubleshooting" on page 121. Error messages on display If an error message is...
User's Guide for Windows
Page 122
...color print cartridge with Procedure 2. Continue with a new one of the cartridge carrier. 3 Make sure the cartridge lids are closed. 4 Close the scanner unit. 5 Press . Error: 2200 1 Raise the scanner unit. 2 Remove any objects blocking the path of the cartridges is not working properly. 1 Remove the print cartridges. 2 Disconnect the power supply... cord from the electrical outlet. 3 Reconnect the power supply cord to the electrical outlet. 4 If the power button is not working properly. 6 If the error: &#...
...color print cartridge with Procedure 2. Continue with a new one of the cartridge carrier. 3 Make sure the cartridge lids are closed. 4 Close the scanner unit. 5 Press . Error: 2200 1 Raise the scanner unit. 2 Remove any objects blocking the path of the cartridges is not working properly. 1 Remove the print cartridges. 2 Disconnect the power supply... cord from the electrical outlet. 3 Reconnect the power supply cord to the electrical outlet. 4 If the power button is not working properly. 6 If the error: &#...
User's Guide for Windows
Page 131
... Mode is sometimes helpful to the EPA Sleep Mode. The Power Saver Mode saves energy by the time the product spends in each mode's energy usage. To completely stop printer power consumption, disconnect the power supply from the wall outlet. Off mode This printer has an off mode which ...still consumes a small amount of time between the last operation and entering Power Saver is designed with an energy-saving mode called...
... Mode is sometimes helpful to the EPA Sleep Mode. The Power Saver Mode saves energy by the time the product spends in each mode's energy usage. To completely stop printer power consumption, disconnect the power supply from the wall outlet. Off mode This printer has an off mode which ...still consumes a small amount of time between the last operation and entering Power Saver is designed with an energy-saving mode called...
User's Guide for Windows
Page 134
..., loading on the scanner glass 48 no computer error 125 O OCR, editing document text 74 On Hook Dial feature 84 Online Tutorial button 34 ordering supplies 100 orientation, changing landscape 38 portrait 38 P page does not print 101 paper exit tray 21 paper jam error 121 paper out error 123 Paper... (ADF) 21 control panel 22 EXT port 22 LINE port 23 memory card slots 21 paper exit tray 21 paper tray 21 PictBridge port 21 power supply port 22 rear access door 22 scanner unit 22 top cover 21 USB port 22 peer-to-peer method 91 Photo Card Mode menu 29...
..., loading on the scanner glass 48 no computer error 125 O OCR, editing document text 74 On Hook Dial feature 84 Online Tutorial button 34 ordering supplies 100 orientation, changing landscape 38 portrait 38 P page does not print 101 paper exit tray 21 paper jam error 121 paper out error 123 Paper... (ADF) 21 control panel 22 EXT port 22 LINE port 23 memory card slots 21 paper exit tray 21 paper tray 21 PictBridge port 21 power supply port 22 rear access door 22 scanner unit 22 top cover 21 USB port 22 peer-to-peer method 91 Photo Card Mode menu 29...
User's Guide for Windows
Page 135
postcards loading 46 printing 50 power button is not lit 101 power supply port 22 premium paper, loading 44 Preview section 36 previewing photos 30 from the... access door 22 receiving a fax automatically 78 fax forwarding 85 manually 79 using an answering machine 79 recycling 100 Lexmark products 100 WEEE statement 128 reducing an image using the control panel 70 removing print cartridges 94 repeating an image ... troubleshooting 101 incorrect language appears on display 101 page does not print 101 power button is not lit 101 software does not install 101 shared printing peer-to-peer method 90 135
postcards loading 46 printing 50 power button is not lit 101 power supply port 22 premium paper, loading 44 Preview section 36 previewing photos 30 from the... access door 22 receiving a fax automatically 78 fax forwarding 85 manually 79 using an answering machine 79 recycling 100 Lexmark products 100 WEEE statement 128 reducing an image using the control panel 70 removing print cartridges 94 repeating an image ... troubleshooting 101 incorrect language appears on display 101 page does not print 101 power button is not lit 101 software does not install 101 shared printing peer-to-peer method 90 135
User's Guide for Windows
Page 136
... 37 Maintenance tab 38 opening 37 Printer Status 37 Troubleshooting tab 38 using 37 speed dial adding to list 80 setting up 80 using 81 supplies, ordering 100 T temporary files 124 text captions, adding 65 Tips button 34 top cover 21 transferring digital photos from memory cards 57 from flash drives... too long or freezes computer 109 scan was not successful 110 troubleshooting, setup 101 incorrect language appears on display 101 page does not print 101 power button is not lit 101 software does not install 101 Troubleshooting tab 38 U unwanted faxes, blocking 86 USB port 22 W Web site button 34 ...
... 37 Maintenance tab 38 opening 37 Printer Status 37 Troubleshooting tab 38 using 37 speed dial adding to list 80 setting up 80 using 81 supplies, ordering 100 T temporary files 124 text captions, adding 65 Tips button 34 top cover 21 transferring digital photos from memory cards 57 from flash drives... too long or freezes computer 109 scan was not successful 110 troubleshooting, setup 101 incorrect language appears on display 101 page does not print 101 power button is not lit 101 software does not install 101 Troubleshooting tab 38 U unwanted faxes, blocking 86 USB port 22 W Web site button 34 ...


