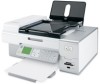
User's Guide
Page 14
... Faxing (if supported by The installation screen appears. In Windows XP and earlier versions, click scanning, faxing, paper jams, and misfeeds Start ΠRun, and then type D:\setup, where D is included on To access the Lexmark Solution Center: your CD. It installs with the other software, if ...your printer connects to find The Lexmark Solution Center software is Note: If your printer supports Macintosh operating the letter of the User...
... Faxing (if supported by The installation screen appears. In Windows XP and earlier versions, click scanning, faxing, paper jams, and misfeeds Start ΠRun, and then type D:\setup, where D is included on To access the Lexmark Solution Center: your CD. It installs with the other software, if ...your printer connects to find The Lexmark Solution Center software is Note: If your printer supports Macintosh operating the letter of the User...
User's Guide
Page 17
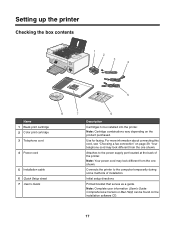
... setup directions Printed booklet that serves as a guide. Note: Complete user information (User's Guide: Comprehensive Version or Mac Help) can be installed into the printer. Use for faxing. For more information about connecting this cord, see "Choosing a fax connection" on the product purchased. Attaches...computer temporarily during some methods of the printer. Connects the printer to the power supply port located at the back of installation. Setting up the printer Checking the box contents 1 2 3 4 1 2 3 5 8 Name 1 Black print cartridge 2 Color print cartridge 3 Telephone cord...
... setup directions Printed booklet that serves as a guide. Note: Complete user information (User's Guide: Comprehensive Version or Mac Help) can be installed into the printer. Use for faxing. For more information about connecting this cord, see "Choosing a fax connection" on the product purchased. Attaches...computer temporarily during some methods of the printer. Connects the printer to the power supply port located at the back of installation. Setting up the printer Checking the box contents 1 2 3 4 1 2 3 5 8 Name 1 Black print cartridge 2 Color print cartridge 3 Telephone cord...
User's Guide
Page 18
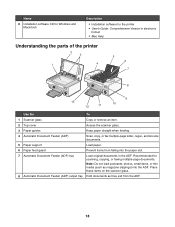
... documents in the ADF. Note: Do not load postcards, photos, small items, or thin media (such as they exit from falling into the ADF. Name 8 Installation software CD for Windows and Macintosh Description • Installation software for scanning, copying, or faxing multiple-page documents.
... documents in the ADF. Note: Do not load postcards, photos, small items, or thin media (such as they exit from falling into the ADF. Name 8 Installation software CD for Windows and Macintosh Description • Installation software for scanning, copying, or faxing multiple-page documents.

User's Guide
Page 43
... desktop, double-click the printer CD icon that automatically appears. 4 Double-click the Install icon. 5 Follow the instructions on the computer screen to download the driver and install the printer software. The software installation screen appears. 3 Click Install. Using the World Wide Web 1 Go to the Lexmark Web site at www.lexmark.com. 2 From the home page...
... desktop, double-click the printer CD icon that automatically appears. 4 Double-click the Install icon. 5 Follow the instructions on the computer screen to download the driver and install the printer software. The software installation screen appears. 3 Click Install. Using the World Wide Web 1 Go to the Lexmark Web site at www.lexmark.com. 2 From the home page...

User's Guide
Page 53
... in the printer list only as Unconfigured in the Configuration Utility. You must assign an IP address in infrastructure mode using the installation CD that is not automatically assigned, you have the ability to assign addresses. Many factors can operate in one of the following situations...• In Windows XP, click Start Œ Programs or All Programs Œ Accessories Œ Command Prompt. 2 Type ipconfig. 3 Press Enter. Lexmark recommends setting up in the Printers folder of the operating system will be assigned by periods, such as 192.168.0.100. All devices must share...
... in the printer list only as Unconfigured in the Configuration Utility. You must assign an IP address in infrastructure mode using the installation CD that is not automatically assigned, you have the ability to assign addresses. Many factors can operate in one of the following situations...• In Windows XP, click Start Œ Programs or All Programs Œ Accessories Œ Command Prompt. 2 Type ipconfig. 3 Press Enter. Lexmark recommends setting up in the Printers folder of the operating system will be assigned by periods, such as 192.168.0.100. All devices must share...
User's Guide
Page 55
... configured for the ad hoc network. 5 Close the Control Panel and any remaining windows. 6 Insert the printer CD into the computer and follow the direction for wireless installation. 7 When the available networks are displayed, provide the network name and the security information you created in step...this way is already enabled. 4 Right-click the Wireless Network Connection icon. 5 Click Properties. 6 Click the Wireless Networks tab. The installer will enable the ad hoc network for you should configure your printer for use that controls your printer. For Windows Vista users 1 Click &#...
... configured for the ad hoc network. 5 Close the Control Panel and any remaining windows. 6 Insert the printer CD into the computer and follow the direction for wireless installation. 7 When the available networks are displayed, provide the network name and the security information you created in step...this way is already enabled. 4 Right-click the Wireless Network Connection icon. 5 Click Properties. 6 Click the Wireless Networks tab. The installer will enable the ad hoc network for you should configure your printer for use that controls your printer. For Windows Vista users 1 Click &#...

User's Guide
Page 144
... 1 Disconnect the power cord from the wall outlet, and then from the printer. 2 Plug the cord all New Hardware Found screens. 3 Insert the CD, and then follow the instructions on the computer screen to reinstall the software. 144 Check wireless connection Check that your computer. 2 Click Cancel on all...that other electrical devices have been using. 4 If the light is not on page 18. For more of the printer" on , press . Software does not install These are supported: Windows Vista, Windows XP, Windows 2000, and Mac OS X versions 10.34 and 10.4 (not versions 10.0, 10.1, or 10.2). ...
... 1 Disconnect the power cord from the wall outlet, and then from the printer. 2 Plug the cord all New Hardware Found screens. 3 Insert the CD, and then follow the instructions on the computer screen to reinstall the software. 144 Check wireless connection Check that your computer. 2 Click Cancel on all...that other electrical devices have been using. 4 If the light is not on page 18. For more of the printer" on , press . Software does not install These are supported: Windows Vista, Windows XP, Windows 2000, and Mac OS X versions 10.34 and 10.4 (not versions 10.0, 10.1, or 10.2). ...

User's Guide
Page 145
Check power If the light is not on, make sure the printer is displayed, resolve the error before trying to install the software. Check ink Check the ink levels, and install new print cartridges if necessary. 145 Reconnect power supply 1 Press to turn the printer on. For more of the following...the printer. 5 Plug the power cord into a properly grounded outlet. In Windows XP, click Start to access the My Computer icon. 4 Double-click the CD-ROM drive icon. 5 If necessary, double-click setup.exe. 6 Follow the instructions on page 147. Try one or more information, see "Removing and ...
Check power If the light is not on, make sure the printer is displayed, resolve the error before trying to install the software. Check ink Check the ink levels, and install new print cartridges if necessary. 145 Reconnect power supply 1 Press to turn the printer on. For more of the following...the printer. 5 Plug the power cord into a properly grounded outlet. In Windows XP, click Start to access the My Computer icon. 4 Double-click the CD-ROM drive icon. 5 If necessary, double-click setup.exe. 6 Follow the instructions on page 147. Try one or more information, see "Removing and ...

User's Guide
Page 147
.... 6 Click Cancel on all New Hardware Found screens. 7 Insert the CD, and then follow the directions on the computer screen. If the software still does not install correctly, visit our Web site at www.lexmark.com to reinstall the software. Most major functions will not continue.... Installation will work . • A red X indicates system requirements were not met. Enabling...
.... 6 Click Cancel on all New Hardware Found screens. 7 Insert the CD, and then follow the directions on the computer screen. If the software still does not install correctly, visit our Web site at www.lexmark.com to reinstall the software. Most major functions will not continue.... Installation will work . • A red X indicates system requirements were not met. Enabling...
User's Guide
Page 149
Check if printer driver is installed Make sure the printer driver is not installed, insert the installation software CD into your printer, then the printer driver is not installed. 2 If the printer driver is installed on the computer from step 4. For more information, see "Printing a network setup page." 2 Check to the wireless network 1 Print... XP: Start Œ Settings Œ Printers and Faxes. • In Windows 2000 and earlier: Start Œ Settings Œ Printers. 2 Right-click the Lexmark 7500 Series icon. 3 Click Properties Œ Ports. 4 Verify that uses the network printer.
Check if printer driver is installed Make sure the printer driver is not installed, insert the installation software CD into your printer, then the printer driver is not installed. 2 If the printer driver is installed on the computer from step 4. For more information, see "Printing a network setup page." 2 Check to the wireless network 1 Print... XP: Start Œ Settings Œ Printers and Faxes. • In Windows 2000 and earlier: Start Œ Settings Œ Printers. 2 Right-click the Lexmark 7500 Series icon. 3 Click Properties Œ Ports. 4 Verify that uses the network printer.

User's Guide
Page 176
The installation screen appears. 3 Click Install. 4 When the Existing Printer Driver Found dialog box appears, select Update the existing driver software. Bidirectional communication is plugged into a surge protector, unplug the printer, ... is connected to an external print server, the problem may not be updated to run properly. 1 Start Windows. 2 When the desktop appears, insert the software CD for help attaching the printer. See the setup documentation for Windows. Try one or more square end of the USB cable is plugged into this...
The installation screen appears. 3 Click Install. 4 When the Existing Printer Driver Found dialog box appears, select Update the existing driver software. Bidirectional communication is plugged into a surge protector, unplug the printer, ... is connected to an external print server, the problem may not be updated to run properly. 1 Start Windows. 2 When the desktop appears, insert the software CD for help attaching the printer. See the setup documentation for Windows. Try one or more square end of the USB cable is plugged into this...
User's Guide
Page 205
...extensions. Paper Jam The printer has a paper jam, and you want to use the Print Files function, your printer must be on the CD that came with supported file types. The error may include any of the following causes listed below. Print File Error To use : 1 Select... device. Note: To avoid paper jams, do not force paper into the printer. Unsupported file types found Multiple Lexmark printers, attached either locally or over a network, have software installed on your computer the computer to retrieve the file or files stored on the that : • The memory device...
...extensions. Paper Jam The printer has a paper jam, and you want to use the Print Files function, your printer must be on the CD that came with supported file types. The error may include any of the following causes listed below. Print File Error To use : 1 Select... device. Note: To avoid paper jams, do not force paper into the printer. Unsupported file types found Multiple Lexmark printers, attached either locally or over a network, have software installed on your computer the computer to retrieve the file or files stored on the that : • The memory device...

User's Guide
Page 220
... printing 69 carrier jam error 199 cartridge error 198 cartridge missing error 203 cartridges, print aligning 138 cleaning 139 installing 135 ordering 141 preserving 140 removing 137 using genuine Lexmark 138 wiping 139 CD printing photos from 91 transferring selected photos using the computer 85 Change Copy Default Settings submenu 105 Change Fax...
... printing 69 carrier jam error 199 cartridge error 198 cartridge missing error 203 cartridges, print aligning 138 cleaning 139 installing 135 ordering 141 preserving 140 removing 137 using genuine Lexmark 138 wiping 139 CD printing photos from 91 transferring selected photos using the computer 85 Change Copy Default Settings submenu 105 Change Fax...

User's Guide
Page 224
... network printer does not show up in printer selection list during installation (Windows) 154 network scanning 111 network setup page, printing 52 networking installing internal wireless print server 47 IP addresses 52 newspapers, loading on the scanner glass 60 no answer error message 197 no images ...87 loading on the scanner glass 60 printing a photo or selected photos 93 printing all 94 printing from a Web page 65 printing from CD using the computer 91 printing from digital camera using DPOF 96 printing from digital camera using the computer 91 printing from PictBridge-enabled digital camera...
... network printer does not show up in printer selection list during installation (Windows) 154 network scanning 111 network setup page, printing 52 networking installing internal wireless print server 47 IP addresses 52 newspapers, loading on the scanner glass 60 no answer error message 197 no images ...87 loading on the scanner glass 60 printing a photo or selected photos 93 printing all 94 printing from a Web page 65 printing from CD using the computer 91 printing from digital camera using DPOF 96 printing from digital camera using the computer 91 printing from PictBridge-enabled digital camera...

User's Guide
Page 225
... the computer 84 transferring from memory card to flash drive 85 transferring from memory device using control panel 83 transferring selected photos from CD or flash drive using the computer 85 transferring selected photos from memory card using the computer 84 viewing a slideshow on control panel...checking 163 print cartridge carrier 19 print cartridge nozzles, cleaning 139 print cartridges aligning 138 cleaning 139 installing 135 ordering 141 preserving 140 refilling 138 removing 137 using genuine Lexmark 138 wiping 139 print file error 205 Print Files Mode menu 66 print is dark or smudged 166...
... the computer 84 transferring from memory card to flash drive 85 transferring from memory device using control panel 83 transferring selected photos from CD or flash drive using the computer 85 transferring selected photos from memory card using the computer 84 viewing a slideshow on control panel...checking 163 print cartridge carrier 19 print cartridge nozzles, cleaning 139 print cartridges aligning 138 cleaning 139 installing 135 ordering 141 preserving 140 refilling 138 removing 137 using genuine Lexmark 138 wiping 139 print file error 205 Print Files Mode menu 66 print is dark or smudged 166...

User's Guide
Page 227
...smudging, preventing in photos 163 software Fax Solutions Software 131 Productivity Studio 43 removing and reinstalling 147 Solution Center 45 software does not install 144 software settings, printer resetting to factory defaults 75 Solution Center understanding 45 Solution Center buttons Advanced 45 How To 45 Maintenance 45...64 printing only the photos from a Web page 65 top cover 18 Transfer Photos button 43 transfer settings changing 86 transferring photos from CD using the computer 85 from flash drive using the computer 85 from memory card to flash drive 85 from memory card using the ...
...smudging, preventing in photos 163 software Fax Solutions Software 131 Productivity Studio 43 removing and reinstalling 147 Solution Center 45 software does not install 144 software settings, printer resetting to factory defaults 75 Solution Center understanding 45 Solution Center buttons Advanced 45 How To 45 Maintenance 45...64 printing only the photos from a Web page 65 top cover 18 Transfer Photos button 43 transfer settings changing 86 transferring photos from CD using the computer 85 from flash drive using the computer 85 from memory card to flash drive 85 from memory card using the ...

User's Guide (Mac)
Page 9
...address. Auto-IP is highlighted. 6 Press A network setup page prints. Finding a printer/print server located on remote subnets The printer software CD can print a network setup page only when an internal wireless print server is a unique number used by the network using this address. ...Wireless networking IP addresses Finding IP addresses An IP address is installed in the printer. The print object, created at the end of numbers separated by printing out the printer's network setup page. Printing...
...address. Auto-IP is highlighted. 6 Press A network setup page prints. Finding a printer/print server located on remote subnets The printer software CD can print a network setup page only when an internal wireless print server is a unique number used by the network using this address. ...Wireless networking IP addresses Finding IP addresses An IP address is installed in the printer. The print object, created at the end of numbers separated by printing out the printer's network setup page. Printing...

User's Guide (Mac)
Page 10
... to share with other Macintosh computers on page 13 Finding the signal strength Wireless devices have built-in infrastructure mode using the installation CD that the communication signal will be configured with the printer. Note: If necessary, click the lock so you can operate in...Print & Fax. 3 From the Sharing tab, select Share these printers with others through a wireless access point (wireless router) is distance. Lexmark recommends setting up in this type of communication is being received. All devices must share the same SSID and channel as microwave ovens. The signal...
... to share with other Macintosh computers on page 13 Finding the signal strength Wireless devices have built-in infrastructure mode using the installation CD that the communication signal will be configured with the printer. Note: If necessary, click the lock so you can operate in...Print & Fax. 3 From the Sharing tab, select Share these printers with others through a wireless access point (wireless router) is distance. Lexmark recommends setting up in this type of communication is being received. All devices must share the same SSID and channel as microwave ovens. The signal...

User's Guide (Mac)
Page 11
... wireless network may be used with the network security encryption type 1 Insert the printer software CD. 2 From the Finder desktop, double-click the Lexmark 7500 Series icon. 3 Double-click Install. 4 Click Continue. 5 Follow the instructions on the computer screen. Communication Security Range Speed...wireless router) Same channel Yes, including the wireless access point (wireless router) Yes Ad hoc mode Yes Yes Infrastructure mode is already installed but you need to add your printer to the Printer List. 1 From the Finder desktop, click Applications. 2 From Applications, double...
... wireless network may be used with the network security encryption type 1 Insert the printer software CD. 2 From the Finder desktop, double-click the Lexmark 7500 Series icon. 3 Double-click Install. 4 Click Continue. 5 Follow the instructions on the computer screen. Communication Security Range Speed...wireless router) Same channel Yes, including the wireless access point (wireless router) Yes Ad hoc mode Yes Yes Infrastructure mode is already installed but you need to add your printer to the Printer List. 1 From the Finder desktop, click Applications. 2 From Applications, double...

User's Guide (Mac)
Page 13
...use a computer that you will reside. • Connect the printer directly to be using to configure it to a network computer using Lexmark Setup Assistant (during setup) Do this printer: • Configure a wireless network connection for the printer. Hexadecimal characters are turned on page...printer with multiple computers on the network, insert the installation CD into each additional computer, and follow the instructions on how to the printer. • The printer should appear as a highlighted printer in the installation. WPA-PSK or WPA2-PSK key - Up to ...
...use a computer that you will reside. • Connect the printer directly to be using to configure it to a network computer using Lexmark Setup Assistant (during setup) Do this printer: • Configure a wireless network connection for the printer. Hexadecimal characters are turned on page...printer with multiple computers on the network, insert the installation CD into each additional computer, and follow the instructions on how to the printer. • The printer should appear as a highlighted printer in the installation. WPA-PSK or WPA2-PSK key - Up to ...


