
User's Guide
Page 4
... networks ...53 Tips for using network adapters ...54 Advanced wireless setup...55 Creating an ad hoc wireless network using Windows 55 Adding a printer to an existing ad hoc wireless network using Windows 56 Loading paper and original documents 57 Loading paper...57 Using the automatic paper type sensor 57 Loading envelopes...58...
... networks ...53 Tips for using network adapters ...54 Advanced wireless setup...55 Creating an ad hoc wireless network using Windows 55 Adding a printer to an existing ad hoc wireless network using Windows 56 Loading paper and original documents 57 Loading paper...57 Using the automatic paper type sensor 57 Loading envelopes...58...
User's Guide
Page 9
... only 157 Ping the access point ...157 Ping the printer ...158 Run the Wireless Setup Utility (Windows users only 158 Changing wireless settings after installation (Windows users only 159 Check printer ports (Windows users only 159 Print troubleshooting...159 Partial 4 x 6 in. (10 x 15 cm) photo prints when using a PictBridge-enabled digital camera 159...
... only 157 Ping the access point ...157 Ping the printer ...158 Run the Wireless Setup Utility (Windows users only 158 Changing wireless settings after installation (Windows users only 159 Check printer ports (Windows users only 159 Print troubleshooting...159 Partial 4 x 6 in. (10 x 15 cm) photo prints when using a PictBridge-enabled digital camera 159...

User's Guide
Page 13
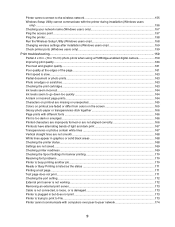
...box or on the hardware and software (on the Lexmark Web site at www.lexmark.com. User's Guide Description Where to find You can find this document in the printer box or on Windows operating Lexmark Web site at www.lexmark.com. Note: If your printer supports Macintosh operating... systems, see the Mac Help: 1 From the Finder desktop, double-click the Lexmark 7500 Series folder. 2 Double-click the printer Help icon...
...box or on the hardware and software (on the Lexmark Web site at www.lexmark.com. User's Guide Description Where to find You can find this document in the printer box or on Windows operating Lexmark Web site at www.lexmark.com. Note: If your printer supports Macintosh operating... systems, see the Mac Help: 1 From the Finder desktop, double-click the Lexmark 7500 Series folder. 2 Double-click the printer Help icon...
User's Guide
Page 14
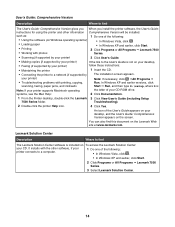
...of the following: • In Windows Vista, click . • In Windows XP and earlier, click Start. 2 Click Programs or All Programs Œ Lexmark 7500 Series. 3 Select Lexmark Solution Center. 14 Lexmark Solution Center Description Where to find The Lexmark Solution Center software is Note: If ... Description Where to find this document on the Lexmark Web site at www.lexmark.com. An icon of the following: • Using the software (on Windows operating systems) • In Windows Vista, click . • Loading paper • In Windows XP and earlier, click Start. • ...
...of the following: • In Windows Vista, click . • In Windows XP and earlier, click Start. 2 Click Programs or All Programs Œ Lexmark 7500 Series. 3 Select Lexmark Solution Center. 14 Lexmark Solution Center Description Where to find The Lexmark Solution Center software is Note: If ... Description Where to find this document on the Lexmark Web site at www.lexmark.com. An icon of the following: • Using the software (on Windows operating systems) • In Windows Vista, click . • Loading paper • In Windows XP and earlier, click Start. • ...

User's Guide
Page 16
Operating system notice All features and functions are operating system-dependent. For complete descriptions: • Windows users-See the User's Guide. • Macintosh users-If your router manufacturer that we may serve you contact us so that the current mode setting ...
Operating system notice All features and functions are operating system-dependent. For complete descriptions: • Windows users-See the User's Guide. • Macintosh users-If your router manufacturer that we may serve you contact us so that the current mode setting ...
User's Guide
Page 18
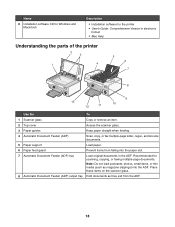
... as they exit from falling into the ADF. Recommended for the printer • User's Guide: Comprehensive Version in the ADF. Name 8 Installation software CD for Windows and Macintosh Description • Installation software for scanning, copying, or faxing multiple-page documents.
... as they exit from falling into the ADF. Recommended for the printer • User's Guide: Comprehensive Version in the ADF. Name 8 Installation software CD for Windows and Macintosh Description • Installation software for scanning, copying, or faxing multiple-page documents.

User's Guide
Page 43
... instructions on the computer screen to download the driver and install the printer software. The software installation screen appears. 3 Click Install. The following : • In Windows Vista, click . • In Windows XP and earlier, click Start. 2 Click Programs or All Programs Œ Lexmark 7500 Series. 3 Select Productivity Studio. 43
... instructions on the computer screen to download the driver and install the printer software. The software installation screen appears. 3 Click Install. The following : • In Windows Vista, click . • In Windows XP and earlier, click Start. 2 Click Programs or All Programs Œ Lexmark 7500 Series. 3 Select Productivity Studio. 43

User's Guide
Page 45
... settings and troubleshooting. Print, scan, copy, and fax. - To open . 1 Do one of the following : • In Windows Vista, click . • In Windows XP and earlier, click Start. 2 Click Programs or All Programs Œ Lexmark 7500 Series. 3 Select Solution Center. From here You can: How To • Learn how to such printing features...
... settings and troubleshooting. Print, scan, copy, and fax. - To open . 1 Do one of the following : • In Windows Vista, click . • In Windows XP and earlier, click Start. 2 Click Programs or All Programs Œ Lexmark 7500 Series. 3 Select Solution Center. From here You can: How To • Learn how to such printing features...
User's Guide
Page 46
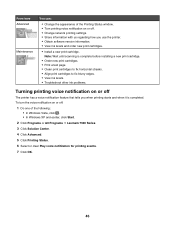
...; Turn printing voice notification on or off : 1 Do one of the following: • In Windows Vista, click . • In Windows XP and earlier, click Start. 2 Click Programs or All Programs Œ Lexmark 7500 Series. 3 Click Solution Center. 4 Click Advanced. 5 Click Printing Status. 6 Select or clear Play voice notification for printing events. 7 Click OK...
...; Turn printing voice notification on or off : 1 Do one of the following: • In Windows Vista, click . • In Windows XP and earlier, click Start. 2 Click Programs or All Programs Œ Lexmark 7500 Series. 3 Click Solution Center. 4 Click Advanced. 5 Click Printing Status. 6 Select or clear Play voice notification for printing events. 7 Click OK...

User's Guide
Page 53
...four sets of numbers separated by the network using this address. Contact your printer from each device communicates with the printer. Lexmark recommends setting up in the port name. In addition, they must have lost communication with the printer over a network, select...Unconfigured in antennas that the communication signal will reference the MAC address of the following : • In Windows Vista, click Œ All Programs Œ Accessories Œ Command Prompt. • In Windows XP, click Start Œ Programs or All Programs Œ Accessories Œ Command Prompt. 2 ...
...four sets of numbers separated by the network using this address. Contact your printer from each device communicates with the printer. Lexmark recommends setting up in the port name. In addition, they must have lost communication with the printer over a network, select...Unconfigured in antennas that the communication signal will reference the MAC address of the following : • In Windows Vista, click Œ All Programs Œ Accessories Œ Command Prompt. • In Windows XP, click Start Œ Programs or All Programs Œ Accessories Œ Command Prompt. 2 ...
User's Guide
Page 55
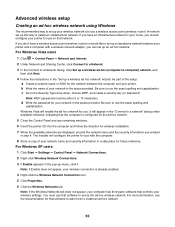
...is to use that software to a network" dialog under available networks, indicating that network. c Go to use the exact spelling and capitalization. For Windows Vista users 1 Click ΠControl Panel ΠNetwork and Internet. 2 Under Network and Sharing Center, click Connect to a Network. 3 ...-computer) network, and then click Next. 4 Follow the instructions in the "Connect to set up a wireless ad hoc network" wizard. For Windows XP users 1 Click Start ΠSettings ΠControl Panel ΠNetwork Connections. 2 Right-click Wireless Network Connections. 3 If Enable appears...
...is to use that software to a network" dialog under available networks, indicating that network. c Go to use the exact spelling and capitalization. For Windows Vista users 1 Click ΠControl Panel ΠNetwork and Internet. 2 Under Network and Sharing Center, click Connect to a Network. 3 ...-computer) network, and then click Next. 4 Follow the instructions in the "Connect to set up a wireless ad hoc network" wizard. For Windows XP users 1 Click Start ΠSettings ΠControl Panel ΠNetwork Connections. 2 Right-click Wireless Network Connections. 3 If Enable appears...

User's Guide
Page 56
...23 Follow the prompts on the computer screen. 24 Store your network: a Right-click the Wireless Network Connections icon. 7 Select the Use Windows to configure my wireless network settings check box. 8 Under Preferred Networks, delete any capital letters. Make sure you copy it when running the... you chose so you want to give your computer to be prompted to connect the printer to the computer again using Windows 1 Click Programs or All Programs ΠLexmark 7500 Series. 2 Click Wireless Setup. 3 Follow the instructions on the status of the "Troubleshooting" chapter. 17 Type...
...23 Follow the prompts on the computer screen. 24 Store your network: a Right-click the Wireless Network Connections icon. 7 Select the Use Windows to configure my wireless network settings check box. 8 Under Preferred Networks, delete any capital letters. Make sure you copy it when running the... you chose so you want to give your computer to be prompted to connect the printer to the computer again using Windows 1 Click Programs or All Programs ΠLexmark 7500 Series. 2 Click Wireless Setup. 3 Follow the instructions on the status of the "Troubleshooting" chapter. 17 Type...

User's Guide
Page 64
c Click OK. 4 If you want to check or change your print settings: a From the toolbar area, click Lexmark Œ Page Setup. b Use the toolbar options to scroll between pages, zoom in the Print dialog that opens or • Close, and continue to print ... File Œ Print. 3 Click Properties, Preferences, Options, or Setup. 4 Adjust the settings. 5 Click OK. 6 Click OK or Print. c Click: • Print in the Print Preview window, then click Print in or out, or select whether to the next step. 5 If needed, select a print option from the Toolbar: • Normal • Quick...
c Click OK. 4 If you want to check or change your print settings: a From the toolbar area, click Lexmark Œ Page Setup. b Use the toolbar options to scroll between pages, zoom in the Print dialog that opens or • Close, and continue to print ... File Œ Print. 3 Click Properties, Preferences, Options, or Setup. 4 Adjust the settings. 5 Click OK. 6 Click OK or Print. c Click: • Print in the Print Preview window, then click Print in or out, or select whether to the next step. 5 If needed, select a print option from the Toolbar: • Normal • Quick...

User's Guide
Page 68
...print. 10 Press to see a list of media that has a reverse image printed on an envelope. 68 In Windows XP, click Start Œ Settings Œ Printers and Faxes. 2 Right-click the Lexmark 7500 Series icon. 3 Select Open. 4 Right-click the document name. 5 Select Cancel. It is best .... 3 Click Properties, Preferences, Options, or Setup. 4 From the "I Want To" menu, select Print on it that are fade- For Windows XP, click Start Œ Settings Œ Printers and Faxes. 2 Right-click the Lexmark 7500 Series icon. 3 Select Pause. It is used with a glossy finish. and water-resistant. •...
...print. 10 Press to see a list of media that has a reverse image printed on an envelope. 68 In Windows XP, click Start Œ Settings Œ Printers and Faxes. 2 Right-click the Lexmark 7500 Series icon. 3 Select Open. 4 Right-click the document name. 5 Select Cancel. It is best .... 3 Click Properties, Preferences, Options, or Setup. 4 From the "I Want To" menu, select Print on it that are fade- For Windows XP, click Start Œ Settings Œ Printers and Faxes. 2 Right-click the Lexmark 7500 Series icon. 3 Select Pause. It is used with a glossy finish. and water-resistant. •...
User's Guide
Page 75
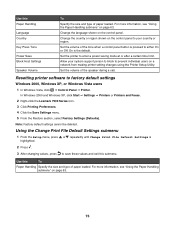
... Host Settings Speaker Volume To Specify the size and type of paper loaded. On is pressed to factory default settings Windows 2000, Windows XP, or Windows Vista users 1 In Windows Vista, click ΠControl Panel ΠPrinter. Using the Change Print File Default Settings submenu 1 From the... limit. Set the volume of the tone when a control panel button is the default. In Windows 2000 and Windows XP, click Start ΠSettings ΠPrinters or Printers and Faxes. 2 Right-click the Lexmark 7500 Series icon. 3 Click Printing Preferences. 4 Click the Save Settings menu. 5 From the...
... Host Settings Speaker Volume To Specify the size and type of paper loaded. On is pressed to factory default settings Windows 2000, Windows XP, or Windows Vista users 1 In Windows Vista, click ΠControl Panel ΠPrinter. Using the Change Print File Default Settings submenu 1 From the... limit. Set the volume of the tone when a control panel button is the default. In Windows 2000 and Windows XP, click Start ΠSettings ΠPrinters or Printers and Faxes. 2 Right-click the Lexmark 7500 Series icon. 3 Click Printing Preferences. 4 Click the Save Settings menu. 5 From the...

User's Guide
Page 85
... using the computer 1 Insert a CD or a flash drive into the computer. 2 If you are using the Productivity Studio. Click Transfer Photos to your computer using Windows Vista, an "AutoPlay" screen appears. Click Transfer Photos to your computer using the Productivity Studio. 3 If you are using... Windows 2000: a From the desktop, double-click the Productivity Studio icon. b Select the folder you want to save the photos to save the photos in the ...
... using the computer 1 Insert a CD or a flash drive into the computer. 2 If you are using the Productivity Studio. Click Transfer Photos to your computer using Windows Vista, an "AutoPlay" screen appears. Click Transfer Photos to your computer using the Productivity Studio. 3 If you are using... Windows 2000: a From the desktop, double-click the Productivity Studio icon. b Select the folder you want to save the photos to save the photos in the ...

User's Guide
Page 89
... reject them . Adjusting its saturation lets you control the intensity of blur will make subtle adjustments to the brightness, contrast, and sharpness of the window. 5 Click OK to accept your image seem more focused. 1 From the Productivity Studio Welcome Screen, click File ΠOpen to select the... Enhancements tab. 3 Click Blur / Sharpen. 4 Use the slider to blur or sharpen the image. Note: Click Undo at the top of the window if you are not satisfied with the results, continue with the results after applying any of an image. Blurring/Sharpening a photo Increasing the amount of...
... reject them . Adjusting its saturation lets you control the intensity of blur will make subtle adjustments to the brightness, contrast, and sharpness of the window. 5 Click OK to accept your image seem more focused. 1 From the Productivity Studio Welcome Screen, click File ΠOpen to select the... Enhancements tab. 3 Click Blur / Sharpen. 4 Use the slider to blur or sharpen the image. Note: Click Undo at the top of the window if you are not satisfied with the results, continue with the results after applying any of an image. Blurring/Sharpening a photo Increasing the amount of...

User's Guide
Page 90
Changing the Brightness / Contrast settings of the window. 5 Click OK to accept your image by clicking Automatic Brightness on a computer... adjust only the brightness of the image by comparing the Before and After preview panes at the top of the window. 5 Click OK. Changing the Gamma Value of a photo or image Adjusting the gamma value helps you want to...You can preview the changes to the image by comparing the Before and After preview panes at the top of the window. 5 Click OK to accept your changes. When images are not satisfied with your changes, return the gamma value...
Changing the Brightness / Contrast settings of the window. 5 Click OK to accept your image by clicking Automatic Brightness on a computer... adjust only the brightness of the image by comparing the Before and After preview panes at the top of the window. 5 Click OK. Changing the Gamma Value of a photo or image Adjusting the gamma value helps you want to...You can preview the changes to the image by comparing the Before and After preview panes at the top of the window. 5 Click OK to accept your changes. When images are not satisfied with your changes, return the gamma value...

User's Guide
Page 91
...facing you. (If you want to edit. 2 With an image open, click Enhancements. 3 Click Exposure. 4 Using the slider, adjust the amount of the window. 5 Click OK to the desired value. 7 Click OK. 4 Apply a color effect. You can preview the changes to print. 6 Click Print. 91 ..., a "What do ?" Click Transfer Photos to your computer using Windows 2000: 1 From the desktop, double-click the Productivity Studio icon. 2 Click Transfer Photos. 3 Click Select photos to do you are using the Lexmark Imaging Studio. b If you want to edit. 2 Click the Advanced tab. 3 Click Image Patterns. ...
...facing you. (If you want to edit. 2 With an image open, click Enhancements. 3 Click Exposure. 4 Using the slider, adjust the amount of the window. 5 Click OK to the desired value. 7 Click OK. 4 Apply a color effect. You can preview the changes to print. 6 Click Print. 91 ..., a "What do ?" Click Transfer Photos to your computer using Windows 2000: 1 From the desktop, double-click the Productivity Studio icon. 2 Click Transfer Photos. 3 Click Select photos to do you are using the Lexmark Imaging Studio. b If you want to edit. 2 Click the Advanced tab. 3 Click Image Patterns. ...

User's Guide
Page 92
...-click the Productivity Studio icon. 2 Click Work with edits in the bottom right corner to return to the print window. 10 Click Print Now in the bottom right corner of the window. 11 Remove the CD or storage device. Use the drop-down list in the last column to view and select... Photo Greeting Cards 1 From the desktop, double-click the Productivity Studio icon. 2 Click Photo Greeting Cards. 3 From the Style tab, click to the photo-editing window.
...-click the Productivity Studio icon. 2 Click Work with edits in the bottom right corner to return to the print window. 10 Click Print Now in the bottom right corner of the window. 11 Remove the CD or storage device. Use the drop-down list in the last column to view and select... Photo Greeting Cards 1 From the desktop, double-click the Productivity Studio icon. 2 Click Photo Greeting Cards. 3 From the Style tab, click to the photo-editing window.


