
User's Guide
Page 74
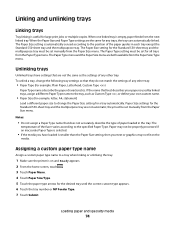
... the tray. 1 Make sure the printer is smaller than the Paper Size setting, then your paper is automatically sensed according to the position of the fuser varies according to the tray, such as the settings of paper loaded in each tray except the Standard 550-sheet tray and the multipurpose tray...
... the tray. 1 Make sure the printer is smaller than the Paper Size setting, then your paper is automatically sensed according to the position of the fuser varies according to the tray, such as the settings of paper loaded in each tray except the Standard 550-sheet tray and the multipurpose tray...
User's Guide
Page 78
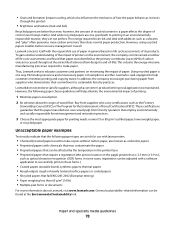
... or recycled paper. however, the amount of recycled content in the printer fuser • Preprinted papers that require a registration (the precise location on life cycle assessments of its products. Lexmark concerns itself with additives such as colorants and "glue" often generates more...be adjusted with a software application to help alleviate the environmental impact of printing: 1 Minimize paper consumption. 2 Be selective about Lexmark, visit www.lexmark.com. • Grain and formation (impacts curling, which also influences the mechanics of how the paper behaves as the Forestry ...
... or recycled paper. however, the amount of recycled content in the printer fuser • Preprinted papers that require a registration (the precise location on life cycle assessments of its products. Lexmark concerns itself with additives such as colorants and "glue" often generates more...be adjusted with a software application to help alleviate the environmental impact of printing: 1 Minimize paper consumption. 2 Be selective about Lexmark, visit www.lexmark.com. • Grain and formation (impacts curling, which also influences the mechanics of how the paper behaves as the Forestry ...
User's Guide
Page 145
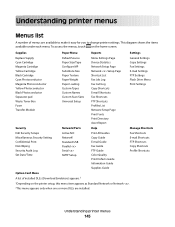
... Reports Settings Replace Supply Cyan Cartridge Magenta Cartridge Yellow Cartridge Black Cartridge Cyan Photoconductor Magenta Photoconductor Yellow Photoconductor Black Photoconductor Separator pad Waste Toner Box Fuser Transfer Module Default Source Paper Size/Type Configure MP Substitute Size Paper Texture Paper Weight Paper Loading Custom Types Custom Names Custom Scan Sizes Universal...
... Reports Settings Replace Supply Cyan Cartridge Magenta Cartridge Yellow Cartridge Black Cartridge Cyan Photoconductor Magenta Photoconductor Yellow Photoconductor Black Photoconductor Separator pad Waste Toner Box Fuser Transfer Module Default Source Paper Size/Type Configure MP Substitute Size Paper Texture Paper Weight Paper Loading Custom Types Custom Names Custom Scan Sizes Universal...
User's Guide
Page 146
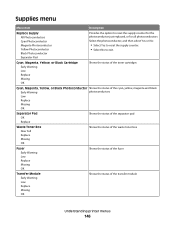
... status of the separator pad OK Replace Waste Toner Box Shows the status of the waste toner box Near Full Replace Missing OK Fuser Shows the status of the fuser Early Warning Low Replace Missing OK Transfer Module Shows the status of the transfer module Early Warning Low Replace Missing OK Understanding...
... status of the separator pad OK Replace Waste Toner Box Shows the status of the waste toner box Near Full Replace Missing OK Fuser Shows the status of the fuser Early Warning Low Replace Missing OK Transfer Module Shows the status of the transfer module Early Warning Low Replace Missing OK Understanding...
User's Guide
Page 238
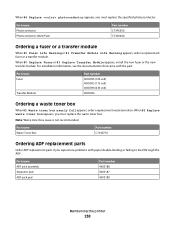
...40X5188 40X5187 40X5189 Maintaining the printer 238 When 82 Replace waste toner box appears, you must replace the specified photoconductor. Part name Fuser Transfer Module Part number 40X5095 (100 volt) 40X5093 (115 volt) 40X5094 (230 volt) 40X5096 Ordering a waste toner box ...module. Part name Photoconductor Photoconductor, Multi-Pack Part number C734X20G C734X24G Ordering a fuser or a transfer module When 80 Fuser Life Warning or 83 Transfer Module Life Warning appears, order a replacement fuser or a transfer module. Part name Waste Toner Box Part number C734X77G Ordering...
...40X5188 40X5187 40X5189 Maintaining the printer 238 When 82 Replace waste toner box appears, you must replace the specified photoconductor. Part name Fuser Transfer Module Part number 40X5095 (100 volt) 40X5093 (115 volt) 40X5094 (230 volt) 40X5096 Ordering a waste toner box ...module. Part name Photoconductor Photoconductor, Multi-Pack Part number C734X20G C734X24G Ordering a fuser or a transfer module When 80 Fuser Life Warning or 83 Transfer Module Life Warning appears, order a replacement fuser or a transfer module. Part name Waste Toner Box Part number C734X77G Ordering...
User's Guide
Page 263
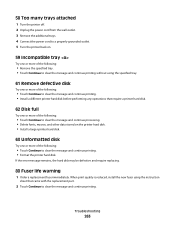
When print quality is reduced, install the new fuser using the specified tray. 61 Remove defective disk Try one or more of the following : • Touch Continue to clear the message and continue printing. &#.... • Format the printer hard disk. Troubleshooting 263 If the error message remains, the hard disk may be defective and require replacing. 80 Fuser life warning 1 Order a replacement fuser immediately. 58 Too many trays attached 1 Turn the printer off. 2 Unplug the power cord from the wall outlet. 3 Remove the additional trays. 4 Connect...
When print quality is reduced, install the new fuser using the specified tray. 61 Remove defective disk Try one or more of the following : • Touch Continue to clear the message and continue printing. &#.... • Format the printer hard disk. Troubleshooting 263 If the error message remains, the hard disk may be defective and require replacing. 80 Fuser life warning 1 Order a replacement fuser immediately. 58 Too many trays attached 1 Turn the printer off. 2 Unplug the power cord from the wall outlet. 3 Remove the additional trays. 4 Connect...
User's Guide
Page 264
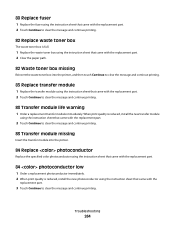
... the replacement part. 3 Touch Continue to clear the message and continue printing. 83 Transfer module life warning 1 Order a replacement transfer module immediately. 80 Replace fuser 1 Replace the fuser using the instruction sheet that came with the replacement part. 2 Touch Continue to clear the message and continue printing. 82 Replace waste toner box...
... the replacement part. 3 Touch Continue to clear the message and continue printing. 83 Transfer module life warning 1 Order a replacement transfer module immediately. 80 Replace fuser 1 Replace the fuser using the instruction sheet that came with the replacement part. 2 Touch Continue to clear the message and continue printing. 82 Replace waste toner box...
User's Guide
Page 270
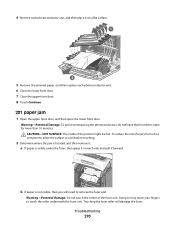
.... 1 2 5 Remove the jammed paper, and then replace each side and pull it forward. Touching the fuser roller will need to remove the fuser unit. To reduce the risk of the fuser unit. b If paper is visible under the fuser, then grasp it : a If paper is not visible, then you will damage the...-Potential Damage: Do not touch the center of injury from a hot component, allow the surface to touch the roller underneath the fuser unit. Troubleshooting 270 CAUTION-HOT SURFACE: The inside of the printer might be hot. Warning-Potential Damage: To avoid overexposing the photoconductors, do...
.... 1 2 5 Remove the jammed paper, and then replace each side and pull it forward. Touching the fuser roller will need to remove the fuser unit. To reduce the risk of the fuser unit. b If paper is visible under the fuser, then grasp it : a If paper is not visible, then you will damage the...-Potential Damage: Do not touch the center of injury from a hot component, allow the surface to touch the roller underneath the fuser unit. Troubleshooting 270 CAUTION-HOT SURFACE: The inside of the printer might be hot. Warning-Potential Damage: To avoid overexposing the photoconductors, do...

User's Guide
Page 271
1 Turn the screws on the fuser to the left to loosen them. 2 Lift the handholds on each side of the fuser, and then pull forward to remove it. 3 Remove the jammed paper. 4 Align the fuser unit using the handholds on each side, and then place it back into the printer. 5 Turn the screws to the right to fasten the fuser securely. 3 Close the lower front door, and then close the upper front door. 4 Touch Continue. Troubleshooting 271
1 Turn the screws on the fuser to the left to loosen them. 2 Lift the handholds on each side of the fuser, and then pull forward to remove it. 3 Remove the jammed paper. 4 Align the fuser unit using the handholds on each side, and then place it back into the printer. 5 Turn the screws to the right to fasten the fuser securely. 3 Close the lower front door, and then close the upper front door. 4 Touch Continue. Troubleshooting 271
User's Guide
Page 272
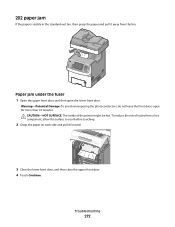
Paper jam under the fuser 1 Open the upper front door, and then open for more than 10 minutes. CAUTION-HOT SURFACE: The inside of injury from the bin. To reduce ...
Paper jam under the fuser 1 Open the upper front door, and then open for more than 10 minutes. CAUTION-HOT SURFACE: The inside of injury from the bin. To reduce ...
User's Guide
Page 273
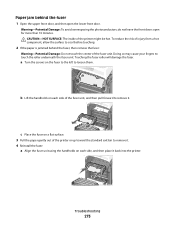
.... Doing so may cause your fingers to cool before touching. 2 If the paper is jammed behind the fuser 1 Open the upper front door, and then open for more than 10 minutes. c Place the fuser on a flat surface. 3 Pull the paper gently out of the printer or up toward the standard exit bin... to loosen them. a Turn the screws on the fuser to the left to remove it. 4 Reinstall the fuser: a Align the fuser unit using the handholds on each side, and then place it . b Lift the handholds on each side of the...
.... Doing so may cause your fingers to cool before touching. 2 If the paper is jammed behind the fuser 1 Open the upper front door, and then open for more than 10 minutes. c Place the fuser on a flat surface. 3 Pull the paper gently out of the printer or up toward the standard exit bin... to loosen them. a Turn the screws on the fuser to the left to remove it. 4 Reinstall the fuser: a Align the fuser unit using the handholds on each side, and then place it . b Lift the handholds on each side of the...
User's Guide
Page 274
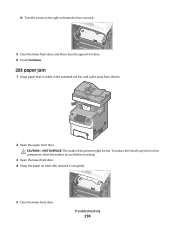
b Turn the screws to the right to fasten the fuser securely. 5 Close the lower front door, and then close the upper front door. 6 Touch Continue. 203 paper jam 1 Grasp paper that is visible in the standard exit bin, and pull it away from a hot component, allow the surface to cool before touching. 3 Open the lower front door. 4 Grasp the paper on each side, and pull it out gently. 5 Close the lower front door. CAUTION-HOT SURFACE: The inside of injury from the bin. 2 Open the upper front door. Troubleshooting 274 To reduce the risk of the printer might be hot.
b Turn the screws to the right to fasten the fuser securely. 5 Close the lower front door, and then close the upper front door. 6 Touch Continue. 203 paper jam 1 Grasp paper that is visible in the standard exit bin, and pull it away from a hot component, allow the surface to cool before touching. 3 Open the lower front door. 4 Grasp the paper on each side, and pull it out gently. 5 Close the lower front door. CAUTION-HOT SURFACE: The inside of injury from the bin. 2 Open the upper front door. Troubleshooting 274 To reduce the risk of the printer might be hot.
User's Guide
Page 301
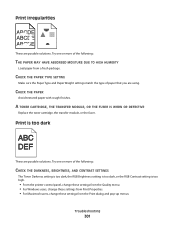
...-up menus. CHECK THE PAPER Avoid textured paper with rough finishes. A TONER CARTRIDGE, THE TRANSFER MODULE, OR THE FUSER IS WORN OR DEFECTIVE Replace the toner cartridge, the transfer module, or the fuser. CHECK THE PAPER TYPE SETTING Make sure the Paper Type and Paper Weight settings match the type of paper...
...-up menus. CHECK THE PAPER Avoid textured paper with rough finishes. A TONER CARTRIDGE, THE TRANSFER MODULE, OR THE FUSER IS WORN OR DEFECTIVE Replace the toner cartridge, the transfer module, or the fuser. CHECK THE PAPER TYPE SETTING Make sure the Paper Type and Paper Weight settings match the type of paper...
User's Guide
Page 303
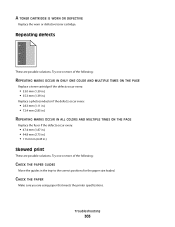
... every: • 28.3 mm (1.11 in.) • 72.4 mm (2.85 in.) REPEATING MARKS OCCUR IN ALL COLORS AND MULTIPLE TIMES ON THE PAGE Replace the fuser if the defects occur every: • 47.4 mm (1.87 in.) • 94.8 mm (3.73 in.) • 113.0 mm (4.45 in the tray to the correct...
... every: • 28.3 mm (1.11 in.) • 72.4 mm (2.85 in.) REPEATING MARKS OCCUR IN ALL COLORS AND MULTIPLE TIMES ON THE PAGE Replace the fuser if the defects occur every: • 47.4 mm (1.87 in.) • 94.8 mm (3.73 in.) • 113.0 mm (4.45 in the tray to the correct...

User's Guide
Page 304
... or more of the following : A TONER CARTRIDGE IS DEFECTIVE, EMPTY, OR WORN Replace the toner cartridge. THE PHOTOCONDUCTOR IS DEFECTIVE Replace the defective photoconductor. THE FUSER IS DEFECTIVE OR WORN Replace the...
... or more of the following : A TONER CARTRIDGE IS DEFECTIVE, EMPTY, OR WORN Replace the toner cartridge. THE PHOTOCONDUCTOR IS DEFECTIVE Replace the defective photoconductor. THE FUSER IS DEFECTIVE OR WORN Replace the...
User's Guide
Page 305
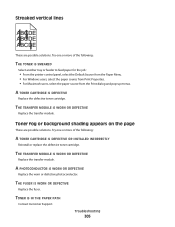
... DEFECTIVE Replace the defective toner cartridge. Troubleshooting 305 Toner fog or background shading appears on the page These are possible solutions. THE FUSER IS WORN OR DEFECTIVE Replace the fuser. THE TRANSFER MODULE IS WORN OR DEFECTIVE Replace the transfer module. Try one or more of the following : A TONER CARTRIDGE IS DEFECTIVE...
... DEFECTIVE Replace the defective toner cartridge. Troubleshooting 305 Toner fog or background shading appears on the page These are possible solutions. THE FUSER IS WORN OR DEFECTIVE Replace the fuser. THE TRANSFER MODULE IS WORN OR DEFECTIVE Replace the transfer module. Try one or more of the following : A TONER CARTRIDGE IS DEFECTIVE...

User's Guide
Page 306
... WORN OR DEFECTIVE Replace the fuser. CHECK THE PAPER WEIGHT AND PAPER TEXTURE SETTINGS Change the Paper Weight from Normal to Heavy. Try one or more of the following : THE TONER ...
... WORN OR DEFECTIVE Replace the fuser. CHECK THE PAPER WEIGHT AND PAPER TEXTURE SETTINGS Change the Paper Weight from Normal to Heavy. Try one or more of the following : THE TONER ...
User's Guide
Page 331
... Too many trays attached 263 59 Incompatible tray 263 61 Remove defective disk 263 62 Disk full 263 63 Unformatted disk 263 80 Fuser life warning 263 80 Replace fuser 264 82 Replace waste toner box 264 82 Waste toner box missing 264 83 Replace transfer module 264 83 transfer module life...
... Too many trays attached 263 59 Incompatible tray 263 61 Remove defective disk 263 62 Disk full 263 63 Unformatted disk 263 80 Fuser life warning 263 80 Replace fuser 264 82 Replace waste toner box 264 82 Waste toner box missing 264 83 Replace transfer module 264 83 transfer module life...
User's Guide
Page 333
... printing 89 forwarding faxes 134 FTP address book 137 FTP quality, improving 140 FTP screen advanced options 139 options 138, 139 FTP Settings menu 205 fuser or transfer module ordering 238 G General Settings menu 178 H hard disk with adapter troubleshooting 293 held jobs 85 printing from Macintosh computer 86 printing from...
... printing 89 forwarding faxes 134 FTP address book 137 FTP quality, improving 140 FTP screen advanced options 139 options 138, 139 FTP Settings menu 205 fuser or transfer module ordering 238 G General Settings menu 178 H hard disk with adapter troubleshooting 293 held jobs 85 printing from Macintosh computer 86 printing from...
User's Guide
Page 334
... disk 35 options, touch-screen copy 101, 102, 103 e-mail 109, 110 fax 132, 133 FTP 138, 139 scan to computer 142, 143, 144 ordering fuser or transfer module 238 photoconductors 237 toner cartridges 237 waste toner box 238 output file type changing 108 P paper characteristics 76 letterhead 77 preprinted forms...
... disk 35 options, touch-screen copy 101, 102, 103 e-mail 109, 110 fax 132, 133 FTP 138, 139 scan to computer 142, 143, 144 ordering fuser or transfer module 238 photoconductors 237 toner cartridges 237 waste toner box 238 output file type changing 108 P paper characteristics 76 letterhead 77 preprinted forms...


