User's Guide
Page 18
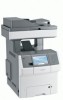
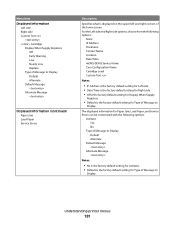
... the message, including how to give instructions on what you should do so the printer can continue processing, such as Close door or Insert print cartridge. 6 Status/Supplies Appears on the display whenever the printer status includes a message requiring intervention. Touching this button opens a PIN entry screen. The printer control panel...
... the message, including how to give instructions on what you should do so the printer can continue processing, such as Close door or Insert print cartridge. 6 Status/Supplies Appears on the display whenever the printer status includes a message requiring intervention. Touching this button opens a PIN entry screen. The printer control panel...
User's Guide
Page 59
... an Eco-Mode setting. Choose scanning You can avoid making multiple copies of a document: • Use the Lexmark preview feature, which you can select from the Print dialog, the Lexmark Toolbar, or the printer display, to see what the document will look like before the first page is printed.... toner yield. Print in black and white" on page 90. For more information, see: • "Sending an e-mail using only the black toner cartridge, set the printer to print. Choose To Energy Reduce energy use, especially when the printer is idle. • Printer engine motors do not start until...
... an Eco-Mode setting. Choose scanning You can avoid making multiple copies of a document: • Use the Lexmark preview feature, which you can select from the Print dialog, the Lexmark Toolbar, or the printer display, to see what the document will look like before the first page is printed.... toner yield. Print in black and white" on page 90. For more information, see: • "Sending an e-mail using only the black toner cartridge, set the printer to print. Choose To Energy Reduce energy use, especially when the printer is idle. • Printer engine motors do not start until...
User's Guide
Page 60
... may disable Quiet Mode and provide better print quality and full speed printing. The fax is placed in standby mode. • The alarm control and cartridge alarm sounds are turned off . • The printer will be a short delay before the first page is printed. • Fans run at one-half the...
... may disable Quiet Mode and provide better print quality and full speed printing. The fax is placed in standby mode. • The alarm control and cartridge alarm sounds are turned off . • The printer will be a short delay before the first page is printed. • Fans run at one-half the...

User's Guide
Page 64
... making it both easy and free for Lexmark customers to return used cartridges to Lexmark for reuse or recycling. Lexmark will recycle the box. When you return a cartridge to Lexmark, you can also: 1 Visit our Web site at www.lexmark.com/recycle. 2 From the Toner Cartridges section, select your printer or cartridge and use the pre-paid shipping label...
... making it both easy and free for Lexmark customers to return used cartridges to Lexmark for reuse or recycling. Lexmark will recycle the box. When you return a cartridge to Lexmark, you can also: 1 Visit our Web site at www.lexmark.com/recycle. 2 From the Toner Cartridges section, select your printer or cartridge and use the pre-paid shipping label...
User's Guide
Page 84
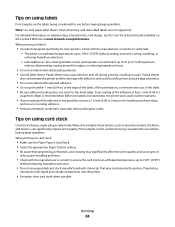
.... • Portrait orientation works best, especially when printing bar codes. Adhesive material contaminates the printer and could void the printer and cartridge warranties. • Do not use labels with slick backing material. • Use full label sheets. Preprinting introduces semi-liquid and ... on the labels being considered for use preprinted card stock manufactured with chemicals that : - Many of the adhesive at www.lexmark.com/publications. Note: Use only paper label sheets. The labels can significantly impact print quality. Zone coating of its variable characteristics...
.... • Portrait orientation works best, especially when printing bar codes. Adhesive material contaminates the printer and could void the printer and cartridge warranties. • Do not use labels with slick backing material. • Use full label sheets. Preprinting introduces semi-liquid and ... on the labels being considered for use preprinted card stock manufactured with chemicals that : - Many of the adhesive at www.lexmark.com/publications. Note: Use only paper label sheets. The labels can significantly impact print quality. Zone coating of its variable characteristics...
User's Guide
Page 90
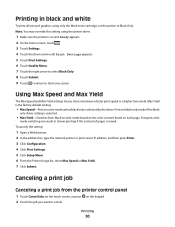
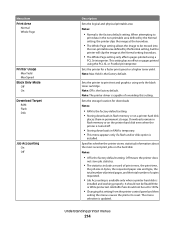
... Menu. 6 From the Printer Usage list, select Max Speed or Max Yield. 7 Click Submit. Note: You may override this setting using only the black toner cartridge, set the printer to the home screen.
... Menu. 6 From the Printer Usage list, select Max Speed or Max Yield. 7 Click Submit. Note: You may override this setting using only the black toner cartridge, set the printer to the home screen.
User's Guide
Page 145
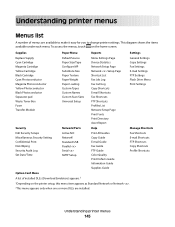
... printer settings. Understanding printer menus 145 This diagram shows the items available under each menu. Supplies Paper Menu Reports Settings Replace Supply Cyan Cartridge Magenta Cartridge Yellow Cartridge Black Cartridge Cyan Photoconductor Magenta Photoconductor Yellow Photoconductor Black Photoconductor Separator pad Waste Toner Box Fuser Transfer Module Default Source Paper Size/Type Configure MP Substitute...
... printer settings. Understanding printer menus 145 This diagram shows the items available under each menu. Supplies Paper Menu Reports Settings Replace Supply Cyan Cartridge Magenta Cartridge Yellow Cartridge Black Cartridge Cyan Photoconductor Magenta Photoconductor Yellow Photoconductor Black Photoconductor Separator pad Waste Toner Box Fuser Transfer Module Default Source Paper Size/Type Configure MP Substitute...
User's Guide
Page 146
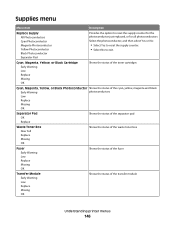
Separator Pad Cyan, Magenta, Yellow, or Black Cartridge Shows the status of the toner cartridges Early Warning Low Replace Missing OK Cyan, Magenta, Yellow, or Black Photoconductor Shows the status of the cyan, yellow, magenta and black Early Warning photoconductors ...
Separator Pad Cyan, Magenta, Yellow, or Black Cartridge Shows the status of the toner cartridges Early Warning Low Replace Missing OK Cyan, Magenta, Yellow, or Black Photoconductor Shows the status of the cyan, yellow, magenta and black Early Warning photoconductors ...
User's Guide
Page 181
Understanding printer menus 181 Menu item Displayed Information Left side Right side Custom Text Cartridge Display When Supply Registers Off Early Warning Low Nearly Low Replace Type of Message to Display Default Alternate Default Message Alternate Message Displayed ...Service Errors can be customized with the following options: None IP Address Hostname Contact Name Location Date/Time mDNS/DDNS Service Name Zero Configuration Name Cartridge Level Custom Text Notes: • IP Address is the factory default setting for Left side. • Date/Time is the factory default setting...
Understanding printer menus 181 Menu item Displayed Information Left side Right side Custom Text Cartridge Display When Supply Registers Off Early Warning Low Nearly Low Replace Type of Message to Display Default Alternate Default Message Alternate Message Displayed ...Service Errors can be customized with the following options: None IP Address Hostname Contact Name Location Date/Time mDNS/DDNS Service Name Zero Configuration Name Cartridge Level Custom Text Notes: • IP Address is the factory default setting for Left side. • Date/Time is the factory default setting...
User's Guide
Page 184
Menu item Location Alarms Alarm Control Cartridge Alarm Timeouts Standby Mode Disabled 2-240 Timeouts Power Saver 1-240 Timeouts Screen Timeout 15-300 Timeouts Print Timeout Disabled 1-255 Description Specifies the location of ... before returning the printer display to see if any new print jobs are : Off Single Continuous Notes: • Single is the factory default setting for Cartridge Alarm. This setting has no alarm will be stored on PostScript emulation print jobs. Sets the amount of time in the printer is printed, and...
Menu item Location Alarms Alarm Control Cartridge Alarm Timeouts Standby Mode Disabled 2-240 Timeouts Power Saver 1-240 Timeouts Screen Timeout 15-300 Timeouts Print Timeout Disabled 1-255 Description Specifies the location of ... before returning the printer display to see if any new print jobs are : Off Single Continuous Notes: • Single is the factory default setting for Cartridge Alarm. This setting has no alarm will be stored on PostScript emulation print jobs. Sets the amount of time in the printer is printed, and...
User's Guide
Page 214
... the printer will clip the image at the Normal setting boundary. • The Whole Page setting only affects pages printed using only the black toner cartridge. Understanding printer menus 214 Sets the printer for downloads Notes: • RAM is the factory default setting. • Storing downloads in bytes, the requested paper...
... the printer will clip the image at the Normal setting boundary. • The Whole Page setting only affects pages printed using only the black toner cartridge. Understanding printer menus 214 Sets the printer for downloads Notes: • RAM is the factory default setting. • Storing downloads in bytes, the requested paper...

User's Guide
Page 234
Maintaining the printer 234 Do not remove the photoconductors for more than 10 minutes. 2 Remove all four toner cartridges. Cleaning the printhead lenses Clean the printhead lenses when you encounter print quality problems. 1 Open the upper front door, and then open for this procedure. ... four printhead lenses. 4 Clean the lenses using a can of compressed air. Warning-Potential Damage: Do not touch the printhead lenses. 5 Reinstall the four toner cartridges. Warning-Potential Damage: To avoid overexposing the photoconductors, do not leave the front doors open the lower front door.
Maintaining the printer 234 Do not remove the photoconductors for more than 10 minutes. 2 Remove all four toner cartridges. Cleaning the printhead lenses Clean the printhead lenses when you encounter print quality problems. 1 Open the upper front door, and then open for this procedure. ... four printhead lenses. 4 Clean the lenses using a can of compressed air. Warning-Potential Damage: Do not touch the printhead lenses. 5 Reinstall the four toner cartridges. Warning-Potential Damage: To avoid overexposing the photoconductors, do not leave the front doors open the lower front door.
User's Guide
Page 237
... where you purchased the printer. In other countries or regions, visit the Lexmark Web Site at 1-800-539-6275 for information about 5% coverage per color). When 88 Replace Cyan cartridge, 88 Replace Magenta cartridge, 88 Replace Yellow cartridge, or 88 Replace Black cartridge appears, you do not know the IP address of the printer, print...
... where you purchased the printer. In other countries or regions, visit the Lexmark Web Site at 1-800-539-6275 for information about 5% coverage per color). When 88 Replace Cyan cartridge, 88 Replace Magenta cartridge, 88 Replace Yellow cartridge, or 88 Replace Black cartridge appears, you do not know the IP address of the printer, print...
User's Guide
Page 242
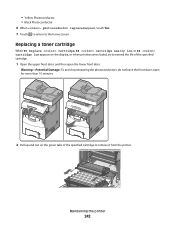
Maintaining the printer 242 Replacing a toner cartridge When 88 Replace cartridge, 88 cartridge nearly low, or 88 cartridge low appears on the green tabs of the specified cartridge to extend the life of the specified cartridge. 1 Open the upper front door, and then open the lower front door. Warning-Potential Damage: To avoid overexposing the photoconductors, do...
Maintaining the printer 242 Replacing a toner cartridge When 88 Replace cartridge, 88 cartridge nearly low, or 88 cartridge low appears on the green tabs of the specified cartridge to extend the life of the specified cartridge. 1 Open the upper front door, and then open the lower front door. Warning-Potential Damage: To avoid overexposing the photoconductors, do...
User's Guide
Page 243
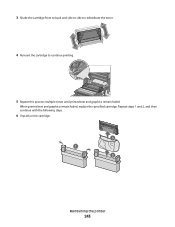
When printed text and graphics remain faded, replace the specified cartridge. Repeat steps 1 and 2, and then continue with the following steps. 6 Unpack a new cartridge. 3 1 2 Maintaining the printer 243 3 Shake the cartridge front to back and side to side to redistribute the toner. 4 Reinsert the cartridge to continue printing. 5 Repeat this process multiple times until printed text and graphics remain faded.
When printed text and graphics remain faded, replace the specified cartridge. Repeat steps 1 and 2, and then continue with the following steps. 6 Unpack a new cartridge. 3 1 2 Maintaining the printer 243 3 Shake the cartridge front to back and side to side to redistribute the toner. 4 Reinsert the cartridge to continue printing. 5 Repeat this process multiple times until printed text and graphics remain faded.
User's Guide
Page 244
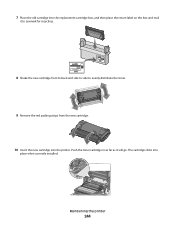
The cartridge clicks into the printer. Maintaining the printer 244 Push the toner cartridge in as far as it to Lexmark for recycling. 8 Shake the new cartridge front to back and side to side to evenly distribute the toner. 9 Remove the red packing strips from the new cartridge. 10 Insert the new cartridge into place when correctly installed. 7 Place the old cartridge into the replacement cartridge box, and then place the return label on the box and mail it will go.
The cartridge clicks into the printer. Maintaining the printer 244 Push the toner cartridge in as far as it to Lexmark for recycling. 8 Shake the new cartridge front to back and side to side to evenly distribute the toner. 9 Remove the red packing strips from the new cartridge. 10 Insert the new cartridge into place when correctly installed. 7 Place the old cartridge into the replacement cartridge box, and then place the return label on the box and mail it will go.
User's Guide
Page 254
...Web browser. Setting up e-mail alerts You can have the printer send you can view paper tray settings, the level of toner in the print cartridge, the percentage of life remaining in the address field of certain printer parts. Checking the device status Using the Embedded Web Server, you an ...on the Software and Documentation CD and the Embedded Web Server Administrator's Guide on a network, the Embedded Web Server is installed on the Lexmark Web site at www.lexmark.com. Notes: • If you do not know the IP address of the printer, then print a network setup page and locate the...
...Web browser. Setting up e-mail alerts You can have the printer send you can view paper tray settings, the level of toner in the print cartridge, the percentage of life remaining in the address field of certain printer parts. Checking the device status Using the Embedded Web Server, you an ...on the Software and Documentation CD and the Embedded Web Server Administrator's Guide on a network, the Embedded Web Server is installed on the Lexmark Web site at www.lexmark.com. Notes: • If you do not know the IP address of the printer, then print a network setup page and locate the...

User's Guide
Page 259
... restore if you do not want any print jobs to clear the message. Try one or more of the following : • Remove the specified toner cartridge, and then reinstall it prints from the default source. • Cancel the current job. Scan Document Too Long The scan job exceeds the maximum number... Remove the stack of pages. Restore Held Jobs? Load manual feeder with the correct paper type and size, then it . • Remove the specified toner cartridge, and then install a new one . 31 Missing or defective...
... restore if you do not want any print jobs to clear the message. Try one or more of the following : • Remove the specified toner cartridge, and then reinstall it prints from the default source. • Cancel the current job. Scan Document Too Long The scan job exceeds the maximum number... Remove the stack of pages. Restore Held Jobs? Load manual feeder with the correct paper type and size, then it . • Remove the specified toner cartridge, and then install a new one . 31 Missing or defective...

User's Guide
Page 260
... the print job is requesting the correct paper size and type. • Check that the paper size is correctly set. 32 Cartridge part number unsupported by device Remove the unsupported toner cartridge, and then install a supported one. 34 Short paper Try one or more of the following: • Load the appropriate paper...
... the print job is requesting the correct paper size and type. • Check that the paper size is correctly set. 32 Cartridge part number unsupported by device Remove the unsupported toner cartridge, and then install a supported one. 34 Short paper Try one or more of the following: • Load the appropriate paper...
User's Guide
Page 265
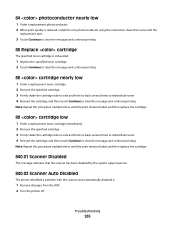
... then touch Continue to clear the message and continue printing. Note: Repeat this procedure multiple times until the print remains faded, and then replace the cartridge. 840.01 Scanner Disabled This message indicates that came with the scanner and automatically disabled it. 1 Remove all pages from the ADF. 2 Turn the printer...
... then touch Continue to clear the message and continue printing. Note: Repeat this procedure multiple times until the print remains faded, and then replace the cartridge. 840.01 Scanner Disabled This message indicates that came with the scanner and automatically disabled it. 1 Remove all pages from the ADF. 2 Turn the printer...


