
Getting Started
Page 2
... Kingdom and Eire, call 0628481500. In other countries. Evaluation and verification of the Rights in Technical Data and Computer Software clause at any country where such provisions are the property of the information you supply in certain transactions; UNITED STATES GOVERNMENT ...described may be made to this statement may use or distribute any of their respective owners. © Copyright 2001 Lexmark International, Inc. Lexmark may not apply to make these changes will be incorporated in which it believes appropriate without incurring any existing intellectual property...
... Kingdom and Eire, call 0628481500. In other countries. Evaluation and verification of the Rights in Technical Data and Computer Software clause at any country where such provisions are the property of the information you supply in certain transactions; UNITED STATES GOVERNMENT ...described may be made to this statement may use or distribute any of their respective owners. © Copyright 2001 Lexmark International, Inc. Lexmark may not apply to make these changes will be incorporated in which it believes appropriate without incurring any existing intellectual property...

Getting Started
Page 8
Apply an overlay (in another language) to the operator panel, if desired. 1 3 2 3 Macintosh: Connect the USB cable now. 4 Press the Power button. Windows: Connect the USB cable during software installation. Setting up your printer 1 Unpack the printer. 2 Unlock the scanner bed. Your power supply may be different than the one shown. 3 Connect the power supply.
Apply an overlay (in another language) to the operator panel, if desired. 1 3 2 3 Macintosh: Connect the USB cable now. 4 Press the Power button. Windows: Connect the USB cable during software installation. Setting up your printer 1 Unpack the printer. 2 Unlock the scanner bed. Your power supply may be different than the one shown. 3 Connect the power supply.
Getting Started
Page 11
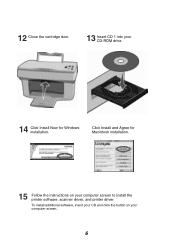
To install additional software, insert your CD and click the button on your computer screen to install the printer software, scanner driver, and printer driver. Click Install and Agree for Macintosh installation. 15 Follow the instructions on your CD-ROM drive. 14 Click Install Now for Windows installation. 12 Close the cartridge door. 13 Insert CD 1 into your computer screen. 6
To install additional software, insert your CD and click the button on your computer screen to install the printer software, scanner driver, and printer driver. Click Install and Agree for Macintosh installation. 15 Follow the instructions on your CD-ROM drive. 14 Click Install Now for Windows installation. 12 Close the cartridge door. 13 Insert CD 1 into your computer screen. 6
Getting Started
Page 12
... you want to... 1 Setup Adjust your copy and scan settings using the Scan & Copy Control Program. 2 Scan Scan an image and send to a software application. 3 Color Copy an image in color. 4 Black Copy an image in black and white. 5 E-mail Scan an image and send as an e-mail message. 6 Fax Scan an image...
... you want to... 1 Setup Adjust your copy and scan settings using the Scan & Copy Control Program. 2 Scan Scan an image and send to a software application. 3 Color Copy an image in color. 4 Black Copy an image in black and white. 5 E-mail Scan an image and send as an e-mail message. 6 Fax Scan an image...

Getting Started
Page 13
Fax to send a scanned image as an e-mail attachment. - Scan to send a scanned image to send a scanned image as a fax. 8 Scanning Scan using the printer operator panel 1 Make sure your computer and your printer are turned on. 2 Open the top cover. 3 Place your document face down on the scanner bed in the bottom, right corner. 4 Close the top cover. 5 Press the button that matches the destination of your scan: - E-mail to a software application. -
Fax to send a scanned image as an e-mail attachment. - Scan to send a scanned image to send a scanned image as a fax. 8 Scanning Scan using the printer operator panel 1 Make sure your computer and your printer are turned on. 2 Open the top cover. 3 Place your document face down on the scanner bed in the bottom, right corner. 4 Close the top cover. 5 Press the button that matches the destination of your scan: - E-mail to a software application. -

Getting Started
Page 14
For Windows: Select Start Programs Lexmark X73 Scan & Copy Control Program - Scan using the printer software 1 Make sure your printer is turned on the scanner bed in the bottom, right corner. 4 Close the top cover. 5 Access the Scan & Copy Control Program. - For Macintosh: Select Scan Now. 9 For Macintosh: Select the Scan & Copy Control Program icon from your document face down on . 2 Open the top cover. 3 Place your desktop. 6 Scan the document. - For Windows: Click the button that matches the destination of your scan. -
For Windows: Select Start Programs Lexmark X73 Scan & Copy Control Program - Scan using the printer software 1 Make sure your printer is turned on the scanner bed in the bottom, right corner. 4 Close the top cover. 5 Access the Scan & Copy Control Program. - For Macintosh: Select Scan Now. 9 For Macintosh: Select the Scan & Copy Control Program icon from your document face down on . 2 Open the top cover. 3 Place your desktop. 6 Scan the document. - For Windows: Click the button that matches the destination of your scan. -

Getting Started
Page 15
Macintosh 1 From your software application File menu, select Print. 2 To change the printer settings, click Properties or Printer Preferences. 3 From the Print dialog box, click OK or Print (depending on the application). Printing Windows 1 From your software application File menu, choose Print.... 2 Change settings, as needed, and then choose Save Settings. 3 Select Print. 10
Macintosh 1 From your software application File menu, select Print. 2 To change the printer settings, click Properties or Printer Preferences. 3 From the Print dialog box, click OK or Print (depending on the application). Printing Windows 1 From your software application File menu, choose Print.... 2 Change settings, as needed, and then choose Save Settings. 3 Select Print. 10

Getting Started
Page 17
For Windows: Click Copy. - For Windows: Select Start Programs Lexmark X73 Scan & Copy Control Program - Copy using the printer software 1 Make sure your printer is turned on the scanner bed in the bottom, right corner. 4 Close the top cover. 5 Access the Scan & Copy Control Program. - For Macintosh: Select the Scan & Copy Control Program icon from your desktop. 6 Make a copy of your document face down on . 2 Open the top cover. 3 Place your document. - For Macintosh: Select Copy Now. 12
For Windows: Click Copy. - For Windows: Select Start Programs Lexmark X73 Scan & Copy Control Program - Copy using the printer software 1 Make sure your printer is turned on the scanner bed in the bottom, right corner. 4 Close the top cover. 5 Access the Scan & Copy Control Program. - For Macintosh: Select the Scan & Copy Control Program icon from your desktop. 6 Make a copy of your document face down on . 2 Open the top cover. 3 Place your document. - For Macintosh: Select Copy Now. 12
User's Guide
Page 1
...of publications related to this publication to you supply in certain transactions; UNITED STATES GOVERNMENT RESTRICTED RIGHTS This software and documentation are inconsistent with local law: LEXMARK INTERNATIONAL, INC., PROVIDES THIS PUBLICATION "AS IS" WITHOUT WARRANTY OF ANY KIND, EITHER EXPRESS OR ...described may be made to you. Evaluation and verification of express or implied warranties in any way it operates. www.lexmark.com Lexmark X73 Comments about this statement may be used instead. In other products, programs, or services, except those expressly designated by...
...of publications related to this publication to you supply in certain transactions; UNITED STATES GOVERNMENT RESTRICTED RIGHTS This software and documentation are inconsistent with local law: LEXMARK INTERNATIONAL, INC., PROVIDES THIS PUBLICATION "AS IS" WITHOUT WARRANTY OF ANY KIND, EITHER EXPRESS OR ...described may be made to you. Evaluation and verification of express or implied warranties in any way it operates. www.lexmark.com Lexmark X73 Comments about this statement may be used instead. In other products, programs, or services, except those expressly designated by...

User's Guide
Page 3
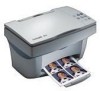
You can scan, print, and copy documents using the printer operator panel and the printer software. • Using the operator panel • Using the Scan & Copy Control Program • Using the Print Control Program • Loading the paper • Replacing the cartridges • Aligning the cartridges • Preserving the cartridges www.lexmark.com Lexmark X73 Basics Copying Printing Scanning Troubleshooting Appendix Index Basics 3 Basics Congratulations on the purchase of your Lexmark™ X73 Scan/Print/Copy.
You can scan, print, and copy documents using the printer operator panel and the printer software. • Using the operator panel • Using the Scan & Copy Control Program • Using the Print Control Program • Loading the paper • Replacing the cartridges • Aligning the cartridges • Preserving the cartridges www.lexmark.com Lexmark X73 Basics Copying Printing Scanning Troubleshooting Appendix Index Basics 3 Basics Congratulations on the purchase of your Lexmark™ X73 Scan/Print/Copy.
User's Guide
Page 5
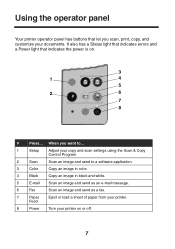
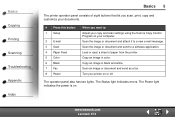
The operator panel also has two lights. www.lexmark.com Lexmark X73 The Power light indicates the power is on or off. Basics Copying Printing Scanning Troubleshooting Appendix Index Basics 5 The printer operator panel consists of eight ... document and attach it to a new e-mail message. 3 Scan Scan the image or document and send to a software application. 4 Paper Feed Load or eject a sheet of paper from the printer. 5 Color Copy an image in color. 6 Black Copy an image in black and white. 7 Fax Scan an image or document and send as...
The operator panel also has two lights. www.lexmark.com Lexmark X73 The Power light indicates the power is on or off. Basics Copying Printing Scanning Troubleshooting Appendix Index Basics 5 The printer operator panel consists of eight ... document and attach it to a new e-mail message. 3 Scan Scan the image or document and send to a software application. 4 Paper Feed Load or eject a sheet of paper from the printer. 5 Color Copy an image in color. 6 Black Copy an image in black and white. 7 Fax Scan an image or document and send as...
User's Guide
Page 6
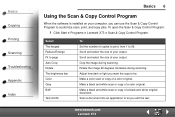
... scanning. Make a black and white scan or copy of a black and white original document. www.lexmark.com Lexmark X73 Rotate the image 90 degrees clockwise during scanning. Make a color scan or copy of your output. Scroll and select the size of copies to print, from 1 ...and select the size of a color original. To open the Scan & Copy Control Program: 1 Click Start Programs Lexmark X73 Scan & Copy Control Program. Basics Copying Printing Scanning Troubleshooting Appendix Index Basics 6 Using the Scan & Copy Control Program When the software is installed on your computer, ...
... scanning. Make a black and white scan or copy of a black and white original document. www.lexmark.com Lexmark X73 Rotate the image 90 degrees clockwise during scanning. Make a color scan or copy of your output. Scroll and select the size of copies to print, from 1 ...and select the size of a color original. To open the Scan & Copy Control Program: 1 Click Start Programs Lexmark X73 Scan & Copy Control Program. Basics Copying Printing Scanning Troubleshooting Appendix Index Basics 6 Using the Scan & Copy Control Program When the software is installed on your computer, ...

User's Guide
Page 9
Enable or disable various software functions, such as Sound Effects and Buffer Mode. • View your print job. www.lexmark.com Lexmark X73 Basics Copying Printing Scanning Troubleshooting Appendix Index Windows 98/Me Click the: Status tab Options tab Cartridges tab Basics 9 When you want to: • Monitor .... • Align cartridges for best quality. • Clean the nozzles. • Print a test page. • View cartridge part numbers and order supplies directly from the Lexmark Web site.
Enable or disable various software functions, such as Sound Effects and Buffer Mode. • View your print job. www.lexmark.com Lexmark X73 Basics Copying Printing Scanning Troubleshooting Appendix Index Windows 98/Me Click the: Status tab Options tab Cartridges tab Basics 9 When you want to: • Monitor .... • Align cartridges for best quality. • Clean the nozzles. • Print a test page. • View cartridge part numbers and order supplies directly from the Lexmark Web site.

User's Guide
Page 33
... the application File menu. 2 Choose Print (or Printer) Setup. www.lexmark.com Lexmark X73 Basics Copying Printing Scanning Troubleshooting Appendix Index Printing 33 Printing instructions 1 From the application File menu, select Print. 2 From the Print dialog box, click OK. Customizing print settings The software includes several applications that let you are using Windows 2000...
... the application File menu. 2 Choose Print (or Printer) Setup. www.lexmark.com Lexmark X73 Basics Copying Printing Scanning Troubleshooting Appendix Index Printing 33 Printing instructions 1 From the application File menu, select Print. 2 From the Print dialog box, click OK. Customizing print settings The software includes several applications that let you are using Windows 2000...

User's Guide
Page 34
www.lexmark.com Lexmark X73 The first page will be on the application.) Printer Properties for operating the printer and its software. Basics Copying Printing Scanning Troubleshooting Appendix Index Printing 34 3 In the Printer Setup dialog box, click Properties, Option, or Setup (depending on top of your ...
www.lexmark.com Lexmark X73 The first page will be on the application.) Printer Properties for operating the printer and its software. Basics Copying Printing Scanning Troubleshooting Appendix Index Printing 34 3 In the Printer Setup dialog box, click Properties, Option, or Setup (depending on top of your ...
User's Guide
Page 36
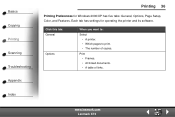
Print • Frames. • All linked documents. • A table of copies. www.lexmark.com Lexmark X73 Click this tab: General Options When you want to: Select • A printer. • Which pages to print. • The number of links. Each tab has settings for Windows 2000/XP has five tabs: General, Options, Page Setup, Color, and Features. Basics Copying Printing Scanning Troubleshooting Appendix Index Printing 36 Printing Preferences for operating the printer and its software.
Print • Frames. • All linked documents. • A table of copies. www.lexmark.com Lexmark X73 Click this tab: General Options When you want to: Select • A printer. • Which pages to print. • The number of links. Each tab has settings for Windows 2000/XP has five tabs: General, Options, Page Setup, Color, and Features. Basics Copying Printing Scanning Troubleshooting Appendix Index Printing 36 Printing Preferences for operating the printer and its software.
User's Guide
Page 39
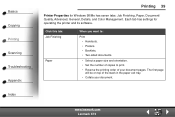
... in the paper exit tray. • Collate your document pages. www.lexmark.com Lexmark X73 Each tab has settings for Windows 98/Me has seven tabs: Job Finishing, Paper, Document/ Quality, Advanced, General, Details, and Color Management. Basics Copying Printing Scanning Troubleshooting Appendix Index Printing 39 Printer Properties for operating the printer and its software.
... in the paper exit tray. • Collate your document pages. www.lexmark.com Lexmark X73 Each tab has settings for Windows 98/Me has seven tabs: Job Finishing, Paper, Document/ Quality, Advanced, General, Details, and Color Management. Basics Copying Printing Scanning Troubleshooting Appendix Index Printing 39 Printer Properties for operating the printer and its software.
User's Guide
Page 42
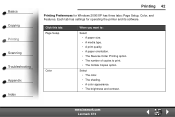
... to print. • The Collate Copies option. Select • The color. • The shading. • A color appearance. • The brightness and contrast. www.lexmark.com Lexmark X73 Basics Copying Printing Scanning Troubleshooting Appendix Index Printing 42 Printing Preferences for operating the printer and its software. Each tab has settings for Windows 2000/XP has three tabs...
... to print. • The Collate Copies option. Select • The color. • The shading. • A color appearance. • The brightness and contrast. www.lexmark.com Lexmark X73 Basics Copying Printing Scanning Troubleshooting Appendix Index Printing 42 Printing Preferences for operating the printer and its software. Each tab has settings for Windows 2000/XP has three tabs...

User's Guide
Page 44
...the appropriate Paper Size setting. Use the default settings for printing on specialty paper, use the following table: When you install the software, the default settings are designed to Print Properties. Basics Copying Printing Scanning Troubleshooting Appendix Index Printing 44 Customizing printer settings for specialty paper... are assigned to override the envelope settings in Printer Properties or Printing Preferences. To change printer settings for printing most documents on inkjet paper. From the Paper Type area, select Greeting Card Stock. www.lexmark.com Lexmark X73
...the appropriate Paper Size setting. Use the default settings for printing on specialty paper, use the following table: When you install the software, the default settings are designed to Print Properties. Basics Copying Printing Scanning Troubleshooting Appendix Index Printing 44 Customizing printer settings for specialty paper... are assigned to override the envelope settings in Printer Properties or Printing Preferences. To change printer settings for printing most documents on inkjet paper. From the Paper Type area, select Greeting Card Stock. www.lexmark.com Lexmark X73

User's Guide
Page 46
..., select Print. 3 After the first side of your two-sided document prints, the software prompts you want to select Two-sided printing. c Click the Job Finishing tab to print booklets. 1 Customize Printer Properties for a two-sided document. www.lexmark.com Lexmark X73 For help, see page 33. d Select a binding edge. Basics Copying Printing Scanning...
..., select Print. 3 After the first side of your two-sided document prints, the software prompts you want to select Two-sided printing. c Click the Job Finishing tab to print booklets. 1 Customize Printer Properties for a two-sided document. www.lexmark.com Lexmark X73 For help, see page 33. d Select a binding edge. Basics Copying Printing Scanning...


